SpringMVC
springmvc是spring框架的一个模块,springmvc和spring无需通过中间整合层进行整合,是一个基于mvc的web框架
MVC设计模式
mvc是一个设计模式,mvc在b/s系统 下的应用:

补:https://blog.csdn.net/MOKEXFDGH/article/details/86583221#MVC_258
springmvc框架
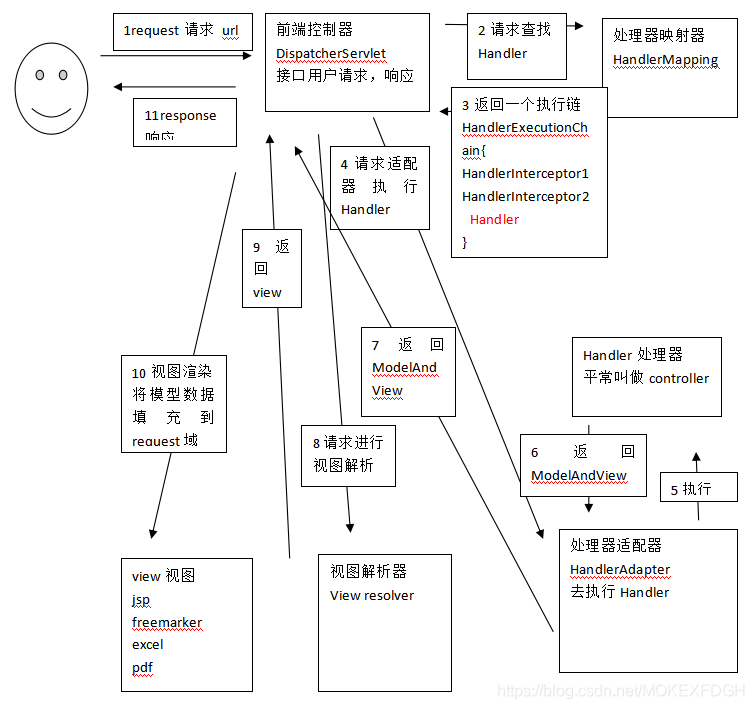
组件:
1、前端控制器DispatcherServlet(不需要程序员开发)
作用接收请求,响应结果,相当于转发器,中央处理器
有了DispatcherServlet减少了其它组件之间的耦合度
2、处理器映射器HandlerMapping(不需要程序员开发)
作用:根据请求的url查找Handler
3、处理器适配器HandlerAdapter
作用:按照特定规则(HandlerAdapter要求的规则)去执行Handler
4、处理器Handler(需要程序员开发)
注意:编写Handler时按照HandlerAdapter的要求去做,这样适配器才可以去正确执行Handler
5、视图解析器View resolver(不需要程序员开发)
作用:进行视图解析,根据逻辑视图名解析成真正的视图(view)
6、视图View(需要程序员开发jsp)
View是一个接口,实现类支持不同的View类型(jsp、freemarker、pdf…)
入门程序
环境:spring3.2
使用mybatis案例,商品列表查询
配置前端控制器和处理器适配器
1.在web.xml中配置前端控制器:
		<servlet>
			<servlet-name>springmvc</servlet-name>
			<servlet-class>org.springframework.web.servlet.DispatcherServlet</servlet-class>
			<!-- contextConfigLocation:指定springmvc配置的加载位置
			如果不指定则默认加载WEB-INF/[DispatcherServlet 的Servlet 名字]-servlet.xml -->
			<init-param>
				<param-name>contextConfigLocation</param-name>
				<param-value>classpath:springmvc.xml</param-value>
			</init-param>
			<load-on-startup>1</load-on-startup>
			<!-- load-on-startup:表示servlet随服务启动 -->
		</servlet>
		<servlet-mapping>
			<servlet-name>springmvc</servlet-name>
			<url-pattern>*.action</url-pattern>
			<!--
			<!--
			第一种:*.action,访问以.action结尾由DispatcherServlet进行解析
			第二种:/,所以访问的地址都由DispatcherServlet进行解析,对于静态文件的解析需要配置不让DispatcherServlet进行解析
			使用此种方式可以实现RESTful风格的url
			第三种:/*,这样配置不对,使用这种配置,最终要转发到一个jsp页面时,仍然会由DispatcherServlet解析jsp地址
			不能根据jsp页面找到handler,会报错
			-->
		</servlet-mapping>
2.创建springmvc.xml配置Handler、处理器映射器、处理器适配器、视图解析器:
		<!-- 配置加载Handler,beanname即为指定url(可以访问的url) -->
		<bean name="/items1.action" id="itemList1" class="cn.moke.springmvc.controller.first.ItemList1"/>
		<!-- 处理器映射器 -->
		<bean class="org.springframework.web.servlet.handler.BeanNameUrlHandlerMapping" />
		<!-- 处理器适配器,由源代码可知适配器能执行实现Controller接口的Handler -->
		<bean class="org.springframework.web.servlet.mvc.SimpleControllerHandlerAdapter"/>
		<!-- 视图解析器,解析jsp,默认使用jstl标签;InternalResourceViewResolver支持JSP视图解析 -->
		<bean class="org.springframework.web.servlet.view.InternalResourceViewResolver"/>
注:
配置完成,运行tomcat通过:http://localhost:8080/项目名称/items1.action,可以访问视图
前端控制器从DispatcherServlet.properties文件(webmvc包中)中加载处理映射器、适配器、视图解析器等组件
如果不在springmvc.xml中配置,使用默认加载的
3.视图解析器配置前缀和后缀:
		<bean class="org.springframework.web.servlet.view.InternalResourceViewResolver">
			<property name="prefix" value="/WEB-INF/jsp/"><!-- 配置jsp路径的前缀 -->
			<property name="suffix" value=".jsp"><!-- 配置jsp路径的后缀 -->
		</bean>
程序中不用指定前缀和后缀:modelAndView.setViewName(“itmes/itemsList”);
开发Handler
		public class ItemList1 implements Controller {
			public ModelAndView handleRequest(HttpServletRequest request,HttpServletResponse response) throws Exception {
				//商品列表
				List<Items> itemsList = new ArrayList<Items>();

				Items items_1 = new Items();
				items_1.setName("联想笔记本");
				items_1.setPrice(6000f);
				items_1.setDetail("ThinkPad T430 联想笔记本电脑!");
				Items items_2 = new Items();
				items_2.setName("苹果手机");
				items_2.setPrice(5000f);
				items_2.setDetail("iphone6苹果手机!");
				itemsList.add(items_1);
				itemsList.add(items_2);

				//创建modelAndView准备填充数据、设置视图
				ModelAndView modelAndView = new ModelAndView();
				//相当于request的setAtrribute,在jsp页面通过itemsList获取数据
				modelAndView.addObject("itemsList", itemsList);
				//视图
				modelAndView.setViewName("/WEB-INF/jsp/itmes/itemsList.jsp");//itemsList.jsp即为视图
				//返回ModelAndView
				return modelAndView;
			}
		}
映射器和适配器
非注解的处理器映射器
BeanNameUrlHandlerMapping和SimpleUrlHandlerMapping
入门程序使用的映射器:org.springframework.web.servlet.handler.BeanNameUrlHandlerMapping
另一个映射器:org.springframework.web.servlet.handler.SimpleUrlHandlerMapping
simpleUrlHandlerMapping是BeanNameUrlHandlerMapping的增强版本,它可以将url和处理器bean的id进行统一映射配置:
		<!-- 加载Handler -->
		<bean id="itemList1" class="cn.moke.controller.ItemList1"/>
		<!—简单url映射 -->
		<bean class="org.springframework.web.servlet.handler.SimpleUrlHandlerMapping">
			<property name="mappings">
				<props>
					<prop key="/items1.action">itemList1</prop>
					<prop key="/items2.action">controller的bean id</prop>
				</props>
			</property>
		</bean>
注:多个映射器可以并存,前端控制器判断url能让哪些映射器映射,就让正确的映射器处理
非注解的处理器适配器
SimpleControllerHandlerAdapter和HttpRequestHandlerAdapter
1.org.springframework.web.servlet.mvc.SimpleControllerHandlerAdapter
要求编写的Handler实现 Controller接口
2.org.springframework.web.servlet.mvc.HttpRequestHandlerAdapter
要求编写的Handler实现HttpRequestHandler接口
		public class ItemList2 implements HttpRequestHandler {
			public void handleRequest(HttpServletRequest request,HttpServletResponse response) throws Exception{
				List<Items> itemsList = new ArrayList<Items>();
				Items items_1 = new Items();
				items_1.setName("联想笔记本");
				items_1.setPrice(6000f);
				items_1.setDetail("ThinkPad T430 联想笔记本电脑!");
				Items items_2 = new Items();
				items_2.setName("苹果手机");
				items_2.setPrice(5000f);
				items_2.setDetail("iphone5  苹果手机!");
				itemsList.add(items_1);
				itemsList.add(items_2);
				//填充数据
				request.setAttribute("itemsList", itemsList);
				request.getRequestDispatcher("/WEB-INF/jsp/order/itemsList.jsp").forward(request, response);
				/*
				使用此方法可以通过修改response,设置响应的数据格式,比如响应json数据
				response.setCharacterEncoding("utf-8");
				response.setContentType("application/json;charset=utf-8");
				response.getWriter().write("json串");
				*/
			}
		}
注解的处理器映射器和适配器(重点)
1.注解映射器:
在spring3.1之前使用org.springframework.web.servlet.mvc.annotation.DefaultAnnotationHandlerMapping注解映射器
在spring3.1之后使用org.springframework.web.servlet.mvc.method.annotation.RequestMappingHandlerMapping注解映射器
配置:
		<!--注解映射器 -->
		<bean class="org.springframework.web.servlet.mvc.method.annotation.RequestMappingHandlerMapping"/>
2.注解适配器:
在spring3.1之前使用org.springframework.web.servlet.mvc.annotation.AnnotationMethodHandlerAdapter注解适配器
在spring3.1之后使用org.springframework.web.servlet.mvc.method.annotation.RequestMappingHandlerAdapter注解适配器
		<!--注解适配器 -->
		<bean class="org.springframework.web.servlet.mvc.method.annotation.RequestMappingHandlerAdapter"/>
3.mvc:annotation-driven代替注解映射器和注解适配器(实际开发常用),默认加载很多的参数绑定方法,如json转换解析器:
<mvc:annotation-driven></mvc:annotation-driven>
4.注解的Handler
		//使用Controller标识 它是一个控制器
		@Controller
		public class ItemsController3 {

			//@RequestMapping实现 对queryItems方法和url进行映射,一个方法对应一个url
			//一般建议将url和方法写成一样
			@RequestMapping("/queryItems")
			public ModelAndView queryItems()throws Exception{

				List<Items> itemsList = new ArrayList<Items>();
				Items items_1 = new Items();
				items_1.setName("联想笔记本");
				items_1.setPrice(6000f);
				items_1.setDetail("ThinkPad T430 联想笔记本电脑!");
				Items items_2 = new Items();
				items_2.setName("苹果手机");
				items_2.setPrice(5000f);
				items_2.setDetail("iphone6苹果手机!");
				itemsList.add(items_1);
				itemsList.add(items_2);

				ModelAndView modelAndView =  new ModelAndView();
				modelAndView.addObject("itemsList", itemsList);
				modelAndView.setViewName("/WEB-INF/jsp/items/itemsList.jsp");

				return modelAndView;
			}
		}
5.加载Handler:
		<!-- 对于注解的Handler可以单个配置,实际开发中建议使用组件扫描 -->
		<!-- <bean class="cn.itcast.ssm.controller.ItemsController3" /> -->
		<!-- 可以扫描controller、service、...,这里让扫描controller,指定controller的包 -->
		<context:component-scan base-package="cn.itcast.ssm.controller"></context:component-scan>
源码分析
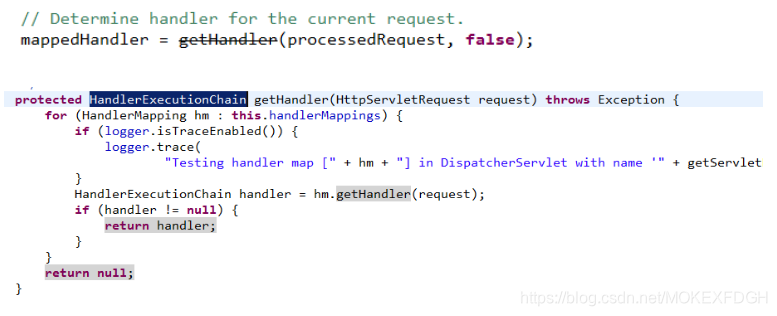
通过前端控制器源码分析springmvc的执行过程:
1.第一步:前端控制器接收请求后,调用doDiapatch方法

2.第二步:前端控制器调用处理器映射器查找Handler
3.第三步:调用处理器适配器执行Handler,得到执行结果ModelAndView

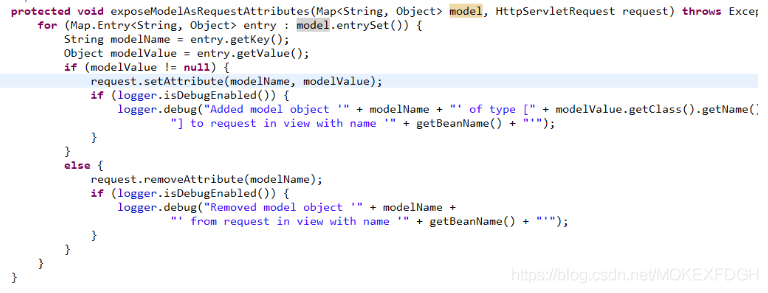
4.第四步:视图渲染,将model数据填充到request域
(1)视图解析,得到view:

(2)调用view的渲染方法:

(3)将model数据填充到request域:
springmvc和mybatis整合
1.springmvc+mybaits的系统架构:
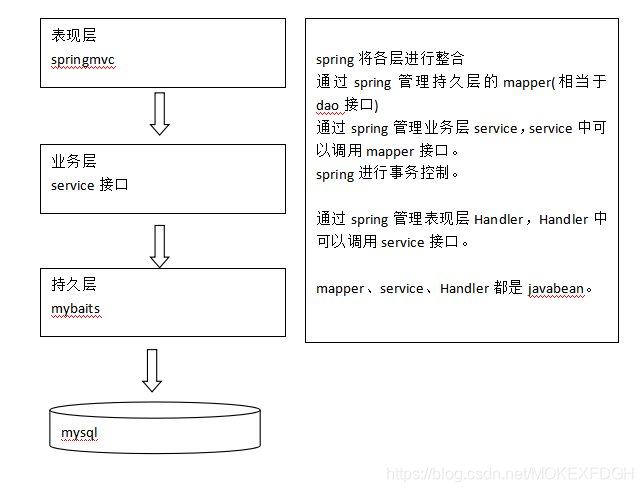
2.整合步骤:
(1)第一步:整合dao层
mybatis和spring整合,通过spring管理mapper接口
使用mapper的扫描器自动扫描mapper接口在spring中进行注册
(2)第二步:整合service层
通过spring管理service接口
使用配置方式将service接口配置在spring配置文件中
实现事务控制
(3)第三步:整合springmvc
由于springmvc是spring的模块,不需要整合
3.所需要jar包:数据库驱动包:mysql5.1、mybatis的jar包、mybatis和spring整合包、log4j包、c3p0数据库连接池包、spring3.2所有jar包、jstl包
整合dao
1.db.properties
	jdbc.driver=com.mysql.jdbc.Driver
	jdbc.url=jdbc:mysql://localhost:3306/mybatis
	jdbc.username=root
	jdbc.password=123
2.log4j.properties
	# Global logging configuration,建议开发环境中要用debug
	log4j.rootLogger=DEBUG, stdout
	# Console output...
	log4j.appender.stdout=org.apache.log4j.ConsoleAppender
	log4j.appender.stdout.layout=org.apache.log4j.PatternLayout
	log4j.appender.stdout.layout.ConversionPattern=%5p [%t] - %m%n
3.sqlMapConfig.xml
在classpath下创建mybatis/sqlMapConfig.xml:
	<?xml version="1.0" encoding="UTF-8" ?>
	<!DOCTYPE configuration PUBLIC "-//mybatis.org//DTD Config 3.0//EN" "http://mybatis.org/dtd/mybatis-3-config.dtd">
	<configuration>
	<!—使用mapper.xml自动扫描器时,mapper.xml文件如果和mapper.java接口在一个目录则此处不用定义mappers -->
		<mappers>
			<package name="cn.itcast.ssm.mapper" />
		</mappers>
	</configuration>
4.applicationContext-dao.xml
配置数据源、事务管理,配置SqlSessionFactory、mapper扫描器:
	<beans xmlns="http://www.springframework.org/schema/beans"
		xmlns:xsi="http://www.w3.org/2001/XMLSchema-instance" xmlns:mvc="http://www.springframework.org/schema/mvc"
		xmlns:context="http://www.springframework.org/schema/context"
		xmlns:aop="http://www.springframework.org/schema/aop" xmlns:tx="http://www.springframework.org/schema/tx"
		xsi:schemaLocation="http://www.springframework.org/schema/beans
			http://www.springframework.org/schema/beans/spring-beans-3.2.xsd
			http://www.springframework.org/schema/mvc
			http://www.springframework.org/schema/mvc/spring-mvc-3.2.xsd
			http://www.springframework.org/schema/context
			http://www.springframework.org/schema/context/spring-context-3.2.xsd
			http://www.springframework.org/schema/aop
			http://www.springframework.org/schema/aop/spring-aop-3.2.xsd
			http://www.springframework.org/schema/tx
			http://www.springframework.org/schema/tx/spring-tx-3.2.xsd ">
		<!-- 加载配置文件 -->
		<context:property-placeholder location="classpath:db.properties"/>
		<!-- 数据库连接池 -->
		<bean id="dataSource" class="com.mchange.v2.c3p0.ComboPooledDataSource">
                	<!-- 配置连接池属性 -->
			<property name="driverClass" value="${jdbc.driver}" />
			<property name="jdbcUrl" value="${jdbc.url}" />
			<property name="user" value="${jdbc.username}" />
			<property name="password" value="${jdbc.password}" />
               		<!-- c3p0连接池的私有属性 -->
			<property name="maxPoolSize" value="30" />
			<property name="minPoolSize" value="10" />
			<!-- 关闭连接后不自动commit -->
			<property name="autoCommitOnClose" value="false" />
			<!-- 获取连接超时时间 -->
			<property name="checkoutTimeout" value="10000" />
			<!-- 当获取连接失败重试次数 -->
			<property name="acquireRetryAttempts" value="2" />
       		</bean>
		<!-- 让spring管理sqlsessionfactory;使用mybatis和spring整合包中的 -->
		<bean id="sqlSessionFactory" class="org.mybatis.spring.SqlSessionFactoryBean">
			<!-- 数据库连接池 -->
			<property name="dataSource" ref="dataSource" />
			<!-- 加载mybatis的全局配置文件 -->
			<property name="configLocation" value="classpath:mybatis/SqlMapConfig.xml" />
		</bean>
		<!-- mapper.java扫描器 -->
		<bean class="org.mybatis.spring.mapper.MapperScannerConfigurer">
			<property name="basePackage" value="cn.moke.ssm.mapper"></property>
			<property name="sqlSessionFactoryBeanName" value="sqlSessionFactory"/>
		</bean>
	</beans>
4.编写自己的mapper文件,如ItemsMapper.xml和ItemsMapper.java文件(可以通过逆向工程生成)
注:针对综合查询mapper,一般情况会有关联查询,建议自定义mapper
即,ItemsMapperCustom.xml和ItemsMapperCustom.java(避免和逆向工程生成的默认的mapper重名)
(1)判断是否复杂查询,若是则使用包装类QueryVo
由逆向工程生成Items类一般不动,使用扩展属性生成扩展类ItemsCustom(extends Items),然后生成综合查询pojo包装类:
	public class QueryVo {
		private Items items;
		private ItemsCusto TtemsCustom;
	}
(2)ItemsMapperCustom.xml
	<?xml version="1.0" encoding="UTF-8" ?>
	<!DOCTYPE mapper
	PUBLIC "-//mybatis.org//DTD Mapper 3.0//EN"
	"http://mybatis.org/dtd/mybatis-3-mapper.dtd">
	<mapper namespace="cn.itcast.ssm.mapper.ItemsMapperCustom">
		<!-- sql片段 -->
		<!-- 商品查询条件 -->
		<sql id="query_items_where">
			<if test="ItemsCustom!=null">
				<if test="ItemsCustom.name!=null and ItemsCustom.name!=''">
					and ItemsCustom.name like '%${ItemsCustom.name}%'
				</if>
			</if>
		</sql>
		<!-- 查询商品信息 -->
		<select id="findItemsList" parameterType="queryVo" resultType="ItemsCustom">
			select * from items
			<where>
				<include refid="query_items_where"/>
			</where>
		</select>
	</mapper>
(3)ItemsMapperCustom.java
	public interface ItemsMapperCustom {
		//商品列表
		public List<ItemsCustom> findItemsList(QueryVo queryVo) throws Exception;//复杂查询条件使用包装类QueryVo
	}
整合Service
1.定义service接口
	public interface ItemsService {
		//商品列表
		public List<ItemsCustom> findItemsList(QueryVo queryVo) throws Exception;
	}
2.service接口实现类
	public class ItemsServiceImpl imlements ItemsService{
		@Autowired
		private ItemsMapperCustom itemsMapperCustom;//spring注入mapper
		public List<ItemsCustom> findItemsList(QueryVo queryVo) throws Exception{
			return itemsMapperCustom.findItemsList(queryVo);
		}
	}
3.在spring容器配置service
创建applicationContext-service.xml,文件中配置service(区别于dao的applicationContext配置文件)
<bean id="itemsService" class="cn.moke.ssm.service.impl.ItemsServiceImpl" />
4.事务控制
创建applicationContext-transaction.xml,在它里面使用spring声明式事务控制方法(到这里spring总共有三个配置文件)
	<!-- 事务管理器 -->
	<bean id="transactionManager" class="org.springframework.jdbc.datasource.DataSourceTransactionManager">
		<!-- 数据源,dataSource在applicationContext-dao.xml中已经配置,直接使用 -->
		<property name="dataSource" ref="dataSource"/>
	</bean>
	<!-- 通知 -->
	<tx:advice id="txAdvice" transaction-manager="transactionManager">
	  <tx:attributes>
	     <!-- 传播行为 -->
	    <tx:method name="save*" propagation="REQUIRED"/>
	    <tx:method name="insert*" propagation="REQUIRED"/>
	    <tx:method name="delete*" propagation="REQUIRED"/>
	    <tx:method name="update*" propagation="REQUIRED"/>
	    <tx:method name="find*" propagation="SUPPORTS" read-only="true"/>
	    <tx:method name="get*" propagation="SUPPORTS" read-only="true"/>
	  </tx:attributes>
	</tx:advice>
	<!-- 切面 -->
	<aop:config>
	  <aop:advisor advice-ref="txAdvice" pointcut="execution(* cn.moke.springmvc.service.impl.*.*(..))"/>
	</aop:config>
整合WEB(springmvc)
1.创建springmvc.xml文件,配置处理器映射器、适配器、视图解析器
	<beans xmlns="http://www.springframework.org/schema/beans"
		xmlns:xsi="http://www.w3.org/2001/XMLSchema-instance" xmlns:mvc="http://www.springframework.org/schema/mvc"
		xmlns:context="http://www.springframework.org/schema/context"
		xmlns:aop="http://www.springframework.org/schema/aop" xmlns:tx="http://www.springframework.org/schema/tx"
		xsi:schemaLocation="http://www.springframework.org/schema/beans
				http://www.springframework.org/schema/beans/spring-beans-3.2.xsd
				http://www.springframework.org/schema/mvc
				http://www.springframework.org/schema/mvc/spring-mvc-3.2.xsd
				http://www.springframework.org/schema/context
				http://www.springframework.org/schema/context/spring-context-3.2.xsd
				http://www.springframework.org/schema/aop
				http://www.springframework.org/schema/aop/spring-aop-3.2.xsd
				http://www.springframework.org/schema/tx
				http://www.springframework.org/schema/tx/spring-tx-3.2.xsd ">
		<!-- 扫描controller注解,多个包中间使用半角逗号分隔 -->
		<context:component-scan base-package="cn.itcast.ssm.controller"/>
		<!--注解映射器、注解适配器 -->
		<mvc:annotation-driven></mvc:annotation-driven>
		<!-- 视图解析器 -->
		<bean class="org.springframework.web.servlet.view.InternalResourceViewResolver">
			<property name="viewClass" value="org.springframework.web.servlet.view.JstlView" />
			<property name="prefix" value="/WEB-INF/jsp/" />
			<property name="suffix" value=".jsp" />
		</bean>
	</beans>
2.web.xml配置前端控制器
		<servlet>
			<servlet-name>springmvc</servlet-name>
			<servlet-class>org.springframework.web.servlet.DispatcherServlet</servlet-class>
			<init-param>
				<param-name>contextConfigLocation</param-name>
				<param-value>classpath:spring/springmvc.xml</param-value>
			</init-param>
			<load-on-startup>1</load-on-startup>
		</servlet>
		<servlet-mapping>
			<servlet-name>springmvc</servlet-name>
			<url-pattern>*.action</url-pattern>
		</servlet-mapping>
3.编写Conroller(Handler)
	@Controller
	public class OrderController {
		@Autowired
		private ItemsService itemsService;
		@RequestMapping("/queryItem.action")
		public ModelAndView queryItem() throws Exception {
			List<ItemsCustom> itemsList = itemsService.findItemsList(null);
			ModelAndView modelAndView = new ModelAndView();
			modelAndView.addObject("itemsList", itemsList);
			modelAndView.setViewName("items/itemsList");
			return modelAndView;
		}
	}
4.编写itemsList.jsp
5.加载spring容器
将mapper、service、controller加载到spring容器中,即所有的applicationContext配置文件
建议使用通配符加载上边的配置文件
在web.xml中,添加spring容器监听器,加载spring容器:
	<!-- 加载spring容器 -->
	<context-param>
		<param-name>contextConfigLocation</param-name>
		<param-value>/WEB-INF/classes/spring/applicationContext-*.xml
		</param-value>
	</context-param>
	<listener>
		<listener-class>org.springframework.web.context.ContextLoaderListener</listener-class>
	</listener>
6.基本整合完毕,启动tomcat访问
整合细节
@RequestMapping
1.作用:定义controller方法对应的url,进行处理器映射使用
注:页面发送请求、表单提交action为:真实路径+相应的url映射+.action结尾,可以请求相应的Controller方法
(相当于请求相应的servlet,再通过servlet进行操作)
2.窄化请求映射:
在class上添加@RequestMapping(url)指定通用请求前缀, 限制此类下的所有方法请求url必须以请求前缀开头,通过此方法对url进行分类管理
如:@RequestMapping("/items")放在类名上边,@RequestMapping("/queryItem ")放在方法上边,则访问地址为:/item/queryItem
3.请求方法限定:
(1)限定GET方法
@RequestMapping(method = RequestMethod.GET)
(2)限定POST方法
@RequestMapping(method = RequestMethod.POST)
(3)GET和POST都可以
@RequestMapping(method={RequestMethod.GET,RequestMethod.POST})
controller方法返回值
1.返回ModelAndView
需要方法结束时,定义ModelAndView,将model和view分别进行设置
2.返回string,有两种表示:
(1)返回逻辑视图名
	@RequestMapping(value="/editItems",method={RequestMethod.POST,RequestMethod.GET})
	public String editItems(Model model)throws Exception{
		ItemsCustom itemsCustom = itemsService.findItemsById(1);
		model.addAttribute("itemsCustom",itemsCustom);//相当于addObject
		return "items/editItems";//指定逻辑视图名,经过视图解析器解析为jsp物理路径:/WEB-INF/jsp/item/editItem.jsp
	}
(2)redirect重定向
特点:浏览器地址栏中的url会变化。修改提交的request数据无法传到重定向的地址。因为重定向后重新进行request(request无法共享)
	//重定向到queryItem.action地址,request无法带过去
	return "redirect:queryItem.action";
(3)forward页面转发
特点:通过forward进行页面转发,浏览器地址栏url不变,request可以共享(方法参数定义request)
	//结果转发到editItem.action,request可以带过去
	return "forward:editItem.action";
3.返回void
在controller方法形参上可以定义request和response,使用request或response指定响应结果:
(1)使用request转向页面,如下:
request.getRequestDispatcher("页面路径").forward(request, response);
(2)也可以通过response页面重定向:
response.sendRedirect("url");
(3)也可以通过response指定响应结果,例如响应json数据如下:
	response.setCharacterEncoding("utf-8");
	response.setContentType("application/json;charset=utf-8");
	response.getWriter().write("json串");
post乱码
在web.xml添加post乱码filter:
	<filter>
		<filter-name>CharacterEncodingFilter</filter-name>
		<filter-class>org.springframework.web.filter.CharacterEncodingFilter</filter-class>
		<init-param>
			<param-name>encoding</param-name>
			<param-value>utf-8</param-value>
		</init-param>
	</filter>
	<filter-mapping>
		<filter-name>CharacterEncodingFilter</filter-name>
		<url-pattern>/*</url-pattern>
	</filter-mapping>
参数绑定
1.概述:
从客户端请求key/value数据,经过参数绑定,将key/value数据绑定到controller方法的形参上
springmvc中,接收页面提交的数据是通过方法形参来接收
过程:
处理器适配器调用springmvc提供参数绑定组件将key/value数据转成controller方法的形参
参数绑定组件:
在spirngmvc早期版本使用PropertyEditor(只能将字符串传成java对象),后期使用converter(进行任意类型的传换)
spirngmvc提供了很多converter(转换器),在特殊情况下需要自定义converter,日期数据绑定需要自定义converter
3.默认支持的类型:HttpServletRequest、HttpServletResponse、HttpSession、Model/ModelMap
注:model是一个接口,modelMap是一个接口实现,将model数据填充到request域
直接在controller方法形参上定义下边类型的对象,就可以使用这些对象。在参数绑定过程中,如果遇到下边类型直接进行绑定
4.简单类型
通过@RequestParam对简单类型的参数进行绑定
如果不使用@RequestParam,要求request传入参数名称和controller方法的形参名称一致,方可绑定成功
如果使用@RequestParam,不用限制request传入参数名称和controller方法的形参名称一致
defaultValue:默认值,表示如果请求中没有同名参数时的默认值
通过required属性指定参数是否必须要传入,如果设置为true,没有传入参数,会报错误:
public String editItems(Model model,@RequestParam(value="id",required=true,defaultValue="1") Integer items_id){}
5.pojo绑定
页面中input的name和controller的pojo形参中的属性名称一致,将页面中数据绑定到pojo
页面定义:
	<input type="text" name="name"/>
	<input type="text" name="price"/>
Controller方法定义:
	@RequestMapping("/editItemSubmit")
	public String editItemSubmit(Items items)throws Exception{}//与Itmes类中定义的参数名字一样
6.自定义参数绑定实现日期类型绑定
对于controller形参中pojo对象,如果属性中有日期类型,需要自定义参数绑定。
将请求日期数据串传成 日期类型,要转换的日期类型和pojo中日期属性的类型保持一致
(1)自定义Converter
	ublic class CustomDateConverter implements Converter<String, Date> {
		public Date convert(String source) {
			try {
				SimpleDateFormat simpleDateFormat = new SimpleDateFormat("yyyy-MM-dd HH:mm:ss");
				return simpleDateFormat.parse(source);
			} catch (Exception e) {
				e.printStackTrace();
			}
			return null;
		}
	}
(2)配置方式(有两种)
第一种:
	<mvc:annotation-driven conversion-service="conversionService"></mvc:annotation-driven>
	<!-- conversionService -->
	<bean id="conversionService" class="org.springframework.format.support.FormattingConversionServiceFactoryBean">
		<!-- 转换器 -->
		<property name="converters">
			<list>
				<bean class="cn.moke.ssm.controller.converter.CustomDateConverter"/>
			</list>
		</property>
	</bean>
第二种:
	<!--注解适配器 -->
	<bean class="org.springframework.web.servlet.mvc.method.annotation.RequestMappingHandlerAdapter">
		 <property name="webBindingInitializer" ref="customBinder"></property>
	</bean>
	<!-- 自定义webBinder -->
	<bean id="customBinder" class="org.springframework.web.bind.support.ConfigurableWebBindingInitializer">
		<property name="conversionService" ref="conversionService" />
	</bean>
	<!-- conversionService -->
	<bean id="conversionService" class="org.springframework.format.support.FormattingConversionServiceFactoryBean">
		<!-- 转换器 -->
		<property name="converters">
			<list>
				<bean class="cn.itcast.ssm.controller.converter.CustomDateConverter"/>
			</list>
		</property>
	</bean>
7.包装类型pojo绑定
(1)页面参数定义:
商品名称:<input name="itemsCustom.name"/><!-- itemsCustom和包装pojo中的属性一致即可 -->
(2)controller方法形参定义:
public String useraddsubmit(Model model,QueryVo queryVo)throws Exception{}
(3)包装pojo:
	public class QueryVo{
		private Items items;
		private ItemsCustom itemsCustom;//将包装类pojo中的pojo当作属性
		...
	}
8.集合类型绑定
(1)数组绑定
页面定义:
	<input type="checkbox" name="item_id" value="001"/>
	<input type="checkbox" name="item_id" value="002"/>
	<input type="checkbox" name="item_id" value="003"/>
Controller定义:
public String deleteitem(String[] item_id)throws Exception{}//使用String[]接收
(2)List绑定
使用List接收页面提交的批量数据,通过包装pojo接收,在包装pojo中定义list属性:
	public class QueryVo{
		private Items items;
		private ItemsCustom itemsCustom;
		private List<ItemsCustom> itemList;//商品列表
		...
	}
页面定义:
	<c:forEach items="${itemsList }" var="item" varStatus="s">
	<tr>
		<td><input type="text" name="itemsList[${s.index }].name" value="${item.name }"/></td>
		<td><input type="text" name="itemsList[${s.index }].price" value="${item.price }"/></td>
		.....
	</tr>
	</c:forEach>
Controller定义:
public String useraddsubmit(QueryVo queryVo)throws Exception{}
(3)map绑定(和List相似)
也通过在包装pojo中定义map类型属性:
	Public class QueryVo {
		private Map<String, Object> itemInfo = new HashMap<String, Object>();
		...
	}
页面定义:
	<tr>
		<td>学生信息:</td>
		<td>
		姓名:<inputtype="text"name="itemInfo['name']"/>
		年龄:<inputtype="text"name="itemInfo['price']"/>
		.. .. ..
		</td>
	</tr>
Contrller方法定义如下:
public String useraddsubmit(QueryVo queryVo)throws Exception{}
服务端校验
1.校验的理解:
(1)项目中,通常使用较多是前端的校验,比如页面中js校验。对于安全要求较高点建议在服务端进行校验
(1)服务端校验:
控制层controller:校验页面请求的参数的合法性。在服务端控制层conroller校验,不区分客户端类型(浏览器、手机客户端、远程调用)
业务层service(使用较多):主要校验关键业务参数,仅限于service接口中使用的参数
持久层dao:一般是不校验的
2.springmvc校验
(1)需求:
springmvc使用hibernate的校验框架:validation
页面提交请求的参数,请求到controller方法中,使用validation进行校验。如果校验出错,将错误信息展示
所需的jar包:hibernate-validator-4.3.0.Final、jboss-logging-3.1.0.CR2、validation-api-1.0.0.GA
3.springmvc.xml配置校验器:
	<!-- 校验器 -->
	<bean id="validator" class="org.springframework.validation.beanvalidation.LocalValidatorFactoryBean">
		<!-- 校验器-->
		<property name="providerClass" value="org.hibernate.validator.HibernateValidator" />
		<!-- 指定校验使用的资源文件,如果不指定则默认使用classpath下的ValidationMessages.properties -->
		<property name="validationMessageSource" ref="messageSource" />
	</bean>
	<!-- 校验错误信息配置文件 -->
	<bean id="messageSource" class="org.springframework.context.support.ReloadableResourceBundleMessageSource">
		<!-- 资源文件名-->
		<property name="basenames">
			<list>
			    <value>classpath:CustomValidationMessages</value>
			 </list>
		</property>
		<!-- 资源文件编码格式 -->
		<property name="fileEncodings" value="utf-8" />
		<!-- 对资源文件内容缓存时间,单位秒 -->
		<property name="cacheSeconds" value="120" />
	</bean>
4.验器注入到处理器适配器中:
<mvc:annotation-driven validator="validator"> </mvc:annotation-driven>
5.在pojo中添加校验规则:
	public class Items {
	    private Integer id;
	    @Size(min=1,max=30,message="{item.name.length.error}")//校验名称在1~30个字符,不符合抛出错误信息
	    private String name;
	    @NotEmpty(message="{pic.is.null}")//非空校验,不符合抛出错误信息
	    private String pic;
检验注解:
	@Null   被注释的元素必须为 null
	@NotNull    被注释的元素必须不为 null
	@AssertTrue     被注释的元素必须为 true
	@AssertFalse    被注释的元素必须为 false
	@Min(value)     被注释的元素必须是一个数字,其值必须大于等于指定的最小值
	@Max(value)     被注释的元素必须是一个数字,其值必须小于等于指定的最大值
	@DecimalMin(value)  被注释的元素必须是一个数字,其值必须大于等于指定的最小值
	@DecimalMax(value)  被注释的元素必须是一个数字,其值必须小于等于指定的最大值
	@Size(max=, min=)   被注释的元素的大小必须在指定的范围内
	@Digits (integer, fraction)     被注释的元素必须是一个数字,其值必须在可接受的范围内
	@Past   被注释的元素必须是一个过去的日期
	@Future     被注释的元素必须是一个将来的日期
	@Pattern(regex=,flag=)  被注释的元素必须符合指定的正则表达式
	Hibernate Validator 附加的 constraint
	@NotBlank(message =)   验证字符串非null,且长度必须大于0
	@Email  被注释的元素必须是电子邮箱地址
	@Length(min=,max=)  被注释的字符串的大小必须在指定的范围内
	@NotEmpty   被注释的字符串的必须非空
	@Range(min=,max=,message=)  被注释的元素必须在合适的范围内
6.创建错误消息文件CustomValidationMessages.properties:
	item.name.length.error=商品名称在1到30个字符之间
	pic.is.null=请上传图片
7.捕获校验错误信息:
(1)修改controller方法:
	@RequestMapping("/editItemSubmit")
	/*
	添加@Validated表示在对items参数绑定时进行校验,校验信息写入BindingResult中
	在要校验的pojo后边添加BingdingResult, 一个BindingResult对应一个pojo,且BingdingResult放在pojo的后边
	*/
	public String editItemSubmit(Model model,
		@Validated @ModelAttribute("item") ItemsCustom ItemsCustom,BindingResult result) throws Exception {
		//如果存在校验错误则转到商品修改页面
		if (result.hasErrors()) {
			List<ObjectError> errors = result.getAllErrors();
			for(ObjectError objectError:errors){
				System.out.println(objectError.getDefaultMessage());
			}
			model.addAttribute("errors", bindingResult);
			return "item/editItem";
		}
(2)页面显示:
	<c:if test="${allErrors!=null}">
		<c:forEach items="${errors.allErrors}" var="error">
			${error.defaultMessage }
		</c:forEach>
	</c:if>
8.分组校验
如果两处校验使用同一个Items类则可以设定校验分组,通过分组校验可以对每处的校验个性化
(1)定义分组
分组就是一个标识,这里定义一个接口:
	public interface ValidGroup1 {}
	public interface ValidGroup2 {}
(2)在校验规则中添加分组:
	public class Items {
	    private Integer id;
	    //这里指定分组ValidGroup1,此@Size校验只适用ValidGroup1校验
	    @Size(min=1,max=30,message="{item.name.length.error}",groups={ValidGroup1.class})
	    private String name;
(2)在controller方法使用指定分组的校验:
	@RequestMapping("/editItemSubmit")
	public String editItemSubmit(Model model,
		@Validated(value={ValidGroup1.class}) Items items,BindingResult result) throws Exception {}
数据回显
提交后,如果出现错误,将刚才提交的数据回显到刚才的提交页面
1.pojo数据回显方法
springmvc默认对pojo数据进行回显,pojo数据传入controller方法后,springmvc自动将pojo数据放到request域,key等于pojo类型(首字母小写)
如果key不是pojo的类名(首字母小写),可以使用@ModelAttribute完成数据回显,即使用@ModelAttribute指定pojo回显到页面在request中的key
@ModelAttribute的两种用法:
(1)绑定请求参数到pojo并且暴露为模型数据传到视图页面,即数据回显,页面通过items.调用pojo内的属性值
	@RequestMapping("/editItemSubmit")
	public String editItemSubmit(Model model,@ModelAttribute("items") ItemsCustom itemsCustom)
(2)将方法的返回值传到页面
controller中的方法,注:此方法没有requestmapping
	@ModelAttribute("itemtypes")
	public Map<String, String> getItemTypes(){
		Map<String, String> itemTypes = new HashMap<String,String>();
		itemTypes.put("101", "数码");
		itemTypes.put("102", "母婴");

		return itemTypes;
	}
页面使用:
	<select name="itemtype">
		<c:forEach items="${itemtypes }" var="itemtype">
			<option value="${itemtype.key }">${itemtype.value }</option>
		</c:forEach>
	</select>
3.使用最简单方法使用model(包括简单类型),可以不用@ModelAttribute
	model.addAttribute("itemsCustom", itemsCustom);
	model.addAttribute("id", id);
异常处理
异常处理
系统中异常包括两类:预期异常和运行时异常RuntimeException
前者通过捕获异常从而获取异常信息,后者主要通过规范代码开发、测试通过手段减少运行时异常的发生
系统的dao、service、controller出现都通过throws Exception向上抛出,最后由springmvc前端控制器交由异常处理器进行异常处理,如下图:
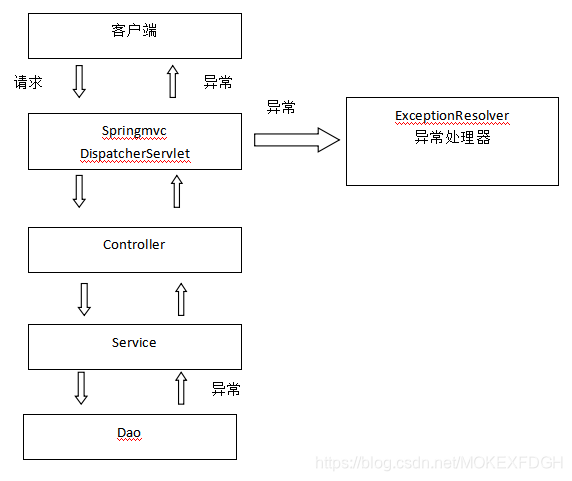
异常处理器
1.自定义异常处理类:
对不同的异常类型定义异常类,继承Exception
	public class CustomException extends Exception {
		/** serialVersionUID*/
		private static final long serialVersionUID = -5212079010855161498L;

		public CustomException(String message){
			super(message);
			this.message = message;
		}
		//异常信息
		private String message;

		public String getMessage() {
			return message;
		}

		public void setMessage(String message) {
			this.message = message;
		}
	}
2.全局异常处理器:
系统遇到异常,在程序中手动抛出,dao抛给service、service给controller、controller抛给前端控制器,前端控制器调用全局异常处理器
全局异常处理器处理思路:
(1)解析出异常类型
(2)如果该异常类型是系统自定义的异常,直接取出异常信息,在错误页面展示
(3)如果该异常类型不是系统自定义的异常,构造一个自定义的异常类型(信息为“未知错误”)
springmvc提供一个HandlerExceptionResolver接口
	public class CustomExceptionResolver implements HandlerExceptionResolver {
		public ModelAndView resolveException(HttpServletRequest request,HttpServletResponse response,
						   Object handler, Exception ex) {
			ex.printStackTrace();
			CustomException customException = null;

			//如果抛出的是系统自定义异常则直接转换
			if(ex instanceof CustomException){
				customException = (CustomException)ex;
			}else{
				//如果抛出的不是系统自定义异常则重新构造一个未知错误异常。
				customException = new CustomException("未知错误,请与系统管理 员联系!");
			}
			ModelAndView modelAndView = new ModelAndView();
			modelAndView.addObject("message", customException.getMessage());
			modelAndView.setViewName("error");

			return modelAndView;
		}
	}
3.错误页面:${message }
4.在springmvc.xml中配置异常处理器:
<bean id="handlerExceptionResolver" class="cn.moke.ssm.controller.exceptionResolver.CustomExceptionResolver"/>
5.异常测试:
	Items item = itemService.findItemById(id);
	if(item == null){
		throw new CustomException("商品信息不存在!");
	}
注:
如果与业务功能相关的异常,建议在service中抛出异常
与业务功能没有关系的异常,建议在controller中抛出
上传图片
1.springmvc中对多部件类型解析
在页面form中提交enctype="multipart/form-data"的数据时,需要springmvc对multipart类型的数据进行解析
在springmvc.xml中配置multipart类型解析器:
	<!-- 文件上传 -->
	<bean id="multipartResolver" class="org.springframework.web.multipart.commons.CommonsMultipartResolver">
		<!-- 设置上传文件的最大尺寸为5MB -->
		<property name="maxUploadSize">
			<value>5242880</value>
		</property>
	</bean>
注:CommonsMultipartResolver解析器依赖commons-fileupload和commons-io
2.创建图片虚拟目录
(1)通过eclipse配置:
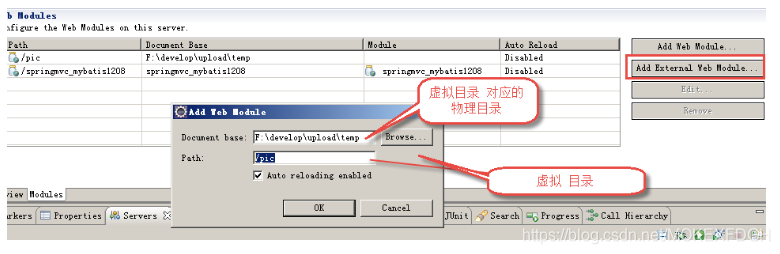
(2)在tomcat上配置:
在conf/server.xml文件,添加虚拟目录:
注:
访问http://localhost:8080/pic即可访问F:\develop\upload\temp下的图片
在图片虚拟目录 中,一定将图片目录分级创建(提高i/o性能),一般我们采用按日期(年、月、日)进行分级创建
3.上传图片方法
(1)页面:
	<form id="itemForm" action="${pageContext.request.contextPath }/item/editItemSubmit.action"
	      	method="post" enctype="multipart/form-data">
		<tr>
			<td>商品图片</td>
			<td>
				<c:if test="${item.pic !=null}">
					<img src="/pic/${item.pic}" width=100 height=100 /><br/>
				</c:if>
				<input type="file" name="pictureFile" /><!-- file的name与controller形参一致 -->
			</td>
		</tr>
		...
(2)controller:
	@RequestMapping("/editItemSubmit")
	public String editItemSubmit(Items items, MultipartFile pictureFile)throws Exception{
		String pic_path = "F:/develop/upload/temp/";
		String pictureFile_name = pictureFile.getOriginalFilename();
		String newFileName = UUID.randomUUID().toString()+pictureFile_name.substring(pictureFile_name.lastIndexOf("."));
		File uploadPic = new File(pic_path+newFileName);
		pictureFile.transferTo(uploadPic);//向磁盘写文件
	}
json数据交互
springmvc进行json交互

1、请求json、输出json,要求请求的是json串,所以在前端页面中需要将请求的内容转成json,不太方便
2、请求key/value、输出json。此方法比较常用
json交互准备
1.加载json转的jar包:jackson-core-asl-1.9.11、jackson-mapper-asl-1.9.11
2.配置json转换器
在注解适配器中加入messageConverters:
	<!--注解适配器 -->
	<bean class="org.springframework.web.servlet.mvc.method.annotation.RequestMappingHandlerAdapter">
		<property name="messageConverters">
			<list>
				<bean class="org.springframework.http.converter.json.MappingJacksonHttpMessageConverter"></bean>
			</list>
		</property>
	</bean>
注:如果使用<mvc:annotation-driven /> 则不用定义上边的内容
输入json,输出json
1.页面
使用jquery的ajax提交json串,对输出的json结果进行解析:
(1)引入js文件:
<script type="text/javascript" src="${pageContext.request.contextPath }/js/jquery-1.4.4.min.js"></script>
(2)js文件:
	//请求json响应json
	function request_json(){
		$.ajax({
			type:"post",
			url:"${pageContext.request.contextPath }/item/editItemSubmit_RequestJson.action",
			contentType:"application/json;charset=utf-8",
			data:'{"name":"测试商品","price":99.9}',
			success:function(data){
				alert(data);
			}
		});
	}
2.controller:
	// 商品修改提交json信息,响应json信息
	@RequestMapping("/editItemSubmit_RequestJson")
	public @ResponseBody ItemsCustom editItemSubmit_RequestJson(@RequestBody ItemsCustom itemsCustom) throws Exception {
		System.out.println(items);
		return items;
	}
输入key/value,输出json
1.页面
	function formsubmit(){
		var user = " name=测试商品&price=99.9";
		alert(user);
		  $.ajax({
				type:'post',//这里改为get也可以正常执行
				url:'${pageContext.request.contextPath}/item/ editItemSubmit_RequestJson.action',
				//ContentType没指定将默认为:application/x-www-form-urlencoded
				data:'name=测试商品&price99.9',
				success:function(data){
					alert(data.name);
				}
			});
	}
2.controller:
	// 商品修改提交,提交普通form表单数据,响应json
	@RequestMapping("/editItemSubmit_ResponseJson")
	public @ResponseBody ItemsCustom editItemSubmit_ResponseJson(ItemsCustom ItemsCustom) throws Exception {
		System.out.println(items);
		return items;
	}
RESTful支持
RESTful架构,就是目前最流行的一种互联网软件架构;它结构清晰、符合标准、易于理解、扩展方便,所以正得到越来越多网站的采用
规范
1、对url进行规范,写RESTful格式的url
非REST的url:http://…/queryItems.action?id=001&type=T01
REST的url风格:http://…/items/001
特点:url简洁,将参数通过url传到服务端
2、http的方法规范
不管是删除、添加、更新。。使用url是一致的,如果进行删除,需要设置http的方法为delete,其它同理
后台controller方法:判断http方法,如果是delete执行删除,如果是post执行添加
3、对http的contentType规范
请求时指定contentType,要json数据,设置成json格式的type
使用
1.REST方法的前端控制器配置:
	<servlet>
		<servlet-name>springmvc-servlet-rest</servlet-name>
		<servlet-class>org.springframework.web.servlet.DispatcherServlet</servlet-class>
		<init-param>
			<param-name>contextConfigLocation</param-name>
			<param-value>classpath:spring/springmvc.xml</param-value>
		</init-param>
	</servlet>
	<servlet-mapping>
		<servlet-name>springmvc-servlet-rest</servlet-name>
		<url-pattern>/</url-pattern>
	</servlet-mapping>
2.controller(url映射使用REST风格的url):
	@RequestMapping("/viewItems/{id}")//{×××}占位符,请求的URL可以是“/viewItems/1”或“/viewItems/2”
	public @ResponseBody viewItems(@PathVariable("id") String id,Model model) throws Exception{
		//通过在方法中使用@PathVariable获取{×××}中的×××变量
		ItemsCustom itemsCustom = itemsService.findItemsById(id);//调用 service查询商品信息
		return itemsCustom;
	}
3.对静态资源的解析
配置前端控制器的url-parttern中指定/,对静态资源的解析会出现问题(不能访问静态资源)
在springmvc.xml中添加静态资源解析方法:
<mvc:resources location="/js/" mapping="/js/**"/>
拦截器
Spring Web MVC 的处理器拦截器类似于Servlet开发中的过滤器Filter,用于对处理器进行预处理和后处理
定义和配置
1.定义:
	public class HandlerInterceptor1 implements HandlerInterceptor {
		//进入 Handler方法之前执行
		//用于身份认证、身份授权
		//比如身份认证,如果认证通过表示当前用户没有登陆,需要此方法拦截不再向下执行
		public boolean preHandle(HttpServletRequest request,HttpServletResponse response, Object handler) throws Exception{
			//return false表示拦截,不向下执行
			//return true表示放行
			return false;
		}
		//进入Handler方法之后,返回modelAndView之前执行
		//应用场景从modelAndView出发:将公用的模型数据(比如菜单导航)在这里传到视图,也可以在这里统一指定视图
		public void postHandle(HttpServletRequest request,HttpServletResponse response, Object handler,
							ModelAndView modelAndView) throws Exception {

		}
		//执行Handler完成执行此方法
		//应用场景:统一异常处理,统一日志处理
		public void afterCompletion(HttpServletRequest request,HttpServletResponse response,
							Object handler, Exception ex)throws Exception {
		}
	}
2.配置:
注:springmvc拦截器针对HandlerMapping进行拦截设置
(1)针对HandlerMapping配置(一般不推荐使用)
如果在某个HandlerMapping中配置拦截,经过该HandlerMapping映射成功的handler最终使用该拦截器
	<bean class="org.springframework.web.servlet.handler.BeanNameUrlHandlerMapping">
		<property name="interceptors">
			<list>
				<ref bean="handlerInterceptor1"/>
				<ref bean="handlerInterceptor2"/>
			</list>
		</property>
	</bean>
		<bean id="handlerInterceptor1" class="springmvc.intercapter.HandlerInterceptor1"/>
		<bean id="handlerInterceptor2" class="springmvc.intercapter.HandlerInterceptor2"/>
(2)实现类似全局的拦截器(顺序执行)
	<!--拦截器 -->
	<mvc:interceptors>
		<!--多个拦截器,顺序执行 -->
		<mvc:interceptor>
			<mvc:mapping path="/**"/>
			<bean class="cn.moke.springmvc.filter.HandlerInterceptor1"></bean>
		</mvc:interceptor>
		<mvc:interceptor>
			<mvc:mapping path="/**"/>
			<bean class="cn.moke.springmvc.filter.HandlerInterceptor2"></bean>
		</mvc:interceptor>
	</mvc:interceptors>
拦截器应用
1.实现登陆认证,需求:
用户请求url,拦截器进行拦截校验->
(1)如果请求的url是公开地址(无需登陆即可访问的url),让放行
(2)如果用户session不存在跳转到登陆页面
(3)如果用户session存在放行,继续操作
2.controller方法:
	//登陆
	@RequestMapping("/login")
	public String login(HttpSession session, String username, String password)
			throws Exception {
		// 调用service进行用户身份验证
		// ...
		// 在session中保存用户身份信息
		session.setAttribute("username", username);
		// 重定向到商品列表页面
		return "redirect:/items/queryItems.action";
	}
	// 退出
	@RequestMapping("/logout")
	public String logout(HttpSession session) throws Exception {
		// 清除session
		session.invalidate();
		// 重定向到商品列表页面
		return "redirect:/items/queryItems.action";
	}
3.登陆认证拦截实现
(1)拦截器定义:
	public class LoginInterceptor implements HandlerInterceptor {
		public boolean preHandle(HttpServletRequest request,
				HttpServletResponse response, Object handler) throws Exception {
			//获取请求的url
			String url = request.getRequestURI();
			//判断url是否是公开地址(实际使用时将公开地址配置到配置文件中)
			//这里公开地址是登陆提交的地址
			if(url.indexOf("login.action")>=0){
				//如果进行登陆提交,放行
				return true;
			}
			//判断session
			HttpSession session  = request.getSession();
			//从session中取出用户身份信息
			String username = (String) session.getAttribute("username");

			if(username != null){
				//身份存在,放行
				return true;
			}

			//执行这里表示用户身份需要认证,跳转登陆页面
			request.getRequestDispatcher("/WEB-INF/jsp/login.jsp").forward(request, response);
			return false;
		}
	}
(2)配置:
	<mvc:interceptors>
		<mvc:interceptor>
			<mvc:mapping path="/**"/>
			<bean class="cn.moke.springmvc.filter.LoginInterceptor"></bean>
		</mvc:interceptor>
	</mvc:interceptors>