Ambari 与hdp 集群搭建教程
集群环境os为centos6.8 server
1,各个节点进行:网络(静态IP)配制(
| 192.168.10.30 |
master |
8g |
| 192.168.10.31 |
slave1 |
8g |
| 192.168.10.32 |
Slave2 |
8g |
| 192.168.10.33 |
Slave3 |
8g |
| 192.168.10.34 |
Slave4 |
8g |
| 192.168.10.35 |
Slave5 |
8g |
Vi /etc/sysconfig/network-scripts/ifcfg-eth0
:
DEVICE=eth0
HWADDR=00:50:56:A7:45:10
TYPE=Ethernet
UUID=010e7a3c-f81c-4914-a69a-01da66b9cfb3
ONBOOT=yes
NM_CONTROLLED=yes
BOOTPROTO=static
IPADDR=192.168.10.30
NETMASK=255.255.240.0
GATEWAY=192.168.2.1
DNS1=202.98.96.68
DNS2=202.98.96.69
Vi /etc/sysconfig/network
:
NETWORKING=yes
HOSTNAME=master
GATEWAY=192.168.2.1
重启网络服务:
/etc/init.d/network restart
2,Hosts配置
在各个节点:vi /etc/hosts
添加集群主机:
192.168.10.30 master
192.168.10.31 slave1
192.168.10.32 slave2
192.168.10.33 slave3
192.168.10.34 slave4
192.168.10.35 slave5
………………………….
3,关闭防火墙和SELinux(各个节点)。
chkconfig iptables off (重启后生效)
修改SELINUX=disabled (重启后永久生效
Ssh 无密码登录
在master 节点下:
ssh-keygen -t rsa
cat ~/.ssh/id_rsa.pub >> ~/.ssh/authorized_keys
chmod 600 ~/.ssh/authorized_keys
scp ~/.ssh/authorized_keys root@slave1:~/.ssh/
scp ~/.ssh/authorized_keys root@slave2:~/.ssh/
……………………..
4,Ntp 即时服务
以master 为ntp校准服务器
Master 的 vi /etc/ntp.conf
:
restrict 127.0.0.1
restrict -6 ::1
# Hosts on local network are less restricted.
#restrict 192.168.1.0 mask 255.255.255.0 nomodify notrap
restrict 192.168.10.0 mask 255.255.240.0 nomodify notrap //允许的网络字段连接ip限制
server 127.127.1.0 perfer //以本机时间为准
fudge 127.127.1.0 stratum 10
#server 0.centos.pool.ntp.org iburst //全部注释掉
#server 1.centos.pool.ntp.org iburst
#server 2.centos.pool.ntp.org iburst
#server 3.centos.pool.ntp.org iburst
各个客户端(slave1,2,3,4,5)配置如下:
Vi /etc/ntp.conf
Server master //指定ntp 服务器,为master
#server 0.centos.pool.ntp.org iburst //全部注释掉
#server 1.centos.pool.ntp.org iburst
#server 2.centos.pool.ntp.org iburst
#server 3.centos.pool.ntp.org iburst
启动全部节点ntp服务;
service ntpd start
检查是否成功,用ntpstat命令查看同步状态,出现以下状态代表启动成功
请求服务器前,请先使用ntpdate手动同步一下时间:ntpdate -umaster (主节点ntp服务器)
这里可能出现同步失败的情况,请不要着急,一般是本地的ntp服务器还没有正常启动,一般需要等待5-10分钟才可以正常同步。启动服务:
service ntpd start
5,在各个节点jdk配置,:
rpm –ivh jdk-8u101-linux-x64.rpm
此时jdk安装目录为/usr/java/….
配置jdk环境:
Vi /etc/profile
export JAVA_HOME=/usr/java/jdk1.8.0_101
export CLASSPATH=.:$JAVA_HOME/lib/dt.jar:$JAVA_HOME/lib/tools.jar
export PATH=$PATH:$HOME/bin:$JAVA_HOME/bin
source /etc/profile
6,安装http服务器(主节点)
yum install httpd
service httpd start
#修改网站默认的跟目录
vi /etc/httpd/conf/httpd.conf
#
# DocumentRoot: Thedirectory out of which you will serve your
# documents. Bydefault, all requests are taken from this directory, but
# symbolic links andaliases may be used to point to other locations.
#
DocumentRoot"/var/www/html"
#
# This should bechanged to whatever you set DocumentRoot to.
#
<Directory"/var/www/html">
7,安装mysql(主节点)
rpm –ivh MySQL-server-5.5.36-1.el6.x86_64.rpm
rpm –ivh MySQL-client-5.5.36-1.el6.x86_64.rpm
service mysql start
service mysql start
4.mysqladmin -u root password 'xxxx'
5.mysql -uroot -pxxxx (进入mysql命令行)
进入mysql命令行之后,开始执行下面sql语
#创建用户并分配权限
CREATE USER 'ambari'@'master'IDENTIFIED BY 'ambari';
GRANT ALL PRIVILEGES ON *.* TO 'ambari'@'master';
GRANT ALL PRIVILEGES ON *.* TO root@'master';
FLUSH PRIVILEGES;
8,创建用户组及用户(在主节点)
Groupadd ambari
添加ambari安装、运行用户到组.
useradd -G ambari ambari
9, 配置安装源
注:鉴于多数集群生产环境不能上网,所以安装时采用本地源的方式.具体为先下载附录中的ambari、HDP、HDP-UTILS的tar包然后再配置到本地源中。
#ambari和HDP(含HDP-UTILS)源
a)Ambari2.2.2源
| 操作系统 |
格式 |
URL地址 |
| RedHat 6 CentOS 6 Oracle Linux 6 |
Base URL |
http://public-repo-1.hortonworks.com/ambari/centos6/2.x/updates/2.2.2.0 |
| Repo File |
http://public-repo-1.hortonworks.com/ambari/centos6/2.x/updates/2.2.2.0/ambari.repo |
|
| Tarball md5 | asc |
http://public-repo-1.hortonworks.com/ambari/centos6/2.x/updates/2.2.2.0/ ambari-2.2.2.0-centos6.tar.gz |
b)HDP 2.4源
| 操作系统 |
版本号 |
源名称 |
格式 |
URL地址 |
| RedHat 6 CentOS 6 Oracle Linux 6 |
HDP-2.4.2.0 |
HDP |
Base URL |
http://public-repo-1.hortonworks.com/HDP/centos6/2.x/ updates/2.4.2.0 |
| Repo File |
http://public-repo-1.hortonworks.com/HDP/centos6/2.x/ updates/2.4.2.0/hdp.repo |
|||
| Tarball md5 | asc |
http://public-repo-1.hortonworks.com/HDP/centos6/2.x/ updates/2.4.2.0/HDP-2.4.2.0-centos6-rpm.tar.gz |
|||
| HDP-UTILS |
Base URL |
http://public-repo-1.hortonworks.com/HDP-UTILS-1.1.0.20/ repos/centos6 |
||
| Repo File |
http://public-repo-1.hortonworks.com/HDP-UTILS-1.1.0.20/ repos/centos6/HDP-UTILS-1.1.0.20-centos6.tar.gz |
1) 下载如下组件并拷贝到主节点的httpd网站根目录,即/var/www/html内后解压
Ambari 2.2.2:
HDP 2.4.2:
HDP-UTILS-1.1.0.20:
注:事实证明HDP、HDP-UTILS源不需要配置,ambari安装时可以指定本地源,并在各个节点里创建repo文件.ambari的源需要配置,因为安装采用yum install ambari方式.
vi ambari.repo(在http目录下,即解压目录:/var/www/html/)
#VERSION_NUMBER=2.2.2.0-460
[Updates-ambari-2.2.2.0]
name=ambari-2.2.2.0 -Updates
baseurl=http://192.168.10.30/AMBARI-2.2.2.0/centos6/2.2.2.0-460/
gpgcheck=1
gpgkey=http://192.168.10.30/AMBARI-2.2.2.0/centos6/2.2.2.0-460/RPM-GPG-KEY/RPM-GPG-KEY-Jenkins
enabled=1
priority=1
vi hdp.repo(在http目录下,即解压目录:/var/www/html/)
#VERSION_NUMBER=2.4.2.0-258
[HDP-2.4.2.0]
name=HDP Version -HDP-2.4.2.0
baseurl=http://192.168.10.30/HDP/centos6/2.x/updates/2.4.2.0
gpgcheck=1
gpgkey=http://192.168.10.30/HDP/centos6/2.x/updates/2.4.2.0/RPM-GPG-KEY/RPM-GPG-KEY-Jenkins
enabled=1
priority=1
[HDP-UTILS-1.1.0.20]
name=HDP Utils Version- HDP-UTILS-1.1.0.20
baseurl=http://192.168.10.30/HDP-UTILS-1.1.0.20/repos/centos6
gpgcheck=1
gpgkey=http://192.168.10.30/HDP/centos6/2.x/updates/2.4.2.0/RPM-GPG-KEY/RPM-GPG-KEY-Jenkins
enabled=1
priority=1
将ambari.repo ,hdp.repo复制到/etc/ yum.repos.d/目录下
接着执行以下指令:
yum clean all
yum list update
yum makecache
yum repolist
Yum方式安装ambari。
1)安装ambari
yum install ambari-server
2)配置amabri
ambari-server setup
Customize user account for ambari-server daemon [y/n] (n)?
输入:y
Enter user account for ambari-server daemon (root):
注:这里亦可选择用户amabri,届时会让提供该用户的密码等信息.
输入:root
检查防火墙是否关闭
Adjusting ambari-server permissions and ownership...
Checking firewall...
WARNING: iptables is running. Confirm the necessary Ambari ports areaccessible. Refer to the Ambari documentation for more details on ports.
OK to continue [y/n] (y)?
输入:y
检查JDK
Checking JDK...
[1] - Oracle JDK 1.7 + Java Cryptography Extension (JCE)Policy Files 7
[2] - Oracle JDK 1.6 + Java Cryptography Extension (JCE) Policy Files 6
[3] - Custom JDK
==============================================================================
Enter choice (1):
输入:3
输入:/自己的jdk安装目录
Choose one of the following options:
[1] - PostgreSQL (Embedded)
[2] - Oracle
[3] - MySQL
[4] - PostgreSQL
==============================================================================
Enter choice (1):
输入:3
Hostname (localhost):
Port (3306):
Database Name (ambari):
Username (ambari):
输入:(什么也不输入,直接“回车”)
Enter Database Password (cluster):
Re-enter password:
输入:ambari
WARNING: Before starting Ambari Server, youmust run the following DDL against the database to create the schema:/var/lib/ambari-server/resources/Ambari-DDL-MySQL-CREATE.sql
注:这里需要以mysql的amabri用户在ambari数据库里source上面的sql文件,作用时初始化ambari数据库。
Proceed with configuring remote database connectionproperties [y/n] (y)?
输入:y
简单图示如下:


注意:启动ambari server之前一定要运行上述提到的Ambari-DDL-MySQL-CREATE.sql脚本,否则ambari无法创建数据库,无法启动。
登录mysql,执行如下命令:
"source/var/lib/ambari-server/resources/Ambari-DDL-MySQL-CREATE.sql"
11,启动ambari服务
ambari-server start
Using python /usr/bin/python2.6
Starting ambari-server
Ambari Server running with 'root' privileges.
Organizing resource files at/var/lib/ambari-server/resources...
Server PID at: /var/run/ambari-server/ambari-server.pid
Server out at: /var/log/ambari-server/ambari-server.out
Server log at: /var/log/ambari-server/ambari-server.log
Waiting for server start....................
Ambari Server 'start' completed successfully.
注:启动ambari访问前,请确保mysql驱动已经放置在/usr/share/java内且名字是mysql-connector-java.jar不然ambari server启动时会报错mysql驱动找不到的错误.具体报错见:
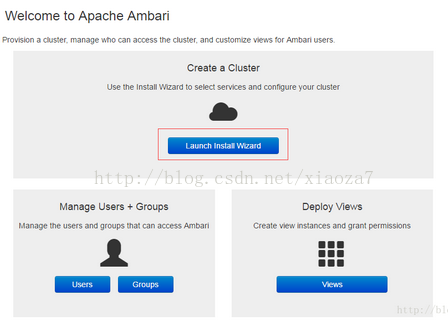
12,访问master即192.168.10.30:8080进入安装界面,用户密码:admin/admin
1,选 launch install wizard
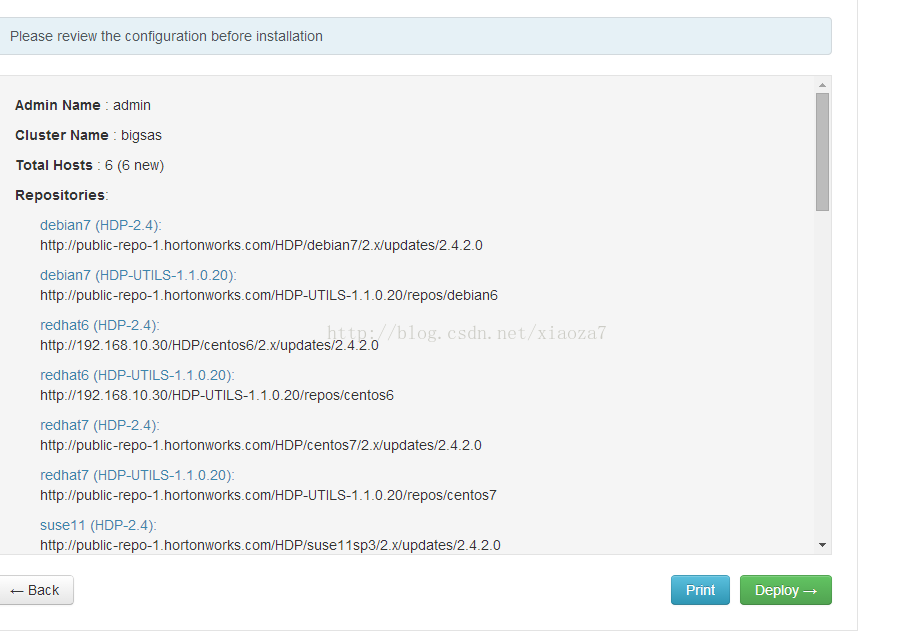
2,配置本地源,如下图示;指定本地源,修改base url,为master,如下图中红线所示;否则会联网下载,安装失败。

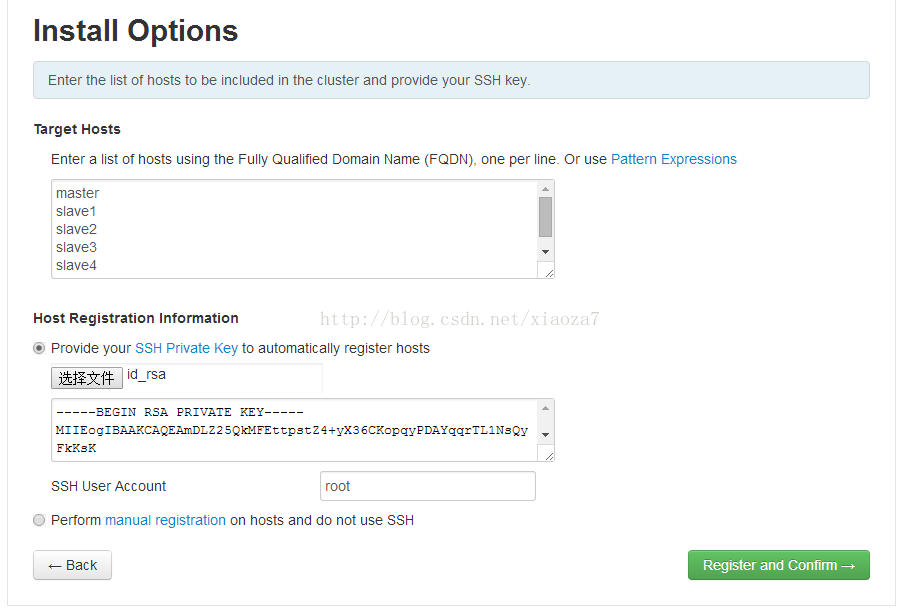
3,配置集群主机,将主节点master下的.ssh文件下id_rsa作为ssh private key,如下图示:
4,主机检查

主机检查时出现TransparentHuge Pages Issues (1)
解决方法:执行下面的命令可临时解决这个警告:
echo never >/sys/kernel/mm/redhat_transparent_hugepage/defrag
永久解决:
vi /etc/rc.local
在文件的最后添加下面的行,保存即可。
echo never >/sys/kernel/mm/redhat_transparent_hugepage/defrag
echo never >/sys/kernel/mm/transparent_hugepage/enabled
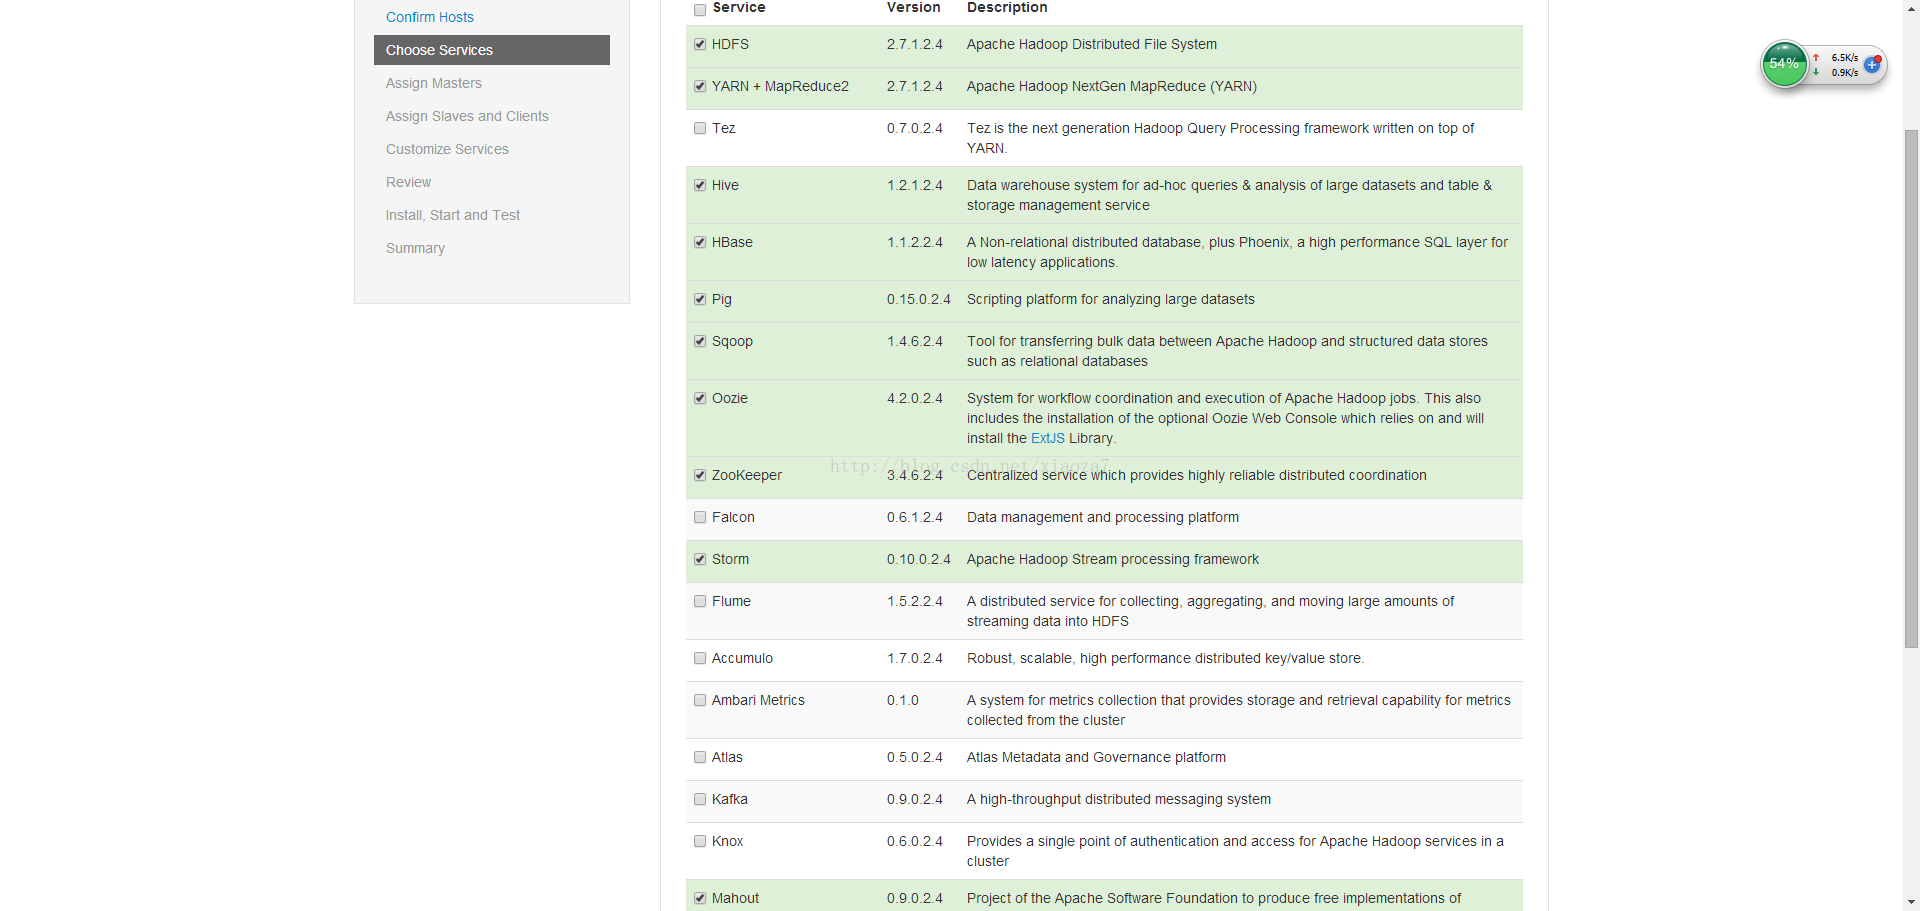
5,选择服务;
6,选择服务安装的server
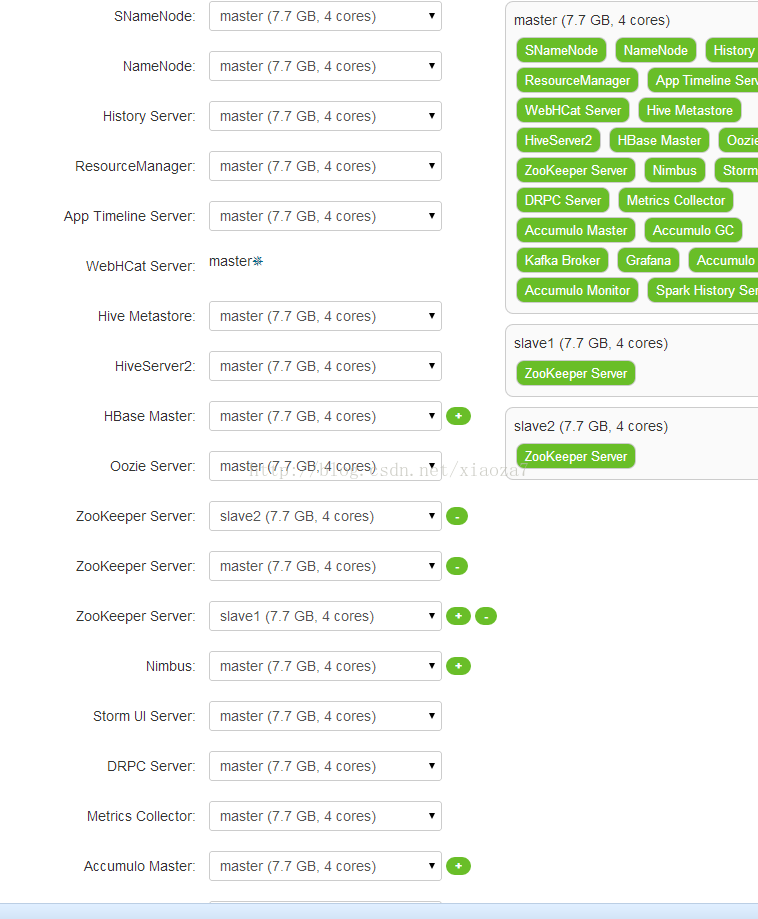

在选server host 时,自己将几乎所有server 都放在了master节点上,包括hbase server ,hive server2 /metastore ,namenode,secondary,hdfs等,除了accumulo,其他可以按配置放。
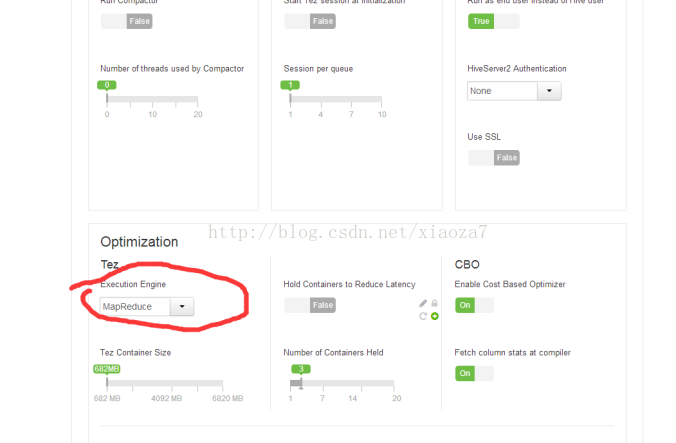
7,注意配置hive config,如下图示,一定要选mapreduce
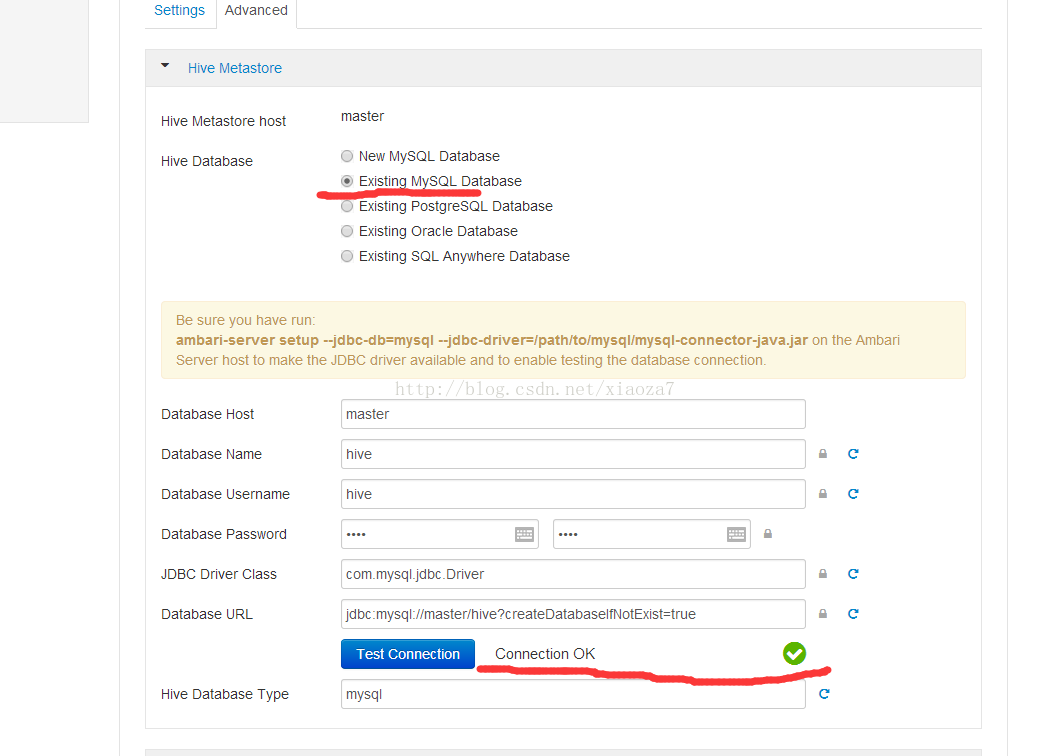
测试之前在mysql执行以下命令:
CREATE USER 'hive'@'master' IDENTIFIED BY 'hive';
GRANT ALL PRIVILEGES ON *.* TO 'hive'@'master' IDENTIFIED BY 'hive' WITH GRANT OPTION;
Flush privileges
8,开始安装
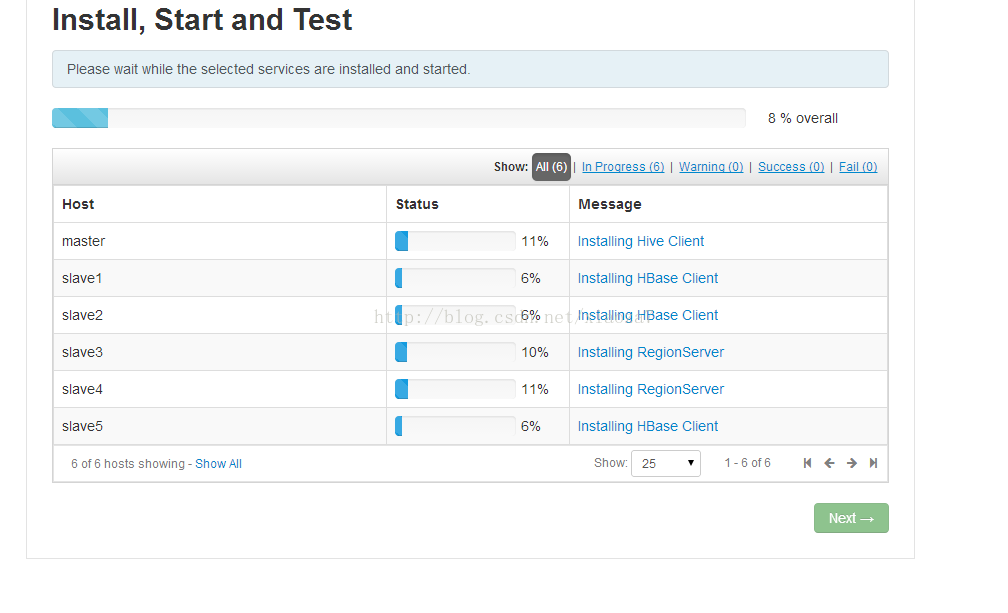
安装较慢,估计40分钟左右
出错时,按提示解决:
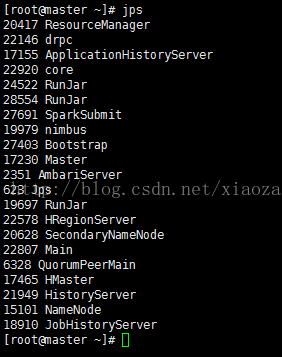
9.安装成功后如下示:

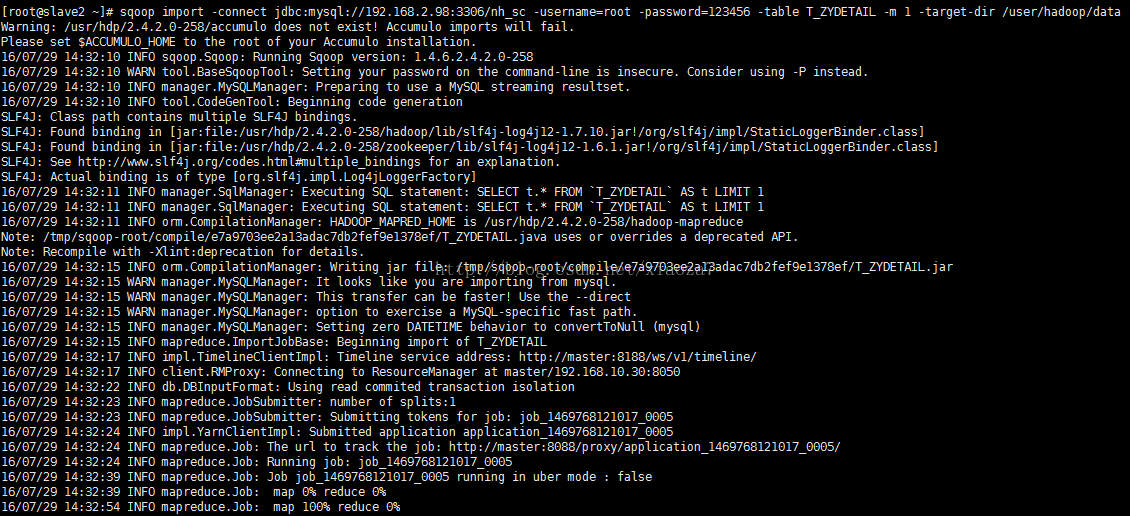
10,Sqoop测试成功。
安装参考链接:http://blog.csdn.net/shenliang1985/article/details/51478151
集群扩容新增硬盘:链接:http://www.centoscn.com/CentOS/config/2014/0403/2711.html