最近在学CNN,大学的同学给我推了一个视频,感觉写得简单易懂,所以记了篇笔记。
笔记差不多到视频17分钟左右,但基本把CNN的原理、结构都讲了一遍,而且个人感觉很好理解。
笔记用很low的英文写的(也是为了四六级?)。
我在本篇blog中加入了一些代码,帮助理解。
如果我的理解有差错,请大家指出,谢谢。
同时我还有超多不理解的地方。。
https://www.bilibili.com/video/av16175135 原视频
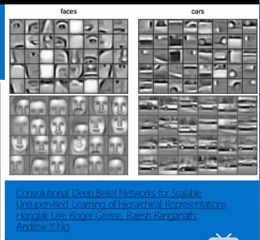
1. What can CNN recognize in each layer?
1. CNN每层都识别了什么?
For example, if fed a face picture, CNN can recognize the noses and eyes which like edges in first and second layer, and in the above layer, it can recognize whole face.
比如说我们给CNN喂了一张脸的图片,CNN的第一层第二层识别了类似鼻子和嘴之类的边缘信息,在更高层能识别出整个面部了。
汽车的例子也类似,底的层识别出轮胎窗户什么的,高的层识别出整个汽车。
(这个只要你懂卷积核是什么,卷积的过程结果,池化的结果,就不难理解)
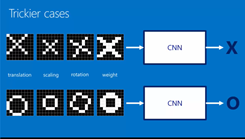
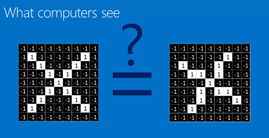
2. Decide whether the picture is of an X or an O
很简单的一个例子说明了CNN的聪明的地方(trickier case)。
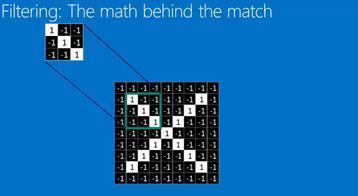
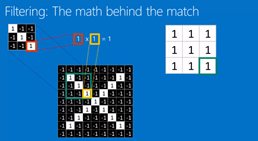
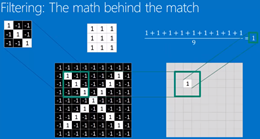
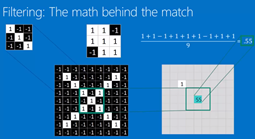
Filtering: The math behind the match 过滤器(好像也叫卷积核?)
- Line up the feature and the image patch
- Multiply each image pixel by the corresponding feature pixel.
- Add them up
- Divide by the total number of pixels in the feature
总体的意思就是用一个filter去和每个image patch相运算,如果这个filter的特征与image patch的特征相似,
则计算出的数值高(接近1)。

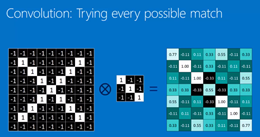
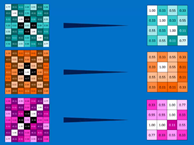
3. Convolution layer: filtering everywhere in a picture
那么上面filter做的数学运算呢,其实就是convolution卷积过程。
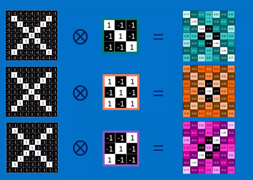
This following picture demonstrate that how and why does the depth of the fed picture change.
For example in following picture, if we process a picture with three filters, we will get three new pictures.
如果你用三个卷积核filter,那么原本的一张图片,在进行完卷积运算后,将会变成三张图片。
也就是说,图片的depth变高了。
这里需要理解的是:filter是什么?filter矩阵中的数是什么?filter中的数是怎么生成的,怎么变化的?
1)filter就是卷积核,本质其实就是矩阵,就是下图中中间3*3的矩阵。
2)filter中的数是weights。(个人理解,存疑)
3)在tensorflow中,你只需要规定filter的尺寸(kernel_size),里面的weights随机生成。(个人理解,存疑)
在训练过程中,weights随之改变。
个人理解,训练到最后得到的filter,就是“无限趋像”图像中每个小patch。
比如说一张脸,在训练完后,filter会是鼻子/眼镜/耳朵等。
因为训练的目的就是使loss降低。

同时可以看出,虽然depth变大了(1-->3),但width和height减小了(9*9-->7*7),这与卷积核的数量和尺寸有关。
# about padding methods(valid & same) please refer to
在本例中padding的模式是valid,关于对valid和same的理解可以看以下链接:
https://blog.csdn.net/wuzqchom/article/details/74785643
Code implementation with using tensorflow:
用代码实现上述卷积层:
c = tf.layers.conv2d(
    inputs=X,
    filters=3,
    kernel_size=[3, 3],
    strides=[1, 1],
    padding='valid',
    activation=tf.nn.relu
)
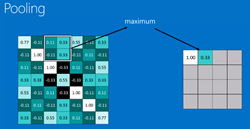
4. Pooling layer: Shrinking the image stack 池化层:收缩图片
- Pick a window size (usually 2 or 3).
- Pick a stride(usually 2).
- Walk your window across your filtered images.
- From each window, take the maximum value.
大体的意思就是在一张图片中很多信息都是没用的(非特征),通过池化过程,可以提取出最有用的特征信息。
这样可以减少下一个卷积层的运算量,同时防止过拟合。
什么是过拟合:https://blog.csdn.net/qq_18254385/article/details/78428887

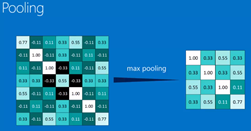
padding='same' , 7*7 --> 4*4
Code implementation with using tensorflow:
代码实现:
p = tf.layers.max_pooling2d(
    inputs=c,
    pool_size=[2, 2],
    strides=[2, 2],
    padding='same'
)
5. Normalization 标准化
Keep the math from breaking by tweaking each of the values just a bit.
Change everything negative to zero.
视频中提到的方法是relu,就是把正数保持不变,负数变为零。
至于为什么用relu函数来这样处理,可以参考以下链接,
主要是1)解决梯度消失问题 2)为了快
The benefits: https://www.sohu.com/a/214965417_100008678
- Solution of gradient vanishing.
- Faster
Code implementation (tf.nn.relu):
代码实现:就是定参的时候让激励函数activation=tf.nn.relu
c = tf.layers.conv2d(
    inputs=X,
    filters=3,
    kernel_size=[3, 3],
    strides=[1, 1],
    padding='valid',
    activation=tf.nn.relu
)
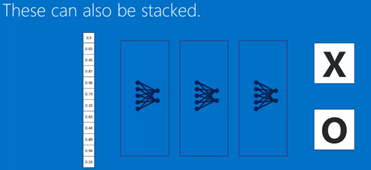
6. Layers get stacked
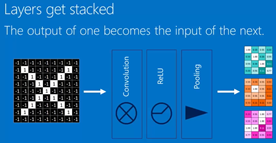
Deep stacking: layers can be repeated several (or many) times.
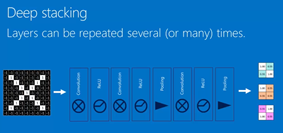
With each step, get more feature and smaller.
层的堆叠,卷积层的输出是池化层的输入。
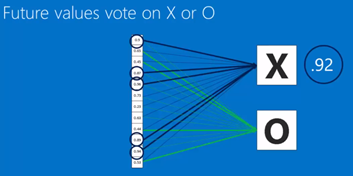
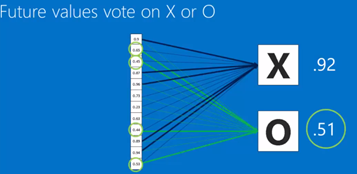
7. Fully connected layer:


对全连接层的理解,视频中把它说成了一个投票的过程。
其实可以理解成:没有卷积层和池化层在前面,单独的全连接层,就是一个简单神经网络。
用这个简单神经网络,可以将前面得到的weights的size改变,并最终对应到相应的labels(X,O)。
比如在本例中,size的变化(2*2*3)-->(1*12)-->(1*2)
In term of future values, after convolution layers and pooling layers, get the weights then vote for points .
For example in following picture, the vote points of X(0.92) if higher than O(0.51), so it is categorized to X.
Also you can use multiple fully connected layers.
你也可以用多层全连接层,每层全连接层也有自己的weights。
Code implementation:
代码实现:
一般来说,全连接层常用的激励函数有tanh和softmax
全连接层之间的连接一般用tanh,全连接层与输出层(预测层)的链接用softmax。
f = tf.layers.dense(
    inputs=p_flat,
    units=num_hidden,
    activation=tf.nn.tanh
)
8. Putting it all together
