React Native集成友盟推送
android推送集成
1.导入SDK:
首先从友盟github上下载demo
下载之后打开并将push文件夹粘贴在你自己rn项目android文件夹下边
(1)push文件夹位置:
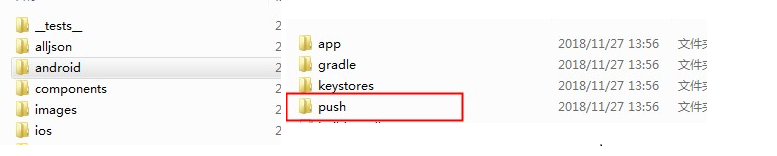
(2)将push文件夹直接复制粘贴到rn项目android目录下,目录结构如下:
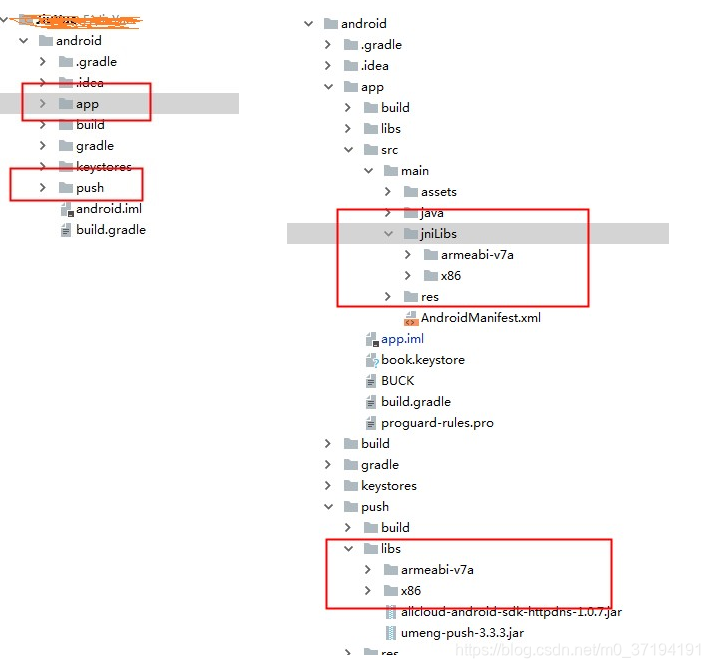
同时需要将push/libs目录下的armebi-v7a以及x86文件夹粘贴到app/src/main/jniLibs下边。如果是用android studio进行开发,直接以导入lib module的形式导入push并在app中添加依赖即可,如果是用其他如webstorm开发,需要手动添加导入配置,需要修改的地方如下:
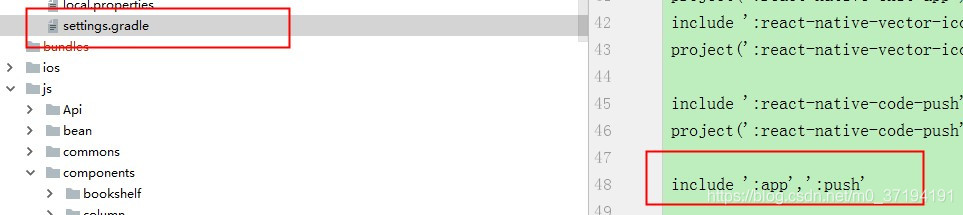
在android目录下的settings.gradle中添加导入:
在app目录下的build.gradle中添加依赖,需要添加两处:
 defaultConfig {
···
        ndk {
            abiFilters "armeabi-v7a", "x86"
        }
 ···
    }
以及
dependencies {
   compile project(':push')
}
ok,至此导入和依赖就已经做完。
2.添加修改android端代码
(1)将下载的友盟demo中的两个java文件复制进app中
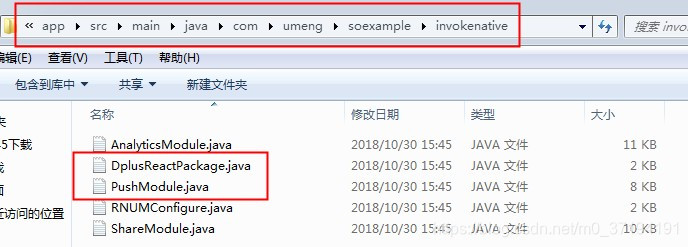
记得修改文件的包名
打开DplusReactPackage这个java类,在这个地方需要进行修改
  /**
     * 如需要添加本地方法,只需在这里add
     *
     * @param reactContext
     * @return
     */
    @Override
    public List<NativeModule> createNativeModules(
        ReactApplicationContext reactContext) {
        List<NativeModule> modules = new ArrayList<>();
        modules.add(new ShareModule(reactContext));//友盟分享的集成
        modules.add(new PushModule(reactContext));//友盟推送的集成
        return modules;
    }
这个方法默认是添加了分享,推送以及统计三个功能的module类,如果只需要且只集成了推送,这个地方只需要留下
modules.add(new PushModule(reactContext));
即可。
(2)资源文件的引入。
将demo中的资源文件导入到项目中,包括android\app\src\main\res中的layout以及drawable中的图片,如果要修改接收到消息的图标(默认是友盟的U型图标),可以将drawable中的图标进行替换。

(3)修改MainApplication中的代码并实现携带参数跳转指定js界面:
MainApplication的修改可以仿照友盟demo中的MainApplication进行
package com.umeng.soexample;

import java.util.Arrays;
import java.util.List;

import android.app.Application;
import android.app.Notification;
import android.content.Context;
import android.os.Handler;
import android.widget.RemoteViews;
import android.widget.Toast;
import com.facebook.react.ReactApplication;
import com.facebook.react.ReactNativeHost;
import com.facebook.react.ReactPackage;
import com.facebook.react.shell.MainReactPackage;
import com.facebook.soloader.SoLoader;
import com.umeng.commonsdk.UMConfigure;
import com.umeng.message.IUmengRegisterCallback;
import com.umeng.message.MsgConstant;
import com.umeng.message.PushAgent;
import com.umeng.message.UTrack;
import com.umeng.message.UmengMessageHandler;
import com.umeng.message.UmengNotificationClickHandler;
import com.umeng.message.common.UmLog;
import com.umeng.message.entity.UMessage;
import com.umeng.socialize.PlatformConfig;
import com.umeng.soexample.invokenative.DplusReactPackage;
import com.umeng.soexample.invokenative.RNUMConfigure;

public class MainApplication extends Application implements ReactApplication {

    private static final String TAG = MainApplication.class.getName();
    private Handler handler;

    private final ReactNativeHost mReactNativeHost = new ReactNativeHost(this) {
        @Override
        public boolean getUseDeveloperSupport() {
            return BuildConfig.DEBUG;
        }

        @Override
        protected List<ReactPackage> getPackages() {
            return Arrays.<ReactPackage>asList(
                new MainReactPackage(),
                new DplusReactPackage()
            );
        }
    };

    @Override
    public ReactNativeHost getReactNativeHost() {
        return mReactNativeHost;
    }

    @Override
    public void onCreate() {
        super.onCreate();
        SoLoader.init(this, /* native exopackage */ false);
        UMConfigure.setLogEnabled(true);
        //初始化组件化基础库, 统计SDK/推送SDK/分享SDK都必须调用此初始化接口
        RNUMConfigure.init(this, "你自己友盟app的appkey", "Umeng", UMConfigure.DEVICE_TYPE_PHONE,
            "你自己的Umeng Message Secret");
        initUpush();
    }

    private void initUpush() {
        PushAgent mPushAgent = PushAgent.getInstance(this);
        handler = new Handler(getMainLooper());

        //sdk开启通知声音
        mPushAgent.setNotificationPlaySound(MsgConstant.NOTIFICATION_PLAY_SDK_ENABLE);
        // sdk关闭通知声音
        //		mPushAgent.setNotificationPlaySound(MsgConstant.NOTIFICATION_PLAY_SDK_DISABLE);
        // 通知声音由服务端控制
        //		mPushAgent.setNotificationPlaySound(MsgConstant.NOTIFICATION_PLAY_SERVER);

        //		mPushAgent.setNotificationPlayLights(MsgConstant.NOTIFICATION_PLAY_SDK_DISABLE);
        //		mPushAgent.setNotificationPlayVibrate(MsgConstant.NOTIFICATION_PLAY_SDK_DISABLE);


        UmengMessageHandler messageHandler = new UmengMessageHandler() {
            /**
             * 自定义消息的回调方法
             */
            @Override
            public void dealWithCustomMessage(final Context context, final UMessage msg) {

                handler.post(new Runnable() {

                    @Override
                    public void run() {
                        // TODO Auto-generated method stub
                        // 对自定义消息的处理方式,点击或者忽略
                        boolean isClickOrDismissed = true;
                        if (isClickOrDismissed) {
                            //自定义消息的点击统计
                            UTrack.getInstance(getApplicationContext()).trackMsgClick(msg);
                        } else {
                            //自定义消息的忽略统计
                            UTrack.getInstance(getApplicationContext()).trackMsgDismissed(msg);
                        }
                        Toast.makeText(context, msg.custom, Toast.LENGTH_LONG).show();
                    }
                });
            }

            /**
             * 自定义通知栏样式的回调方法
             */
            @Override
            public Notification getNotification(Context context, UMessage msg) {
                switch (msg.builder_id) {
                    case 1:
                        Notification.Builder builder = new Notification.Builder(context);
                        RemoteViews myNotificationView = new RemoteViews(context.getPackageName(), R.layout.notification_view);
                        myNotificationView.setTextViewText(R.id.notification_title, msg.title);
                        myNotificationView.setTextViewText(R.id.notification_text, msg.text);
                        myNotificationView.setImageViewBitmap(R.id.notification_large_icon, getLargeIcon(context, msg));
                        myNotificationView.setImageViewResource(R.id.notification_small_icon, getSmallIconId(context, msg));
                        builder.setContent(myNotificationView)
                            .setSmallIcon(getSmallIconId(context, msg))
                            .setTicker(msg.ticker)
                            .setAutoCancel(true);

                        return builder.getNotification();
                    default:
                        //默认为0,若填写的builder_id并不存在,也使用默认。
                        return super.getNotification(context, msg);
                }
            }
        };
        mPushAgent.setMessageHandler(messageHandler);

        /**
         * 自定义行为的回调处理,参考文档:高级功能-通知的展示及提醒-自定义通知打开动作
         * UmengNotificationClickHandler是在BroadcastReceiver中被调用,故
         * 如果需启动Activity,需添加Intent.FLAG_ACTIVITY_NEW_TASK
         * */
        UmengNotificationClickHandler notificationClickHandler = new UmengNotificationClickHandler() {
            @Override
            public void dealWithCustomAction(Context context, UMessage msg) {
                Toast.makeText(context, msg.custom, Toast.LENGTH_LONG).show();
            }
        };
        //使用自定义的NotificationHandler,来结合友盟统计处理消息通知,参考http://bbs.umeng.com/thread-11112-1-1.html
        //CustomNotificationHandler notificationClickHandler = new CustomNotificationHandler();
        mPushAgent.setNotificationClickHandler(notificationClickHandler);


        //注册推送服务 每次调用register都会回调该接口
        mPushAgent.register(new IUmengRegisterCallback() {
            @Override
            public void onSuccess(String deviceToken) {
                UmLog.i(TAG, "device token: " + deviceToken);
            }

            @Override
            public void onFailure(String s, String s1) {
                UmLog.i(TAG, "register failed: " + s + " " + s1);
            }
        });
    }


    {

        PlatformConfig.setWeixin("wxdc1e388c3822c80b", "3baf1193c85774b3fd9d18447d76cab0");
        //豆瓣RENREN平台目前只能在服务器端配置
        PlatformConfig.setSinaWeibo("3921700954", "04b48b094faeb16683c32669824ebdad", "http://sns.whalecloud.com");
        PlatformConfig.setYixin("yxc0614e80c9304c11b0391514d09f13bf");
        PlatformConfig.setQQZone("100424468", "c7394704798a158208a74ab60104f0ba");

    }
}
这个MainApplication是比较全的,不过还需要添加一些地方来实现打开指定js界面:
 /**
           * 自定义行为的回调处理,参考文档:高级功能-通知的展示及提醒-自定义通知打开动作
           * UmengNotificationClickHandler是在BroadcastReceiver中被调用,故
           * 如果需启动Activity,需添加Intent.FLAG_ACTIVITY_NEW_TASK
           * */
          UmengNotificationClickHandler notificationClickHandler = new UmengNotificationClickHandler() {
		//自定义行为的回调
              @Override
              public void dealWithCustomAction(Context context, UMessage msg) {
               Log.i(TAG, "dealWithCustomAction="+msg.toString());
                  Toast.makeText(context, msg.custom, Toast.LENGTH_LONG).show();
              }
		//打开某一个界面的回调
              @Override
              public void openActivity(Context context, UMessage uMessage) {

              }
//启动app的回调
              @Override
              public void launchApp(Context context, UMessage uMessage){
                  super.launchApp(context, uMessage);
              }
//打开网址的回调
              @Override
              public void openUrl(Context context, UMessage uMessage){
                  super.openUrl(context, uMessage);
              }
          };
这块的四个方法分别对应你推送的消息的功能,打开网页,打开app,打开app中某个界面,自定义行为的回调,会在你点击接收到的消息的时候调用。
这里对打开某一界面的消息回调进行处理,代码如下:
 @Override
              public void openActivity(Context context, UMessage uMessage) {
                  Log.i(TAG, "openActivity:type="+uMessage.extra.get("type"));
                  String type=uMessage.extra.get("type");
                  String id=uMessage.extra.get("id");                  MainApplication.this.getReactNativeHost().getReactInstanceManager().getCurrentReactContext().getJSModule(DeviceEventManagerModule.RCTDeviceEventEmitter.class).emit("PUSH_MESSAGE",type+","+id);
              }
消息传递时的参数是在uMessage.extra中,可以通过uMessage.extra.get(自定义参数名)来获取。这个稍后会有具体讲到。
因为RN只存在一个MainActivity界面,所以在打开界面时需要进行android原生与js界面的交互,这里可以直接调用
`getReactNativeHost().getReactInstanceManager().getCurrentReactContext().getJSModule(DeviceEventManagerModule.RCTDeviceEventEmitter.class).emit("PUSH_MESSAGE",type+","+id)
方法进行消息的发送。
注意导包:import com.facebook.react.modules.core.DeviceEventManagerModule;
同时在js中进行消息的接收,接收之后就可以按type与id进行各种跳转了。
  this.pushEmitterListen = DeviceEventEmitter.addListener('PUSH_MESSAGE', (data) => {
            let params=data.toString().split(',');
            let type=params[0]
            let id=params[1]
        });
(4)修改MainActivity中的代码
在MainActivity的onCreat方法中添加配置,注意导包。
@Override
            protected void onCreate(Bundle savedInstanceState) {
              //SplashScreen.show(this);  // 添加这一句
              super.onCreate(savedInstanceState);
           、、、
              PushModule.initPushSDK(this);
              PushAgent.getInstance(this).onAppStart();PushAgent.getInstance(this).onAppStart();
            }
这样就配置完android中的代码
3.发送推送消息
点击进入友盟推送首页
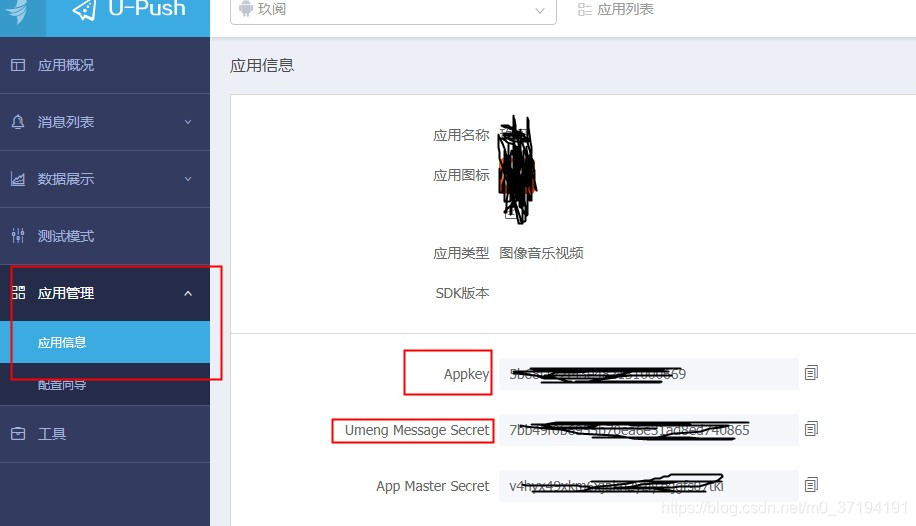
进入之后点击立即使用按钮可以跳转界面进行应用的新建,新建完成应用之后可以在这个地方查看应用的appkey和友盟secret,配置到MainApplication中。
创建完成应用之后就可以进行消息推送
第一步编辑消息不再描述,第二步有一个单独用户推送会需要填写一个devicetoken,这个token是在MainApplicaiton中通过方法获取到的,可以查看日志
    //注册推送服务 每次调用register都会回调该接口
        mPushAgent.register(new IUmengRegisterCallback() {
            @Override
            public void onSuccess(String deviceToken) {
                UmLog.i(TAG, "device token: " + deviceToken);获取到的手机的token
            }

            @Override
            public void onFailure(String s, String s1) {
                UmLog.i(TAG, "register failed: " + s + " " + s1);
            }
        });
    }
第三步在选择时,大部分应该都是选择打开指定界面
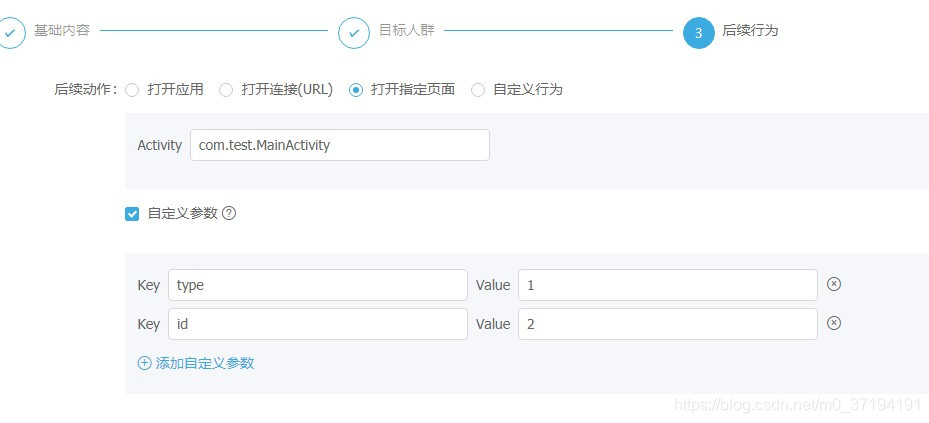
RN只有MainActivity界面,所以这个填包名加类名就好,自定义参数添加上需要传递的参数,点击确定之后会有一个消息预览
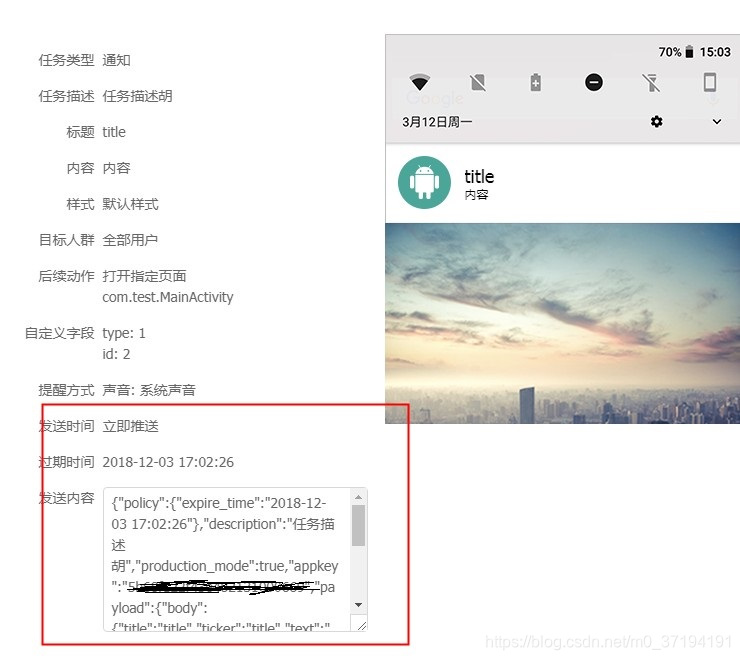
这个红框中就是接收到的UMessage,是一个json。这边咱们添加的json如下:
{"policy":{"expire_time":"2018-12-03 17:02:26"},
"description":"任务描述胡",
"production_mode":true,
"appkey":"自己的appkey",
"payload":{"body":{"title":"title","ticker":"title","text":"内容","after_open":"go_activity","activity":"com.test.MainActivity","play_vibrate":"false","play_lights":"false","play_sound":"true"},
"display_type":"notification",
"extra":{"type":"1","id":"2"}},"type":"broadcast","timestamp":"1543569984459"}
很明显这个extra字段里边就是咱们填入的自定义参数key和value。所以获取到之后可以通过
@Override
              public void openActivity(Context context, UMessage uMessage) {
                  Log.i(TAG, "openActivity:type="+uMessage.extra.get("type"));
                  String type=uMessage.extra.get("type");
                  String id=uMessage.extra.get("id");
                  MainApplication.this.getReactNativeHost().getReactInstanceManager().getCurrentReactContext().getJSModule(DeviceEventManagerModule.RCTDeviceEventEmitter.class).emit("PUSH_MESSAGE",type+","+id);
              }
来获取并传递到js代码中。