1. 创建一个空目录 RNDemo
2. 在RNDemo中创建一个子目录 android
3. 将android 项目拷贝到子目录 android 中,如下项目结构。 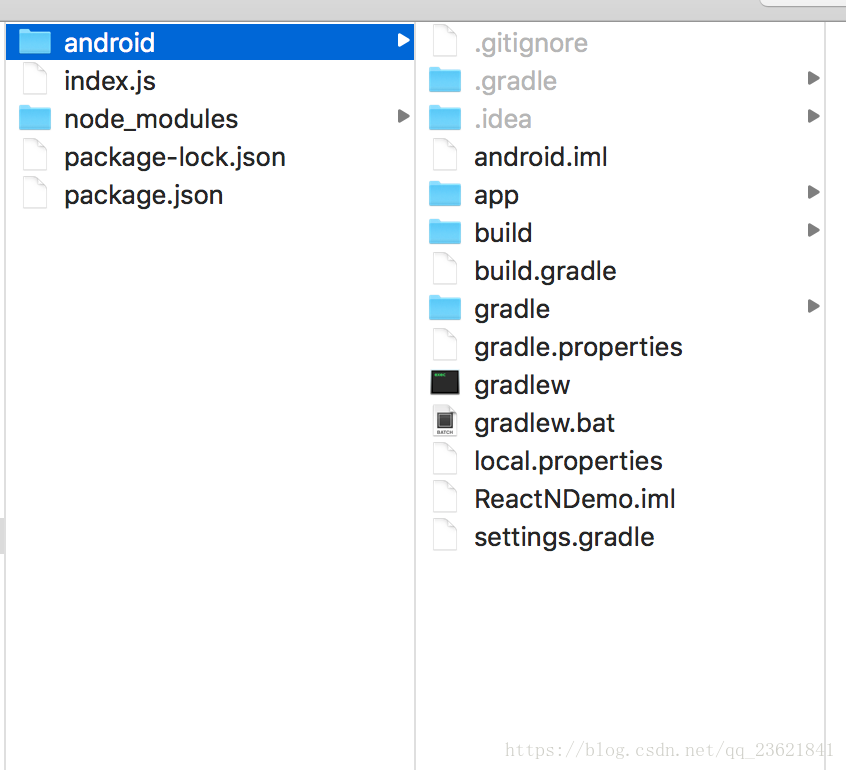
4. 在RNDemo中创建package.json文件添加如下内容:
{
  "name": "MyReactNativeApp",
  "version": "0.0.1",
  "private": true,
  "scripts": {
    "start": "node node_modules/react-native/local-cli/cli.js start"
  },
  "dependencies": {
    "react": "16.0.0-alpha.6",
    "react-native": "0.44.3"
  }
}5.在RNDemo根目录下执行命令:
npm install命令执行完会生成node_modules/目录,(所有通过npm install命令安装的模块都会放在这个目录中。这个目录我们原则上不复制、不移动、不修改、不上传,随用随装)。
6.在你的app中 build.gradle 文件中添加 React Native 依赖:
 dependencies {
     ...
     compile "com.facebook.react:react-native:+" // From node_modules.
}7.在项目的 build.gradle 文件中为 React Native 添加一个 maven 依赖的入口,必须写在 “allprojects” 代码块中:
allprojects {
    repositories {
        ...
        maven {
            // All of React Native (JS, Android binaries) is installed from npm
            url "$rootDir/../node_modules/react-native/android"
        }
    }
    ...
}
//确保依赖路径的正确!以免在 Android Studio 运行Gradle同步构建时抛出 “Failed to resolve: com.facebook.react:react-native:0.x.x" 异常。
配置权限
接着,在 AndroidManifest.xml 清单文件中声明网络
<uses-permission android:name="android.permission.INTERNET" />要访问 DevSettingsActivity 界面(即开发者菜单),则还需要在 AndroidManifest.xml 中声明:
<activity android:name="com.facebook.react.devsupport.DevSettingsActivity" />开发者菜单一般仅用于在开发时从Packager服务器刷新JavaScript代码,所以在正式发布时你可以去掉这一权限。
代码集成
1.在RNDemo根目录创建index.js(在0.49版本之前是index.android.js文件)
2.添加代码:
import React from 'react';
import {
  AppRegistry,
  StyleSheet,
  Text,
  View
} from 'react-native';

class HelloWorld extends React.Component {
  render() {
    return (
      <View style={styles.container}>
        <Text style={styles.hello}>Hello, World</Text>
      </View>
    )
  }
}
var styles = StyleSheet.create({
  container: {
    flex: 1,
    justifyContent: 'center',
  },
  hello: {
    fontSize: 20,
    textAlign: 'center',
    margin: 10,
  },
});

AppRegistry.registerComponent('MyReactNativeApp', () => HelloWorld);
3 . 配置权限以便开发中的红屏错误能正确显示
如果你的应用会运行在Android 6.0(API level 23)或更高版本,请确保你在开发版本中有打开悬浮窗(overlay)权限
if (Build.VERSION.SDK_INT >= Build.VERSION_CODES.M) {
    if (!Settings.canDrawOverlays(this)) {
        Intent intent = new Intent(Settings.ACTION_MANAGE_OVERLAY_PERMISSION,
                                   Uri.parse("package:" + getPackageName()));
        startActivityForResult(intent, OVERLAY_PERMISSION_REQ_CODE);
    }
}
@Override
protected void onActivityResult(int requestCode, int resultCode, Intent data) {
if (requestCode == OVERLAY_PERMISSION_REQ_CODE) {
if (Build.VERSION.SDK_INT >= Build.VERSION_CODES.M) {
if (!Settings.canDrawOverlays(this)) {
// SYSTEM_ALERT_WINDOW permission not granted...
}
}
}
}4.
public class MyReactActivity extends Activity implements DefaultHardwareBackBtnHandler {
    private ReactRootView mReactRootView;
    private ReactInstanceManager mReactInstanceManager;

    @Override
    protected void onCreate(Bundle savedInstanceState) {
        super.onCreate(savedInstanceState);

        mReactRootView = new ReactRootView(this);
        mReactInstanceManager = ReactInstanceManager.builder()
                .setApplication(getApplication())
                .setBundleAssetName("index.android.bundle")
                .setJSMainModuleName("index.android")
                .addPackage(new MainReactPackage())
                .setUseDeveloperSupport(BuildConfig.DEBUG)
                .setInitialLifecycleState(LifecycleState.RESUMED)
                .build();

        // 注意这里的MyReactNativeApp必须对应“index.android.js”中的
        // “AppRegistry.registerComponent()”的第一个参数
        mReactRootView.startReactApplication(mReactInstanceManager, "MyReactNativeApp", null);

        setContentView(mReactRootView);
    }

    @Override
    public void invokeDefaultOnBackPressed() {
        super.onBackPressed();
    }
@Override
protected void onPause() {
    super.onPause();

    if (mReactInstanceManager != null) {
        mReactInstanceManager.onHostPause(this);
    }
}

@Override
protected void onResume() {
    super.onResume();

    if (mReactInstanceManager != null) {
        mReactInstanceManager.onHostResume(this, this);
    }
}

@Override
protected void onDestroy() {
    super.onDestroy();

    if (mReactInstanceManager != null) {
        mReactInstanceManager.onHostDestroy();
    }
}

@Override
 public void onBackPressed() {
    if (mReactInstanceManager != null) {
        mReactInstanceManager.onBackPressed();
    } else {
        super.onBackPressed();
    }
}

@Override
public boolean onKeyUp(int keyCode, KeyEvent event) {
    if (keyCode == KeyEvent.KEYCODE_MENU && mReactInstanceManager != null) {
        mReactInstanceManager.showDevOptionsDialog();
        return true;
    }
    return super.onKeyUp(keyCode, event);
}
}
运行测试结果
npm startreact-native run-android