版权声明:本文为博主原创文章,未经博主允许不得转载。 https://blog.csdn.net/byhook/article/details/84649038
音视频实践学习
- android全平台编译ffmpeg以及x264与fdk-aac实践
- ubuntu下使用nginx和nginx-rtmp-module配置直播推流服务器
- android全平台编译ffmpeg合并为单个库实践
- android-studio使用cmake编译ffmpeg实践
- android全平台下基于ffmpeg解码MP4视频文件为YUV文件
- android全平台编译ffmpeg支持命令行实践
- android全平台基于ffmpeg解码本地MP4视频推流到RTMP服务器
- android平台下音频编码之编译LAME库转码PCM为MP3
- ubuntu平台下编译vlc-android视频播放器实践
- 图解YU12、I420、YV12、NV12、NV21、YUV420P、YUV420SP、YUV422P、YUV444P的区别
- 图解RGB565、RGB555、RGB16、RGB24、RGB32、ARGB32等格式的区别
- YUV420P、YUV420SP、NV12、NV21和RGB互相转换并存储为JPEG以及PNG图片
- android全平台编译libyuv库实现YUV和RGB的转换
- android平台下基于ffmpeg对相机采集的NV21数据编码为MP4视频文件
- android平台下基于ffmpeg采集Camera数据编码成H.264推流到RTMP服务器
- android平台下基于ffmpeg和ANativeWindow实现简单的视频播放器
概述
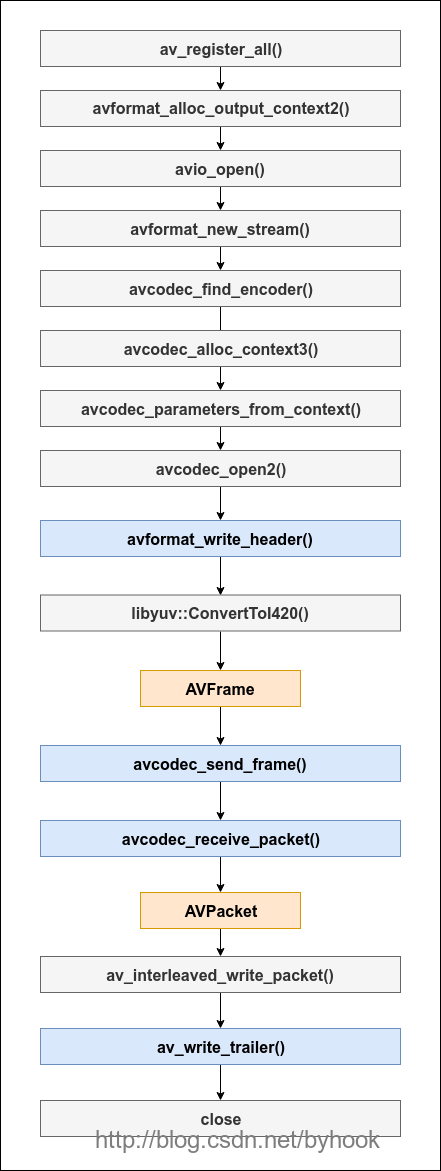
之前的博客有写过基于libjpeg库实现对YUV数据转换存储为JPEG图片,而ffmpeg库中已经自带了jpeg的编解码库,所以直接使用也很方便,直播中对相机的各种处理很多,尤其是对相机数据编码这块,现在以雷神博客中的一个例子实践一下这个过程,由于时间比较久远,部分API笔者有作变更,也整理了一下流程图。
环境配置
操作系统:ubuntu 16.05
ndk版本:android-ndk-r16b
ffmpeg版本:ffmpeg-3.3.8
流程分析
相机输出的格式是NV21的格式,这里笔者直接使用libyuv库进行转码,更高效,更方便。
工程实践
基于之前的工程ffmpeg-camera-encode。新增encode_jpeg.cpp和encode_jpeg.h两个文件:
class JPEGEncoder {

private:

    int width = 0;
    int height = 0;

    int bufferSize = 0;

    char jpegPath[256] = {0};

    AVFormatContext *pFormatCtx = NULL;
    AVStream *pStream = NULL;
    AVCodecContext *pCodecCtx = NULL;
    AVCodec *pCodec = NULL;
    SwsContext *sws_ctx = NULL;
    uint8_t *out_buffer = NULL;
    AVFrame *pFrame = NULL;
    AVPacket avPacket;

    bool transform = false;

public:

    JPEGEncoder(const char *jpegPath, int width, int height);
    ~JPEGEncoder();

    int EncodeJPEG(unsigned char *nv21Buffer);


    bool isTransform();

};
源码文件实现:
#include <libyuv.h>
#include "logger.h"
#include "encode_jpeg.h"


JPEGEncoder::JPEGEncoder(const char *inputPath, int width, int height) {
    this->width = width;
    this->height = height;
    memcpy(jpegPath,inputPath,256);

    //1.注册所有组件
    av_register_all();
    //2. 初始化输出码流的AVFormatContext
    avformat_alloc_output_context2(&pFormatCtx, NULL, NULL, jpegPath);

    //3.打开待输出的视频文件
    if (avio_open(&pFormatCtx->pb, jpegPath, AVIO_FLAG_READ_WRITE)) {
        LOGE("Could not open output file");
        return;
    }
    //4.初始化视频码流
    pStream = avformat_new_stream(pFormatCtx, NULL);
    if (pStream == NULL) {
        LOGE("Could not allocating output stream");
        return;
    }
    //5.寻找编码器并打开编码器
    pCodec = avcodec_find_encoder(AV_CODEC_ID_MJPEG);
    if (!pCodec) {
        LOGE("Could not find encoder");
        return;
    }

    //6.分配编码器并设置参数
    pCodecCtx = avcodec_alloc_context3(pCodec);
    pCodecCtx->codec_id = pCodec->id;
    pCodecCtx->codec_type = AVMEDIA_TYPE_VIDEO;

    pCodecCtx->pix_fmt = AV_PIX_FMT_YUVJ420P;
    pCodecCtx->width = height;
    pCodecCtx->height = width;
    pCodecCtx->time_base.num = 1;
    pCodecCtx->time_base.den = 25;
    pCodecCtx->bit_rate = 400000;
    pCodecCtx->gop_size = 12;

    //将AVCodecContext的成员复制到AVCodecParameters结构体
    avcodec_parameters_from_context(pStream->codecpar, pCodecCtx);

    //7.打开编码器
    int ret = avcodec_open2(pCodecCtx, pCodec, NULL);
    if (ret < 0) {
        LOGE("Could not open encoder");
        return;
    }

    this->transform = true;
}

JPEGEncoder::~JPEGEncoder() {
    avcodec_close(pCodecCtx);
    av_free(pFrame);
    avio_close(pFormatCtx->pb);
    avformat_free_context(pFormatCtx);
}

int JPEGEncoder::EncodeJPEG(unsigned char *nv21Buffer) {
    //初始化帧
    pFrame = av_frame_alloc();
    pFrame->width = pCodecCtx->width;
    pFrame->height = pCodecCtx->height;
    pFrame->format = pCodecCtx->pix_fmt;
    int bufferSize = av_image_get_buffer_size(pCodecCtx->pix_fmt, pCodecCtx->width,
                                              pCodecCtx->height, 1);
    out_buffer = (uint8_t *) av_malloc(bufferSize);
    av_image_fill_arrays(pFrame->data, pFrame->linesize, out_buffer, pCodecCtx->pix_fmt,
                         pCodecCtx->width, pCodecCtx->height, 1);

    //8.写文件头
    avformat_write_header(pFormatCtx, NULL);

    //创建已编码帧
    av_new_packet(&avPacket, bufferSize * 3);

    uint8_t *i420_y = out_buffer;
    uint8_t *i420_u = out_buffer + width * height;
    uint8_t *i420_v = out_buffer + width * height * 5 / 4;

    //NV21转I420
    libyuv::ConvertToI420(nv21Buffer, width * height, i420_y, height, i420_u, height / 2, i420_v,
                          height / 2, 0, 0, width, height, width, height, libyuv::kRotate270,
                          libyuv::FOURCC_NV21);

    //这里可以再作一次镜像翻转,不然你看到的前置相机的图片是反向的

    pFrame->data[0] = i420_y;
    pFrame->data[1] = i420_u;
    pFrame->data[2] = i420_v;

    if (avcodec_send_frame(pCodecCtx, pFrame) < 0) {
        return -1;
    }
    while (avcodec_receive_packet(pCodecCtx, &avPacket) == 0) {
        avPacket.stream_index = pStream->index;
        av_interleaved_write_frame(pFormatCtx, &avPacket);
        av_packet_unref(&avPacket);
    }

    //9.写文件尾
    av_write_trailer(pFormatCtx);
    return 0;
}

bool JPEGEncoder::isTransform() {
    return transform;
}
注意:可以对比上面的流程图来梳理具体的逻辑,其实对于ffmpeg多实践几个示例,它常用的编码解码核心函数就那么多,上面在转码的过程中用到了libyuv库,因为android相机默认是输出NV21格式的,需要转换城YUV420P格式,然后旋转270度,才能得到宽高比正常的图片,否则显示的就是横屏的图片。
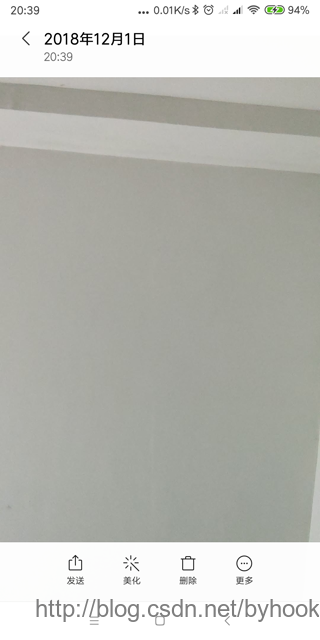
最终输出的JPEG图片可以直接在应用内打开
项目地址:ffmpeg-camera-encode
https://github.com/byhook/ffmpeg4android
参考:
https://blog.csdn.net/leixiaohua1020/article/details/25346147