微服务系统是一个分布式架构,一个微服务系统往往有很多服务单元。由于服务数量众多,业务的复杂性较高,如果出现了错误和异常,很难去定位,主要体现在一个请求可能需要调用很多个服务,而内部服务的调用复杂性决定了问题难以定位。所以在微服务架构中,必须实现分布式链路追踪,去跟进一个请求到底有哪些服务参与,参与的顺序又是怎样的,从而达到每个请求的步骤清晰可见,出了问题能快速定位。
常见的链路追踪组件有 Google 的 Dapper、Twitter 的 Zipkin 以及 阿里的 Eagleeye,这里主要讲述如何在 Spring Cloud Sleuth 中 集成 Zipkin,非常简单,只需要引入相关的依赖并做相关配置即可。
案例
本例采用 Maven 多模块结构,一共有 4 个工程,eureka-server 作为服务注册中心,zipkin-server 作为链路追踪服务中心,负责存储链路数据,gateway-service 作为网关服务工程,负责请求的转发,同时也作为链路追踪客户端,负责产生链路数据,并上传给 zipkin-server,user-service 是一个服务提供者,对外暴露 API 接口,同时也作为链路追踪客户端,产生链路数据。
创建父项目
新建一个 Maven 工程 spring-cloud-sleuth 作为父项目,其 pom 文件如下:
<?xml version="1.0" encoding="UTF-8"?>
<project xmlns="http://maven.apache.org/POM/4.0.0"
         xmlns:xsi="http://www.w3.org/2001/XMLSchema-instance"
         xsi:schemaLocation="http://maven.apache.org/POM/4.0.0 http://maven.apache.org/xsd/maven-4.0.0.xsd">
    <modelVersion>4.0.0</modelVersion>

    <groupId>com.wuychn</groupId>
    <artifactId>spring-cloud-sleuth</artifactId>
    <packaging>pom</packaging>
    <version>1.0-SNAPSHOT</version>
    <modules>
        <module>eureka-server</module>
        <module>zipkin-server</module>
        <module>user-service</module>
        <module>gateway-service</module>
    </modules>

    <parent>
        <groupId>org.springframework.boot</groupId>
        <artifactId>spring-boot-starter-parent</artifactId>
        <version>2.0.6.RELEASE</version>
    </parent>

    <properties>
        <project.build.sourceEncoding>UTF-8</project.build.sourceEncoding>
        <project.reporting.outputEncoding>UTF-8</project.reporting.outputEncoding>
        <java.version>1.8</java.version>
        <spring.cloud.version>Finchley.RELEASE</spring.cloud.version>
    </properties>

    <dependencyManagement>
        <dependencies>
            <dependency>
                <groupId>org.springframework.cloud</groupId>
                <artifactId>spring-cloud-dependencies</artifactId>
                <version>${spring.cloud.version}</version>
                <type>pom</type>
                <scope>import</scope>
            </dependency>
        </dependencies>
    </dependencyManagement>

</project>
创建 eureka-server
在父项目下新建一个 eureka-server 作为服务注册中心,其 pom 文件如下:
<?xml version="1.0" encoding="UTF-8"?>
<project xmlns="http://maven.apache.org/POM/4.0.0"
         xmlns:xsi="http://www.w3.org/2001/XMLSchema-instance"
         xsi:schemaLocation="http://maven.apache.org/POM/4.0.0 http://maven.apache.org/xsd/maven-4.0.0.xsd">
    <parent>
        <artifactId>spring-cloud-sleuth</artifactId>
        <groupId>com.wuychn</groupId>
        <version>1.0-SNAPSHOT</version>
    </parent>
    <modelVersion>4.0.0</modelVersion>

    <artifactId>eureka-server</artifactId>

    <dependencies>
        <dependency>
            <groupId>org.springframework.cloud</groupId>
            <artifactId>spring-cloud-starter-netflix-eureka-server</artifactId>
        </dependency>

        <dependency>
            <groupId>org.springframework.boot</groupId>
            <artifactId>spring-boot-starter-web</artifactId>
        </dependency>
    </dependencies>

    <build>
        <plugins>
            <plugin>
                <groupId>org.springframework.boot</groupId>
                <artifactId>spring-boot-maven-plugin</artifactId>
            </plugin>
        </plugins>
    </build>


</project>
application.yml:
server:
  port: 9001
spring:
  application:
    name: eureka-server
eureka:
  instance:
    hostname: localhost
  client:
    fetch-registry: false
    register-with-eureka: false
    serviceUrl:
      defaultZone: http://localhost:9001/eureka/
程序启动类:
package com.wuychn;

import org.springframework.boot.SpringApplication;
import org.springframework.boot.autoconfigure.SpringBootApplication;
import org.springframework.cloud.netflix.eureka.server.EnableEurekaServer;

@SpringBootApplication
@EnableEurekaServer
public class EurekaServerApplication {

    public static void main(String[] args) {
        SpringApplication.run(EurekaServerApplication.class, args);
    }
}
创建 zipkin-server
在父项目下新建一个 zipkin-server 作为链路追踪服务中心,其 pom 文件如下:
<?xml version="1.0" encoding="UTF-8"?>
<project xmlns="http://maven.apache.org/POM/4.0.0"
         xmlns:xsi="http://www.w3.org/2001/XMLSchema-instance"
         xsi:schemaLocation="http://maven.apache.org/POM/4.0.0 http://maven.apache.org/xsd/maven-4.0.0.xsd">
    <parent>
        <artifactId>spring-cloud-sleuth</artifactId>
        <groupId>com.wuychn</groupId>
        <version>1.0-SNAPSHOT</version>
    </parent>
    <modelVersion>4.0.0</modelVersion>

    <artifactId>zipkin-server</artifactId>

    <dependencies>
        <dependency>
            <groupId>org.springframework.cloud</groupId>
            <artifactId>spring-cloud-starter-netflix-eureka-client</artifactId>
        </dependency>

        <dependency>
            <groupId>io.zipkin.java</groupId>
            <artifactId>zipkin-server</artifactId>
            <version>2.8.4</version>
        </dependency>

        <dependency>
            <groupId>io.zipkin.java</groupId>
            <artifactId>zipkin-autoconfigure-ui</artifactId>
            <version>2.8.4</version>
        </dependency>
    </dependencies>


</project>
程序启动类:
package com.wuychn;

import org.springframework.boot.SpringApplication;
import org.springframework.boot.autoconfigure.SpringBootApplication;
import org.springframework.cloud.netflix.eureka.EnableEurekaClient;
import zipkin.server.internal.EnableZipkinServer;

@SpringBootApplication
@EnableZipkinServer
@EnableEurekaClient
public class ZipkinServerApplication {

    public static void main(String[] args) {
        SpringApplication.run(ZipkinServerApplication.class, args);
    }
}
application.yml:
server:
  port: 9008

spring:
  application:
    name: zipkin-server

eureka:
  client:
    serviceUrl:
      defaultZone: http://localhost:9001/eureka/

management:
  metrics:
    web:
      server:
        auto-time-requests: false
创建 user-service
在父项目下新建一个 user-server 作为服务提供者和链路追踪客户端,其 pom 文件如下:

<?xml version="1.0" encoding="UTF-8"?>
<project xmlns="http://maven.apache.org/POM/4.0.0"
         xmlns:xsi="http://www.w3.org/2001/XMLSchema-instance"
         xsi:schemaLocation="http://maven.apache.org/POM/4.0.0 http://maven.apache.org/xsd/maven-4.0.0.xsd">
    <parent>
        <artifactId>spring-cloud-sleuth</artifactId>
        <groupId>com.wuychn</groupId>
        <version>1.0-SNAPSHOT</version>
    </parent>
    <modelVersion>4.0.0</modelVersion>

    <artifactId>user-service</artifactId>

    <dependencies>
        <dependency>
            <groupId>org.springframework.cloud</groupId>
            <artifactId>spring-cloud-starter-netflix-eureka-client</artifactId>
        </dependency>

        <dependency>
            <groupId>org.springframework.boot</groupId>
            <artifactId>spring-boot-starter-web</artifactId>
        </dependency>

        <dependency>
            <groupId>org.springframework.cloud</groupId>
            <artifactId>spring-cloud-starter-zipkin</artifactId>
        </dependency>
    </dependencies>

</project>
application.yml;
server:
  port: 9002

spring:
  application:
    name: user-service
  zipkin:
    base-url: http://localhost:9008
  sleuth:
    sampler:
      percentage: 1.0

eureka:
  client:
    serviceUrl:
      defaultZone: http://localhost:9001/eureka/
其中,spring.zipkin.base-url 指定 Zipkin Server 的地址,spring.sleuth.sampler.percentage 为 1.0,即以 100% 的概率将链路追踪的数据上传给 Zipkin Server,该值默认为 0.1。
程序启动类:
package com.wuychn;

import org.springframework.boot.SpringApplication;
import org.springframework.boot.autoconfigure.SpringBootApplication;
import org.springframework.cloud.netflix.eureka.EnableEurekaClient;
import org.springframework.web.bind.annotation.GetMapping;
import org.springframework.web.bind.annotation.RequestMapping;
import org.springframework.web.bind.annotation.RestController;

@SpringBootApplication
@EnableEurekaClient
@RestController
@RequestMapping("/user")
public class UserServiceApplication {

    public static void main(String[] args) {
        SpringApplication.run(UserServiceApplication.class, args);
    }

    @GetMapping("/hi")
    public String hi() {
        return "Hi!";
    }
}
创建 gateway-service
在父项目下新建一个 gateway-server 作为服务网关,将请求转发到 user-service,同时作为 Zipkin 客户端产生链路数据。其 pom 文件如下:
<?xml version="1.0" encoding="UTF-8"?>
<project xmlns="http://maven.apache.org/POM/4.0.0"
         xmlns:xsi="http://www.w3.org/2001/XMLSchema-instance"
         xsi:schemaLocation="http://maven.apache.org/POM/4.0.0 http://maven.apache.org/xsd/maven-4.0.0.xsd">
    <parent>
        <artifactId>spring-cloud-sleuth</artifactId>
        <groupId>com.wuychn</groupId>
        <version>1.0-SNAPSHOT</version>
    </parent>
    <modelVersion>4.0.0</modelVersion>

    <artifactId>gateway-service</artifactId>

    <dependencies>
        <dependency>
            <groupId>org.springframework.cloud</groupId>
            <artifactId>spring-cloud-starter-netflix-eureka-client</artifactId>
        </dependency>

        <dependency>
            <groupId>org.springframework.boot</groupId>
            <artifactId>spring-boot-starter-web</artifactId>
        </dependency>

        <dependency>
            <groupId>org.springframework.cloud</groupId>
            <artifactId>spring-cloud-starter-zipkin</artifactId>
        </dependency>

        <dependency>
            <groupId>org.springframework.cloud</groupId>
            <artifactId>spring-cloud-starter-netflix-zuul</artifactId>
        </dependency>
    </dependencies>


</project>
application.yml:
server:
  port: 9999

spring:
  application:
    name: gateway-service
  zipkin:
    base-url: http://localhost:9008
  sleuth:
    sampler:
      percentage: 1.0

eureka:
  client:
    serviceUrl:
      defaultZone: http://localhost:9001/eureka/

zuul:
  routes:
    user-service-api:
      path: /user-api/**
      serviceId: user-service
程序启动类:
package com.wuychn;

import org.springframework.boot.SpringApplication;
import org.springframework.boot.autoconfigure.SpringBootApplication;
import org.springframework.cloud.netflix.eureka.EnableEurekaClient;
import org.springframework.cloud.netflix.zuul.EnableZuulProxy;

@SpringBootApplication
@EnableZuulProxy
@EnableEurekaClient
public class GatewayServiceApplication {

    public static void main(String[] args) {
        SpringApplication.run(GatewayServiceApplication.class, args);
    }
}
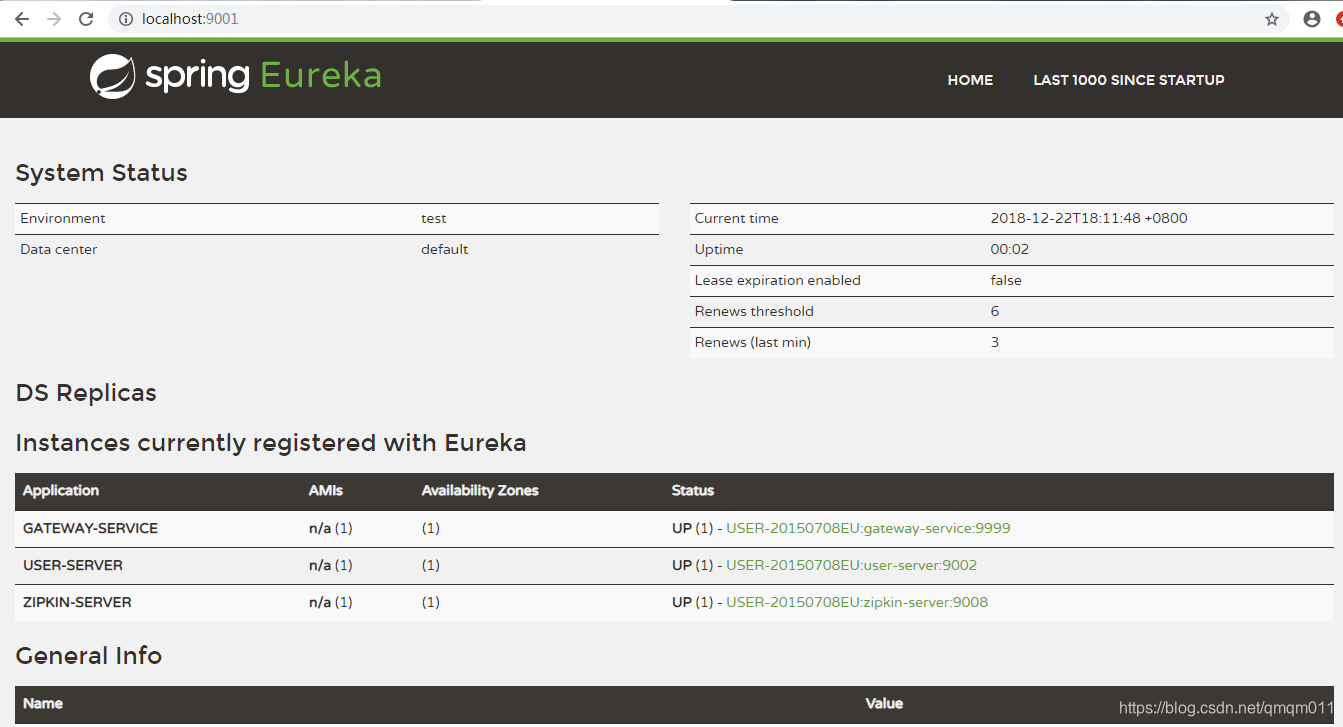
到这里,项目搭建完毕,依次启动 eureka-serer、zipkin-server、user-service 和 gateway-service,在浏览器中访问 http://localhost:9001/,可见所有服务都注册成功:
随后访问 http://localhost:9999/user-api/user/hi,结果如下:
Hi!访问 Zipkin 的主页 http://localhost:9008/zipkin/,界面如下:
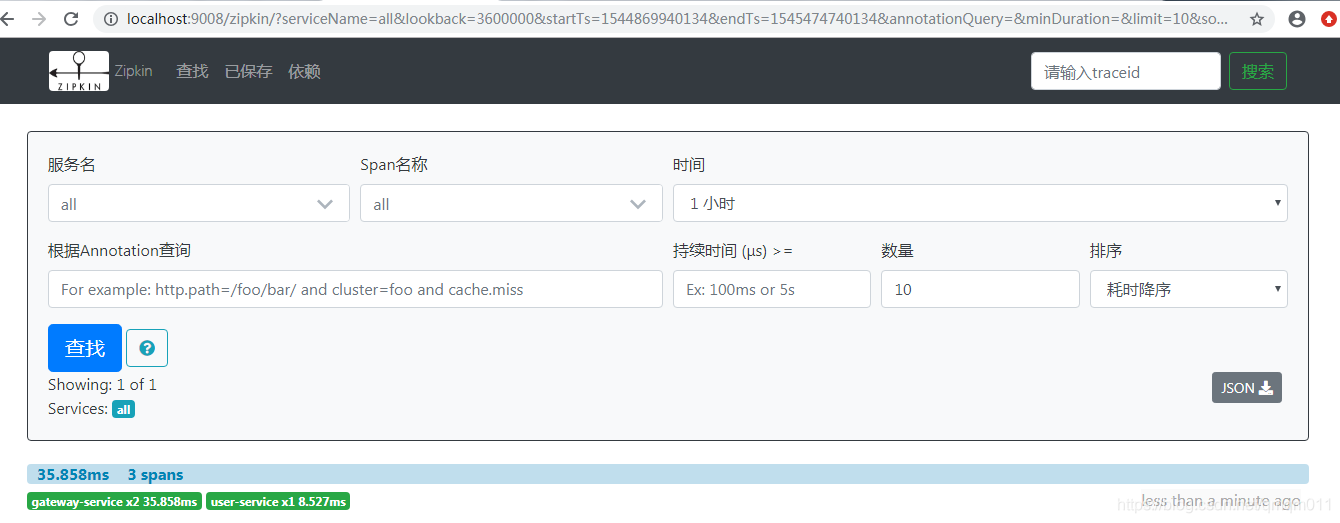
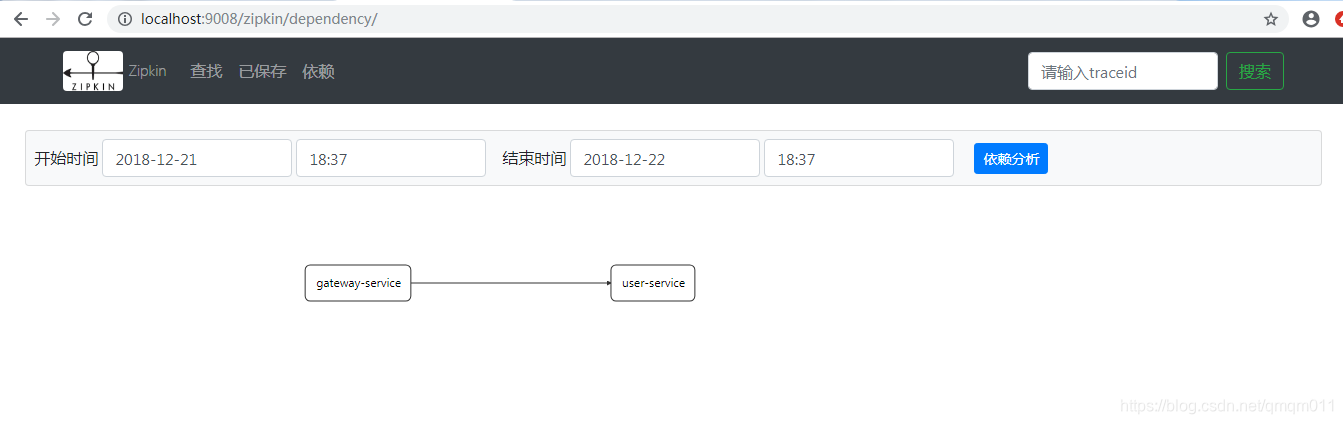
这个界面展示了 Zipkin Server 收集的链路数据,可以根据服务名、开始时间、结束时间、请求消耗的时间等条件进行查找。点击"依赖",可以看到服务的依赖关系:
在 MySQL 中存储链路数据
上面的例子中,链路数据是存放在内存中的,一旦服务重启,之前的链路数据将全部丢失。Zipkin 支持将链路数据存储在 MySQL、Elasticsearch 和 Cassandra 中,下面看看如何将链路数据存储在 MySQL 中。
对前面的例子进行改造,只需要改造 zipkin-server 即可。
首先在 zipkin-server 的 pom 文件中,加上 Zipkin 的 MySQL 存储依赖、MySQL 的连接器依赖 和 JDBC 的起步依赖,修改后的 pom 文件如下:
<?xml version="1.0" encoding="UTF-8"?>
<project xmlns="http://maven.apache.org/POM/4.0.0"
         xmlns:xsi="http://www.w3.org/2001/XMLSchema-instance"
         xsi:schemaLocation="http://maven.apache.org/POM/4.0.0 http://maven.apache.org/xsd/maven-4.0.0.xsd">
    <parent>
        <artifactId>spring-cloud-sleuth</artifactId>
        <groupId>com.wuychn</groupId>
        <version>1.0-SNAPSHOT</version>
    </parent>
    <modelVersion>4.0.0</modelVersion>

    <artifactId>zipkin-server</artifactId>

    <dependencies>
        <dependency>
            <groupId>org.springframework.cloud</groupId>
            <artifactId>spring-cloud-starter-netflix-eureka-client</artifactId>
        </dependency>

        <dependency>
            <groupId>io.zipkin.java</groupId>
            <artifactId>zipkin-server</artifactId>
            <version>2.8.4</version>
            <exclusions>
                <exclusion>
                    <groupId>org.apache.logging.log4j</groupId>
                    <artifactId>log4j-slf4j-impl</artifactId>
                </exclusion>
            </exclusions>
        </dependency>

        <dependency>
            <groupId>io.zipkin.java</groupId>
            <artifactId>zipkin-autoconfigure-ui</artifactId>
            <version>2.8.4</version>
        </dependency>

        <dependency>
            <groupId>io.zipkin.java</groupId>
            <artifactId>zipkin-storage-mysql</artifactId>
            <version>2.8.4</version>
        </dependency>

        <dependency>
            <groupId>mysql</groupId>
            <artifactId>mysql-connector-java</artifactId>
        </dependency>

        <dependency>
            <groupId>org.springframework.boot</groupId>
            <artifactId>spring-boot-starter-jdbc</artifactId>
        </dependency>
    </dependencies>


</project>
然后在 zipkin-server 的配置文件中加上数据源的配置,并且需要配置 zipkin.storage.type 为 mysql:
server:
  port: 9008

spring:
  application:
    name: zipkin-server
  datasource:
    url: jdbc:mysql://localhost:3306/spring-cloud-zipkin?useUnicode=true&characterEncoding=utf8&useSSL=true
    username: root
    password: 1993
    driver-class-name: com.mysql.jdbc.Driver

zipkin:
  storage:
    type: mysql

eureka:
  client:
    serviceUrl:
      defaultZone: http://localhost:9001/eureka/

management:
  metrics:
    web:
      server:
        auto-time-requests: false
接下来在程序启动类中注入 MySQLStorage 的 Bean:
package com.wuychn;

import org.springframework.boot.SpringApplication;
import org.springframework.boot.autoconfigure.SpringBootApplication;
import org.springframework.cloud.netflix.eureka.EnableEurekaClient;
import org.springframework.context.annotation.Bean;
import zipkin.storage.mysql.MySQLStorage;
import zipkin.server.internal.EnableZipkinServer;

import javax.sql.DataSource;

@SpringBootApplication
@EnableZipkinServer
@EnableEurekaClient
public class ZipkinServerApplication {

    public static void main(String[] args) {
        SpringApplication.run(ZipkinServerApplication.class, args);
    }

    @Bean
    public MySQLStorage mySQLStorage(DataSource dataSource) {
        return MySQLStorage.builder().datasource(dataSource).executor(Runnable::run).build();
    }
}
最后,需要在 MySQL 中初始化数据库脚本,数据库脚本地址为 https://github.com/openzipkin/zipkin/blob/master/zipkin-storage/mysql-v1/src/main/resources/mysql.sql。
经过以上配置,即可将链路数据保存在 MySQL 中。