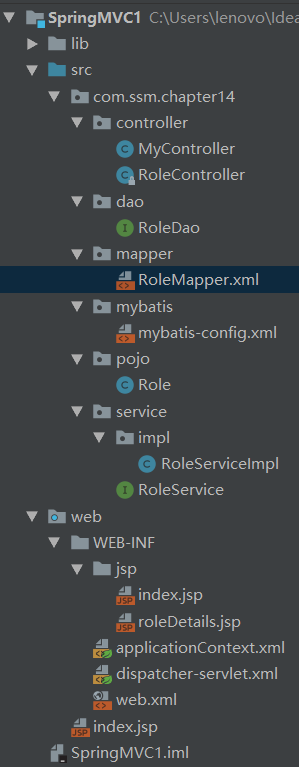
项目的整体目录:
1.在idea中新建spring-->spring MVC项目,lib可以是下载也可以是本地的。如果选择下载,在ssm整合时要加入相应的spring包和MyBatis包,MyBatis-spring包。注意,新建立成的项目的lib文件夹是在src目录下,要在program structure中将其加入到web-info下的lib文件夹中,关于具体的操作,请移步:https://blog.csdn.net/weixin_41060905/article/details/86911172,这里面还降到在idea下包的导入方法。
2.创建好后,IDea会自动帮我们生成web.xml中的内容配置,applicationContext.xml,dispatcher-servlet.xml。其中applicationContext.xml是关于其结合spring和MyBatis的;而dispatcher-servlet.xml是springMVC的配置文件。
3.配置applicationContext.xml:
<?xml version="1.0" encoding="UTF-8"?>
<beans xmlns="http://www.springframework.org/schema/beans"
       xmlns:xsi="http://www.w3.org/2001/XMLSchema-instance" xmlns:p="http://www.springframework.org/schema/p"
       xmlns:tx="http://www.springframework.org/schema/tx" xmlns:context="http://www.springframework.org/schema/context"
       xmlns:mvc="http://www.springframework.org/schema/mvc"
       xsi:schemaLocation="http://www.springframework.org/schema/beans http://www.springframework.org/schema/beans/spring-beans-4.0.xsd
       http://www.springframework.org/schema/tx http://www.springframework.org/schema/tx/spring-tx-4.0.xsd
       http://www.springframework.org/schema/context http://www.springframework.org/schema/context/spring-context-4.0.xsd
       http://www.springframework.org/schema/mvc http://www.springframework.org/schema/mvc/spring-mvc-4.0.xsd">
    <!--使用注解驱动-->
    <context:annotation-config/>
    <!--连接数据库-->
    <bean id="dataSource" class="org.springframework.jdbc.datasource.SimpleDriverDataSource">
        <property name="username" value="root"/>
        <property name="password" value="00000"/>
        <property name="driverClass" value="com.mysql.jdbc.Driver"/>
        <property name="url" value="jdbc:mysql://localhost:3306/ssm"/>
    </bean>
    <!--集成MyBatis-->
    <bean id="SqlSessionFactory" class="org.mybatis.spring.SqlSessionFactoryBean">
        <property name="dataSource" ref="dataSource"/>
        <property name="configLocation" value="classpath:com/ssm/chapter14/mybatis/mybatis-config.xml"/>
    </bean>
    <!--配置数据源事务管理器-->
    <bean id="transactionManger" class="org.springframework.jdbc.datasource.DataSourceTransactionManager">
        <property name="dataSource" ref="dataSource"/>
    </bean>
    <!--采用自动扫描方式创建mapper bean-->
    <bean class="org.mybatis.spring.mapper.MapperScannerConfigurer">
        <property name="basePackage" value="com.ssm.chapter14"/>
        <property name="sqlSessionFactoryBeanName" value="SqlSessionFactory"/>
        <property name="annotationClass" value="org.springframework.stereotype.Repository"/>
    </bean>
</beans>
4.配置dispatcher-servlet.xml(即springMVC的配置文件)
<?xml version='1.0' encoding='UTF-8' ?>
<beans xmlns="http://www.springframework.org/schema/beans"
       xmlns:xsi="http://www.w3.org/2001/XMLSchema-instance" xmlns:p="http://www.springframework.org/schema/p"
       xmlns:tx="http://www.springframework.org/schema/tx" xmlns:context="http://www.springframework.org/schema/context"
       xmlns:mvc="http://www.springframework.org/schema/mvc"
       xsi:schemaLocation="http://www.springframework.org/schema/beans http://www.springframework.org/schema/beans/spring-beans-4.0.xsd
       http://www.springframework.org/schema/tx http://www.springframework.org/schema/tx/spring-tx-4.0.xsd
       http://www.springframework.org/schema/context http://www.springframework.org/schema/context/spring-context-4.0.xsd
       http://www.springframework.org/schema/mvc http://www.springframework.org/schema/mvc/spring-mvc-4.0.xsd">
    <!-- 使用注解驱动 -->
    <mvc:annotation-driven />
    <!-- 定义扫描装载的包 -->
    <context:component-scan base-package="com.*" />
    <!-- 定义视图解析器 -->
    <!-- 找到Web工程/WEB-INF/JSP文件夹,且文件结尾为jsp的文件作为映射 -->
    <bean id="viewResolver"
          class="org.springframework.web.servlet.view.InternalResourceViewResolver"
          p:prefix="/WEB-INF/jsp/" p:suffix=".jsp" />
    <!--开启数据库事务管理-->
<tx:annotation-driven transaction-manager="transactionManger"/>
</beans>
5.创建pojo对象:略;
6.创建dao:RoleDao:
@Repository
public interface RoleDao {
    public Role getRole(long id);
}
7.创建mapper:RoleMapper.xml:
<?xml version="1.0" encoding="UTF-8" ?>
<!DOCTYPE mapper
        PUBLIC "-//mybatis.org//DTD Mapper 3.0//EN"
        "http://mybatis.org/dtd/mybatis-3-mapper.dtd">
<mapper namespace="com.ssm.chapter14.dao.RoleDao">
    <select id="getRole" parameterType="long" resultType="com.ssm.chapter14.pojo.Role">
        select id, role_name as roleName, note from t_role where id = #{id}
    </select>

</mapper>
8.配置MyBatis的配置文件:mybatis-config.xml:
<?xml version="1.0" encoding="UTF-8"?>
<!DOCTYPE configuration PUBLIC "-//mybatis.org//DTD Config 3.0//EN" "http://mybatis.org/dtd/mybatis-3-config.dtd">
<configuration>

    <!-- 指定映射器路径 -->
    <mappers>
        <mapper resource="com/ssm/chapter14/mapper/RoleMapper.xml" />
    </mappers>
</configuration>
9.编写业务代码:
RoleService:
package com.ssm.chapter14.service;

import com.ssm.chapter14.pojo.Role;

public interface RoleService {
    public Role getRole(long id);
}
RoleServiceImpl:
@Service
public class RoleServiceImpl implements RoleService {
    @Autowired
    private RoleDao roleDao=null;
    @Override
    @Transactional(isolation = Isolation.READ_COMMITTED,propagation = Propagation.REQUIRED)
    public Role getRole(long id) {
        return roleDao.getRole(id);
    }
}
10:编写Controller:
@Controller
@RequestMapping("/role")
public class RoleController {
    @Autowired
    private RoleService roleService=null;
    @RequestMapping(value = "/getRole",method = RequestMethod.GET)
    public ModelAndView getRole(@Param("id") long id){
        Role role = roleService.getRole(id);
        ModelAndView mv = new ModelAndView();
        mv.setViewName("roleDetails");
        mv.addObject("role",role);
        return mv;
    }

}
这里仅仅允许介绍get提交的数据:
mv的对象加入role对象。由于这样配置,springmvc会用jstlview进行渲染,也就是会将查询到的数据绑定到jstl模型中,这样通过jstl就可以把数据模型在jsp中读出展示数据了。注意,使用jstl标签库要导入相应的包。
11:RoleDetails.jsp:
<%@ page contentType="text/html;charset=UTF-8" language="java" %>
<%@ page pageEncoding="UTF-8" %>
<%@ taglib prefix="c" uri="http://java.sun.com/jsp/jstl/core" %>
<html>
<head>
    <title>out标签的使用</title>
</head>
<body>
<center>
    <table border="1">
        <tr>
            <td>标签</td>
            <td>值</td>
        </tr>
        <tr>
            <td>角色编号</td>
            <td><c:out value="${role.id}"/></td>
        </tr>
        <tr>
            <td>角色名称</td>
            <td><c:out value="${role.roleName}"/></td>
        </tr>
        <tr>
            <td>角色备注</td>
            <td><c:out value="${role.note}"/></td>
        </tr>
    </table>
</center>
</body>
</html>
12.运行部署,在浏览器中输入:http://localhost:8080/Chapter14/role/getRole.form?id=4,即可。