版权声明:LemonSnm https://blog.csdn.net/LemonSnm/article/details/87894940
1.准备哪些工具
Spring Boot官方网址:https://spring.io/
进入网页 下拉找到SpringBoot


需要准备: ①这里开发工具使用IDEA
②需要JDK1.8或者更高的版本
③选择使用Maven
注意:如果缺少需要下载的话,直接点击上面的红框内容即可下载
注意:如果大家熟悉Eclipse的话 可以直接下载STS 或者在已有的 Eclipse工具中添加STS插件
2.使用官方地址生成项目

选择好,点击Generate Project ,生成文件至桌面,解压出项目文件夹,导入IDEA中(可以将项目直接拖到IDEA中即可导入)
IDEA Spring Boot项目文件目录:

删除了没用的文件: text/java中的文件、pom.xml上面的两个文件(该目录已经删除)
自动生成的类名较长 做相应的修改(个人爱好)
在pom文件中添加web
<dependency> <groupId>org.springframework.boot</groupId> <artifactId>spring-boot-starter-web</artifactId> </dependency>
3.编写第一个Contoller
package com.lemon.contoller;

import org.springframework.web.bind.annotation.RequestMapping;
import org.springframework.web.bind.annotation.RestController;

@RestController
public class HelloContoller {

    @RequestMapping("/hello")
    public Object hello(){
         return "hello springboot";
    }

}

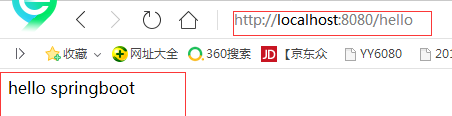
4.运行测试
运行Application:

成功:
温馨提示:

出现这种情况 并没有影响,原因是jdk版本过高导致,调到1.8就没有了