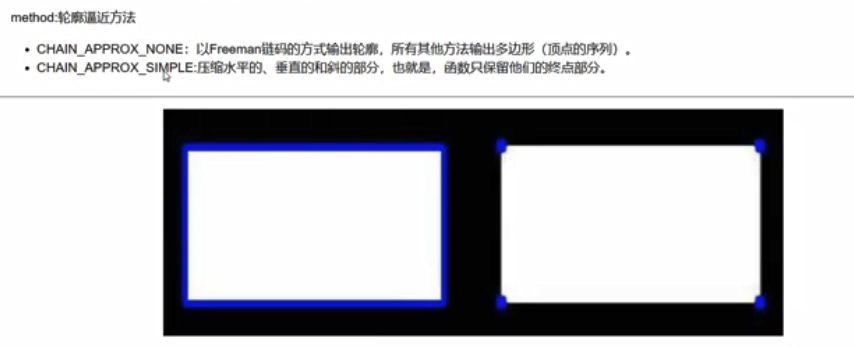
轮廓检测:轮廓检测相较于canny边缘检测,轮廓检测的线条要更少一些,在opencv中,使用的函数是cv2.findCountor进行轮廓检测

上图是轮廓检测过程中所使用的方法,一般我们使用mode RETR_TREE检测出所有的轮廓值, 对于method方法的区别在一种把边缘都检测出来,一种压缩在拐点位置
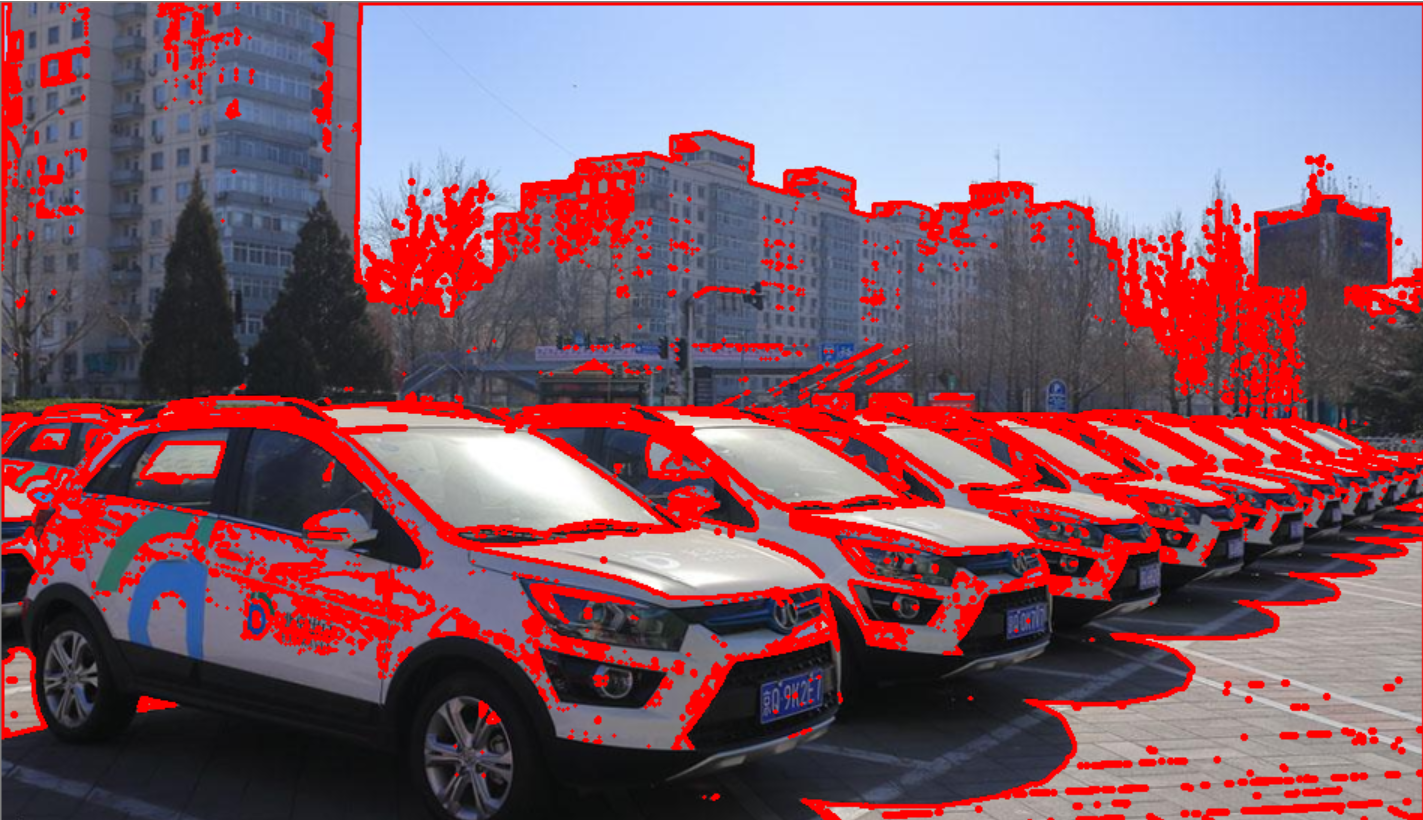
1.轮廓检测与画图:
代码:
第一步:载入图片
第二步:使用cv2.cvtcolor() 将图片转换为灰度图
第三步: 使用cv2.threshold将图片做二值化转换
第四步: 使用cv2.findContours 找出图片的轮廓值
第五步:使用cv2.drawContours在图片上画上轮廓
第六步: 使用cv2.imshow 完成画图操作
import cv2
import numpy as np

def cv_show(img, name):
    cv2.imshow(name, img)
    cv2.waitKey(0)
    cv2.destroyAllWindows()


# 第一步读入图片
img = cv2.imread('car.png')
# 第二步:对图片做灰度变化
gray = cv2.cvtColor(img, cv2.COLOR_BGR2GRAY)
# 第三步:对图片做二值变化
ret, thresh = cv2.threshold(gray, 127, 255, cv2.THRESH_BINARY)

# 第四步:获得图片的轮廓值
Binary, contours, h = cv2.findContours(thresh, cv2.RETR_TREE, cv2.CHAIN_APPROX_NONE)

# 第五步:在图片中画出图片的轮廓值
draw_img = img.copy()
ret = cv2.drawContours(draw_img, contours, -1, (0, 0, 255), 2)
# 第六步:画出带有轮廓的原始图片
cv_show(ret, 'ret')
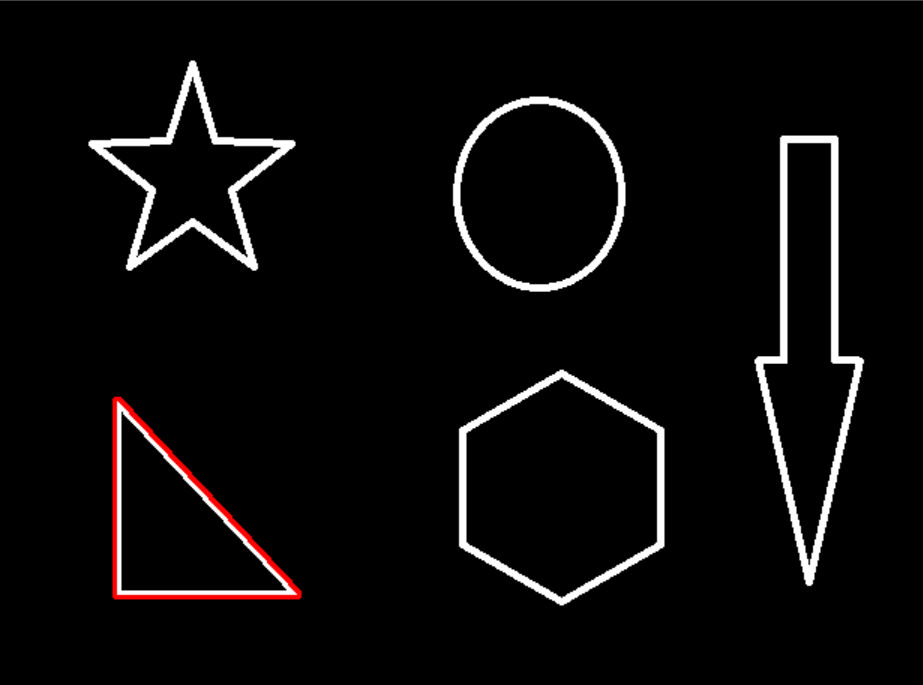
2. 轮廓的周长和面积
使用cv2.findCountor获得的轮廓contours是一个嵌套的类型,即我们可以通过cnt = contours获得第一个物体的轮廓值
代码:
第一步:载入图片,做灰度值和二值化处理,并使用cv2.findCountor找出轮廓值,使用cv2.drawCountors画出第一个图像的轮廓
第二步:通过索引取出第一个轮廓值cnt,使用cv2.ContourArea()计算轮廓的面积
第三步:使用cv2.arcLength 获得轮廓的周长
# 使用另外一个图进行轮廓的测试

# 第一步:载入图片,灰度化和二值化处理,使用cv2.findContours找出轮廓, 使用cv2.drawContours进行画图操作
img = cv2.imread('contours.png')
gray = cv2.cvtColor(img, cv2.COLOR_BGR2GRAY)
ret, thresh = cv2.threshold(gray, 127, 255, cv2.THRESH_BINARY)

binary, contours, h = cv2.findContours(thresh, cv2.RETR_TREE, cv2.CHAIN_APPROX_NONE)

draw_img = img.copy()
# 参数说明,draw_img 需要作图的原始图像, contours表示轮廓, 0表示轮廓索引, (0, 0, 255)表示颜色, 2表示线条粗细
ret = cv2.drawContours(draw_img, contours, 0, (0, 0, 255), 2)
cv_show(ret, 'ret')
# 取出单个的轮廓值
cnt = contours[0]

# 第二步:计算轮廓的面积
area = cv2.contourArea(cnt)

# 第三步: 计算轮廓的周长
length= cv2.arcLength(cnt, True)

print(area, length)
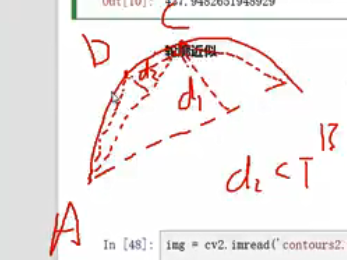
3. 轮廓近似, 假设存在一个曲线A, B,在曲线上存在一个C点,离AB线段的距离最远,记为d1, 如果d1 < T, 将AB线段作为AB曲线的替代,否者连接AC和BC, 计算AC线段上的D点离AB距离最远,记为d2,如果d2 < T,则使用AC线段替代AC曲线,否者继续连接划分
代码:
第一步:读取图片,灰度化和二值化,使用cv2.findcontours找出轮廓
第二步:使用轮廓索引提取第一个轮廓值
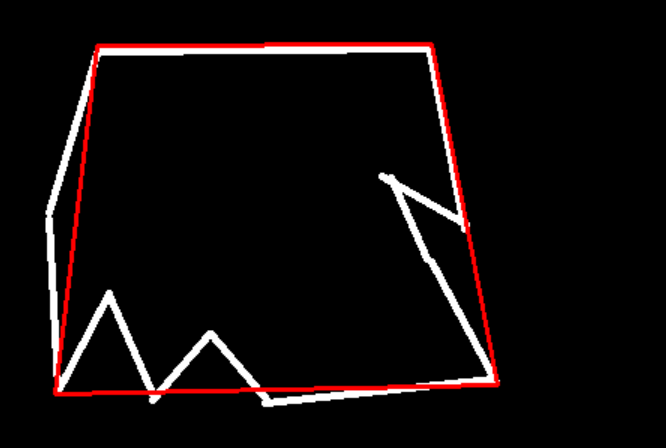
第三步:使用cv2.arcLength即轮廓周长的倍数作为阈值,阈值越小,轮廓与轮廓的越近似
第四步:使用cv2.approxPolyDP(cnt, epilison)
第五步:使用cv2.drawContours进行画图操作
import cv2
import numpy as np

def cv_show(img, name):
    cv2.imshow(name, img)
    cv2.waitKey(0)
    cv2.destroyAllWindows()


# 第一步读入图片
img = cv2.imread('car.png')
# 第二步:对图片做灰度变化
gray = cv2.cvtColor(img, cv2.COLOR_BGR2GRAY)
# 第三步:对图片做二值变化
ret, thresh = cv2.threshold(gray, 127, 255, cv2.THRESH_BINARY)

# 第四步:获得图片的轮廓值
Binary, contours, h = cv2.findContours(thresh, cv2.RETR_TREE, cv2.CHAIN_APPROX_NONE)

# 第五步:在图片中画出图片的轮廓值
draw_img = img.copy()
ret = cv2.drawContours(draw_img, contours, -1, (0, 0, 255), 2)
# 第六步:画出带有轮廓的原始图片
cv_show(ret, 'ret')


# 使用另外一个图进行轮廓的测试

# 第一步:载入图片,灰度化和二值化处理,使用cv2.findContours找出轮廓, 使用cv2.drawContours进行画图操作
img = cv2.imread('contours.png')
gray = cv2.cvtColor(img, cv2.COLOR_BGR2GRAY)
ret, thresh = cv2.threshold(gray, 127, 255, cv2.THRESH_BINARY)

binary, contours, h = cv2.findContours(thresh, cv2.RETR_TREE, cv2.CHAIN_APPROX_NONE)

draw_img = img.copy()
# 参数说明,draw_img 需要作图的原始图像, contours表示轮廓, 0表示轮廓索引, (0, 0, 255)表示颜色, 2表示线条粗细
ret = cv2.drawContours(draw_img, contours, 0, (0, 0, 255), 2)
cv_show(ret, 'ret')
# 取出单个的轮廓值
cnt = contours[0]

# 第二步:计算轮廓的面积
area = cv2.contourArea(cnt)

# 第三步: 计算轮廓的周长
length= cv2.arcLength(cnt, True)

print(area, length)


# 轮廓近似
img = cv2.imread('contours2.png')
gray = cv2.cvtColor(img, cv2.COLOR_BGR2GRAY)
ret, thresh = cv2.threshold(gray, 127, 255, cv2.THRESH_BINARY)

Binary, contours, h = cv2.findContours(thresh, cv2.RETR_TREE, cv2.CHAIN_APPROX_NONE)

cnt = contours[0]

# 使用周长的倍数作为阈值,阈值越小,图像的轮廓近似与轮廓越近似
epsilon = 0.1 * cv2.arcLength(cnt, True)

approx = cv2.approxPolyDP(cnt, epsilon, True)

draw_img = img.copy()
ret = cv2.drawContours(draw_img, [approx], -1, (0, 0, 255), 2)
cv_show(ret, 'ret')
4. 外接矩形和外接圆
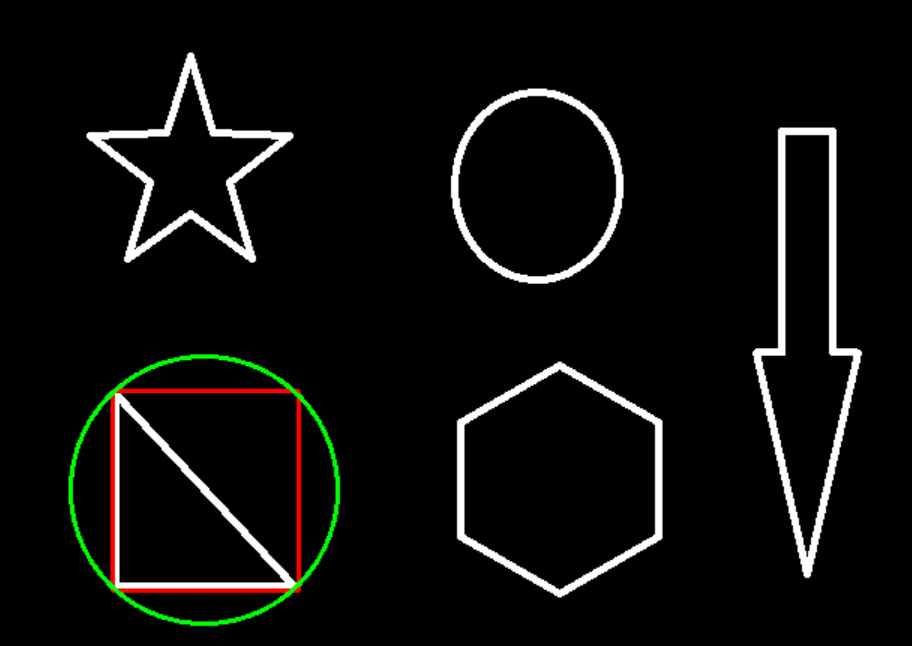
外接矩形: 使用cv2.boudingrect(cnt)获得轮廓的外接矩形,使用cv2.rectangle(img, (x, y), (x+w, y+h), (0, 0, 255), 2)画出矩阵的轮廓
外接圆: 使用cv2.minEnclosingCircle(cnt)获得轮廓的外接圆,使用cv2.circle(ret, centers, radius, (0, 0, 255), 2)画出圆的轮廓
代码:
第一步:载入图片,灰度化,二值化,使用cv2.findCountors找出图像的轮廓,使用轮廓索引获得第一个轮廓cnt
第二步:使用cv2.boundingrect(cnt) ,获得轮廓的x,y,w, h (x, y)表示左上角的坐标,w为宽,h为长
第三步: 使用cv2.rectangle 绘制外接的轮廓
第四步: 使用cv2.minEnclosingCircle(cnt), 获得center和radius,即圆心点的坐标和圆的半径
第五步: 使用cv2.circle(img, center, radius, (0, 0, 255), 2) 绘制圆心的外接轮廓
# 外接矩阵

img = cv2.imread('contours.png')
gray = cv2.cvtColor(img, cv2.COLOR_BGR2GRAY)
res, thresh = cv2.threshold(gray, 127, 255, cv2.THRESH_BINARY)

binary, contours, h = cv2.findContours(thresh, cv2.RETR_TREE, cv2.CHAIN_APPROX_NONE)

cnt = contours[0]

x, y, w, h = cv2.boundingRect(cnt)

ret = cv2.rectangle(img, (x, y), (x+w, y+h), (0, 0, 255), 2)
cv_show(ret, 'ret')

print('矩形面积 / 外接矩形面积', cv2.contourArea(cnt) / (w*h))
# 外接圆

(x, y), radius = cv2.minEnclosingCircle(cnt)
center = (int(x), int(y))
radius = int(radius)
ret = cv2.circle(ret, center, radius, (0, 255, 0), 2)
cv_show(ret, 'ret')
