这是一篇有关iview-admin使用的文章。
1.安装
git地址 https://github.com/iview/iview-admin
git clone https://github.com/iview/iview-admin.git
拉下来后,进入iview-admin文件夹,在控制台输入npm install安装依赖。
依赖安装完成后,控制台输入npm run dev启动项目。
2.前期配置
打开\iview-admin\src\config\index.js 将
useI18n: true,
改为false。把国际化关闭。
根据个人需要 打开\iview-admin\vue.config.js 将
lintOnSave: true,
eslint开启或关闭。
3.添加页面
项目中使用的大多数页面都以单文件组件(.vue文件)形式放在\iview-admin\src\view文件夹下。
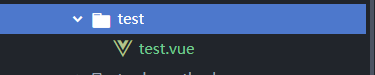
在view文件夹下创建test文件夹,并新建test.vue文件。如下图所示。
然后我们进行路由配置,这样左侧菜单栏才能出现我们添加过的页面,路由的配置是在 /src/router 文件夹下,/src/router/index.js文件中定义路由拦截的逻辑,/src/router/routers.js文件中定义页面路由信息。
在/src/router/routers.js中添加信息
{
    path: '/ceshi',   // 必须项
    name: 'ceshi',  // 必须项,后面缓存页面需要用到,且这个name是唯一的
    meta: {
      icon: 'md-cloud-upload',
      title: '测试',
      showAlways: true
    },
    component: Main,  // 一级目录必须使用Main组件作为component
    children: [
      {
        path: 'test',
        name: 'test',
        meta: {
          icon: 'ios-document',
          title: '测试'
        },
        component: () => import('@/view/test/test.vue')
      }
    ]
  },
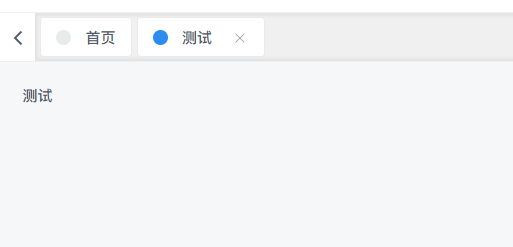
添加完会自动刷新页面,效果如下

我们开始编辑test.vue文件,按照单文件组件的写法,写入一些东西。


<template lang="">
<div>
  <p>{{text}}</p>
</div>
</template>

<script>
export default {
  data() {
    return {
      text:"测试"
    }
  }
}
</script>

<style lang="css" scoped>
</style>
效果如图。
4.打包设置
首先要把mock相关设置注释掉,这样才能打包后正常访问接口。
将src\main.js中的这段代码注释掉。
if (process.env.NODE_ENV !== 'production') require('@/mock')
然后,修改根目录下vue.config.js文件中的
const BASE_URL = process.env.NODE_ENV === 'production'
  ? '/'
  : '/'
为
const BASE_URL = './'
   const router = new Router({
    routes,
    mode: 'hash'                     // 项目中本来mode: 'history'
   })
然后就可以在控制台输入 npm run build进行打包了。