一、任务
1、异步任务
package com.yunche.task.service;

import org.springframework.stereotype.Service;

/**
 * @ClassName: TaskService
 * @Description:
 * @author: yunche
 * @date: 2019/02/05
 */
@Service
public class TaskService {

    public void doSomething() {
        try {
            Thread.sleep(3000);
        } catch (InterruptedException e) {
            e.printStackTrace();
        }
        System.out.println("I am doing something");
    }
}
package com.yunche.task.controller;
import com.yunche.task.service.TaskService;
import org.springframework.beans.factory.annotation.Autowired;
import org.springframework.web.bind.annotation.GetMapping;
import org.springframework.web.bind.annotation.RestController;
/**
* @ClassName: TaskController
* @Description:
* @author: yunche
* @date: 2019/02/05
*/
@RestController
public class TaskController {
@Autowired
public TaskService taskService;
@GetMapping("/say")
public String say() {
taskService.doSomething();
return "Hello world!";
}
}访问:http://localhost:8080/say,由于处理 doSomething() 方法会阻塞 3 秒,所以浏览器 3 秒后才会得到字符串
Hello world!。为了加快其返回结果,可以将 doSomething() 方法修改为异步任务执行,首先在方法体上面加上
@Async注解,然后还需要添加@EnableAsync 注解,开启使用异步注解。
@Async
public void doSomething() {
    try {
        Thread.sleep(3000);
    } catch (InterruptedException e) {
        e.printStackTrace();
    }
    System.out.println("I am doing something");
}
package com.yunche.task;
import org.springframework.boot.SpringApplication;
import org.springframework.boot.autoconfigure.SpringBootApplication;
import org.springframework.scheduling.annotation.EnableAsync;
@EnableAsync
@SpringBootApplication
public class TaskApplication {
public static void main(String[] args) {
SpringApplication.run(TaskApplication.class, args);
}
}此时访问:http://localhost:8080/say,就可以立即得到返回结果了。
2、定时任务
定时任务类似于异步任务也是需要两个注解:@Scheduled、@EnableScheduling。需要注意的是该怎么计划定时任务的时间,即如何书写cron表达式,规则如下图:

来看下例子:
package com.yunche.task.service;

import org.springframework.scheduling.annotation.Scheduled;
import org.springframework.stereotype.Service;

/**
 * @ClassName: ScheduleService
 * @Description:
 * @author: yunche
 * @date: 2019/02/05
 */
@Service
public class ScheduleService {
    /**
     * cron 表达式时间的设置分为 6 个部分:
     * second(秒), minute(分), hour(时), day of month(日), month(月), day of week(周几).每个部分以空格分隔。
     *
     */
    @Scheduled(cron = "0 * * * * 1-5") // 代表每周的周 1 到周 5 的每个小时的每个整分执行任务
    public void test() {
        System.out.println("我是定时任务。。。");
    }
}
package com.yunche.task;
import org.springframework.boot.SpringApplication;
import org.springframework.boot.autoconfigure.SpringBootApplication;
import org.springframework.scheduling.annotation.EnableAsync;
import org.springframework.scheduling.annotation.EnableScheduling;
@EnableScheduling
@EnableAsync
@SpringBootApplication
public class TaskApplication {
public static void main(String[] args) {
SpringApplication.run(TaskApplication.class, args);
}
}运行主程序,发现确实是整分的时候打印语句。下面是几个实例。
 *  【0 0/5 14,18 * * ?】 每天 14 点整,和 18 点整,每隔 5 分钟执行一次
 *  【0 15 10 ? * 1-6】 每个月的周一至周六 10:15 分执行一次
 *  【0 0 2 ? * 6L】每个月的最后一个周六凌晨 2 点执行一次
 *  【0 0 2 LW * ?】每个月的最后一个工作日凌晨 2 点执行一次
 *  【0 0 2-4 ? * 1#1】每个月的第一个周一凌晨 2 点到 4 点期间,每个整点都执行一次;
3、邮件任务
需要导入 spring-boot-starter-mail 场景启动器,pom 文件:
<dependency>
    <groupId>org.springframework.boot</groupId>
    <artifactId>spring-boot-starter-mail</artifactId>
</dependency>
下面用 163 邮箱给 qq 邮箱发送邮件:首先需要在发送方的邮箱设置中开启一些服务,并保存一个第三方授权码。

spring:
  mail:
    username: [email protected]
    password: 第三方授权码
    host: smtp.163.com
接下来根据邮件是否包含附件,分为 2 种情况:
不带附件,简单文本内容:
package com.yunche.task;

import org.junit.Test;
import org.junit.runner.RunWith;
import org.springframework.beans.factory.annotation.Autowired;
import org.springframework.boot.test.context.SpringBootTest;
import org.springframework.mail.SimpleMailMessage;
import org.springframework.mail.javamail.JavaMailSenderImpl;
import org.springframework.scheduling.annotation.Scheduled;
import org.springframework.test.context.junit4.SpringRunner;

@RunWith(SpringRunner.class)
@SpringBootTest
public class TaskApplicationTests {

    @Autowired
    JavaMailSenderImpl mailSender;
    @Test
    public void contextLoads() {
      //简单消息使用 SimpleMailMessage 类
        SimpleMailMessage message = new SimpleMailMessage();

        message.setFrom("发送方@163.com");
        message.setSubject("我是主题");
        message.setText("我是普通的文本内容,我想说:你好");
        message.setTo("接收者@qq.com");

        mailSender.send(message);
        System.out.println("发送成功");
    }

}
带附件的邮件:
@Test
public void test01() throws MessagingException {

    MimeMessage message= mailSender.createMimeMessage();
    //第二个参数,开启文件上传功能
    MimeMessageHelper helper = new MimeMessageHelper(message, true);
    try {
        //上传一张图片到附件中
        helper.addAttachment("66418885_p0.png", new File("C:\\Users\\Administrator\\Desktop\\wallpaper\\66418885_p0.png"));
        //第二个参数,文本内容以 HTML 方式显示
        helper.setText("<p style='color:red'> 我是红色的内容哦 </p>", true);
        helper.setSubject("我是主题");
        helper.setFrom("发送方@163.com");
        helper.setTo("收件方@qq.com");
    } catch (MessagingException e) {
        e.printStackTrace();
    }

    mailSender.send(message);
    System.out.println("发送成功");
}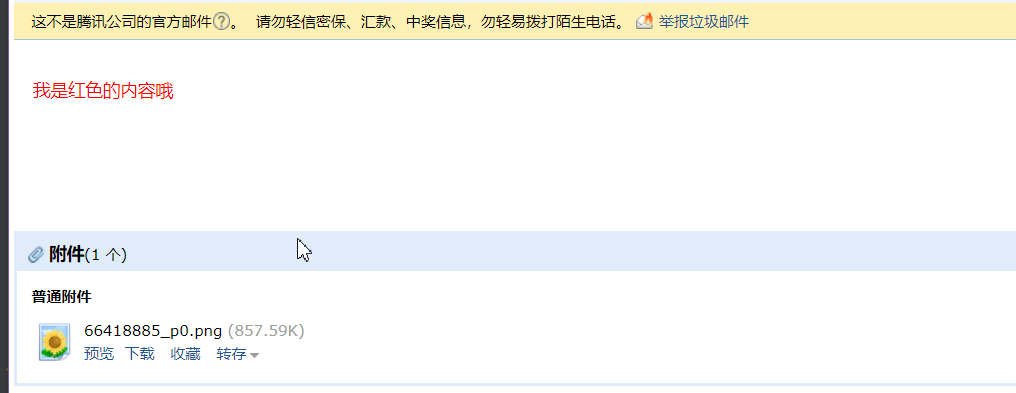
二、参考资料
尚硅谷.Spring Boot 高级