SpringBoot项目整合动态数据源(读写分离)
1.配置多个数据源,根据业务需求访问不同的数据,指定对应的策略:增加,删除,修改操作访问对应数据,查询访问对应数据,不同数据库做好的数据一致性的处理。由于此方法相对易懂,简单,不做过多介绍。
2. 动态切换数据源,根据配置的文件,业务动态切换访问的数据库:此方案通过Spring的AOP,AspactJ来实现动态织入,通过编程继承实现Spring中的AbstractRoutingDataSource,来实现数据库访问的动态切换,不仅可以方便扩展,不影响现有程序,而且对于此功能的增删也比较容易。
3. 通过mycat来实现读写分离:使用mycat提供的读写分离功能,mycat连接多个数据库,数据源只需要连接mycat,对于开发人员而言他还是连接了一个数据库(实际是mysql的mycat中间件),而且也不需要根据不同 业务来选择不同的库,这样就不会有多余的代码产生。
详细参考配置
动态数据源核心配置
在Spring 2.0.1中引入了AbstractRoutingDataSource, 该类充当了DataSource的路由中介, 能有在运行时, 根据某种key值来动态切换到真正的DataSource上。
1.项目中需要集成多个数据源分别为读和写的数据源,绑定不同的key。
2.采用AOP技术进行拦截业务逻辑层方法,判断方法的前缀是否需要写或者读的操作
3.如果方法的前缀是写的操作的时候,直接切换为写的数据源,反之切换为读的数据源
也可以自己定义注解进行封装
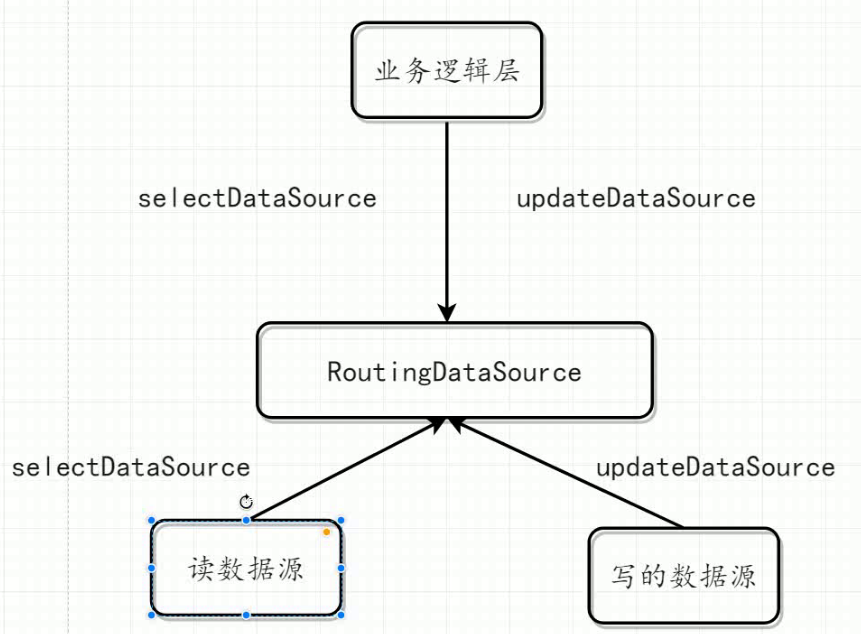
项目中有两个数据源 分别为读和写的数据源
使用AOP技术判断业务逻辑方法的前缀,如果前缀为比如select get find等。直接走RoutingDataSource
如果是写的话,传递一个key给RoutingDataSource指明使用写的数据源
下面是两个数据源,读的数据源和写的数据源。都需要设置一个key。然后注册存放到RoutingDataSource。
使用AOP技术拦截业务逻辑层的方法,判断方法的前缀是否为读或者写的操作
如果是写的操作,会给RoutingDataSource传递一个key 哈哈懂得了吧
环境配置:
1.创建读和写的数据源
2.将读和写的数据源注册到RoutiongDataSource
3.使用AOP技术拦截业务逻辑层,判断方法的前缀是否需要做读或者写
pom:
<parent>
        <groupId>org.springframework.boot</groupId>
        <artifactId>spring-boot-starter-parent</artifactId>
        <version>2.0.4.RELEASE</version>
        <relativePath /> <!-- lookup parent from repository -->
    </parent>
    <dependencies>
        <dependency>
            <groupId>org.springframework.boot</groupId>
            <artifactId>spring-boot-starter-aop</artifactId>
        </dependency>
        <dependency>
            <groupId>org.springframework.boot</groupId>
            <artifactId>spring-boot-starter-web</artifactId>
        </dependency>
        <dependency>
            <groupId>org.mybatis.spring.boot</groupId>
            <artifactId>mybatis-spring-boot-starter</artifactId>
            <version>1.3.2</version>
        </dependency>

        <dependency>
            <groupId>mysql</groupId>
            <artifactId>mysql-connector-java</artifactId>
            <scope>runtime</scope>
        </dependency>
        <dependency>
            <groupId>org.springframework.boot</groupId>
            <artifactId>spring-boot-starter-test</artifactId>
            <scope>test</scope>
        </dependency>

        <dependency>
            <groupId>com.alibaba</groupId>
            <artifactId>druid</artifactId>
            <version>1.0.23</version>
        </dependency>
    </dependencies>

    <build>
        <plugins>
            <plugin>
                <groupId>org.springframework.boot</groupId>
                <artifactId>spring-boot-maven-plugin</artifactId>
            </plugin>
        </plugins>
    </build>
配置代码:
通过ThreadLocal 保存本地多数据源
import java.util.HashMap;
import java.util.Map;

import javax.sql.DataSource;

import org.springframework.beans.factory.annotation.Autowired;
import org.springframework.beans.factory.annotation.Qualifier;
import org.springframework.context.annotation.Primary;
import org.springframework.jdbc.datasource.lookup.AbstractRoutingDataSource;
import org.springframework.stereotype.Component;

@Component
@Primary
public class DynamicDataSource extends AbstractRoutingDataSource {
    @Autowired
    @Qualifier("selectDataSource")   //获取读的数据源
    private DataSource selectDataSource;

    @Autowired
    @Qualifier("updateDataSource")  //获取写的数据源
    private DataSource updateDataSource;

    /**
     * 这个是主要的方法,返回的是生效的数据源名称
     */
    @Override
    protected Object determineCurrentLookupKey() {
        System.out.println("DataSourceContextHolder:::" + DataSourceContextHolder.getDbType());
        return DataSourceContextHolder.getDbType();
    }

    /**
     * 配置数据源信息   注册数据源的操作 最终注入到datasource数据源中
     */
    @Override
    public void afterPropertiesSet() {
        Map<Object, Object> map = new HashMap<>();
        map.put("selectDataSource", selectDataSource);
        map.put("updateDataSource", updateDataSource);
        setTargetDataSources(map);
        setDefaultTargetDataSource(updateDataSource);
        super.afterPropertiesSet();
    }
}
配置多个数据源:
import javax.sql.DataSource;

import org.springframework.boot.context.properties.ConfigurationProperties;
import org.springframework.boot.jdbc.DataSourceBuilder;
import org.springframework.context.annotation.Bean;
import org.springframework.context.annotation.Configuration;
/*
 * 配置多个数据源
 */

@Configuration
public class DataSourceConfig {

    // 创建可读数据源
    @Bean(name = "selectDataSource")
    @ConfigurationProperties(prefix = "spring.datasource.select") // application.properteis中对应属性的前缀
    public DataSource dataSource1() {
        return DataSourceBuilder.create().build();
    }

    // 创建可写数据源
    @Bean(name = "updateDataSource")
    @ConfigurationProperties(prefix = "spring.datasource.update") // application.properteis中对应属性的前缀
    public DataSource dataSource2() {
        return DataSourceBuilder.create().build();
    }

}
将数据源注册到RoutingDataSource中
import java.util.HashMap;
import java.util.Map;

import javax.sql.DataSource;

import org.springframework.beans.factory.annotation.Autowired;
import org.springframework.beans.factory.annotation.Qualifier;
import org.springframework.context.annotation.Primary;
import org.springframework.jdbc.datasource.lookup.AbstractRoutingDataSource;
import org.springframework.stereotype.Component;

@Component
@Primary
public class DynamicDataSource extends AbstractRoutingDataSource {
    @Autowired
    @Qualifier("selectDataSource")   //获取读的数据源
    private DataSource selectDataSource;

    @Autowired
    @Qualifier("updateDataSource")  //获取写的数据源
    private DataSource updateDataSource;

    /**
     * 这个是主要的方法,返回的是生效的数据源名称
     */
    @Override
    protected Object determineCurrentLookupKey() {
        System.out.println("DataSourceContextHolder:::" + DataSourceContextHolder.getDbType());
        return DataSourceContextHolder.getDbType();
    }

    /**
     * 配置数据源信息   注册数据源的操作 最终注入到datasource数据源中
     */
    @Override
    public void afterPropertiesSet() {
        Map<Object, Object> map = new HashMap<>();
        map.put("selectDataSource", selectDataSource);
        map.put("updateDataSource", updateDataSource);
        setTargetDataSources(map);
        setDefaultTargetDataSource(updateDataSource);
        super.afterPropertiesSet();
    }
}
然后对于AOP的编写配置:
import org.aspectj.lang.JoinPoint;
import org.aspectj.lang.annotation.Aspect;
import org.aspectj.lang.annotation.Before;
import org.springframework.context.annotation.Lazy;
import org.springframework.core.annotation.Order;
import org.springframework.stereotype.Component;

import com.mayikt.config.DataSourceContextHolder;

@Aspect
@Component
@Lazy(false)
@Order(0) // Order设定AOP执行顺序 使之在数据库事务上先执行  动态数据源事务先执行的
public class SwitchDataSourceAOP {
    // 这里切到你的方法目录
    @Before("execution(* com.mayikt.service.*.*(..))")   //扫包范围是业务逻辑层
    public void process(JoinPoint joinPoint) {
        String methodName = joinPoint.getSignature().getName();  //通过反射获取到方法名称
        if (methodName.startsWith("get") || methodName.startsWith("count") || methodName.startsWith("find")
                || methodName.startsWith("list") || methodName.startsWith("select") || methodName.startsWith("check")) {
            // 读
            DataSourceContextHolder.setDbType("selectDataSource");
        } else {
            // 切换dataSource
            DataSourceContextHolder.setDbType("updateDataSource");
        }
    }
}
启动:
import org.mybatis.spring.annotation.MapperScan;
import org.springframework.boot.SpringApplication;
import org.springframework.boot.autoconfigure.SpringBootApplication;

@SpringBootApplication
@MapperScan(basePackages = "com.toov5.mapper")
public class AppMybatis {

    public static void main(String[] args) {
        SpringApplication.run(AppMybatis.class, args);
    }

}
yml:
spring:
  datasource:
    ###可读数据源
    select:
      jdbc-url: jdbc:mysql://192.168.91.7:8066/mycat_testdb
      driver-class-name: com.mysql.jdbc.Driver
      username: user
      password: user
    ####可写数据源
    update:
      jdbc-url: jdbc:mysql://192.168.91.7:8066/mycat_testdb
      driver-class-name: com.mysql.jdbc.Driver
      username: root
      password: 123456
    type: com.alibaba.druid.pool.DruidDataSource
注意数据源的配置:是MyCat的域名和端口
Controller:
import java.util.List;

import org.springframework.beans.factory.annotation.Autowired;
import org.springframework.web.bind.annotation.RequestMapping;
import org.springframework.web.bind.annotation.RestController;

import com.mayikt.entity.UserEntity;
import com.mayikt.service.UserService;

@RestController
public class UserController {

    @Autowired
    private UserService userService;

    @RequestMapping("/findUser")
    public List<UserEntity> findUser() {
        return userService.findUser();
    }

    @RequestMapping("/insertUser")
    public List<UserEntity> insertUser(String userName) {
        return userService.insertUser(userName);
    }

}
entity:
public class UserEntity {

    private String userName;

    public String getUserName() {
        return userName;
    }

    public void setUserName(String userName) {
        this.userName = userName;
    }

}
service:
import java.util.List;

import org.springframework.beans.factory.annotation.Autowired;
import org.springframework.stereotype.Service;

import com.mayikt.entity.UserEntity;
import com.mayikt.mapper.UserMapper;

@Service
public class UserService {
    @Autowired
    private UserMapper userMapper;

    public List<UserEntity> findUser() {
        return userMapper.findUser();
    }

    public List<UserEntity> insertUser(String userName) {
        return userMapper.insertUser(userName);
    }

}
mapper:
import java.util.List;

import org.apache.ibatis.annotations.Param;
import org.apache.ibatis.annotations.Select;

import com.mayikt.entity.UserEntity;

public interface UserMapper {
    @Select("SELECT * FROM  user_info ")
    public List<UserEntity> findUser();

    @Select("insert into user_info values (null,#{userName}); ")
    public List<UserEntity> insertUser(@Param("userName") String userName);
}