在上文中介绍了如何安装petalinux 2018.2。其验证的方法是:
source /home/liwenz/petalinux/settings.sh
如果不报错,并且echo $PETALINUX 能显示你的安装路径就是好了。其中/home/liwenz/petalinux 是我的安装目录。
本文在此基础上创建一个工程,并用sd卡启动测试。
1:搭建硬件环境
ug1144 里提到zynq 7000 的硬件建立条件是:
1. One Triple Timer Counter (TTC) (required)
2. External memory controller with at least 32 MB of memory (required)
3. UART for serial console (required)
4. Non-volatile memory (optional), for example, QSPI Flash and SD/MMC
5. Ethernet (optional, essential for network access)
参考helloworld 实验建立工程,设计原理图。
需要添加补充的如下:添加设置DDR, QSPI,SD卡,串口用于显示(helloworld 实验里一样),网口,定时器。
下图是定时器的设置示意图:
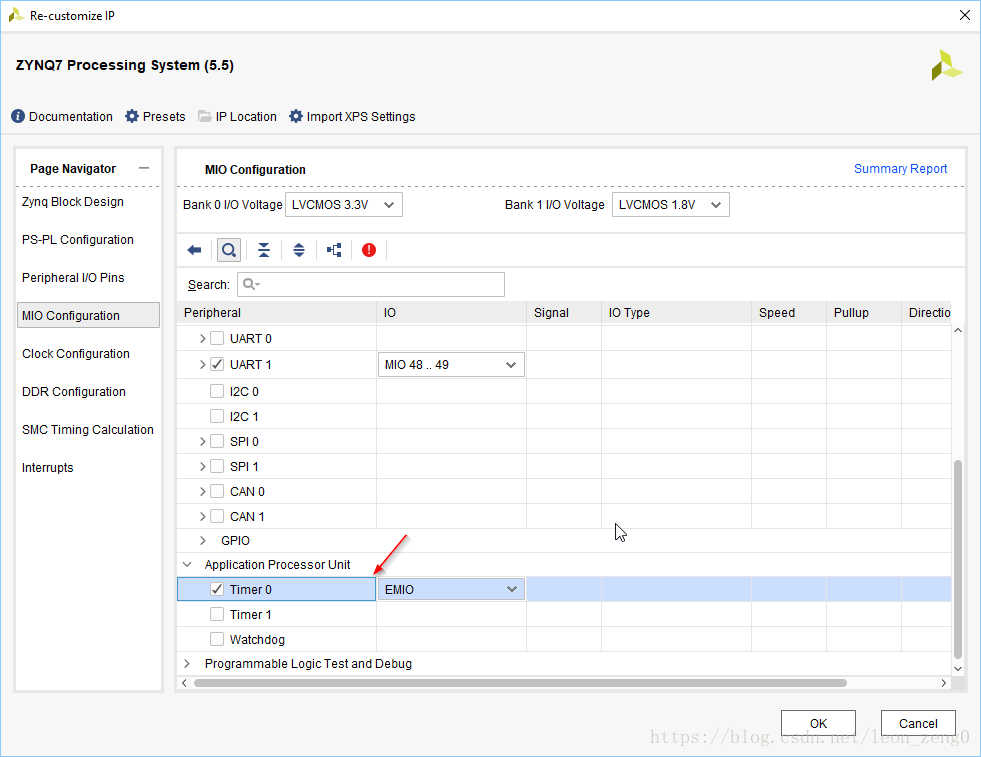

余下操作和helloworld 基本一样。右键单击 Block 文件,选择 Generate the Output Products,然后右键单击 Block 文件,选择 Create a HDL wrapper,根据 Block 文件内容产生一个 HDL 的顶层文件,并选择让 vivado 自动完成。
经Vivado综合,实现,比特流后,在Vivado中导出硬件,输出PetaLinux所需要的硬件描述文件 。
输出的文件就在“/(工程文件夹)/(工程名).sdk”这个文件夹下,这个文件夹下的system_wrapper.hdf待用。
2:建立petalinux 工程,配置,编译
2.1 配置petalinux 环境
source /home/liwenz/petalinux/settings.sh
我开始操作的时候,忘记前面的source, 请不要忘记。
2.2 建立工程
petalinux-create
liwenz@ubuntu:~/pro$ petalinux-create --type project --template zynq --name he
INFO: Create project: he
INFO: New project successfully created in /home/liwenz/pro/he
liwenz@ubuntu:~/pro$
2.3 复制第1章得到的hdf文件到工程目录下
cp /mnt/hgfs/xilinx/*.hdf /home/liwenz/pro/he
列表工程目录显示如下:
liwenz@ubuntu:~/pro$ ls -l he
total 372
-rw-r--r-- 1 liwenz liwenz 248 Sep 18 14:13 config.project
drwxr-xr-x 5 liwenz liwenz 4096 Sep 18 14:13 project-spec
-rwxrwxr-x 1 liwenz liwenz 369297 Sep 18 14:15 system_wrapper.hdf
liwenz@ubuntu:~/pro$
2.4 工程配置
工程配置就用 petalinux-config, 命令如下
petalinux-config --get-hw-description=<path-to-directory-containing-hardwaredescription-file>
包含硬件配置hdf文件的目录名
ug1144 和其他文档都这么说,可我操作总显示工程目录名不存在。
后来我就cd 工程目录(he)
然后在工程目录里配置 petalinux-config --get-hw-description=.
这样操作就没问题,这里工程目录名就是当前目录,用 一点'.'表示。
运行正常后,提示参数设置菜单栏:
Linux Components Selection --->
Auto Config Settings --->
-*- Subsystem AUTO Hardware Settings --->
DTG Settings --->
Kernel Bootargs --->
ARM Trusted Firmware Compilation Configuration --->
PMU FIRMWARE Configuration --->
u-boot Configuration --->
Image Packaging Configuration --->
Firmware Version Configuration --->
Yocto Settings --->
确保选择
| Subsystem AUTO Hardware Settings ---> |
进入子菜单对话:
| Subsystem AUTO Hardware Settings |
| System Processor (psu_cortexa53_0) ---> |
| Memory Settings ---> |
| Serial Settings ---> |
| Ethernet Settings ---> |
| Flash Settings ---> |
| SD/SDIO Settings ---> |
| RTC Settings ---> |
| [*]Advanced bootable images storage Settings ---> |
ug1144 上就这么介绍的,我也这么操作的,没有设置,只是简单保存,文件名就缺省 config,退出。
然后会运行比较长的时间。
如下是我创建配置 gpio工程目录的显示信息。
liwenz@ubuntu:~/pro/gpio$ petalinux-config --get-hw-description=.
INFO: Getting hardware description...
INFO: Rename system_wrapper.hdf to system.hdf
[INFO] generating Kconfig for project
[INFO] menuconfig project
/home/liwenz/pro/gpio/build/misc/config/Kconfig.syshw:30:warning: defaults for choice values not supported
/home/liwenz/pro/gpio/build/misc/config/Kconfig:597:warning: config symbol defined without type
*** End of the configuration.
*** Execute 'make' to start the build or try 'make help'.
[INFO] sourcing bitbake
[INFO] generating plnxtool conf
[INFO] generating meta-plnx-generated layer
[INFO] generating machine configuration
[INFO] generating bbappends for project . This may take time !
[INFO] generating u-boot configuration files
[INFO] generating kernel configuration files
[INFO] generating kconfig for Rootfs
[INFO] oldconfig rootfs
[INFO] generating petalinux-user-image.bb
liwenz@ubuntu:~/pro/gpio$
导入hdf 文件配置后,还可以多次配置,这个时候 petalinux-config 就可以了,以下是一次配置的图示过程。
liwenz@ubuntu:~/pro/he$ petalinux-config
[INFO] generating Kconfig for project
[INFO] menuconfig project
/home/liwenz/pro/he/build/misc/config/Kconfig.syshw:30:warning: defaults for choice values not supported
/home/liwenz/pro/he/build/misc/config/Kconfig:597:warning: config symbol defined without type
*** End of the configuration.
*** Execute 'make' to start the build or try 'make help'.
[INFO] sourcing bitbake
[INFO] generating plnxtool conf
[INFO] generating meta-plnx-generated layer
[INFO] generating machine configuration
[INFO] generating bbappends for project . This may take time !
[INFO] generating u-boot configuration files
[INFO] generating kernel configuration files
[INFO] generating kconfig for Rootfs
[INFO] oldconfig rootfs
[INFO] generating petalinux-user-image.bb
[INFO] successfully configured project
2.5 工程编译
按ug1144 的说法,petalinux-build 然后就可以了。
但我第一次做的时候显示fsbl 没有,可能第一次参数设置哪里乱改了一下,怎么也不成功。后来我就重建一个新工程hello。
我就添加了下面2个操作。
配置fsbl 并编译
petalinux-config -c bootloader
这个有一点点时间
petalinux-build -c bootloader
这个要用了一点时间,完成了fsbl 文件。
配置u-boot并编译
petalinux-config -c u-boot
配置的时候,我选择启动介质为SD , 而我下面图选择的是QSPI,我想尝试从QSPI启动。
│ │ [ ] Support for booting from NAND flash │ │
│ │ [ ] Support for booting from ONENAND │ │
│ │ [*] Support for booting from QSPI flash │ │
│ │ [ ] Support for booting from SATA │ │
│ │ [ ] Support for booting from SD/EMMC │ │
│ │ [ ] Support for booting from SPI flash
petalinux-build -c u-boot
则是编译u-boot,需要些时间,产生了u-boot 文件。
做了上面2个分次配置,编译后,我就直接总编译。
petalinux-build
以下是我的一次图示过程:
liwenz@ubuntu:~/pro/he$ petalinux-build
[INFO] building project
[INFO] sourcing bitbake
INFO: bitbake petalinux-user-image
Loading cache: 100% |########################################################################################| Time: 0:00:03
Loaded 3423 entries from dependency cache.
Parsing recipes: 100% |######################################################################################| Time: 0:00:10
Parsing of 2552 .bb files complete (2514 cached, 38 parsed). 3425 targets, 148 skipped, 0 masked, 0 errors.
NOTE: Resolving any missing task queue dependencies
Initialising tasks: 100% |###################################################################################| Time: 0:00:13
Checking sstate mirror object availability: 100% |###########################################################| Time: 0:00:15
NOTE: Executing SetScene Tasks
NOTE: Executing RunQueue Tasks
WARNING: petalinux-user-image-1.0-r0 do_rootfs: [log_check] petalinux-user-image: found 1 warning message in the logfile:
[log_check] warning: %post(sysvinit-inittab-2.88dsf-r10.plnx_zynq7) scriptlet failed, exit status 1
NOTE: Tasks Summary: Attempted 3065 tasks of which 2996 didn't need to be rerun and all succeeded.
Summary: There was 1 WARNING message shown.
INFO: Copying Images from deploy to images
NOTE: Successfully copied built images to tftp dir: /tftpboot
[INFO] successfully built project
liwenz@ubuntu:~/pro/he$
分次编译的目的就是先做一些排除,同时减少总编译的时间。
总编译是很花时间的。完成后就在images/linux 下生成了需要的文件。
下面是列表的情况:
liwenz@ubuntu:~/pro/he$ ls images/linux
image.ub rootfs.ext3 rootfs.manifest System.map.linux
rootfs.bin rootfs.ext3.bz2 rootfs.tar.bz2 u-boot.bin
rootfs.cpio rootfs.ext4 rootfs.tar.gz u-boot.elf
rootfs.cpio.bz2 rootfs.ext4.gz rootfs.testdata.json vmlinux
rootfs.cpio.gz rootfs.its system.bit zImage
rootfs.cpio.gz.u-boot rootfs.jffs2 system.dtb zynq_fsbl.elf
liwenz@ubuntu:~/pro/he$
3:打包和启动测试
有了上面工程编译的文件,需要打包成boot.bin
其操作是:
petalinux-package --boot --fsbl <FSBL image> --fpga <FPGA bitstream> --u-boot
下面是实际操作图:
liwenz@ubuntu:~/pro/he/images/linux$ petalinux-package --boot --fsbl zynq_fsbl.elf --fpga system.bit --u-boot
INFO: File in BOOT BIN: "/home/liwenz/pro/he/images/linux/zynq_fsbl.elf"
INFO: File in BOOT BIN: "/home/liwenz/pro/he/images/linux/system.bit"
INFO: File in BOOT BIN: "/home/liwenz/pro/he/images/linux/u-boot.elf"
INFO: Generating zynq binary package BOOT.BIN...
****** Xilinx Bootgen v2018.2
**** Build date : Jun 14 2018-20:09:18
** Copyright 1986-2018 Xilinx, Inc. All Rights Reserved.
INFO: Binary is ready.
liwenz@ubuntu:~/pro/he/images/linux$
最后就是复制 BOOT.BIN 和image.ub 到一张格式化成fat32 的SD 空卡里。
把zynq 板卡设置成SD启动,就可以在串口上看到启动过程,最后提示输入用户名 root 密码 root
就登陆了自己做的petalinux 里了。
以下就是最后登陆的复制部分:
...
can: netlink gateway (rev 20170425) max_hops=1
Registering SWP/SWPB emulation handler
hctosys: unable to open rtc device (rtc0)
of_cfs_init
of_cfs_init: OK
ALSA device list:
No soundcards found.
Freeing unused kernel memory: 1024K
mmc0: new SDHC card at address 0001
mmcblk0: mmc0:0001 ASTC 7.44 GiB (ro)
INIT: mmcblk0: p1
version 2.88 booting
Starting udev
udevd[729]: starting version 3.2.2
udevd[730]: starting eudev-3.2.2
hwclock: can't open '/dev/misc/rtc': No such file or directory
Sun Sep 16 06:14:01 UTC 2018
hwclock: can't open '/dev/misc/rtc': No such file or directory
Starting internet superserver: inetd.
Configuring packages on first boot....
(This may take several minutes. Please do not power off the machine.)
Running postinst /etc/rpm-postinsts/100-sysvinit-inittab...
update-rc.d: /etc/init.d/run-postinsts exists during rc.d purge (continuing)
Removing any system startup links for run-postinsts ...
/etc/rcS.d/S99run-postinsts
INIT: Entering runlevel: 5
Configuring network interfaces... IPv6: ADDRCONF(NETDEV_UP): eth0: link is not ready
udhcpc (v1.24.1) started
Sending discover...
Sending discover...
Sending discover...
No lease, forking to background
done.
Starting Dropbear SSH server: Generating key, this may take a while...
Public key portion is:
ssh-rsa AAAAB3NzaC1yc2EAAAADAQABAAABAQC3altEc5t87dW5cBWfTdaYLbRDL0uMpiQAFLv5L4eEHtFuFPqnfnz+tR2QCOPFTTMJjvZuKwIsGhQn2Ys/sFemHPCCp/RxrMhVuihYb9IiOLoI2kzI3DsDx8ASdLjcKcYLaFnh+OID9olHsjJDilxyYBvHueVbewBWItG52jRRVHSrQibks6pV978FMJ7ZSgNdP8IK/1hlmIeSI1NQ2oT6NwDvu8sCetCS7C8SU1yDEBxHdr2vdeyIEdCcjK1beaeip5ViBCQp3U73nXpvMsN6MSwWJCYthGBYgTjFcRgJx7TbSmwoTxFYkjDoOryJzfVPAB/XaEE/Y61umMNmLiBp root@hello
Fingerprint: md5 99:3f:b0:0c:b4:c4:f8:96:e5:b5:19:d2:4a:eb:05:e6
dropbear.
hwclock: can't open '/dev/misc/rtc': No such file or directory
Starting syslogd/klogd: done
Starting tcf-agent: OK
PetaLinux 2018.2 hello /dev/ttyPS0
hello login: root
Password:
root@hello:~#
本文主要参考了ug1144,还有https://blog.csdn.net/long_fly/article/details/78727813。