mask_rcnn github地址:https://github.com/matterport/Mask_RCNN
一、配置
1、安装 Anconda
Anconda下载地址:https://mirrors.tuna.tsinghua.edu.cn/anaconda/archive/
2、创建名为tensorflow的python36环境
conda create -n tensorflow python=3.6 //创建环境
source activate tensorflow //激活环境
3、配置环境tensorflow
(1)安装Tensorflow(CPU)
pip install tensorflow
(2)安装keras
pip install keras
(3)安装opencv
pip install opencv-python
(5)安装其他依赖包
pip install cython
pip install scikit-image
pip install theano
pip install jupyter
(4)安装pycocotools
下载地址:https://github.com/waleedka/coco
解压后,cd到PythonAPI里面,输入make
二、运行
1、下载Mask-RCNN
github地址:https://github.com/matterport/Mask_RCNN
2、下载coco权重文件
文件mask_rcnn_coco.h5 (246MB)
下载地址:https://github.com/matterport/Mask_RCNN/releases
若下载过慢,百度网盘: https://pan.baidu.com/s/18OYXRM3Fpqmk1cs9vH5WNA
下载完成以后放在Mask_RCNN目录下
3、运行Mask_RCNN的demo
(1)Jupyter运行
Mask_RCNN根目录下输入:jupyter notebook
稍等片刻,会在浏览器打开页面,点击进入 samples目录,点击demo.ipynp进入代码运行页面
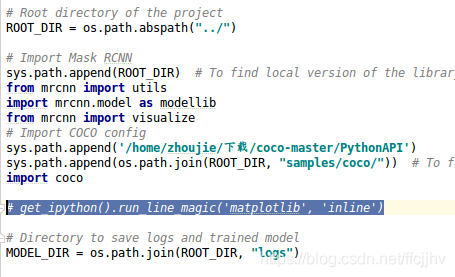
把pycocotools路径加到系统路径
sys.path.append('/home/zhoujie/下载/coco-master/PythonAPI')
修改后点击保存(工具栏最左边按钮),再点击重启服务然后运行整个代码(工具栏最右边按钮)

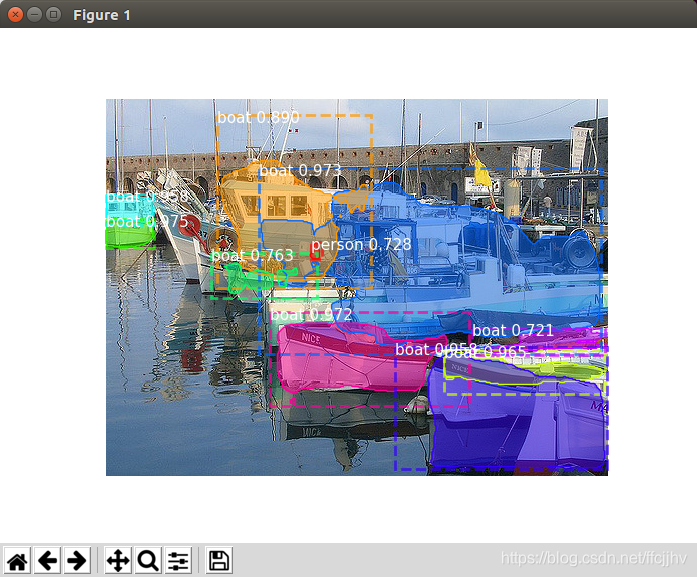
出现结果
 (2)pycharm运行
Mask_RCNN根目录下输入:jupyter notebook
稍等片刻,会在浏览器打开页面,点击进入 samples目录,点击demo.ipynp进入代码运行页面
点击文件-下载-Python(.py),将demo.py保存到samples文件夹
把pycocotools路径加到系统路径
sys.path.append('/home/zhoujie/下载/coco-master/PythonAPI')
再注释掉# get_ipython().run_line_magic('matplotlib', 'inline')
就可以运行demo.py了
 运行结果:
运行结果: