目标检测是计算机视觉和模式识别的重要研究方向,主要是确定图像中是否有感兴趣的目标存在,并对其进行探测和精确定位。传统的目标检测流程采用滑动窗口进行区域选择,然后采用 SIFT、HOG 等方法进行特征提取,最后采用 SVM、Adaboost 进行类别判断。但是传统的目标检测方法面临的主要问题有:特征提取鲁棒性差,不能反应光照变化、背景多样等情况;区域选择没有针对性,时间复杂度高,窗口冗余。基于深度学习的目标检测模型有 Faster RCNN,Yolo 和 Yolo2,SSD 等,对图片中的物体进行目标检测的应用示例如下所示:
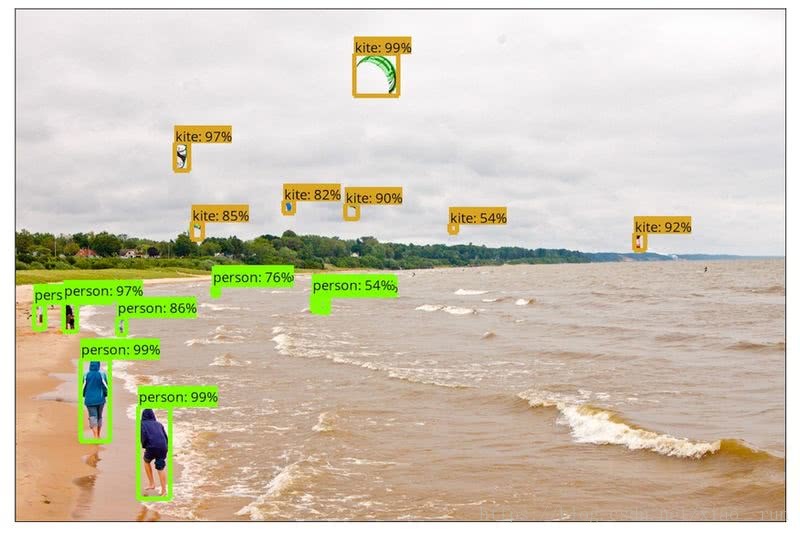
从上图中可以看出,目标检测主要指检测一张图像中有什么目标,并使用方框表示出来;而实体分割要标出每个像素所属的类别。下图的实体分割,不仅把每个物体的方框标注出来,并且把每个方框中像素所属的类别也标记出来。下图中每个方框中包含的信息有目标所属类别,置信概率以及方框中每个像素的类别。
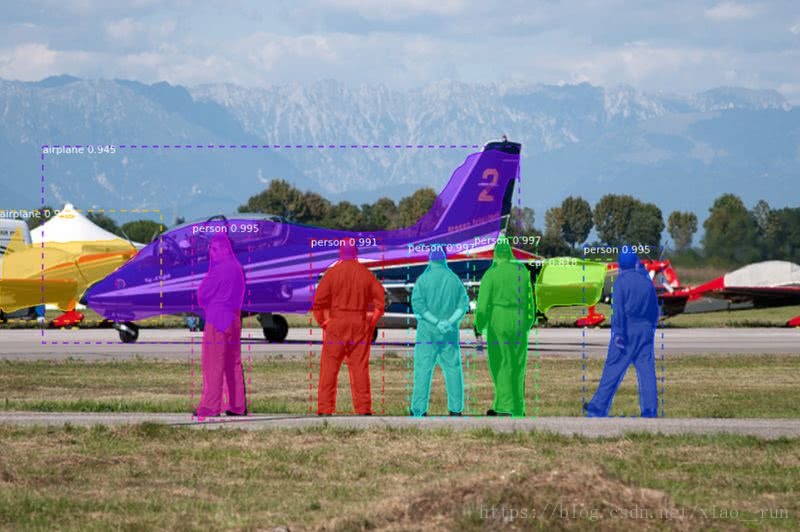
Kaiming He 等于 2017 年提出 Mask RCNN 网络结构,该网络结构主要用于目标检测和实体分割,并且赢得了 COCO 2016 挑战赛的冠军。该文章的主要思想是把 Faster RCNN 目标检测框架进行扩展,添加一个 Mask 分支用于检测目标框中每个像素的类别,如上图
从 https://github.com/matterport/Mask_RCNN.git 下载 MaskRCNN 代码,该代码由 matterport 公司开源,模型主要由 keras 和 tensorflow API 实现。本应用的模型训练主函数代码为 Mask_RCNN/samples下demo.ipynb修改成 demo.py,如下
环境配置:
1.安装tensorflow 1.3+
安装tensorflow:
对于CPU版本:pip install tensorflow
对于GPU版本:pip install tensorflow-gpu
升级tensorflow到最新版1.4.0:pip install --upgrade tensorflow-gpu
2.安装keras(2.08+)
pip install keras3.安装scikit-image
sudo pip install scikit-image git clone https://github.com/matterport/Mask_RCNN.git
cd Mask_RCNN4.下载预训练的coco权重文件(mask_rcnn_coco.h5)
https://github.com/matterport/Mask_RCNN/releases5.为了在MS COCO上训练或者测试,需要安装pycocotools.
https://github.com/waleedka/cocoMS COCO是一个大型图像数据集用于目标检测,分割以及图像字幕产生。pycocotools提供了matlab,Python,以及lua APIs用于加载、可视化COCO的标注。
对于我们的python安装: 打开coco/PythonAPI
第一步:
git clone https://github.com/pdollar/coco.git第二步:
cd coco/PythonAPI

python3 setup.py build_ext --inplace
第三步:
python3 setup.py build_ext install本应用的模型训练主函数代码为 Mask_RCNN/samples/demo.ipython,为了方便我们修改为demo.py
import os
import sys
import random
import math
import numpy as np
import skimage.io
import matplotlib
import matplotlib.pyplot as plt
# Root directory of the project
ROOT_DIR = os.path.abspath("../")
# Import Mask RCNN
sys.path.append(ROOT_DIR) # To find local version of the library
from mrcnn import utils
import mrcnn.model as modellib
from mrcnn import visualize
# Import COCO config
sys.path.append(os.path.join(ROOT_DIR, "samples/coco/")) # To find local version
sys.path.append('/home/xiaorun/deeplerning/Mask_RCNN/coco/PythonAPI')
import coco
#%matplotlib inline
# Directory to save logs and trained model
MODEL_DIR = os.path.join(ROOT_DIR, "logs")
# Local path to trained weights file
COCO_MODEL_PATH = os.path.join(ROOT_DIR, "mask_rcnn_coco.h5")
# Download COCO trained weights from Releases if needed
if not os.path.exists(COCO_MODEL_PATH):
utils.download_trained_weights(COCO_MODEL_PATH)
# Directory of images to run detection on
IMAGE_DIR = os.path.join(ROOT_DIR, "images")
class InferenceConfig(coco.CocoConfig):
# Set batch size to 1 since we'll be running inference on
# one image at a time. Batch size = GPU_COUNT * IMAGES_PER_GPU
GPU_COUNT = 1
IMAGES_PER_GPU = 1
config = InferenceConfig()
config.display()
# Create model object in inference mode.
model = modellib.MaskRCNN(mode="inference", model_dir=MODEL_DIR, config=config)
# Load weights trained on MS-COCO
model.load_weights(COCO_MODEL_PATH, by_name=True)
# COCO Class names
# Index of the class in the list is its ID. For example, to get ID of
# the teddy bear class, use: class_names.index('teddy bear')
class_names = ['BG', 'person', 'bicycle', 'car', 'motorcycle', 'airplane',
'bus', 'train', 'truck', 'boat', 'traffic light',
'fire hydrant', 'stop sign', 'parking meter', 'bench', 'bird',
'cat', 'dog', 'horse', 'sheep', 'cow', 'elephant', 'bear',
'zebra', 'giraffe', 'backpack', 'umbrella', 'handbag', 'tie',
'suitcase', 'frisbee', 'skis', 'snowboard', 'sports ball',
'kite', 'baseball bat', 'baseball glove', 'skateboard',
'surfboard', 'tennis racket', 'bottle', 'wine glass', 'cup',
'fork', 'knife', 'spoon', 'bowl', 'banana', 'apple',
'sandwich', 'orange', 'broccoli', 'carrot', 'hot dog', 'pizza',
'donut', 'cake', 'chair', 'couch', 'potted plant', 'bed',
'dining table', 'toilet', 'tv', 'laptop', 'mouse', 'remote',
'keyboard', 'cell phone', 'microwave', 'oven', 'toaster',
'sink', 'refrigerator', 'book', 'clock', 'vase', 'scissors',
'teddy bear', 'hair drier', 'toothbrush']
# Load a random image from the images folder
file_names = next(os.walk(IMAGE_DIR))[2]
image = skimage.io.imread(os.path.join(IMAGE_DIR, random.choice(file_names)))
# Run detection
results = model.detect([image], verbose=1)
# Visualize results
r = results[0]
visualize.display_instances(image, r['rois'], r['masks'], r['class_ids'],
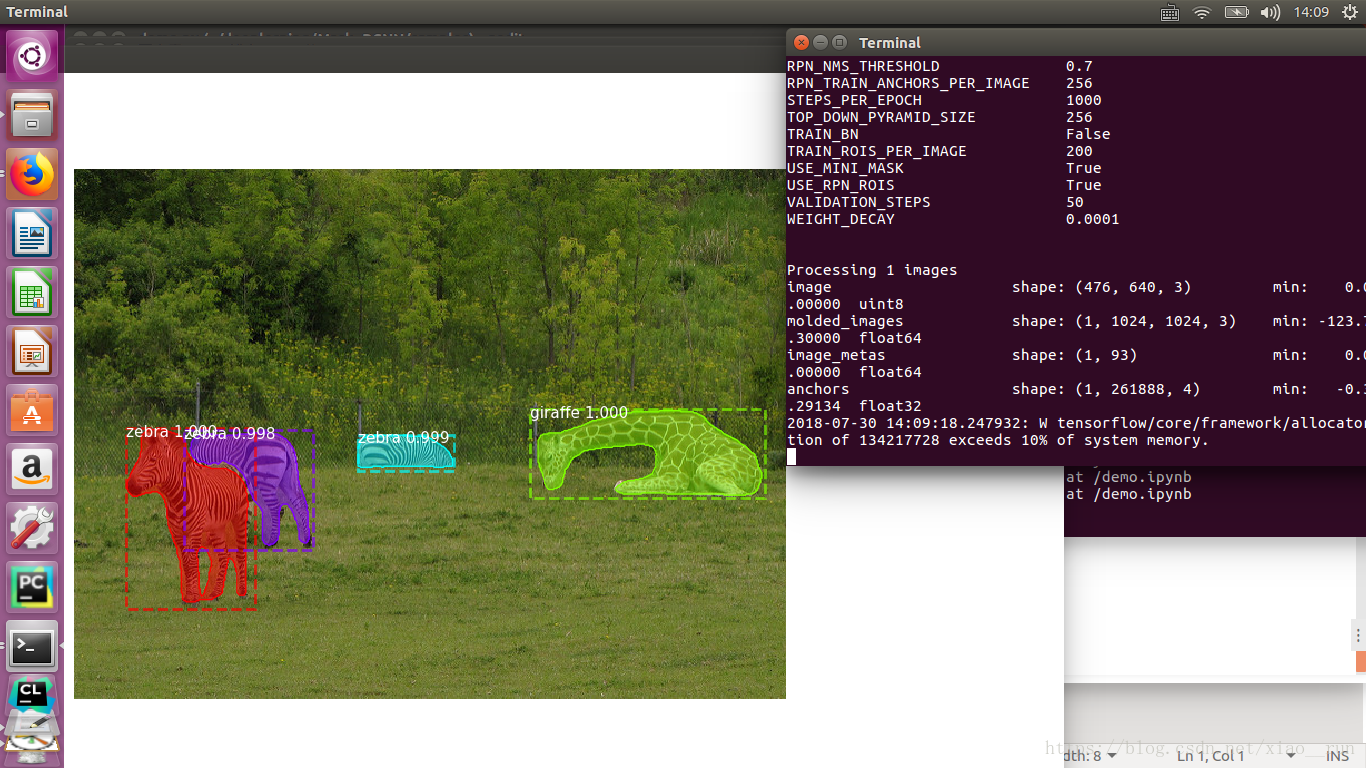
class_names, r['scores'])运行python3 demo.py
结果如下
三、使用labelme生成mask掩码数据集
github地址:https://github.com/wkentaro/labelme
安装方式:
sudo apt-get install python3-qt5 pyqt5-dev-tools
sudo pip install labelme
使用,只需在终端输入:
labelme
我的数据集命名如下
这里写图片描述
Note:在画掩码过程中如有多个box、fruit…命名规则为box1、box2..fruit1、fruit2..。因为labelme这个标定工具还是不太智能,最后生成的标签为一个label.png文件,这个文件只有一通道,在你标注时同一标签mask会被给予一个标签位,而mask要求不同的实例要放在不同的层中。最终训练索要得到的输入为一个w*h*n的ndarray,其中n为该图片中实例的个数。总而言之,画mask时就按照上述命名规则就好了,具体的过程已经在上述代码中实现。如图:这里写图片描述。
此时labelme生成的为.json文件,需要将json文件转换为我们需要的标签文件,我这里写了一个简单的脚本,不用一个个去转化了,只需将s1改为你对应的路径及图片前缀名,循环数改为自己数据集数即可
#!/bin/bash
s1="/media/lj/GSP1RMCPRXV/fg_dateset/json/rgb_"
s2=".json"
for((i=1;i<901;i++))
do
s3=${i}
labelme_json_to_dataset ${s1}${s3}${s2}
done
在你图片目录下会生成多个rgb_x_json文件夹,每个文件夹中有img.png(原图),info.yaml,label.png,label_viz.png四个文件,其中需要用的只有info.yaml以及label.png
转化出来的可视化标签如图:
这里写图片描述
四、转化label.png为可用格式
labelme生成的掩码标签 label.png为16位存储,opencv默认读取8位,需要将16位转8位
参考:http://blog.csdn.net/l297969586/article/details/79154150
五、训练
直接运行修改后的py文件即可,训练中图片展示: