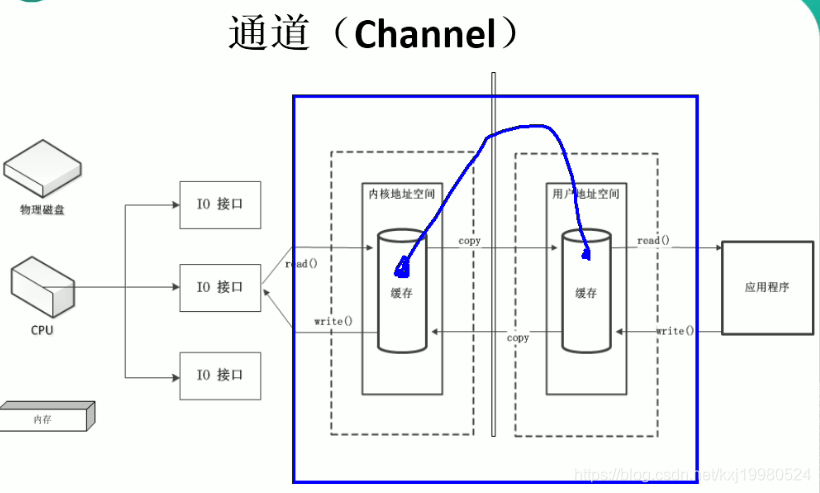
在学网络通信之前先看看NIO缓冲区和通道
上节说到这个IO传输是先传输到内核地址空间,再copy到用户空间的一个过程
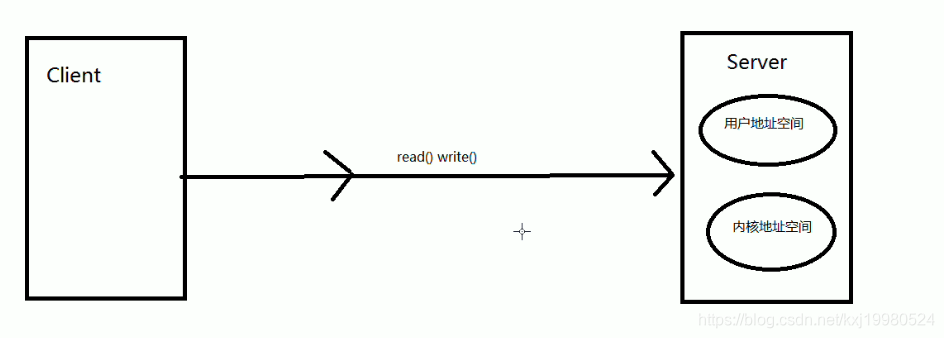
在socket通信当中,服务端判断客户端是否传过来有效数据是通过线程不停的判断内核地址种是否有有效数据,如果没有有效数据就处于阻塞状态,当别的用户也访问的时候就访问不了了.
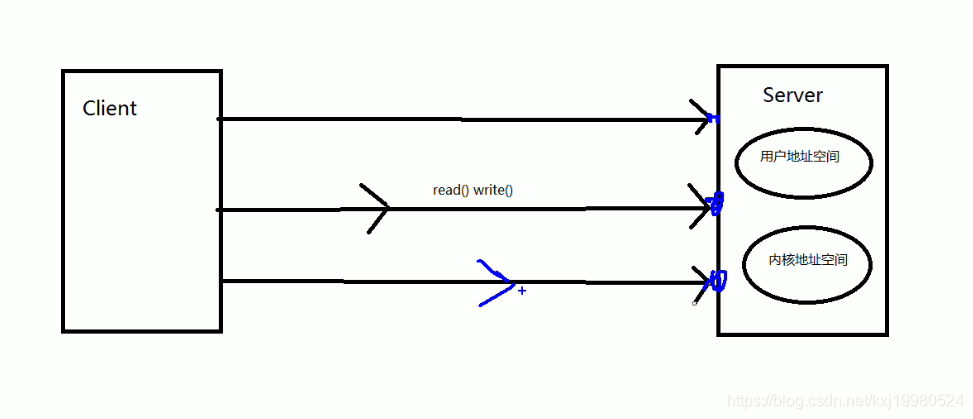
所以在sokect解决方案中,一个用户会单独开辟一个线程这样每个用户之间就不会打扰了,但是线程池总量有一定大小,如果阻塞的线程到达一定数量,还是有一部分用户在等待.这样虽然相对于原来,cpu利用率提高了,但是没完全提升,这就是原来io阻塞式.
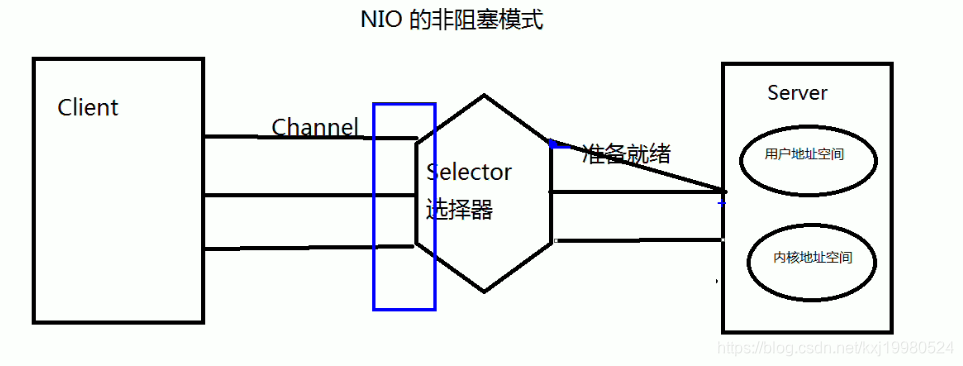
NIO非阻塞式
就是在客户端和服务端建立的通道之间有个selector选择器,它是用来时时刻刻监控客户端想要建立与服务端的通信的通道,会在该选择器上先注册,不会直接与服务端建立联系,当客户端的数据完全准备充分时,选择器才会与服务端建立一个或多个线程来执行客户端发送的操作,如果客户端没准备充分的时候是不会与服务端建立线程的.这样服务端的线程就不会被阻塞,大大提高了服务端cpu的效率.
下面这是一个简单的socket阻塞式的测试,先开启服务器,再开启客户端,发现服务端给客户端打印的话一直没有回馈,这就是因为客户端一直占用着线程,当建立连接后就一直跟服务端保持连接.除非把sChannel.shutdownOutput();这个打开,关闭连接后就接收到了.
package com.atguigu.nio;

import java.io.IOException;
import java.net.InetSocketAddress;
import java.nio.ByteBuffer;
import java.nio.channels.FileChannel;
import java.nio.channels.ServerSocketChannel;
import java.nio.channels.SocketChannel;
import java.nio.file.Paths;
import java.nio.file.StandardOpenOption;

import org.junit.Test;

public class TestBlockingNIO2 {

	//客户端
	@Test
	public void client() throws IOException{
		SocketChannel sChannel = SocketChannel.open(new InetSocketAddress("127.0.0.1", 9898));

		FileChannel inChannel = FileChannel.open(Paths.get("1.jpg"), StandardOpenOption.READ);

		ByteBuffer buf = ByteBuffer.allocate(1024);

		while(inChannel.read(buf) != -1){
			buf.flip();
			sChannel.write(buf);
			buf.clear();
		}

		//sChannel.shutdownOutput();

		//接收服务端的反馈
		int len = 0;
		while((len = sChannel.read(buf)) != -1){
			buf.flip();
			System.out.println(new String(buf.array(), 0, len));
			buf.clear();
		}

		inChannel.close();
		sChannel.close();
	}

	//服务端
	@Test
	public void server() throws IOException{
		ServerSocketChannel ssChannel = ServerSocketChannel.open();

		FileChannel outChannel = FileChannel.open(Paths.get("2.jpg"), StandardOpenOption.WRITE, StandardOpenOption.CREATE);

		ssChannel.bind(new InetSocketAddress(9898));

		SocketChannel sChannel = ssChannel.accept();

		ByteBuffer buf = ByteBuffer.allocate(1024);

		while(sChannel.read(buf) != -1){
			buf.flip();
			outChannel.write(buf);
			buf.clear();
		}

		//发送反馈给客户端
		buf.put("服务端接收数据成功".getBytes());
		buf.flip();
		sChannel.write(buf);

		sChannel.close();
		outChannel.close();
		ssChannel.close();
	}

}
下面就是非阻塞式的方式,客户端如果不循环发消息的话,你会发现客户端启动后执行完,它会关闭连接,但上面阻塞式,就算只发一句也会直接保持连接的状态.在实际应用的时候,可以把服务端的那几个判断都放到独立的线程当中去就可以了.
package com.atguigu.nio;
import java.io.IOException;
import java.net.InetSocketAddress;
import java.nio.ByteBuffer;
import java.nio.channels.SelectionKey;
import java.nio.channels.Selector;
import java.nio.channels.ServerSocketChannel;
import java.nio.channels.SocketChannel;
import java.util.Date;
import java.util.Iterator;
import java.util.Scanner;
import org.junit.Test;
/*
* 一、使用 NIO 完成网络通信的三个核心:
*
* 1. 通道(Channel):负责连接
*
* java.nio.channels.Channel 接口:
* |--SelectableChannel
* |--SocketChannel
* |--ServerSocketChannel
* |--DatagramChannel
*
* |--Pipe.SinkChannel
* |--Pipe.SourceChannel
*
* 2. 缓冲区(Buffer):负责数据的存取
*
* 3. 选择器(Selector):是 SelectableChannel 的多路复用器。用于监控 SelectableChannel 的 IO 状况
*
*/
public class TestNonBlockingNIO {
//客户端
@Test
public void client() throws IOException{
//1. 获取通道
SocketChannel sChannel = SocketChannel.open(new InetSocketAddress("127.0.0.1", 9898));
//2. 切换非阻塞模式
sChannel.configureBlocking(false);
//3. 分配指定大小的缓冲区
ByteBuffer buf = ByteBuffer.allocate(1024);
buf.put((new Date().toString() + "\n" + str).getBytes());
buf.flip();
sChannel.write(buf);
buf.clear();
/*//4. 发送数据给服务端
Scanner scan = new Scanner(System.in);
while(scan.hasNext()){
String str = scan.next();
buf.put((new Date().toString() + "\n" + str).getBytes());
buf.flip();
sChannel.write(buf);
buf.clear();
}*/
//5. 关闭通道
sChannel.close();
}
//服务端
@Test
public void server() throws IOException{
//1. 获取通道
ServerSocketChannel ssChannel = ServerSocketChannel.open();
//2. 切换非阻塞模式
ssChannel.configureBlocking(false);
//3. 绑定连接
ssChannel.bind(new InetSocketAddress(9898));
//4. 获取选择器
Selector selector = Selector.open();
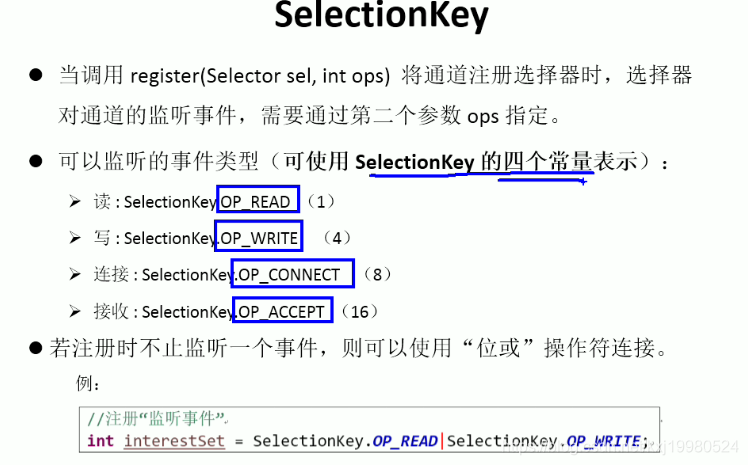
//5. 将通道注册到选择器上, 并且指定“监听接收事件”
ssChannel.register(selector, SelectionKey.OP_ACCEPT);
//6. 轮询式的获取选择器上已经“准备就绪”的事件
while(selector.select() > 0){
//7. 获取当前选择器中所有注册的“选择键(已就绪的监听事件)”
Iterator<SelectionKey> it = selector.selectedKeys().iterator();
while(it.hasNext()){
//8. 获取准备“就绪”的是事件
SelectionKey sk = it.next();
//9. 判断具体是什么事件准备就绪
if(sk.isAcceptable()){
//10. 若“接收就绪”,获取客户端连接
SocketChannel sChannel = ssChannel.accept();
//11. 切换非阻塞模式
sChannel.configureBlocking(false);
//12. 将该通道注册到选择器上
sChannel.register(selector, SelectionKey.OP_READ);
}else if(sk.isReadable()){
//13. 获取当前选择器上“读就绪”状态的通道
SocketChannel sChannel = (SocketChannel) sk.channel();
//14. 读取数据
ByteBuffer buf = ByteBuffer.allocate(1024);
int len = 0;
while((len = sChannel.read(buf)) > 0 ){
buf.flip();
System.out.println(new String(buf.array(), 0, len));
buf.clear();
}
}
//15. 取消选择键 SelectionKey
it.remove();
}
}
}
}
udp传输协议,使用过程都一样只是实现类不同.
package com.atguigu.nio;

import java.io.IOException;
import java.net.InetSocketAddress;
import java.nio.ByteBuffer;
import java.nio.channels.DatagramChannel;
import java.nio.channels.SelectionKey;
import java.nio.channels.Selector;
import java.util.Date;
import java.util.Iterator;
import java.util.Scanner;

import org.junit.Test;

public class TestNonBlockingNIO2 {

	@Test
	public void send() throws IOException{
		DatagramChannel dc = DatagramChannel.open();

		dc.configureBlocking(false);

		ByteBuffer buf = ByteBuffer.allocate(1024);

		Scanner scan = new Scanner(System.in);

		while(scan.hasNext()){
			String str = scan.next();
			buf.put((new Date().toString() + ":\n" + str).getBytes());
			buf.flip();
			dc.send(buf, new InetSocketAddress("127.0.0.1", 9898));
			buf.clear();
		}

		dc.close();
	}

	@Test
	public void receive() throws IOException{
		DatagramChannel dc = DatagramChannel.open();

		dc.configureBlocking(false);

		dc.bind(new InetSocketAddress(9898));

		Selector selector = Selector.open();

		dc.register(selector, SelectionKey.OP_READ);

		while(selector.select() > 0){
			Iterator<SelectionKey> it = selector.selectedKeys().iterator();

			while(it.hasNext()){
				SelectionKey sk = it.next();

				if(sk.isReadable()){
					ByteBuffer buf = ByteBuffer.allocate(1024);

					dc.receive(buf);
					buf.flip();
					System.out.println(new String(buf.array(), 0, buf.limit()));
					buf.clear();
				}
			}

			it.remove();
		}
	}

}
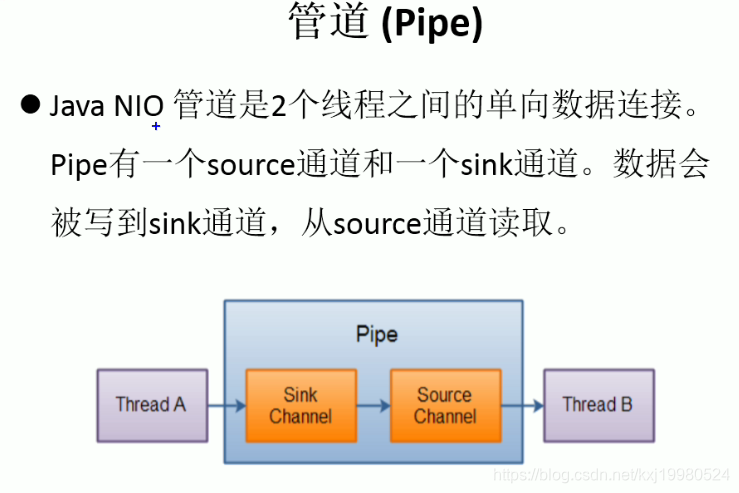
管道用来两个线程之间的读写
package com.atguigu.nio;

import java.io.IOException;
import java.nio.ByteBuffer;
import java.nio.channels.Pipe;

import org.junit.Test;

public class TestPipe {

	@Test
	public void test1() throws IOException{
		//1. 获取管道
		Pipe pipe = Pipe.open();

		//2. 将缓冲区中的数据写入管道
		ByteBuffer buf = ByteBuffer.allocate(1024);

		Pipe.SinkChannel sinkChannel = pipe.sink();
		buf.put("通过单向管道发送数据".getBytes());
		buf.flip();
		sinkChannel.write(buf);

		//3. 读取缓冲区中的数据
		Pipe.SourceChannel sourceChannel = pipe.source();
		buf.flip();
		int len = sourceChannel.read(buf);
		System.out.println(new String(buf.array(), 0, len));

		sourceChannel.close();
		sinkChannel.close();
	}

}