
Zipkin是twitter在google的dapper论文的基础上实现的分布式跟踪系统。关于dapper的解读,详细可以参看:https://blog.csdn.net/liumiaocn/article/details/80657661
zipkin概要信息
| 项目 | 说明 |
|---|---|
| 官方网站 | https://zipkin.io/ |
| 开源/闭源 | 开源 |
| License类别 | Apache License 2.0 |
| 代码管理地址 | https://github.com/openzipkin/zipkin/ |
| 开发语言 | Java,Javascript |
| 支持平台 | 可运行于Linux/Windows/MacOS等多种操作系统,并提供docker标准镜像 |
| 当前版本 | 2.9.1 (2018/06/11) |
| 更新频度 | 平均每月数次 |
使用zipkin
使用docker方式,使用如下方法,可以最简单快速地启动zipkin
docker run –name zipkin -d -p 9411:9411 openzipkin/zipkin
[root@kong ~]# docker pull openzipkin/zipkin
Using default tag: latest
Trying to pull repository docker.io/openzipkin/zipkin ...
latest: Pulling from docker.io/openzipkin/zipkin
3a9e9033596c: Pull complete
187e634e5a8a: Pull complete
fdcad99cc6cd: Pull complete
Digest: sha256:8b6d9da454dcd38ed8c34f11d4a9008d9ad664d913748ebc9b13c247596e7e6c
Status: Downloaded newer image for docker.io/openzipkin/zipkin:latest
[root@kong ~]#
[root@kong ~]#docker run --name zipkin -d -p 9411:9411 openzipkin/zipkin
6a752c4fef6283712908070661ca8e2d6e3d96c535432d04a66a24233ce81949
[root@kong ~]#- 1
- 2
- 3
- 4
- 5
- 6
- 7
- 8
- 9
- 10
- 11
- 12
- 13
zipkin架构
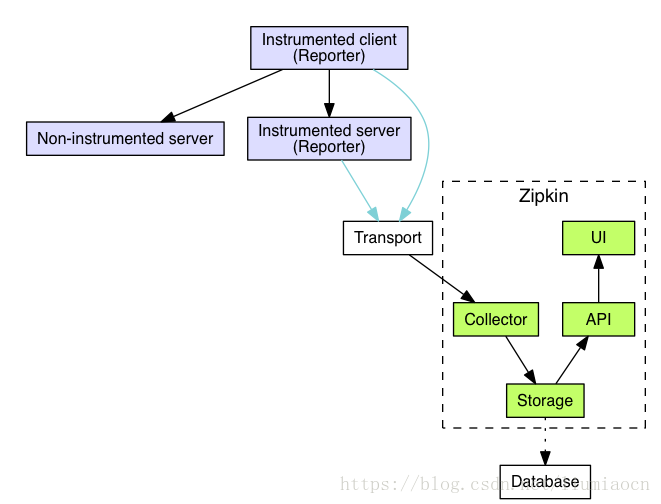
zipkin由图示的四个部分组成:
- collector
- storage
- API
- web UI
Python项目依赖
为了在Python项目中使用zipkin,需要py_zipkin/pyramid/pyramid_zipkin 。在CentOS系Linux发行版上命令如下:
yum install python-devel
pip install –trusted-host pypi.org –trusted-host files.pythonhosted.org py_zipkin pyramid pyramid_zipkin
模拟dapper论文的调用链
在这篇文章中我们将会模拟在Python项目中如何跟中dapper论文中的三层架构的例子:
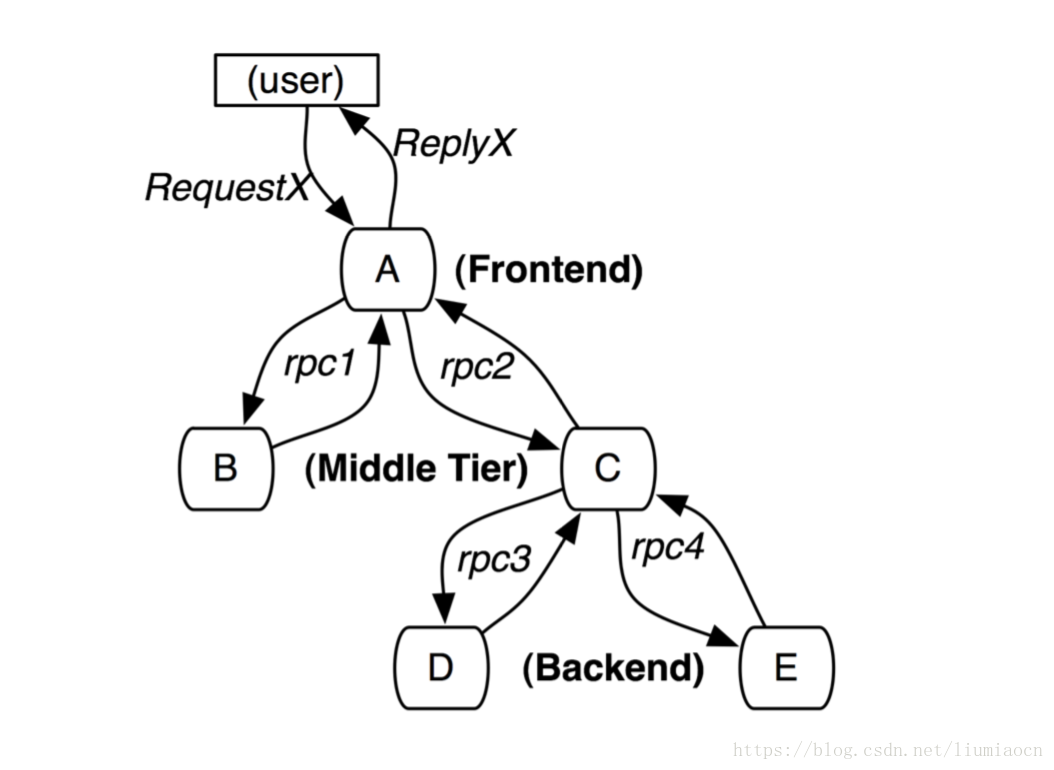
| 层次 | 服务名称 | 父span | 调用顺序 |
|---|---|---|---|
| 前端 | Frontend:A | 无 | 1 |
| 中间 | MiddleTier:B | A | 2 |
| 中间 | MiddleTier:C | A | 3 |
| 后端 | Backend:D | C | 4 |
| 后端 | Backend:E | C | 5 |
这样的一个树形结构,表现出来的调用顺序则是:A->B->C->D->E。
模拟五个服务
使用python简单地模拟如上地A-E等五个服务,其中A和C为调用节点,而B/D/E为终端节点,A会调用B和C,其示例代码如下,C与之类似:
[root@kong python]# ls
A.py  B.py  C.py  D.py  E.py  test_zipkin.sh
[root@kong python]# cat A.py
import requests
import datetime
from pyramid.response import Response
from pyramid.view import view_config
from pyramid.config import Configurator
from py_zipkin.zipkin import create_http_headers_for_new_span
from wsgiref.simple_server import make_server

class ZipkinNode:
  #properties:
  connect_url='http://localhost:9001/api'
  zipkin_url='http://localhost:9411'
  zipkin_span_api=zipkin_url+'/api/v1/spans'
  zipkin_service_name='default_service_name'
  config=None

  #function: zikpin callback handler
  def zipkin_handler(self,stream_name, encoded_span):
    requests.post(
        self.zipkin_span_api,
        data=encoded_span,
        headers={'Content-Type': 'application/x-thrift'},
    )

  #function:
  def init_zipkin_settings(self,service_name):
    settings = {}
    settings['service_name'] = service_name
    self.zipkin_service_name=service_name
    settings['zipkin.transport_handler'] = self.zipkin_handler
    settings['zipkin.tracing_percent'] = 100.0

    self.config = Configurator(settings=settings)
    self.config.include('pyramid_zipkin')

  #function: add route
  def add_router(self,router_type,router_url):
    self.config.add_route(router_type, router_url)
    self.config.scan()

  #function:
  def invoke_wsgi_service(self,host_port):
    app = self.config.make_wsgi_app()
    server = make_server('0.0.0.0', host_port, app)
    print('service '+self.zipkin_service_name+' listening : http://localhost:'+str(host_port))
    server.serve_forever()

#function: connector node callback function
@view_config(route_name='invoke_service')
def invoke_service(request):
  headers = {}
  headers.update(create_http_headers_for_new_span())
  nextend_response = requests.get(
      'http://localhost:9002/apib',
      headers=headers,
  )
  headers = {}
  headers.update(create_http_headers_for_new_span())
  nextend_response = requests.get(
      'http://localhost:9003/api',
      headers=headers,
  )
  return Response(nextend_response.text)

node=ZipkinNode()
node.init_zipkin_settings('Service_A')
node.add_router('invoke_service','/api')
node.invoke_wsgi_service(9001)
[root@kong python]#- 1
- 2
- 3
- 4
- 5
- 6
- 7
- 8
- 9
- 10
- 11
- 12
- 13
- 14
- 15
- 16
- 17
- 18
- 19
- 20
- 21
- 22
- 23
- 24
- 25
- 26
- 27
- 28
- 29
- 30
- 31
- 32
- 33
- 34
- 35
- 36
- 37
- 38
- 39
- 40
- 41
- 42
- 43
- 44
- 45
- 46
- 47
- 48
- 49
- 50
- 51
- 52
- 53
- 54
- 55
- 56
- 57
- 58
- 59
- 60
- 61
- 62
- 63
- 64
- 65
- 66
- 67
- 68
- 69
- 70
- 71
- 72
服务B的代码如下,D与E与之类似:
[root@kong python]# cat B.py
import requests
import datetime
from pyramid.response import Response
from pyramid.view import view_config
from pyramid.config import Configurator
from py_zipkin.zipkin import create_http_headers_for_new_span
from wsgiref.simple_server import make_server

class ZipkinNode:
  #properties:
  connect_url='http://localhost:9001/api'
  zipkin_url='http://localhost:9411'
  zipkin_span_api=zipkin_url+'/api/v1/spans'
  zipkin_service_name='default_service_name'
  config=None

  #function: zikpin callback handler
  def zipkin_handler(self,stream_name, encoded_span):
    requests.post(
        self.zipkin_span_api,
        data=encoded_span,
        headers={'Content-Type': 'application/x-thrift'},
    )

  #function:
  def init_zipkin_settings(self,service_name):
    settings = {}
    settings['service_name'] = service_name
    self.zipkin_service_name=service_name
    settings['zipkin.transport_handler'] = self.zipkin_handler
    settings['zipkin.tracing_percent'] = 100.0

    self.config = Configurator(settings=settings)
    self.config.include('pyramid_zipkin')

  #function: add route
  def add_router(self,router_type,router_url):
    self.config.add_route(router_type, router_url)

  #function:
  def invoke_wsgi_service(self,host_port):
    self.config.scan()
    app = self.config.make_wsgi_app()
    server = make_server('0.0.0.0', host_port, app)
    print('service '+self.zipkin_service_name+' listening : http://localhost:'+str(host_port))
    server.serve_forever()

#function: end node callback function
@view_config(route_name='show_time')
def show_time(request):
    return Response(str(datetime.datetime.now()))

node=ZipkinNode()
node.init_zipkin_settings('Service_B')
node.add_router('show_time','/apib')
node.invoke_wsgi_service(9002)
[root@kong python]#- 1
- 2
- 3
- 4
- 5
- 6
- 7
- 8
- 9
- 10
- 11
- 12
- 13
- 14
- 15
- 16
- 17
- 18
- 19
- 20
- 21
- 22
- 23
- 24
- 25
- 26
- 27
- 28
- 29
- 30
- 31
- 32
- 33
- 34
- 35
- 36
- 37
- 38
- 39
- 40
- 41
- 42
- 43
- 44
- 45
- 46
- 47
- 48
- 49
- 50
- 51
- 52
- 53
- 54
- 55
- 56
- 57
- 58
为了模拟zipkin,此处还提供了一个脚本用于对A到E的启动/停止/重启/状态确认进行操作
[root@kong python]# sh test_zipkin.sh
Usage: test_zipkin.sh ACTION
       ACTION: start|stop|restart|status

[root@kong python]#- 1
- 2
- 3
- 4
- 5
代码地址
代码上传到了github上,可参看:https://github.com/liumiaocn/easypack/tree/master/zipkin/python
事前准备&确认
事前pull完毕zipkin的镜像,如果没有,在实验的时候也会自行pull
[root@kong python]# docker images |grep zipkin
docker.io/openzipkin/zipkin                              latest              a62fb9056a9a        8 days ago               181 MB
[root@kong python]# - 1
- 2
- 3
启动zipkin和服务
[root@kong python]# sh test_zipkin.sh start

## Operation: start
## start begins ...
## start zipkin service
2afd09f3ee50e4766702a70ea6cfaf0645e9c4aa5d609911bca2763b890f7f20
## before start action

## Operation: status
## status begins ...
demo process: A.py
demo process: B.py
demo process: C.py
demo process: D.py
demo process: E.py
## status ends...
## after start action

## Operation: status
## status begins ...
demo process: A.py
root      7988  7911  7 00:32 pts/1    00:00:00 python A.py
demo process: B.py
service Service_A listening : http://localhost:9001
service Service_C listening : http://localhost:9003
root      7989  7911  7 00:32 pts/1    00:00:00 python B.py
demo process: C.py
root      7990  7911  7 00:32 pts/1    00:00:00 python C.py
demo process: D.py
root      7991  7911  7 00:32 pts/1    00:00:00 python D.py
demo process: E.py
root      7992  7911  7 00:32 pts/1    00:00:00 python E.py
## status ends...
## start ends...
[root@kong python]#- 1
- 2
- 3
- 4
- 5
- 6
- 7
- 8
- 9
- 10
- 11
- 12
- 13
- 14
- 15
- 16
- 17
- 18
- 19
- 20
- 21
- 22
- 23
- 24
- 25
- 26
- 27
- 28
- 29
- 30
- 31
- 32
- 33
- 34
- 35
确认zipkin

访问入口服务
[root@kong python]# curl http://localhost:9001/api
127.0.0.1 - - [30/May/2018 00:36:35] "GET /apib HTTP/1.1" 200 26
127.0.0.1 - - [30/May/2018 00:36:35] "GET /api HTTP/1.1" 200 26
127.0.0.1 - - [30/May/2018 00:36:40] "GET /api HTTP/1.1" 200 26
127.0.0.1 - - [30/May/2018 00:36:40] "GET /api HTTP/1.1" 200 26
127.0.0.1 - - [30/May/2018 00:36:40] "GET /api HTTP/1.1" 200 26
2018-05-30 00:36:40.788249[root@kong python]#
[root@kong python]#- 1
- 2
- 3
- 4
- 5
- 6
- 7
- 8
确认:服务个数
再次刷新zipkin,即可看到service name发生变化

确认:trace信息
点击find trace即可看到含有5个span的如下信息

调用栈

服务A详细

服务B详细

服务C详细

服务D详细

服务E详细

依赖关系

再分享一下我老师大神的人工智能教程吧。零基础!通俗易懂!风趣幽默!还带黄段子!希望你也加入到我们人工智能的队伍中来!https://blog.csdn.net/jiangjunshow