一 npm 方式
1,安装依赖 (已有项目)
如果想简单体验:基于vue-cli
/*
npm install vue -g
npm install vue-cli -g // -g 是否全局安装,如果不需要可不加
vue init webpack mint-pro
(一路回车默认即可)
*/
npm install -s mint-ui
2,main.js主函数配置
// 全局 mint-ui 引入
import Vue from 'vue'
import MintUI from 'mint-ui'
import 'mint-ui/lib/style.css'
import router from './router'
import App from './App'

Vue.use(MintUI);
Vue.config.productionTip = false

/* eslint-disable no-new */
new Vue({
  el: '#app',
  router,
  components: { App },
  template: '<App/>'
})
3,使用 app.vue
<template>
<div id="app">
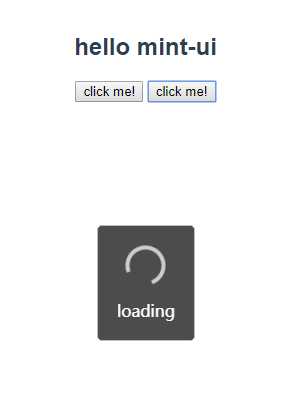
<h2> hello mint-ui </h2>
<button @click="handleToast">click me!</button>
<button @click="handleIndictor">click me!</button>
<router-view/>
</div>
</template>
<script>
export default {
name: 'App',
methods: {
handleToast () {
this.$toast({
message: '提示',
position: 'middle',
duration: 5000
})
},
handleIndictor (){
this.$indicator.open({
text: 'loading',
spinnerType: 'snake'
});
setTimeout(() => {
this.$indicator.close()
},2000);
}
}
}
</script>
4,npm run dev 预览结果
1)toast

2) indicator
5, css 组件 直接把官方标签引入即可
<template>
  <div class="hello">
    <h3>css components</h3>
    <mt-header title="标题过长会隐藏后面的内容啊哈哈哈哈">
      <router-link to="/" slot="left">
        <mt-button icon="back">返回</mt-button>
      </router-link>
      <mt-button icon="more" slot="right"></mt-button>
    </mt-header>

    <h3>form components</h3>
    <mt-switch v-model="value">开关</mt-switch>

  </div>
</template>

<script>
  export default {
    name: 'HelloWorld',
    data() {
      return {
        value: false
      }
    }
  }
</script>
5.1 对应效果
