1.hibernate介绍

2.框架简介
1.基于java语言开发的一套orm框架
好处:方便开发大大减少代码量,性能稍高,跨数据库平台
ORM(Object Relation Mapping):
Object: 类 属性 数据类型 对象
Relation: 表名 字段 数据类型 行级数据
Mapping:把Object类型的数据映射到关系型数据库中,这样就可以让我们只操作对象,不需要操作数据库。

2.hibernate的实质
封装JDBC+SQL

其他的持久层框架:
Jdbc
Hibernate
JPA
Ibatis/myBatis
springJDBCTemplate
3.hibernate系统架构


1.Transient Object(瞬时对象)
2.Persistent Object(持久对象)
3.session:hibernate的会话
4.SessionFactory:会话工厂,这是一个进程级别的对象,重量级的
5.Transaction:本地事务
6.TransactionFactory:事务工厂
7.ConnectionProvider:使用第三方的数据源,如:c3p0,dbcp
8.JNDI:java naming Directory interface,提供的就是资源的目录。
9.JDBC:操作数据库的api
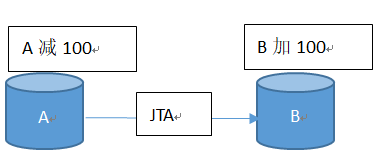
10.JTA:跨数据库的事务
2.hibernate环境搭建
(注:网上全是英文的,需要中文pdf的请联系博主)

搭建环境步骤:
1.建立一个java项目
2.导包:

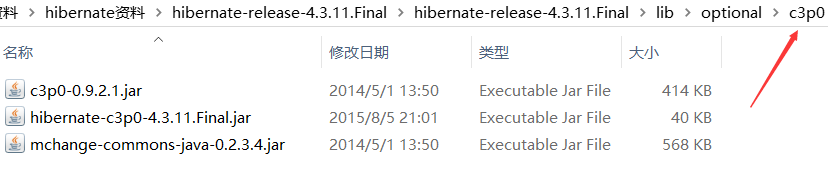
还有一个也是重要的包,mysql数据库包
![]()
3.创建hibernate.cfg.xml
默认位置在classpath下,默认名称hibernate.cfg.xml
<?xml version="1.0" encoding="UTF-8"?>
<!DOCTYPE hibernate-configuration PUBLIC
"-//Hibernate/Hibernate Configuration DTD//EN"
"http://www.hibernate.org/dtd/hibernate-configuration-3.0.dtd">
<hibernate-configuration>
    <session-factory>
        <!-- 数据库连接设置 -->
        <property name="connection.driver_class">com.mysql.jdbc.Driver</property>
        <property name="connection.url">jdbc:mysql://localhost:3306/hiber01</property>
        <property name="connection.username">root</property>
        <property name="connection.password">root</property>

        <!-- 设置数据库连接池的初始化连接数 -->
        <property name="connection.pool_size">1</property>
        <!-- 数据库方言 -->
        <property name="dialect">org.hibernate.dialect.MySQL5Dialect</property>
        <!--显示执行的SQL语句-->
        <property name="show_sql">true</property>
        <mapping resource=""/>
    </session-factory>
</hibernate-configuration>
4.创建实体类(model)
package com.zy.hiber.model;

import java.util.Date;

public class User {

	private int userId;

	private String uname;

	private int gender;

	private Date birthday;

	public int getUserId() {
		return userId;
	}

	public void setUserId(int userId) {
		this.userId = userId;
	}

	public String getUname() {
		return uname;
	}

	public void setUname(String uname) {
		this.uname = uname;
	}

	public int getGender() {
		return gender;
	}

	public void setGender(int gender) {
		this.gender = gender;
	}

	public Date getBirthday() {
		return birthday;
	}

	public void setBirthday(Date birthday) {
		this.birthday = birthday;
	}


}
5.映射文件配置
<?xml version="1.0" encoding="UTF-8"?>
<!DOCTYPE hibernate-mapping PUBLIC
          "-//Hibernate/Hibernate Mapping DTD 3.0//EN"
          "http://hibernate.sourceforge.net/hibernate-mapping-3.0.dtd">
<hibernate-mapping>
	<class name="com.zy.hiber.model.User" table="t_user">
		<id name="userId" column="user_id">
			<generator class="assigned"></generator>
		</id>
		<property name="uname" column="uname"></property>
		<property name="gender" column="gender"></property>
		<property name="birthday" column="birthday"></property>
	</class>
</hibernate-mapping>
6.根据映射文件建立相应的表
这里建立数据库就行,然后建立DBExport.java
package com.zy.hiber.DButils;


import org.hibernate.cfg.Configuration;
import org.hibernate.tool.hbm2ddl.SchemaExport;

public class DBExport {

	public static void main(String [] args){
		//创建配置文件
		Configuration cfg = new Configuration();
		//指定hibernate.cfg.xml的位置
		cfg.configure("hibernate.cfg.xml");
		//创建表对象
		SchemaExport se = new SchemaExport(cfg);
		se.create(true,true);
		}

}
运行这个文件,可发现数据库已经建立。


测试:新建JUnit

package com.zy.hibernate.test;


import java.util.Date;


import org.hibernate.Session;
import org.hibernate.SessionFactory;
import org.hibernate.Transaction;
import org.hibernate.boot.registry.StandardServiceRegistryBuilder;
import org.hibernate.cfg.Configuration;
import org.hibernate.service.ServiceRegistry;
import org.junit.Test;

import com.zy.hiber.model.User;

public class TestHibernate {

	@Test
	public void test() {
		//创建hibernate的配置对象
		Configuration cfg = new Configuration();
		//配置hibernate的核心文件的位置
		cfg.configure("hibernate.cfg.xml");
		//注册配置属性信息
		ServiceRegistry sr = new StandardServiceRegistryBuilder()
							.applySettings(cfg.getProperties()).build();

		//创建sessionFactory
		SessionFactory factory = cfg.buildSessionFactory(sr);
		//创建session
		Session session  = factory.openSession();
		//开启事物
		Transaction tx = session.beginTransaction();
		User user = new User();
		user.setUserId(1);
		user.setUname("zhangyan");
		user.setGender(1);
		user.setBirthday(new Date());
		//通过Session保存对象
		session.save(user);
		//提交事物
		tx.commit();
		//结束会话,节省资源
		session.close();
	}

}
数据库相应的也增加一条语句。