内容提要:
- 单个元素或组件的过渡: 过渡类、CSS过渡、CSS动画、自定义过渡类、动画和过渡在一起使用、声明过渡持续时间、JavaScript钩子
- 初始渲染的过渡
- 元素间的过渡
- 组件间的过渡
- 列表的过渡:列表进入/离开过渡,列表项移动过渡,交错列表过渡
- 可复用的过渡
- 动态的过渡
概览
当项目从DOM插入、更新或删除的时候我们提供了多种方式去使用过渡效果。这包含以下工具:
- 使用CSS过渡和动画自动应用于classes
- 集成第三方动画库,例如Animate.css
- 在过渡钩子期间使用JavaScript直接操作DOM
- 集成第三方动画库,例如:Velocity.js
在这页,我们仅仅包括进入、离开,和列表过渡,你也可以看下一节管理过渡状态 managing state transitions。
单独的元素或组件的过渡
我们提供了一个transition封装组件,允许你去为以下内容的任何元素或组件添加进入/离开动画:
- 条件渲染(例如
v-if) - 条件显示(例如
v-show) - 动态组件
- 组件根节点
这里是一个实际的例子:
<div id="demo">
    <button v-on:click="show = !show">
        Toggle
    </button>
    <transition name="fade">
        <p v-if="show">hello</p>
    </transition>
</div>
new Vue({
    el: '#demo',
    data: {
        show: true
    }
})
.fade-enter-active, .fade-leave-active {
    transition: opacity .5s;
}
.fade-enter, .fade-leave-to /*.fade-enter-active 在2.1.8版本以下 */ {
    opacity: 0;
}
当一个封装在transition组件的元素被插入或删除时,发生了以下事情:
- Vue将自动嗅出是否目标元素应用了CSS过渡或动画。如果是,在合适的时候CSS过渡类将被自动增加或删除。
- 如果过渡组件提供了 JavaScript hooks,这些钩子将在合适的时间调用。
- 如果没有CSS过渡/动画被发现和没有JavaScript钩子被提供,对于插入或删除的DOM操作符将被立即在下一帧执行(注意:这是一个浏览器动画帧,Vue的
nextTick概念是不同的)。
过渡类
有六种类被应用于输入/输出过渡。
v-enter:定义进入过渡的开始状态,元素被插入之前生效,在元素被添加的下一帧移除。v-enter-active:定义进入过渡的活跃状态。整个进入过渡的阶段中被使用。元素被插入之前生效,当过渡/动画完成时被移除。这个类可以被使用去定义进入过渡的持续时间,延迟和曲线函数。v-enter-to:只在版本2.1.8+可用。定义进入过渡的结束状态。元素被插入之后的下一帧生效(同时v-enter被删除),当过渡/动画完成的时候被移除。v-leave:定义离开的开始状态,一个离开过渡被触发的时候立即生效,下一帧被移除。v-leave-active:定义离开的活跃状态,被应用于整个离开阶段。当离开过渡被触发的时候立即生效,当过渡/动画完成的时候被移除。这个类能被用于去定义持续时间,延迟,离开过渡的曲线函数。v-leave-to:2.1.8+版本可用。定义离开过渡的结束状态。离开过渡被触发之后的下一帧生效(与此同时v-leave被删除),当过渡/动画完成的时候被移除。

每个类都以过渡的名称作为前缀。当你使用一个transition元素而没有名字的时候默认的前缀是v-。如果使用了<transition name="my-transition">,v-enter将会被my-transition-enter。
v-enter-active和v-leave-active使你能够为进入/离开过渡指定不同的曲线,你将在下一节看到一个例子。
CSS 过渡
最常用的过渡类型之一是使用CSS过渡。这有一个例子:
<div id="example-1">
    <button @click="show = !show">
        Toggle render
    </button>
    <transition name="slide-fade">
        <p v-if="show">hello</p>
    </transition>
</div>
new Vue({
    el: '#example-1',
    data: {
        show: true
    }
})
/* 可以设置不同的进入和离开动画 */
/* 设置持续时间和动画函数 */
.slide-fade-enter-active {
    transition: all .3s ease;
}
.slide-fade-leave-active {
    transition: all .8s cubic-bezier(1.0, 0.5, 0.8, 1.0);
}
.slide-fade-enter, .slide-fade-leave-to
/* .slide-fade-leave-active below version 2.1.8 */
{
    transform: translateX(10px);
    opacity: 0;
}
CSS 动画
CSS动画以和CSS过渡相同的方式被应用,不同的是v-enter在元素插入后没有被立即移除。而是在一个animationend事件中被移除。
这是一个例子,为了简洁,省略了在CSS规则中的前缀。
<div id="example-2">
    <button @click="show = !show">Toggle show</button>
    <transition name="bounce">
        <p v-if="show">Lorem ipsum dolor sit amet</p>
    </transition>
</div>
new Vue({
    el: '#example-2',
    data: {
        show: true
    }
})
.bounce-enter-active {
    animation: bounce-in .5s;
}
.bounce-leave-active {
    animation: bounce-in .5s reverse;
}
@keyframes bounce-in {
    0% {
        transform: scale(0);
    }
    50% {
        transform: scale(1.5);
    }
    100% {
        transform: scale(1);
    }
}
自定义过渡类名
你也能够指定自定义过渡类通过提供以下属性:
enter-classenter-active-classenter-to-class(2.1.8+)leave-classleave-active-classleave-to-class(2.1.8+)
这些约定俗成的类名将被覆盖。当你想要用已经存在的CSS动画库结合Vue’s过渡系统的时候尤其有用,例如:Animate.css.
这有一个例子:
<link href="https://cdn.jsdelivr.net/npm/[email protected]" rel="stylesheet" type="text/css">

<div id="example-3">
    <button @click="show = !show">
        Toggle render
    </button>
    <transition
                name="custom-classes-transtion"
                enter-active-class="animated tada"
                leave-active-class="animated bounceOutRight">
        <p v-if="show">hello</p>
    </transition>
</div>
new Vue({
    el: '#example-3',
    data: {
        show: true
    }
})
过渡和动画一起使用
为了知道动画什么时候结束我们需要附加事件监听器。它可以是transitionend或animationend,取决于被应用的CSS规则类型。如果你仅仅使用到了其中的一个,我们能够自动发现正确的类型。
然而,某种情况下你想要在同一个元素里同时使用过渡和动画,例如你通过Vue触发了一个CSS动态,在这些情况下,你需要使用animation或transition的值明确声明想让Vue监听的type属性的类型。
显式的过渡持续时间
在2.2.0+新增
在大多数情况下,Vue能够自动算出过渡完成的时机。默认,Vue会在根过渡元素等待第一个transitionend或animationend。然而,这并不总是符合期望-例如,我们在一些被嵌套的元素内部刻意安排一系列比根过渡元素的延迟过渡或一个更长的过渡。
在这些例子我们可以明确的在<transition>元素的duration 属性指定过渡时间(以毫秒计算):
<transiton :duration="1000">...</transiton>
你也能够分别指定进入和离开的值:
<transition :duration="{enter: 500, leave: 800}">...<transition>
JavaScript 钩子
你也能够在属性中定义JavaScript钩子:
<transition
            v-on:before-enter="beforeEnter"
            v-on:enter="enter"
            v-on:after-enter="afterEnter"
            v-on:enter-cancelled="enterCancelled"

            v-on:before-leave="beforeLeave"
            v-on:leave="leave"
            v-on:after-leave="afterLeave"
            v-on:leave-cancelled="leaveCancelled">
    <!-- ... -->
</transition>
// ...
methods: {
    // -----
    // Entering
    // -----
    beforeEnter: function (el) {
        // ...
    }
    // the done callback is optional when
    // used in combination with CSS
    enter: function (el, done) {
        // ...
        done()
    },
    afterEnter: function (el) {
          // ...
    },
    enterCancelled: function (el) {
          // ...
    },

    // ------
    // Leaving
    // ------
    beforeLeave: function (el) {
       // ...
    }
    // the done callback is optional when
    // used in combination with CSS
    leave: function(el, done) {
        // ...
        done()
    }
    afterLeave: function(el) {
        // ...
    }
    // leaveCancelled only available with v-show
    leaveCancelled: function (el) {
        // ...
    }
}
这些钩子能够结合CSS 过渡/动画或自己单独使用。
当仅仅使用JavaScript过渡的时候,对于
enter和leave钩子done是必须的。否则,钩子将被同步调用,过渡将立即完成。
如果你想跳过CSS声明只使用JavaScript过渡,最好明确声明
v-bind:css="false",这也会避免CSS规则在过渡过程中的干扰。
让我们深入研究一个例子,这是一个使用Velocity.js的JavaScript过渡:
<!-- Velocity 工作方式更像jQuery.animated 这也是JavaScript animations的一个很棒的选择 -->
<script src="https://cdnjs.cloudflare.com/ajax/libs/velocity/1.2.3/velocity.min.js"></script>

<div id="example-4">
	<button @click="show = !show">
        Toggle
    </button>
    <transition
                v-on:before-enter="beforeEnter"
                v-on:enter="enter"
                v-on:leave="leave"
                v-bind:css="false">
        <p v-if="show">
            Demo
        </p>
    </transition>
</div>
new Vue({
    el: '#example-4',
    data: {
        show: false
    },
    methods: {
        beforeEenter: function (el) {
            el.style.opacity = 0
        },
        enter: function (el, done) {
            Velocity(el,{opacity: 1, fontSize: '1.4em'}, { duration: 300 })
            Velocity(el,{ fontSize: '1em'}, { complete: done })
        },
        leave: function (el, done) {
            Velocity(el, {translateX: '15px', rotateZ: '50deg' }, { duration: 600 })
            Velocity(el, { rotateZ: '100deg' }, { loop: 2 })
            Velocity(el, {
                rotateZ: '45deg',
                translateY: '30px',
                translateX: '30px',
                opacity: 0
            }, {complate: done})
        }
    }
})
初始渲染的过渡
如果你想在节点初始化渲染的时候应用一个过渡,你可以添加一个appear属性:
<transition appear>
    <!-- ... -->
</transition>
默认,这将使用进入和离开时使用的过渡。如果你喜欢,你也可以指定自定义的CSS类:
<transition
            appear
            appear-class="custom-appear-class"
            appear-to-class="custom-appear-to-class"(2.1.8+)
            appear-active-class="custom-appear-active-calss">
</transition>
自定义JS钩子:
<transtion
           appear
           v-on:before-appear="customBeforeAppearHook"
           v-on:appear="customAppearHook"
           v-on:after-appear="customAfterAppearHook"
           v-on:appear-cancelled="customAppearCannelledHood">
    <!-- ... -->
</transtion>
元素间的过渡
稍后我们讨论组件间的过渡 transitioning between components,你可以使用v-if/v-else在原生元素之间过渡。最常见的两种元素过渡之一是一个列表容器和描述空列表之间的过渡:
<transition>
    <table v-if="items.length > 0">
        <! -- ... -->
    </table>
    <p v-else>Sorry, no items found</p>
</transition>
这个工作是没问题,但是会有一个警告:
当使用相同的标签名切换时,你必须通过通过给他们唯一的
key属性来告诉Vue区分元素。否则Vue编译器将仅仅高效的替换元素内的内容。即使技术上没有需要,在一个transition组件的多个条目内总是给一个key也是非常好的经验。
例如:
<transition>
    <button v-if="isEditing" key="save">
        save
    </button>
    <button v-else key="edit">
        Edit
    </button>
</transition>
在一些情况下,你也能使用key属性去切换相同元素的不同状态代替使用v-if和v-else,重写以上的例子:
<transition>
    <button v-bind:key="isEdiing">
        {{ isEditing ? 'Save' : 'Edit' }}
    </button>
</transition>
它实际上可以在任意数量的元素间过渡,使用多个v-if或绑定单个元素给一个动态属性。例如:
<transition>
    <button v-if="docState === 'saved'" key="saved">
    	Edit
    </button>
    <button v-if="docState === 'edited'" key="edited">
        Save
    </button>
    <button v-if="docState === 'editing'" key="editing">
        Cancel
    </button>
</transition>
也可以被写作:
<transition>
    <button v-bind:key="docState">
        {{ buttonMessage }}
    </button>
</transition>
// ...
computed: {
    buttonMessage: function () {
        switch (this.docState) {
            case 'saved': return 'Edit'
            case 'edited': return 'Save'
            case 'editing': return 'Cancel'
        }
    }
}
过渡模式
不过仍有一个问题。试着点击以下按钮:
上图会展现开on关off过渡全过程,一个离开同时另一个过渡进来,这两个过程都会被渲染。默认情况下transition元素进入和离开同时发生。
有时这么工作是很好的,比如过渡的button在绝对位置上互相叠加:
他们也可以像幻灯片一样过渡:
不过,同时进入和离开的过渡方式并不总是令人满意的,所以Vue提供了一些可供选择的转化模式:
- in-out:新的元素首先过渡,当过渡完成的时候,当前的元素过渡离开。
- out-in:当前的元素首先过渡离开,但过渡完成时,新的元素过渡进入。
现在让我们使用out-in更新on/off 按钮的过渡:
<transition name="fade" mode="out-in">
    <!-- ... the buttons ... -->
</transition>
只需要增加一个属性,我们就修复了原始过渡而不用增加任何额外的风格。
in-out模式不经常用,但作为一个稍微不同的过渡效果有时是有用的。让我们试着把它和之前淡入淡出的效果结合起来:
图示请看原文
十分酷吧。
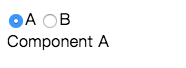
组件间的过渡
组件间的过渡更简单-我们甚至不需要key属性.我们封装一个 dynamic component代替:
<script src="https://unpkg.com/[email protected]"></script>
<script src="https://unpkg.com/vue"></script>

<div id="transition-components-demo" class="demo">
 <input v-model="view" type="radio" value="v-a" id="a" name="view"><label for="a">A</label>
  <input v-model="view" type="radio" value="v-b" id="b" name="view"><label for="b">B</label>
<transition name="component-fade" mode="out-in">
<component v-bind:is="view"></component>
</transition>
</div>
new Vue({
  el: '#transition-components-demo',
  data: {
    view: 'v-a'
  },
  components: {
    'v-a': {
      template: '<div>Component A</div>'
    },
    'v-b': {
      template: '<div>Component B</div>'
    }
  }
})
.component-fade-enter-active, .component-fade-leave-active {
  transition: opacity .3s ease;
}
.component-fade-enter, .component-fade-leave-to
/* .component-fade-leave-active below version 2.1.8 */ {
  opacity: 0;
}
列表过渡
到目前为止,我们管理了如下过渡:
- 单个节点
- 多个节点仅仅一次渲染一个
那么当我们有一个项目列表我们想要同时渲染,例如使用v-for,在这个例子中,我们使用transition-group组件。然而在我们深入研究一个例子之前,有一些关于这个组件的重要事情需要知道:
- 不像transition元素,它默认使用span元素渲染一个实际的元素。你能够使用
tag属性改变被渲染的元素。 - Transition modes是不可用的(即:mode="out-int"和mode=“in-out”不可用),因为我们不在相互排斥的元素之间交替。
- 元素内部总是要求必须有一个唯一的
key属性。
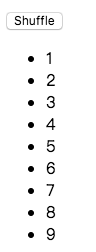
列表进入/离开过渡
现在让我们研究一个例子,让我们使用前面用过的同一个CSS类创建进入或离开动画:
<script src="https://unpkg.com/[email protected]"></script>
<script src="https://unpkg.com/vue"></script>

<div id="list-demo">
<button v-on:click="add">Add</button>
<button v-on:click="remove">Remove</button>
<transition-group name="list" tag="p">
   <span v-for="item in items" v-bind:key="item" class="list-item">
     {{ item }}
   </span>
</transition-group>
</div>
new Vue({
  el: '#list-demo',
  data: {
  	items: [1,2,3,4,5,6,7,8,9],
    nextNum:10
  },
  methods: {
    randomIndex: function() {
			return Math.floor(Math.random() * this.items.length)
  },
  add: function() {
     this.items.splice(this.randomIndex(), 0, this.nextNum++)
  },
  remove: function() {
     this.items.splice(this.randomIndex(), 1)
  }
  }
})
.list-item {
  display: inline-block;
  margin-right: 10px;
}
.list-enter-active, .list-leave-active {
   transition: all 1s;
}
.list-enter, .list-leave-to {
  opacity: 0;
  transform: translateY(30px);
}

用这个例子有一个问题,当你增加或删除按个数字的时候,它周围的数字会立刻滑动到新的位置而不是平滑的过渡。我们稍后修复它。
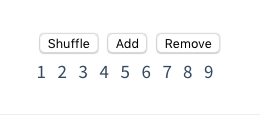
列表移动过渡
transition-group组件还有另一个锦囊妙计。它不仅有进入和离开的动画,而且也能改变位置。这不仅仅是一个新的概念你也需要知道这个功能需要额外增加一个v-move类。当条目改变位置的时候它会被增加。和其他classes一样,它的前缀匹配你提供的name属性的值,也可以通过move-class属性收到设置。
这对于指定过渡时间和缓和的过渡曲线非常有用,正如你下面看到的:
<script src="https://unpkg.com/[email protected]"></script>
<script src="https://unpkg.com/vue"></script>
<script src="https://cdnjs.cloudflare.com/ajax/libs/lodash.js/4.14.1/lodash.min.js"></script>

<div id="flip-list-demo" class="demo">
<button v-on:click="shuffle">Shuffle</button>
<transition-group name="flip-list" tag="ul">
  <li v-for="item in items" v-bind:key="item">
   {{ item }}
  </li>
</transition-group>
</div>
new Vue({
	el: '#flip-list-demo',
  data: {
    items:[1,2,3,4,5,6,7,8,9]
  },
  methods: {
   shuffle: function() {
   	this.items = _.shuffle(this.items)
   }
  }
})
.flip-list-move {
  transition: transform 1s;
}
可以在jsfiddle里面测试如上代码。
点击上面的Shufle按钮,随机排序动画十分平滑,这可能有一点点魔幻,但在钩子下面,Vue使用了一个被称为FLIP的动画库将一个元素从一个老的位置平滑过渡到新的位置。
我们能够结合这个技术和我们前面实现,使我们的列表每一次可能的改变产生动画效果:
<script src="https://unpkg.com/[email protected]"></script>
<script src="https://unpkg.com/vue"></script>
<script src="https://cdnjs.cloudflare.com/ajax/libs/lodash.js/4.14.1/lodash.min.js"></script>

<div id="flip-list-demo" class="demo">
<button v-on:click="shuffle">Shuffle</button>
<button v-on:click="add">Add</button>
<button v-on:click="remove">Remove</button>
<transition-group name="list-complete" tag="p">
  <span v-for="item in items" v-bind:key="item" class="list-complete-item">
   {{ item }}
  </span>
</transition-group>
</div>
new Vue({
	el: '#flip-list-demo',
  data: {
    items:[1,2,3,4,5,6,7,8,9],
    nextNum: 10
  },
  methods: {
   randomIndex: function () {
    return Math.floor(Math.random()* this.items.length)
   },
   add: function () {
     this.items.splice(this.randomIndex(), 0, this.nextNum++)
   },
   remove: function () {
     this.items.splice(this.randomIndex(), 1)
   },
   shuffle: function() {
   	this.items = _.shuffle(this.items)
   }
  }
})
.list-complete-item {
  transition: all 1s;
  display: inline-block;
  margin-right: 10px;
}
.list-complete-enter, .list-complete-leave-to {
  /* .list-complete-leave-active below version 2.1.8*/
  opacity: 0;
  transform: translateY(30px);
}
.list-complete-leave-active {
  position:absolute;
}
一个重要的事情是这些FLIP过渡使用
display:inline设置元素是无法工作的。作为一种替代方案,你可以使用display:inline-block或放置元素在flex中。
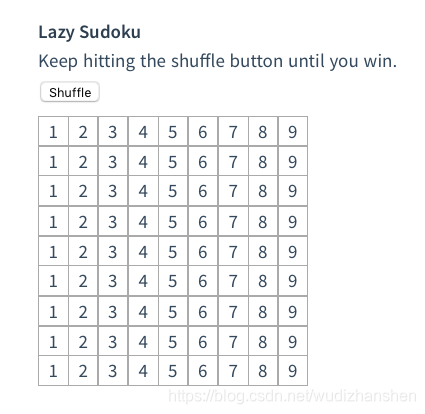
这些FLIP动画不限于单个轴。条目在一个多维网格中也能过渡transitioned too:
<script src="https://unpkg.com/[email protected]"></script>
<script src="https://unpkg.com/vue"></script>
<script src="https://cdnjs.cloudflare.com/ajax/libs/lodash.js/4.14.1/lodash.min.js"></script>

<div id="sudoku-demo" class="demo">
<h1>Lazy Sudoku</h1>
<p>Keeping hitting the shuffle button until you win.</p>

<button @click="shuffle">
  Shuffle
</button>
<transition-group name="cell" tag="div" class="container">
  <div v-for="cell in cells" :key="cell.id" class="cell">
    {{ cell.number }}
  </div>
</transition-group>
</div>
new Vue({
  el: '#sudoku-demo',
  data:{
  	cells: Array.apply(null, { length: 81 })
      .map(function (_, index){
         return {
           id: index,
           number: index % 9 + 1
         }
      })
  },
  methods: {
    shuffle: function () {
      this.cells = _.shuffle(this.cells)
    }
  }
})
.cell {
  display: flex;
  justify-content: space-around;
  align-items: center;
  width: 25px;
  height: 25px;
  border: 1px solid #aaa;
  margin-right: -1px;
  margin-bottom: -1px;
}
.cell:nth-child(3n) {
  margin-right: 0;
}
.cell-move {
  transition: transform 1s;
}
列表的交错过渡
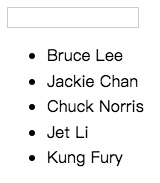
通过数据属性与JavaScript过渡进行通信,可以实现列表的交错过渡:
<script src="https://cdnjs.cloudflare.com/ajax/libs/velocity/1.2.3/velocity.min.js"></script>

<div id="staggered-list-demo">
  <input v-model="query">
  <transition-group
    name="staggered-fade"
    tag="ul"
    v-bind:css="false"
    v-on:before-enter="beforeEnter"
    v-on:enter="enter"
    v-on:leave="leave"
  >
    <li
      v-for="(item, index) in computedList"
      v-bind:key="item.msg"
      v-bind:data-index="index"
    >{{ item.msg }}</li>
  </transition-group>
</div>
new Vue({
  el: '#staggered-list-demo',
  data: {
    query: '',
    list: [
      { msg: 'Bruce Lee' },
      { msg: 'Jackie Chan' },
      { msg: 'Chuck Norris' },
      { msg: 'Jet Li' },
      { msg: 'Kung Fury' }
    ]
  },
  computed: {
    computedList: function () {
      var vm = this
      return this.list.filter(function (item) {
        return item.msg.toLowerCase().indexOf(vm.query.toLowerCase()) !== -1
      })
    }
  },
  methods: {
    beforeEnter: function (el) {
      el.style.opacity = 0
      el.style.height = 0
    },
    enter: function (el, done) {
      var delay = el.dataset.index * 150
      setTimeout(function () {
        Velocity(
          el,
          { opacity: 1, height: '1.6em' },
          { complete: done }
        )
      }, delay)
    },
    leave: function (el, done) {
      var delay = el.dataset.index * 150
      setTimeout(function () {
        Velocity(
          el,
          { opacity: 0, height: 0 },
          { complete: done }
        )
      }, delay)
    }
  }
})
可复用的动画
过渡能通过Vue的组件系统够被复用。对于创建一个可复用的过渡,你所有的transition元素或transition-group元素必须放在组件的根节点,而后传递所有的子组件在过渡组件内。
这有一个例子使用了一个模板组件:
Vue.component('my-special-transition',{
    template:`\
	<transition\
	name="very-special-transition"\
	mode="out-in"\
	v-on:before-enter="beforeEnter"\
	v-on:after-enter="afterEnter"\
	>\
	<slot><slot>\
    </transition>\
`,
    methods: {
        beforeEnter: function (el) {
            // ...
        }
        afterEnter: function (el) {
            // ...
		}
    }
})
功能组件尤其适合这项任务:
Vue.component('my-special-transition',{
    functional: true,
    render: function (createElement, context) {
        var data = {
            props: {
                name: 'very-special-transition',
                mode: 'out-in'
            },
            on: {
                beforeEnter: function (el) {
                    // ...
                },
                afterEnter: function (el) {
                    // ...
                }
            }
        }
        return createElement('transition',data,context.children)
    }
})
动态过渡
是的,虽然在Vue中过渡是数据驱动的!动态过渡最基本的例子是为动态属性绑定name属性。
<transition v-bind:name="transitionName">
    <!-- ... -->
</transition>
当你想要使用Vue的过渡类惯例去定义CSS过渡/动画,并且想要去切换他们。这是有用的。
说真的,任何过渡属性都能被动态绑定。它不仅仅是属性。由于事件的钩子是方法,他们能在上下文访问任何数据。这意味着你组件的状态,你的JavaScript过渡能够执行不同的行为。
<script src="https://unpkg.com/[email protected]"></script>
<script src="https://unpkg.com/vue"></script>
<script src="https://cdnjs.cloudflare.com/ajax/libs/velocity/1.2.3/velocity.min.js"></script>

<div id="dynamic-fade-demo" class="demo">
  Fade In: <input type="range" v-model="fadeInDuration" min = "0" v-bind:max="maxFadeDuration">
  Fade out: <input type="range" v-model="fadeOutDuration" min = "0" v-bind:max="maxFadeDuration">
  <transition
    v-bind:css="false"
    v-on:before-enter="beforeEnter"
    v-on:enter="enter"
    v-on:leave="leave">
    <p v-if="show">hello</p>
  </transition>
  <button
  v-if="stop"
  v-on:click="stop = false; show = false">Satrt animating</button>
  <button
   v-else
   v-on:click="stop = true">Stop it!
  </button>
</div>
new Vue({
 el: '#dynamic-fade-demo',
 data: {
 	show: true,
  fadeInDuration: 1000,
  fadeOutDuration: 1000,
  maxFadeDuration: 1500,
  stop: true
 },
 mounted: function () {
   this.show = false
 },
 methods: {
   beforeEnter: function (el) {
     el.style.opacity = 0
   },
   enter: function (el, done) {
     var vm = this
     Velocity(el,{
       opacity: 1
     },{
       duration: this.fadeInDuration,
       complete: function () {
         done()
         if (!vm.stop) vm.show = false
       }
     })
   },
   leave: function (el, done) {
     var vm = this
     Velocity(el,
     { opacity: 0 },
     {
       duration: this.fadeOutDuration,
       complete: function () {
         done()
         vm.show = true
       }
     }
    )
   }
 }
})
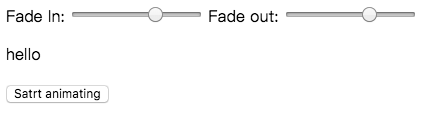
最后,创建动态过渡的基本原则是通过组件接受props去改变之前的过渡的性质。这听起来比较虚,但想象力是你唯一的限制。