音频相关知识讲解了音频相关的基础知识,然后说明了Android中对音频的处理用到的类,接下来将开始讲解利用AudioRecord进行音频录制,和利用AudioTrack对录制的PCM格式文件进行播放。
1 AudioRecord介绍
Developer:https://developer.android.google.cn/reference/android/media/AudioRecord
The AudioRecord class manages the audio resources for Java applications to record audio from the audio input hardware of the platform. This is achieved by “pulling” (reading) the data from the AudioRecord object. The application is responsible for polling the AudioRecord object in time using one of the following three methods:read(byte[], int, int), read(short[], int, int) or read(ByteBuffer, int). The choice of which method to use will be based on the audio data storage format that is the most convenient for the user of AudioRecord.
Upon creation, an AudioRecord object initializes its associated audio buffer that it will fill with the new audio data. The size of this buffer, specified during the construction, determines how long an AudioRecord can record before “over-running” data that has not been read yet. Data should be read from the audio hardware in chunks of sizes inferior to the total recording buffer size.
AudioRecord 是Android提供的用于录音的工具类。AudioRecord管理应用的各类音频资源,记录平台的各类输入设备的音频输入。录音是通过拉的方式读取AudioRecord的数据来完成,是通过使用AudioRecord对象提供的下面三个方法:read(byte[], int, int), read(short[], int, int) or read(ByteBuffer, int)。
开始录音时,AudioRecord需要初始化相关联的Buffer,这个buffer用来存储新的数据,可以在构造对象时指定大小。表示AudioRecord在读取完数据之前(“over-running”),每次可以读取的数据大小。声音数据从音频硬件中被读出,数据大小不超过整个录音数据的大小(可以分多次读出),即每次读取初始化buffer容量的数据。
利用AudioRecord实现Android录音的流程为:
- 构造一个AudioRecord对象,其中需要的最小录音缓存buffer大小可以通过getMinBufferSize方法得到。如果buffer容量过小,将导致对象构造的失败。
- 初始化一个buffer,该buffer大于等于AudioRecord对象用于写声音数据的buffer大小。
- 调用startRecording函数,开始录音
- 创建一个数据流,一边从AudioRecord中读取声音数据到初始化的buffer,一边将buffer中数据导入数据流,生成PCM格式文件
- 录音结束时,关闭数据流, 停止录音
AudioRecord构造函数
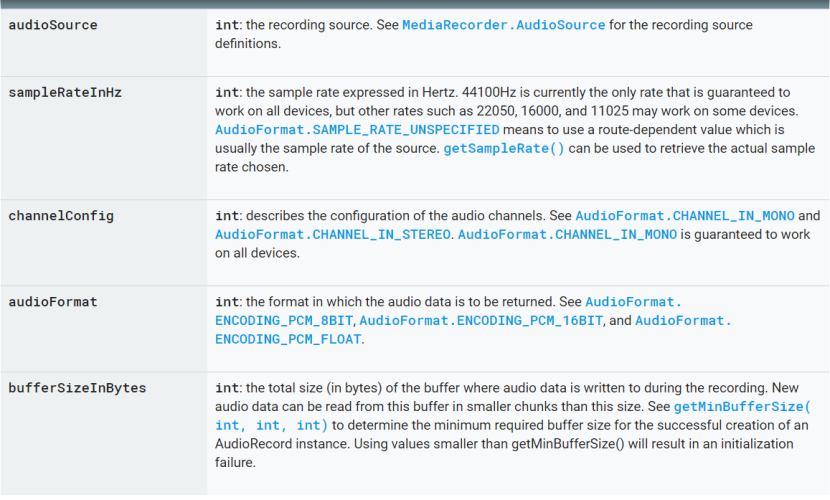
AudioRecord(int audioSource, int sampleRateInHz, int channelConfig, int audioFormat, int bufferSizeInBytes)
参数说明:
audioSource:音频源,从哪个硬件设备获取音频,一般直接设置成麦克风。MediaRecorder.AudioSource.MIC,AudioRecorder为它设置了默认值: AUDIO_INPUT = MediaRecorder.AudioSource.MIC;
AudioSource可以设置的来源包括:
MediaRecorder.AudioSource.CAMCORDER :设定录音来源于同方向的相机麦克风相同,若相机无内置相机或无法识别,则使用预设的麦克风
MediaRecorder.AudioSource.DEFAULT : 默认音频源
MediaRecorder.AudioSource.MIC:设定录音来源为主麦克风。
MediaRecorder.AudioSource.VOICE_CALL:设定录音来源为语音拨出的语音与对方说话的声音
MediaRecorder.AudioSource.VOICE_COMMUNICATION:摄像头旁边的麦克风
MediaRecorder.AudioSource.VOICE_DOWNLINK:下行声音
MediaRecorder.AudioSource.VOICE_RECOGNITION:语音识别
MediaRecorder.AudioSource.VOICE_UPLINK:上行声音
sampleRateInHz:音频采样率,越高质量越好。常用频率为44100Hz,可以在所有的设备上完美运行,还有其他的频率包括22050,16000,11025只能在某些设备上正常运行。AudioFormat.SAMPLE_RATE_UNSPECIFIED 可以自动根据选定的音频源设置频率。AUDIO_SAMPLE_RATE = 16000。
ChannelConfig:声道设置,AudioFormat.CHANNEL_IN_MONO单声道,常量为AUDIO_CHANNEL = AudioFormat.CHANNEL_IN_MONO。CHANNEL_IN_STEREO为双声道,立体声道。
audioFormat:音频格式,AudioFormat.ENCODING_PCM_8BIT, AudioFormat.ENCODING_PCM_16BIT, and AudioFormat.ENCODING_PCM_FLOAT.,以上都是音频PCM编码,android支持的采样大小16bit 或者8bit。当然采样大小越大,那么信息量越多,音质也越高,现在主流的采样大小都是16bit,在低质量的语音传输的时候8bit足够了。
bufferSizeInBytes:采集数据需要的缓冲区的大小,getMinBufferSize()可以查看最小的缓冲区。使用的缓冲区不能比getMinBufferSize获取的最小值,否则将报错。
public static int getMinBufferSize (int sampleRateInHz, int channelConfig, int audioFormat)参数都上上面已经讲解过的。
三个重要的read方法:
public int read (short[] audioData, int offsetInShorts, int sizeInShorts)
从音频硬件录制缓冲区读取数据。
参数说明:
audioData : 写入的音频录制数据,利用audioData接收数据。
offsetInShorts: 目标数组 audioData 的起始偏移量,一般是0。
sizeInShorts : 每次请求读取的数据大小,缓存大小。
返回值:
返回short型数据,表示读取到的数据,如果对象属性没有初始化,则返回ERROR_INVALID_OPERATION,如果参数不能解析成有效的数据或索引,则返回ERROR_BAD_VALUE。 返回数值不会超过sizeInShorts。
返回类型说明:
//操作成功
public static final int SUCCESS = AudioSystem.SUCCESS;
//获取失败
public static final int ERROR = AudioSystem.ERROR;
//获取失败由于不合理的参数
public static final int ERROR_BAD_VALUE = AudioSystem.BAD_VALUE;
//方法使用不当,获取失败
public static final int ERROR_INVALID_OPERATION = AudioSystem.INVALID_OPERATION;
//返回失败,对象已死
public static final int ERROR_DEAD_OBJECT = AudioSystem.DEAD_OBJECT;
public int read (byte[] audioData, int offsetInBytes, int sizeInBytes)
从音频硬件录制缓冲区读取数据。
参数说明:
audioData : 写入的音频录制数据,利用audioData接收数据。
offsetInBytes 目标数组 audioData 的起始偏移量,一般是0。
sizeInBytes 每次请求读取的数据大小,缓存大小。
返回值:
读入缓冲区的总byte数,如果对象属性没有初始化,则返回ERROR_INVALID_OPERATION,如果参数不能解析成有效的数据或索引,则返回ERROR_BAD_VALUE。 读取的总byte数不会超过sizeInBytes。
public int read (ByteBuffer audioBuffer, int sizeInBytes)
从音频硬件录制缓冲区读取数据,直接复制到指定缓冲区。 如果audioBuffer不是直接的缓冲区,此方法总是返回0。
参数说明:
audioBuffer 存储写入音频录制数据的缓冲区。
sizeInBytes 每次请求的最大字节数。
返回值:
读入缓冲区的总byte数,如果对象属性没有初始化,则返回ERROR_INVALID_OPERATION,如果参数不能解析成有效的数据或索引,则返回ERROR_BAD_VALUE。 读取的总byte数不会超过sizeInBytes。
release函数:
public void release ():释放本地AudioRecord资源。对象不能经常使用此方法,而且在调用release()后,必须设置引用为null。
开始录制函数:
startRecording ():开始进行录制
2 AudioRecord 录制音频
AudioRecord由于输出的数据是原始数据PCM,MediaPlayer播放器是不能识别播放的,需要通过AudioTrack处理播放,或者把PCM转化为可以播放的格式类似wav,MP3等。
public class Main14Activity extends AppCompatActivity {
private ProgressBar mProgressBar;
private Button mBtn1;
private Button mBtn2;
private Button mBtn3;
private AudioRecord mAudioRecord;
private boolean isRecording = false;
int laiyuan = MediaRecorder.AudioSource.MIC;//来源
int samHz = 16000;//采样频率
int shengdao = AudioFormat.CHANNEL_IN_MONO;//声道
int audioFormat = AudioFormat.ENCODING_PCM_16BIT;//格式
int bufferSize = 2 * AudioRecord.getMinBufferSize(samHz,shengdao,audioFormat);//缓冲区大小
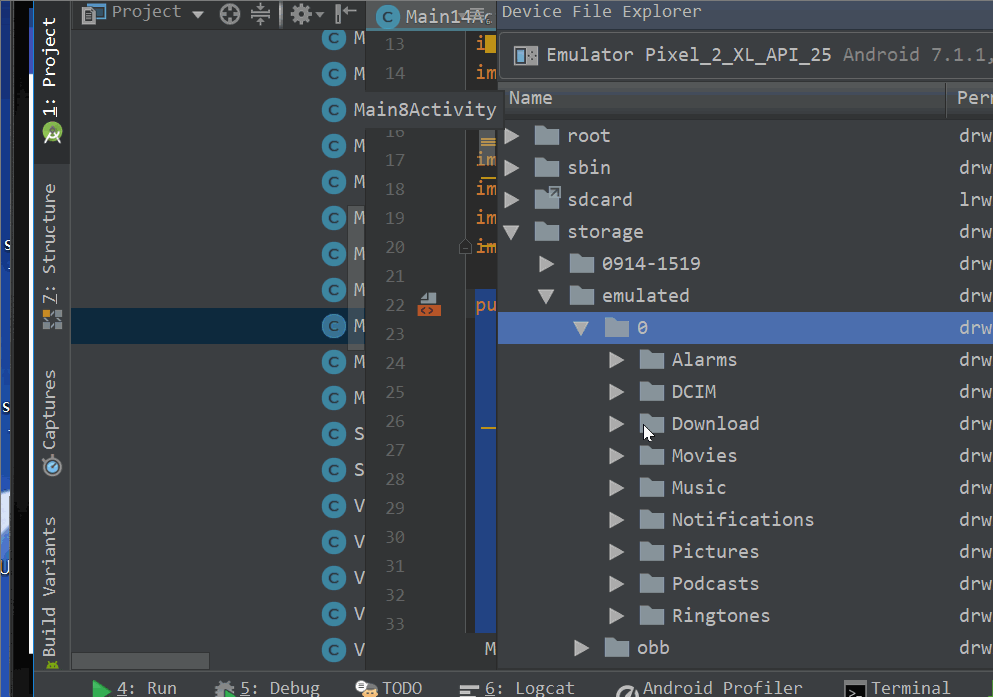
private String voicePath = Environment.getExternalStorageDirectory()
.getPath() + "/audio";
private String voiceName = "/test.pcm";
@Override
protected void onCreate(Bundle savedInstanceState) {
super.onCreate(savedInstanceState);
setContentView(R.layout.activity_main14);
init();
}
private void init() {
verifyStoragePermissions(this);
mProgressBar = findViewById(R.id.progressbar);
mProgressBar.setVisibility(View.GONE);
mBtn1 = findViewById(R.id.btn1);
mBtn2 = findViewById(R.id.btn2);
mBtn3 = findViewById(R.id.btn3);
mBtn1.setOnClickListener(new View.OnClickListener() {
@Override
public void onClick(View v) {
if (mAudioRecord == null){
startRecord();
}else{
}
}
});
mBtn2.setOnClickListener(new View.OnClickListener() {
@Override
public void onClick(View v) {
if (mAudioRecord != null){
stopRecord();
}
}
});
mBtn3.setOnClickListener(new View.OnClickListener() {
@Override
public void onClick(View v) {
MediaManager.playSound(voicePath, new MediaPlayer.OnCompletionListener() {
@Override
public void onCompletion(MediaPlayer mp) {
}
});
}
});
}
private static final int REQUEST_EXTERNAL_STORAGE = 1;
private static String[] PERMISSIONS_STORAGE = {"android.permission.READ_EXTERNAL_STORAGE", "android.permission.WRITE_EXTERNAL_STORAGE" ,"android.permission.RECORD_AUDIO"};
public static void verifyStoragePermissions(Activity activity) {
try {
//检测是否有写的权限
int permission1 = ActivityCompat.checkSelfPermission(activity,
"android.permission.WRITE_EXTERNAL_STORAGE");
int permission2 = ActivityCompat.checkSelfPermission(activity,
"android.permission.RECORD_AUDIO");
if (permission1 != PackageManager.PERMISSION_GRANTED || permission2 != PackageManager.PERMISSION_GRANTED) {
// 没有写的权限,去申请写的权限,会弹出对话框
ActivityCompat.requestPermissions(activity, PERMISSIONS_STORAGE,REQUEST_EXTERNAL_STORAGE);
}
} catch (Exception e) {
e.printStackTrace();
}
}
public void startRecord() {
mAudioRecord = new AudioRecord(laiyuan, samHz,
shengdao, audioFormat, bufferSize);
final byte data[] = new byte[bufferSize];
final File file = new File(voicePath);
final File fileaudio = new File(voicePath + voiceName);
if (fileaudio.exists()) {
fileaudio.delete();
}
if (!file.mkdirs()) {
return ;
}
mAudioRecord.startRecording();
isRecording = true;
mProgressBar.setVisibility(View.VISIBLE);
new Thread(new Runnable() {
@Override
public void run() {
FileOutputStream fos = null;
try {
fos = new FileOutputStream(fileaudio);
} catch (FileNotFoundException e) {
e.printStackTrace();
}
if (null != fos) {
while (isRecording) {
int read = mAudioRecord.read(data, 0, bufferSize);
//返回正确时才读取数据
if (AudioRecord.ERROR_INVALID_OPERATION != read) {
try {
fos.write(data);
} catch (IOException e) {
e.printStackTrace();
}
}
}
try {
fos.close();
} catch (IOException e) {
e.printStackTrace();
}
}
}
}).start();
}
public void stopRecord() {
isRecording = false;
if (mAudioRecord != null) {
mProgressBar.setVisibility(View.GONE);
mAudioRecord.stop();
mAudioRecord.release();
//调用release之后必须置为null
mAudioRecord = null;
}
}
}
利用MediaPlayer播放pcm音频文件无法播放,因为MediaPlayer不支持PCM格式文件。
3 AudioTrack
AudioRecord由于输出的数据是原始的PCM格式数据,MediaPlayer播放器是不能识别播放的,需要通过AudioTrack处理Pcm格式文件的播放。
AudioTrack只能播放已经解码的PCM流,如果是文件的话只支持wav格式的音频文件,因为wav格式的音频文件大部分都是PCM流。AudioTrack不创建解码器,所以只 能播放不需要解码的wav文件。
The AudioTrack class manages and plays a single audio resource for Java applications. It allows streaming of PCM audio buffers to the audio sink for playback. This is achieved by “pushing” the data to the AudioTrack object using one of the write(byte[], int, int), write(short[], int, int), and write(float[], int, int, int) methods.
AudioTrack可以为应用管理和播放一个audio资源,它允许PCM音频缓冲器流到音频接收器然后进行回放。利用AudioTrack的三个write方法通过推的方式实现。
AudioTrack可以在两种模式下工作,一种是静态(static),一种是流( streaming)。流模式中,应用可以利用write方法写一个连续的数据流信息。
STREAM模式通过write方式把数据一次一次得写到audiotrack中,适用于实时数据,或者数据太大无法直接完全加载到内存中的情况。
STATIC模式在创建AudioTrack的时候,就把音频数据放到一个固定的buffer,然后直接传给audiotrack,只有读取一次,这种方法对于铃声等内存占用较小,延时要求较高的声音来说很适用。
AudioTrack构造函数
AudioTrack(int streamType, int sampleRateInHz, int channelConfig, int audioFormat, int bufferSizeInBytes, int mode)
参数说明:
streamType: 音频文件流类型, AudioManager.STREAM_VOICE_CALL, AudioManager.STREAM_SYSTEM, AudioManager.STREAM_RING, AudioManager.STREAM_MUSIC, AudioManager.STREAM_ALARM, and AudioManager.STREAM_NOTIFICATION.
Android系统的音乐是分类管理的,音频流的类型与Android系统对音频流的管理和分类有关,而对于AudioTrack读取文件是没有限制的,也就是ALARM,MUSIC,RING都可以是同一个mp3文件。
选择类型作为参数没有固定标准,铃声也可以选择MUSIC,但是最好按照使用类型进行选择,这样有助于Android对音频的管理。例如你在听歌的时候接到电话,歌曲播放停止,这时只能听到电话,如果你调节音量的话,这个调节肯定只对电话起作用,当电话打完了,再回到播放音乐,这时是不用再调节音量了。如果随意设置,就需要进行音量的调节。
Android将系统的声音分为好几种流类型,下面是几个常见的:
· STREAM_ALARM:警告声
· STREAM_MUSIC:音乐声,例如music等
· STREAM_RING:铃声
· STREAM_SYSTEM:系统声音,例如低电提示音,锁屏音等
· STREAM_VOCIE_CALL:通话声
sampleRateInHz,audioFormat,bufferSizeInBytes在AudioRecord中已经讲解,含义相同此处不再讲解
**channelConfig:**声道,CHANNEL_OUT_MONO和CHANNEL_OUT_STEREO,分别代表单声道和立体声道,和AudioRecord的声道是不同的,因为此处是输出声道。
mode:
AudioTrack有两种数据加载模式(MODE_STREAM和MODE_STATIC),不同模式的数据加载模式和音频流类型都不同,两者使用场景也有较大差异。
MODE_STREAM:play函数调用后,要通过write一次次把音频数据写到AudioTrack中。
MODE_STATIC:在play之前只需要把所有数据通过一次write调用传递到AudioTrack中的内部缓冲区,后续就不必再传递数据了。这种模式适用于像铃声这种内存占用量较小,延时要求较高的文件。但它也有一个缺点,就是一次write的数据不能太多,否则系统无法分配足够的内存来存储全部数据。
AudioTrack(int streamType, int sampleRateInHz, int channelConfig, int audioFormat, int bufferSizeInBytes, int mode, int sessionId)
只讲解sessionId:
生成的AudioTrack实例会连接一个特定的音频会话,使用sessionId的作用是对一个AudioTrack实例添加和音频效果(AudioEffect)的联系。也就是如果这个session已经被其他的播放器或者audio track使用,新创建的AudioTrack就会和它们共享AudioEffect。如果是第一次使用该session,AudioEffect就会将session与新创建的AudioTrack对象关联起来,
以后其他的播放器或audio track再使用该session时,就会与该AudioTrack共享AudioEffect。
如果没有指定一个session,就会为该AudioTrack创建一个自己的session,该session可以被别人通过getAudioSessionId得到。
别人得到了该session,并且使用该session创建播放器或者audio track,就会会你共享AudioEffect。
AudioTrack(AudioAttributes attributes, AudioFormat format, int bufferSizeInBytes, int mode, int sessionId)
api21才添加的方法,
**attributes:**内部可以设置streamType,
**format:**可以设置audio format 和 channel ,所以新的构造函数和以前的构造函数几乎没区别。
4 AudioTrack MODE_STATIC模式
MODE_STATIC模式下,在调用play函数之前要把所有数据通过一次write调用传递到AudioTrack中的内部缓冲区,后续就不必再传递数据了。但有个显而易见的缺点是,write的数据不能太大,如果超出了内存可承受范围就会OOM,所以还要看具体使用场景来使用。这种模式适用于像铃声这种内存占用量较小,延时要求较高的文件。
如果采用STATIC模式,须先调用write写数据,然后再调用play。
public void startRecord() {
    mAudioRecord = new AudioRecord(laiyuan, samHz,
            shengdao, audioFormat, bufferSize);

    final byte data[] = new byte[bufferSize];
    final File file = new File(voicePath);
    final File fileaudio = new File(voicePath + voiceName);

    if (fileaudio.exists()) {
        fileaudio.delete();
    }

    if (!file.mkdirs()) {
        return ;
    }

    mAudioRecord.startRecording();
    isRecording = true;
    mProgressBar.setVisibility(View.VISIBLE);

    new Thread(new Runnable() {
        @Override
        public void run() {

            FileOutputStream fos = null;
            try {
                fos = new FileOutputStream(fileaudio);
            } catch (FileNotFoundException e) {
                e.printStackTrace();
            }

            if (null != fos) {
                while (isRecording) {
                    int read = mAudioRecord.read(data, 0, bufferSize);
                    //返回正确时才读取数据
                    if (AudioRecord.ERROR_INVALID_OPERATION != read) {
                        try {
                            fos.write(data);
                        } catch (IOException e) {
                            e.printStackTrace();
                        }
                    }
                }
                try {
                    fos.close();
                } catch (IOException e) {
                    e.printStackTrace();
                }
            }
        }
    }).start();
}
播放:
    AudioTrack audioTrack =  new AudioTrack(AudioManager.STREAM_MUSIC, samHz,
            AudioFormat.CHANNEL_OUT_MONO, audioFormat,
            audioData.length, AudioTrack.MODE_STATIC);
    audioTrack.write(audioData,0,audioData.length);
    audioTrack.play();
5 MODE_STREAM:
MODE_STREAM模式下,通过write一次次把音频数据写到AudioTrack中,类似网络视频播放,如果数据时实时的,则必须使用Stream方式。
可以先调用play,在调用write方式。
public void streamPlayMode(final String path){
    final AudioTrack audioTrack =  new AudioTrack(AudioManager.STREAM_MUSIC, samHz,
            AudioFormat.CHANNEL_OUT_MONO, audioFormat,
            bufferSize, AudioTrack.MODE_STREAM);
    audioTrack.play();
    new Thread(new Runnable() {
        @Override
        public void run() {
            try {
                InputStream in = new FileInputStream(path);
                try {
                    byte[] tempBuffer = new byte[bufferSize];
                    int readCount = 0;
                    while (in.available() > 0) {
                        readCount = in.read(tempBuffer);
                        if (readCount == AudioTrack.ERROR_INVALID_OPERATION || readCount == AudioTrack.ERROR_BAD_VALUE) {
                            continue;
                        }
                        if (readCount != 0 && readCount != -1) {
                            audioTrack.write(tempBuffer, 0, readCount);
                        }
                    }
                } finally {
                    in.close();
                }
            } catch (IOException e) {

            }
        }
    }).start();