文章目录
一、实验环境
CentOS环境:
[root@localhost ~]# cat /etc/redhat-release
CentOS Linux release 7.1.1503 (Core)
[root@localhost ~]# uname -a
Linux localhost.localdomain 3.10.0-229.el7.x86_64 #1 SMP Fri Mar 6 11:36:42 UTC 2015 x86_64 x86_64 x86_64 GNU/Linux
[root@localhost ~]# ip addr show|sed -rn '/inet[[:space:]]+127/! s/^[[:space:]]+inet[[:space:]]+(.*)\/[[:digit:]]+[[:space:]]+.*$/\1/p'
172.16.0.77

Selinux关闭状态,firewalld防火墙启动状态。
使用默认的base仓库以及配置了epel仓库。
二、yum安装httpd2.4并简单配置和说明
2.1、yum安装httpd2.4
直接在bash接口执行安装:
[root@localhost ~]# yum install httpd
...... #安装过程省略。

默认的httpd的版本:
[root@localhost ~]# httpd -v
Server version: Apache/2.4.6 (CentOS)
Server built:   Nov  5 2018 01:47:09

httpd:apache的httpd项目。The apache httpd服务器是功能强大的,高效的而且可扩展的web服务器。
[root@localhost ~]# rpm -qi httpd
Name        : httpd
Version     : 2.4.6
Release     : 88.el7.centos
Architecture: x86_64
Install Date: Fri 21 Dec 2018 08:39:35 PM CST
Group       : System Environment/Daemons
Size        : 9817309
License     : ASL 2.0
Signature   : RSA/SHA256, Mon 12 Nov 2018 10:28:53 PM CST, Key ID 24c6a8a7f4a80eb5
Source RPM  : httpd-2.4.6-88.el7.centos.src.rpm
Build Date  : Mon 05 Nov 2018 09:48:57 AM CST
Build Host  : x86-01.bsys.centos.org
Relocations : (not relocatable)
Packager    : CentOS BuildSystem <http://bugs.centos.org>
Vendor      : CentOS
URL         : http://httpd.apache.org/
Summary     : Apache HTTP Server
Description :
The Apache HTTP Server is a powerful, efficient, and extensible
web server.
2.2、httpd2.4安装常见文件介绍
配置文件:
/etc/httpd/conf/httpd.conf
/etc/httpd/conf.d/*.conf
/etc/httpd/conf.modules.d/*.conf

httpd服务的配置文件:
/etc/sysconfig/httpd

httpd服务的unit文件:
/usr/lib/systemd/system/httpd.service

httpd编译进的模块文件:
/usr/lib64/httpd/modules/*.so

httpd程序文件:
/usr/sbin/httpd

httpd日志文件目录:
/var/log/httpd/

缓存目录:
/var/cache/httpd
/var/cache/httpd/proxy

默认主页文件目录:
/var/www/html/
2.3、自定义文档路径配置资源能实现被访问
假设自定义的资源路径为:/data/web/html
创建目录:
[root@localhost ~]# mkdir -pv /data/web/html
mkdir: created directory ‘/data’
mkdir: created directory ‘/data/web’
mkdir: created directory ‘/data/web/html’

给系统加一个主机名到ip地址的映射:
[root@www ~]# tail -1 /etc/hosts
172.16.0.77 www.yanhui.com
[root@www ~]# ping www.yanhui.com
PING www.yanhui.com (172.16.0.77) 56(84) bytes of data.
64 bytes from www.yanhui.com (172.16.0.77): icmp_seq=1 ttl=64 time=0.088 ms
^C
--- www.yanhui.com ping statistics ---
1 packets transmitted, 1 received, 0% packet loss, time 0ms
rtt min/avg/max/mdev = 0.088/0.088/0.088/0.000 ms

备份主配置文件:
[root@www ~]# cp /etc/httpd/conf/httpd.conf{,.bak}

修改主配置文件:
添加:
ServerName www.yanhui.com
或者直接写成
ServerName 172.16.0.77
修改原先配置的DocumentRoot:
修改前:DocumentRoot "/var/www/html"
修改后:DocumentRoot "/data/web/html"

添加一个虚拟主机子配置文件配置文件:
 <VirtualHost *:80>
    DocumentRoot /data/web/html
    <Directory "/data/web/html">
        Options None
        AllowOverride None
        Require all granted
    </Directory>
</VirtualHost>

检测语法:
[root@www ~]# httpd -t
Syntax OK

防火墙开放http服务:(这次测试只是临时生效,没有永久写入配置文件)
[root@www ~]# firewall-cmd --list-all
public (default, active)
  interfaces: eno16777736
  sources:
  services: dhcpv6-client ssh
  ports:
  masquerade: no
  forward-ports:
  icmp-blocks:
  rich rules:

[root@www ~]# firewall-cmd --add-service=http
success
[root@www ~]# firewall-cmd --list-all
public (default, active)
  interfaces: eno16777736
  sources:
  services: dhcpv6-client http ssh
  ports:
  masquerade: no
  forward-ports:
  icmp-blocks:
  rich rules:

准备一个主页文件:
[root@www ~]# cat /data/web/html/index.html
<h1>This is a testpage.</h1>

检查一下资源根目录apache用户是否有权限:
[root@www ~]# ls -ld /data/web/html/
drwxr-xr-x 2 root root 23 Dec 21 22:46 /data/web/html/
[root@www ~]# ls -ld /data/web/html/index.html
-rw-r--r-- 1 root root 29 Dec 21 22:46 /data/web/html/index.html
我们只是测试访问,目录和主页文件对于apache用户来说都有读的权限;

#启动httpd服务:
[root@www ~]# systemctl start httpd.service
[root@www ~]# systemctl status httpd.service
httpd.service - The Apache HTTP Server
   Loaded: loaded (/usr/lib/systemd/system/httpd.service; disabled)
   Active: active (running) since Fri 2018-12-21 22:50:03 CST; 5s ago
     Docs: man:httpd(8)
           man:apachectl(8)
 Main PID: 23663 (httpd)
   Status: "Processing requests..."
   CGroup: /system.slice/httpd.service
           ├─23663 /usr/sbin/httpd -DFOREGROUND
           ├─23664 /usr/sbin/httpd -DFOREGROUND
           ├─23665 /usr/sbin/httpd -DFOREGROUND
           ├─23666 /usr/sbin/httpd -DFOREGROUND
           ├─23667 /usr/sbin/httpd -DFOREGROUND
           └─23668 /usr/sbin/httpd -DFOREGROUND

Dec 21 22:50:03 www.yanhui.com systemd[1]: Started The Apache HTTP Server.
[root@www ~]# ss -tnlp|grep :80
LISTEN     0      128                      :::80                      :::*      users:(("httpd",23668,4),("httpd",23667,4),("httpd",23666,4),("httpd",23665,4),("httpd",23664,4),("httpd",23663,4))
在windows浏览器测试访问:

三、yum安装php-fpm并简单配置和说明
3.1、yum安装php-fpm
php-fpm:PHP FastCGI 进程管理器
[root@www ~]# yum info php-fpm
Loaded plugins: fastestmirror
Loading mirror speeds from cached hostfile
 * base: mirrors.aliyun.com
 * epel: mirror01.idc.hinet.net
 * extras: mirrors.cn99.com
 * updates: mirrors.cn99.com
Available Packages
Name        : php-fpm
Arch        : x86_64
Version     : 5.4.16
Release     : 46.el7
Size        : 1.4 M
Repo        : base/7/x86_64
Summary     : PHP FastCGI Process Manager
URL         : http://www.php.net/
License     : PHP and Zend and BSD
Description : PHP-FPM (FastCGI Process Manager) is an alternative PHP FastCGI
            : implementation with some additional features useful for sites of
            : any size, especially busier sites.
CentOS 7上的php-fpm版本是5.4。

安装php-fpm:
[root@www ~]# yum install php-fpm
...... #安装过程省略。

[root@www ~]# rpm -ql php-fpm
/etc/logrotate.d/php-fpm
/etc/php-fpm.conf #php-fpm的主配置文件
/etc/php-fpm.d
/etc/php-fpm.d/www.conf #php-fpm的子配置文件
/etc/sysconfig/php-fpm #php-fpm服务的配置文件
/run/php-fpm
/usr/lib/systemd/system/php-fpm.service #php-fpm.service服务的unit文件
/usr/lib/tmpfiles.d/php-fpm.conf
/usr/sbin/php-fpm #php-fpm程序
/usr/share/doc/php-fpm-5.4.16
/usr/share/doc/php-fpm-5.4.16/fpm_LICENSE
/usr/share/doc/php-fpm-5.4.16/php-fpm.conf.default
/usr/share/fpm
/usr/share/fpm/status.html
/usr/share/man/man8/php-fpm.8.gz
/var/log/php-fpm #php-fpm日志文件目录

[root@www ~]# rpm -ql php-common
/etc/php.d
/etc/php.d/curl.ini #下面这些也是子配置文件,不过每个配置文件就加入一个扩展,这个是启用curl扩展模块的配置文件
/etc/php.d/fileinfo.ini #启用fileinfo扩展模块的子配置文件
/etc/php.d/json.ini #启用json模块的子配置文件
/etc/php.d/phar.ini #启用phar模块的子配置文件
/etc/php.d/zip.ini #启用zip模块的子配置文件
/etc/php.ini #php的环境的主配置文件
/usr/lib64/php
/usr/lib64/php/modules #php的模块路径
/usr/lib64/php/modules/curl.so
/usr/lib64/php/modules/fileinfo.so
/usr/lib64/php/modules/json.so
/usr/lib64/php/modules/phar.so
/usr/lib64/php/modules/zip.so
/usr/share/doc/php-common-5.4.16
...... #中间省略很多安装的说明文档
/usr/share/php
/var/lib/php
3.2、php.ini和php-fpm配置说明
先备份php的配置文件和php-fpm的配置文件:
[root@www ~]# cp /etc/php.ini{,.bak}
[root@www ~]# cp /etc/php-fpm.conf{,.bak}
[root@www ~]# cp /etc/php-fpm.d/www.conf{,.bak}
[root@www ~]# ls -l /etc/php.ini* /etc/php-fpm.conf* /etc/php-fpm.d/www.conf*
-rw-r--r-- 1 root root  1691 Oct 31 03:33 /etc/php-fpm.conf
-rw-r--r-- 1 root root  1691 Dec 21 23:40 /etc/php-fpm.conf.bak
-rw-r--r-- 1 root root 10018 Oct 31 03:33 /etc/php-fpm.d/www.conf
-rw-r--r-- 1 root root 10018 Dec 21 23:40 /etc/php-fpm.d/www.conf.bak
-rw-r--r-- 1 root root 64945 Oct 31 03:33 /etc/php.ini
-rw-r--r-- 1 root root 64945 Dec 21 23:40 /etc/php.ini.bak

php.ini的配置可以参考:
https://my.oschina.net/miaowang/blog/299546
http://www.php.net/manual/zh/ini.php
#本次博文不涉及调整生产环境php.ini的配置,会有专门博文提供此类说明

php-fpm.conf的配置可以参考:
http://www.php.net/manual/zh/install.fpm.php
https://www.cnblogs.com/jonsea/p/5522018.html
https://www.tuicool.com/articles/NjmQNj6
https://blog.csdn.net/l_ieluil/article/details/52808634

默认的php.ini 启用的配置:
[root@www ~]# grep -Ev '^#|^;|^$' /etc/php.ini
[PHP]
engine = On
short_open_tag = Off
asp_tags = Off
precision = 14
output_buffering = 4096
zlib.output_compression = Off
implicit_flush = Off
unserialize_callback_func =
serialize_precision = 17
disable_functions =
disable_classes =
zend.enable_gc = On
expose_php = On
max_execution_time = 30
max_input_time = 60
memory_limit = 128M
error_reporting = E_ALL & ~E_DEPRECATED & ~E_STRICT
display_errors = Off
display_startup_errors = Off
log_errors = On
log_errors_max_len = 1024
ignore_repeated_errors = Off
ignore_repeated_source = Off
report_memleaks = On
track_errors = Off
html_errors = On
variables_order = "GPCS"
request_order = "GP"
register_argc_argv = Off
auto_globals_jit = On
post_max_size = 8M
auto_prepend_file =
auto_append_file =
default_mimetype = "text/html"
doc_root =
user_dir =
enable_dl = Off
file_uploads = On
upload_max_filesize = 2M
max_file_uploads = 20
allow_url_fopen = On
allow_url_include = Off
default_socket_timeout = 60
[CLI Server]
cli_server.color = On
[Date]
[filter]
[iconv]
[intl]
[sqlite]
[sqlite3]
[Pcre]
[Pdo]
[Pdo_mysql]
pdo_mysql.cache_size = 2000
pdo_mysql.default_socket=
[Phar]
[mail function]
SMTP = localhost
smtp_port = 25
sendmail_path = /usr/sbin/sendmail -t -i
mail.add_x_header = On
[SQL]
sql.safe_mode = Off
[ODBC]
odbc.allow_persistent = On
odbc.check_persistent = On
odbc.max_persistent = -1
odbc.max_links = -1
odbc.defaultlrl = 4096
odbc.defaultbinmode = 1
[Interbase]
ibase.allow_persistent = 1
ibase.max_persistent = -1
ibase.max_links = -1
ibase.timestampformat = "%Y-%m-%d %H:%M:%S"
ibase.dateformat = "%Y-%m-%d"
ibase.timeformat = "%H:%M:%S"
[MySQL]
mysql.allow_local_infile = On
mysql.allow_persistent = On
mysql.cache_size = 2000
mysql.max_persistent = -1
mysql.max_links = -1
mysql.default_port =
mysql.default_socket =
mysql.default_host =
mysql.default_user =
mysql.default_password =
mysql.connect_timeout = 60
mysql.trace_mode = Off
[MySQLi]
mysqli.max_persistent = -1
mysqli.allow_persistent = On
mysqli.max_links = -1
mysqli.cache_size = 2000
mysqli.default_port = 3306
mysqli.default_socket =
mysqli.default_host =
mysqli.default_user =
mysqli.default_pw =
mysqli.reconnect = Off
[mysqlnd]
mysqlnd.collect_statistics = On
mysqlnd.collect_memory_statistics = Off
[OCI8]
[PostgreSQL]
pgsql.allow_persistent = On
pgsql.auto_reset_persistent = Off
pgsql.max_persistent = -1
pgsql.max_links = -1
pgsql.ignore_notice = 0
pgsql.log_notice = 0
[Sybase-CT]
sybct.allow_persistent = On
sybct.max_persistent = -1
sybct.max_links = -1
sybct.min_server_severity = 10
sybct.min_client_severity = 10
[bcmath]
bcmath.scale = 0
[browscap]
[Session]
session.save_handler = files
session.use_cookies = 1
session.use_only_cookies = 1
session.name = PHPSESSID
session.auto_start = 0
session.cookie_lifetime = 0
session.cookie_path = /
session.cookie_domain =
session.cookie_httponly =
session.serialize_handler = php
session.gc_probability = 1
session.gc_divisor = 1000
session.gc_maxlifetime = 1440
session.bug_compat_42 = Off
session.bug_compat_warn = Off
session.referer_check =
session.cache_limiter = nocache
session.cache_expire = 180
session.use_trans_sid = 0
session.hash_function = 0
session.hash_bits_per_character = 5
url_rewriter.tags = "a=href,area=href,frame=src,input=src,form=fakeentry"
[MSSQL]
mssql.allow_persistent = On
mssql.max_persistent = -1
mssql.max_links = -1
mssql.min_error_severity = 10
mssql.min_message_severity = 10
mssql.compatability_mode = Off
mssql.secure_connection = Off
[Assertion]
[mbstring]
[gd]
[exif]
[Tidy]
tidy.clean_output = Off
[soap]
soap.wsdl_cache_enabled=1
soap.wsdl_cache_dir="/tmp"
soap.wsdl_cache_ttl=86400
soap.wsdl_cache_limit = 5
[sysvshm]
[ldap]
ldap.max_links = -1
[mcrypt]
[dba]

php-fpm.conf主配置文件默认选项:
include=/etc/php-fpm.d/*.conf
[global]
pid = /run/php-fpm/php-fpm.pid
error_log = /var/log/php-fpm/error.log
daemonize = no

php-fpm的子配置文件默认选项:
[root@www ~]# grep -Ev '^#|^$|^;|^ ' /etc/php-fpm.d/www.conf
[www]
listen = 127.0.0.1:9000
listen.allowed_clients = 127.0.0.1
user = apache
group = apache
pm = dynamic
pm.max_children = 50
pm.start_servers = 5
pm.min_spare_servers = 5
pm.max_spare_servers = 35
slowlog = /var/log/php-fpm/www-slow.log
php_admin_value[error_log] = /var/log/php-fpm/www-error.log
php_admin_flag[log_errors] = on
php_value[session.save_handler] = files
php_value[session.save_path] = /var/lib/php/session


注解php-fpm.conf: ("#"和";"都可以注释)
include=/etc/php-fpm.d/*.conf #include指令可以使用多次和任意地方,引入子配置文件

[global] #这种特定格式,以大括号引用,这里是全局配置部分开始

pid = /run/php-fpm/php-fpm.pid
#php-fpm进程的pid文件,默认值为none,不过模板默认值为前边/run/php-fpm/php-fpm.pid

error_log = /var/log/php-fpm/error.log
#定义错误日志文件,默认值为/var/log/php-fpm.log,这里有模板默认值为/var/log/php-fpm/error.log

;log_level = notice
#定义日志级别。可选值:alert, error, warning, notice, debug,生产环境不要使用debug,选择warning或notice
#都行。如果业务量比较大,可以只选择warning。默认值为notice

;emergency_restart_threshold = 0
如果emergency_restart_threshold 指定数量的子进程
在emergency_restart_interval指定的时间内以IGSEGV或SIGBUS信号退出,则重启fpm,
默认0表示关闭这个功能。

;emergency_restart_interval = 0
设置时间间隔来决定服务的初始化时间,平滑重启(默认单位:s秒),可选单位:
s(econds), m(inutes), h(ours), or d(ays)
秒,分,时,天(单位表示可以缩写,也可以不缩写)
默认值:0,默认单位:秒
这对于解决加速器共享内存中的意外损坏很有用。


;process_control_timeout = 0
子进程等待master进程对信号的响应(默认单位:s秒),可选单位:
s(econds), m(inutes), h(ours), or d(ays)
秒,分,时,天(单位表示可以缩写,也可以不缩写)
默认值为:0,默认单位为:秒

daemonize = no
是否让php-fpm以守护进程方式后台运行。设置为no表示调试的时候使用,正常要设置为yes。默认值也是yes,
#这里的模板配置是no,建议改成yes。

进程池的定义在子配置文件:
[www] #这个表示启动一个新的(进程)池,名字叫www

listen = 127.0.0.1:9000
#指定php-fpm监听的套接字信息。可以支持指定ip加端口,表示监听到指定接口的自定端口上。
#也可以只指定一个端口,表示监听所有网卡接口
#可以指定/path/to/unix/socket,这表示一个unix套接字文件。
#如果php-fpm和httpd安装到一个主机上,可以采用unix套接字,性能最佳。其次为了安全,可以监听到本地回环
#接口或内网接口。注意,此选项是强制性的,不可省略。

;listen.backlog = -1
#backlog定义挂起队列的最大长度。可以参考man 2 listen相关说明。默认值为-1,表示不限制这个队列长度。

listen.allowed_clients = 127.0.0.1
#允许连接的FastCGI客户端的ipv4地址列表。多个地址应该以逗号隔开。如果该值留空,表示允许任意地址的客
#户端连接,默认值为any表示允许任意地址。这里的模板配置默认值为:127.0.0.1
#这个参数设置有讲究的,如果访问php-fpm不是走公网,建议这里设置好允许连接的客户端地址,在本机的话,#尽量使用127.0.0.1,如果客户端与php-fpm不在同一台服务器,尽量建议走内网。平常使用虚拟机NAT上网做实验
#的话,要注意浏览器实际要通过虚拟网关地址接入,客户端地址很有可能类似于172.16.0.1这种形式。

;listen.owner = nobody
;listen.group = nobody
;listen.mode = 0666
如果监听套接字是unix套接字的话,那么用使用上面这三个参数来定义套接字文件的权限。
默认值:套接字文件属主和文件属组设置为运行进程用户,mode权限设置为0666
至少要给php-fpm运行的工作进程用户读写unix套接字的权限。

user = apache
group = apache
#设置php-fpm运行工作进程用户和组。user选项不可省略。如果省略group选项,会使用user指定用户的主要组。

pm = dynamic
pm可选值可以为:static或dynamic,该选项不可省略。
static:固定数量的子进程;使用pm.max_children进行定义固定子进程数量;
dynamic:子进程数量以动态模式进行管理;具体动态和以下指令有关系:
pm.max_children,pm.start_servers ,pm.min_spare_servers,pm.max_spare_servers

pm.max_children = 50
#最大的子进程数量。该选项不可省略。这个值就是并发限制值。

pm.start_servers = 5
#只有当pm设置为dynamic动态管理时候,该参数才有用。
#初始启动,创建php-fpm工作子进程数量。默认值要通过下面的公式换算:
min_spare_servers + (max_spare_servers - min_spare_servers) / 2

pm.min_spare_servers = 5
#期望最少空闲的php-fpm工作进程的数量。只有当pm值设置为dynamic时候才有用,而且pm设置为dynamic时,
#该参数不可省略。

pm.max_spare_servers = 35
#期望最多空闲的php-fpm工作进程的数量。只有当pm值设置为dynamic时候才有用,而且pm设置为dynamic时,
#该参数不可省略。

;pm.max_requests = 500
#设置每个php-fpm工作子进程响应多少次请求后被销毁,并重新创建新的子进程。
#默认值是0表示不限制其相应多少次请求。有时候使用第三方程序存在内存泄露,定义这个参数
#为一个合理值,有时候会更好。

;pm.status_path = /status
#设置php-fpm的状态页。值必须以前导的"/"正向反斜线符号开始,后边的字符串可以设置为合理的任意值。
#尽量不要和php的扩展名同名。默认值没有设置状态页。状态页显示信息含义如下:
accepted conn:指定进程池已经接收了的请求数量;
pool:进程池的名字;
process manager:子进程的管理方式,动态的或静态的
idle processes:空闲进程数量;
active processes:活跃进程数量;
total processes:空闲进程和活跃进程总数量;
#值刷新说明:"idle processes","active processes","total processes"得值是按照每一秒的频率去刷新
#的;“accepted conn”的值是实时刷新的。
#输出格式说明:默认状态页的输出格式是text/plain,还可以指定以html或json格式输出。如果定义状态页参数
#为/status,请求域名为www.yanhui.com,那么输出不同格式的写法如下:
http://www.yanhui.com/status
http://www.yanhui.com/status?json
http://www.yanhui.com/status?html


;ping.path = /ping
用于监控FPM状态的ping URI。定义这个ping URI可能有以下几种用途:
(1) 可以借助第三方利用ping URI监控,把FPM的可用性状态绘制成趋势图谱;
(2) 在负载均衡的场景,一当使用ping URI探测不到fpm主机,可以使用相关策略自动移除这个后端的fpm主机;
(3) 触发告警,发送给相关维护团队;
#使用说明:值必须要以"/"开头,后边的部分不一定要定义成ping,可以定义成其他任意合理字符串。建议
不要和php扩展名同名。默认值没有设置。

;ping.response = pong
#用于定义响应ping URI的请求,默认响应格式为text/plain,而且响应报文的状态码为200.默认值为
#pong。

;request_terminate_timeout = 0
#终止请求超时时间,在worker进程被杀掉之后,提供单个请求的超时间隔。由于某种原因不停止脚本执行时,
#应该使用该选项,0表示关闭不启用。
php.ini有定义一个选项叫max_execution_time(默认是30秒),如果单个脚本的最大执行时间超过这个定义值,正
常要被kill掉,有些特殊情况可能会导致脚本并未被终止。这里可选单位为:
s(econds)(default), m(inutes), h(ours), or d(ays)
默认值为0表示off,不启用这种机制。

;request_slowlog_timeout = 0
慢查询超时时间。如果定义为0表示off,不定义这个慢查询超时时间。如果定义成非0的正数值。php的执行程序
超过这个阈值,会记录到slowlog定义的慢查询日志文件中。可用单位为:
s(econds)(default), m(inutes), h(ours), or d(ays)
默认值为0;

slowlog = /var/log/php-fpm/www-slow.log
如果定义了request_slowlog_timeout为非0,那么这个slowlog是不可少的选项。
定义慢查询日志记录的文件。

;rlimit_files = 1024
定义打开的文件描述符的限制。这个值如果定义的大于系统默认的值,会以系统默认值为准。
这个选项的默认值等于系统的默认。建议在生产环境要调整系统的最大打开的文件描述符个数,
而且php-fpm的配置文件的这个选项要根据实际情况调大或调小。

;rlimit_core = 0
设置内核对资源的使用限制值,用于内核转储。默认值等于系统设置的值。
这里可以定义为"unlimited"表示无限制,或定义为大于等于0的正整数值。

;chroot =
设置chroot路径,程序一启动就将其chroot放置到指定的目录下,该指令值必须是一个绝对路径
默认值没有设置。

;chdir = /var/www
在程序启动时将会改变到指定的位置(这个是相对路径,相对当前路径或chroot后的“/”目录)
默认值为当前工作路径或启用chroot时候表示当前chroot的根目录。

;catch_workers_output = yes
将worker进程的标准输出和标准错误输出 重定向到主要的错误日志记录中,如果没有设置,根据FastCGI的指
定,将会被重定向到/dev/null上。默认值为no

;security.limit_extensions = .php .php3 .php4 .php5
限制FPM执行解析的扩展名。(简单来说就是php代码,以什么格式后缀结尾才被解析成php资源)。
默认值为:.php

;env[HOSTNAME] = $HOSTNAME
;env[PATH] = /usr/local/bin:/usr/bin:/bin
;env[TMP] = /tmp
;env[TMPDIR] = /tmp
;env[TEMP] = /tmp
定义环境变量的值。php中定义的环境都从当前环境所继承。默认值为没有定义环境变量。(clean env状态)

附加的php.ini定义(就是在应用web配置中也可以定义php.ini中的部分选项)。这里定义的是局部部分,生效范围
默认为这个工作进程的进程池内。这里的设置会覆盖从php.ini全局配置文件定义的选项值。这些指令和PHP
SAPI类似:
(1 )php_value/php_flag
(2) php_admin_value/php_admin_flag
第一种形式定义的ini的值表示古典定义格式,就是原生态的。可以被php的ini_set的方法调用和修改的;就是
你这里定义了这种形式的值,在php的代码中也可以调用ini_set来修改对应(php.ini)选项的值。第一种形式,例如
php_value[session.save_path] = /var/lib/php/session
第二种形式定义的ini的值,不能被php的ini_set方法修改的值所覆盖。例如:
php_admin_value[error_log] = /var/log/php-fpm/www-error.log

上面两种形式的value可以换成flag,flag类型的值表示布尔类型的值,可选有效值:
启用:on,1,yes
不启用:off,0,no

下面这些启用值的含义的作用域只是改工作进程池([www]),而且这些选项,会覆盖从php.ini读取的配置。其相关
含义可以参考php.ini的注解。上面有讲过下面的这些值可以定义为
php_admin_value[php_admin_options] = value形式或php_admin_flag[php_admin_options] = bool_value
php_value[php_options] = value形式或 php_flag[php_options] = bool_value

小贴士:我这里只是根据自己的理解总结成这种形式。

;php_admin_value[sendmail_path] = /usr/sbin/sendmail -t -i -f [email protected]
;php_flag[display_errors] = off
php_admin_value[error_log] = /var/log/php-fpm/www-error.log
php_admin_flag[log_errors] = on
;php_admin_value[memory_limit] = 128M

php_value[session.save_handler] = files
php_value[session.save_path] = /var/lib/php/session
#创建session目录,默认值存储在文件系统的文件,路径在/var/lib/php/session,所以如果不存在,要创建
#这个目录,而且要保证php-fpm工作进程用户要对这个会话目录要有读写权限。
3.3、php-fpm最终配置参考
[root@www ~]# grep -Ev '^;|^#|^$|^ ' /etc/php-fpm.conf
include=/etc/php-fpm.d/*.conf
[global]
pid = /run/php-fpm/php-fpm.pid
error_log = /var/log/php-fpm/error.log
log_level = notice
daemonize = yes

[root@www php]# grep -Ev '^;|^#|^$|^ ' /etc/php-fpm.d/www.conf
[www]
listen = 127.0.0.1:9000
listen.backlog = -1
listen.allowed_clients = 127.0.0.1
user = apache
group = apache
pm = dynamic
pm.max_children = 50
pm.start_servers = 5
pm.min_spare_servers = 5
pm.max_spare_servers = 15
pm.max_requests = 1000
pm.status_path = /fpm-status
ping.path = /fpm-ping
ping.response = fpm-pong
request_slowlog_timeout = 5s
slowlog = /var/log/php-fpm/www-slow.log
catch_workers_output = yes
security.limit_extensions = .php .php5
php_admin_value[error_log] = /var/log/php-fpm/www-error.log
php_admin_flag[log_errors] = on
php_value[session.save_handler] = files
php_value[session.save_path] = /var/lib/php/session

创建php的session目录,并设置合理的权限:
[root@www ~]# mkdir  /var/lib/php/session
[root@www ~]# chown apache:apache /var/lib/php/session
[root@www ~]# ls -ld /var/lib/php/session
drwxr-xr-x 2 apache apache 6 Dec 22 11:38 /var/lib/php/session
3.4、启动php-fpm,并配置站点访问测试
启动服务php-fpm服务:
[root@www ~]# systemctl start php-fpm.service
[root@www ~]# systemctl status php-fpm.service
php-fpm.service - The PHP FastCGI Process Manager
   Loaded: loaded (/usr/lib/systemd/system/php-fpm.service; disabled)
   Active: active (running) since Sat 2018-12-22 13:06:04 CST; 3s ago
 Main PID: 27057 (php-fpm)
   Status: "Ready to handle connections"
   CGroup: /system.slice/php-fpm.service
           ├─27057 php-fpm: master process (/etc/php-fpm.conf)
           ├─27058 php-fpm: pool www
           ├─27059 php-fpm: pool www
           ├─27060 php-fpm: pool www
           ├─27061 php-fpm: pool www
           └─27062 php-fpm: pool www

Dec 22 13:06:04 www.yanhui.com systemd[1]: Starting The PHP FastCGI Process Manager...
Dec 22 13:06:04 www.yanhui.com systemd[1]: Started The PHP FastCGI Process Manager.

[root@www ~]# ss -tnlp|grep :9000
LISTEN     0      128               127.0.0.1:9000                     *:*      users:(("php-fpm",27062,0),("php-fpm",27061,0),("php-fpm",27060,0),("php-fpm",27059,0),("php-fpm",27058,0),("php-fpm",27057,6))

[root@www ~]# ps aux|grep php-fpm|grep -v grep
root      27057  0.0  0.4 221332  8520 ?        Ss   13:06   0:00 php-fpm: master process (/etc/php-fpm.conf)
apache    27058  0.0  0.2 221332  4072 ?        S    13:06   0:00 php-fpm: pool www
apache    27059  0.0  0.2 221332  4072 ?        S    13:06   0:00 php-fpm: pool www
apache    27060  0.0  0.2 221332  4072 ?        S    13:06   0:00 php-fpm: pool www
apache    27061  0.0  0.2 221332  4072 ?        S    13:06   0:00 php-fpm: pool www
apache    27062  0.0  0.2 221332  4072 ?        S    13:06   0:00 php-fpm: pool www

配置新httpd的虚拟主机站点:
[root@www ~]# ls -ld /data/web/php/index.php
-rw-r--r-- 1 root root 23 Dec 22 12:44 /data/web/php/index.php
这里站点文档路径为:/data/web/php

确认配置文件有载入fcgi模块:
[root@www ~]# grep 'fcgi' /etc/httpd/conf.modules.d/*.conf
/etc/httpd/conf.modules.d/00-proxy.conf:LoadModule proxy_fcgi_module modules/mod_proxy_fcgi.so

子配置:
[root@www ~]# cat /etc/httpd/conf.d/php.conf
<VirtualHost *:8080>
    DocumentRoot /data/web/php
    ProxyRequests Off
    ProxyPassMatch ^/(.*\.php)$ fcgi://127.0.0.1:9000/data/web/php/$1

    <Directory "/data/web/php">
        Options None
        AllowOverride None
        Require all granted
    </Directory>
</VirtualHost>

检测语法和设置防火墙允许:
[root@www ~]# httpd -t
Syntax OK

[root@www ~]# firewall-cmd --list-all
public (default, active)
  interfaces: eno16777736
  sources:
  services: dhcpv6-client http ssh
  ports:
  masquerade: no
  forward-ports:
  icmp-blocks:
  rich rules:

[root@www ~]# firewall-cmd --add-port=8080/tcp
success
[root@www ~]# firewall-cmd --list-all
public (default, active)
  interfaces: eno16777736
  sources:
  services: dhcpv6-client http ssh
  ports: 8080/tcp   #因为8080不是http协议的标准端口,所以这里就直接允许tcp的8080开放访问
  masquerade: no
  forward-ports:
  icmp-blocks:
  rich rules:

重启或重载httpd服务:
[root@www ~]# systemctl restart httpd.service
[root@www ~]# ss -tnl
State      Recv-Q Send-Q                                           Local Address:Port                                             Peer Address:Port
LISTEN     0      128                                                  127.0.0.1:9000                                                        *:*
LISTEN     0      128                                                          *:22                                                          *:*
LISTEN     0      100                                                  127.0.0.1:25                                                          *:*
LISTEN     0      128                                                         :::8080                                                       :::*
LISTEN     0      128                                                         :::80                                                         :::*
LISTEN     0      128                                                         :::22                                                         :::*
LISTEN     0      100                                                        ::1:25                                                         :::*
测试访问:
四、yum安装mariadb-server并简单配置和说明
4.1、安装mariadb-server
[root@www ~]# yum install mariadb-server php-mysql
...... #安装过程省略

php-mysql:(php连接mysql数据库要用到这个软件包)
[root@www ~]# yum info php-mysql
Loaded plugins: fastestmirror
Loading mirror speeds from cached hostfile
 * base: mirrors.aliyun.com
 * epel: mirrors.aliyun.com
 * extras: mirrors.cn99.com
 * updates: mirrors.cn99.com
Installed Packages
Name        : php-mysql
Arch        : x86_64
Version     : 5.4.16
Release     : 46.el7
Size        : 232 k
Repo        : installed
From repo   : base
Summary     : A module for PHP applications that use MySQL databases
URL         : http://www.php.net/
License     : PHP
Description : The php-mysql package contains a dynamic shared object that will add
            : MySQL database support to PHP. MySQL is an object-relational database
            : management system. PHP is an HTML-embeddable scripting language. If
            : you need MySQL support for PHP applications, you will need to install
            : this package and the php package.

[root@www ~]# rpm -ql php-mysql
/etc/php.d/mysql.ini
/etc/php.d/mysqli.ini
/etc/php.d/pdo_mysql.ini
/usr/lib64/php/modules/mysql.so
/usr/lib64/php/modules/mysqli.so
/usr/lib64/php/modules/pdo_mysql.so

mariadb-server:
[root@www ~]# yum info mariadb-server
Loaded plugins: fastestmirror
Loading mirror speeds from cached hostfile
 * base: mirrors.aliyun.com
 * epel: mirrors.ustc.edu.cn
 * extras: mirrors.cn99.com
 * updates: mirrors.cn99.com
Installed Packages
Name        : mariadb-server
Arch        : x86_64
Epoch       : 1
Version     : 5.5.60
Release     : 1.el7_5
Size        : 58 M
Repo        : installed
From repo   : base
Summary     : The MariaDB server and related files
URL         : http://mariadb.org
License     : GPLv2 with exceptions and LGPLv2 and BSD
Description : MariaDB is a multi-user, multi-threaded SQL database server. It is a
            : client/server implementation consisting of a server daemon (mysqld)
            : and many different client programs and libraries. This package contains
            : the MariaDB server and some accompanying files and directories.
            : MariaDB is a community developed branch of MySQL.
[root@www systemd]# rpm -ql mariadb-server
/etc/logrotate.d/mariadb
/etc/my.cnf.d/server.cnf  #子配置文件
/usr/bin/innochecksum #离线innodb 表文件的一致性检测工具
/usr/bin/myisam_ftdump
/usr/bin/myisamchk #MyISAM存储引擎的表的维护工具
/usr/bin/myisamlog
/usr/bin/myisampack
/usr/bin/mysql_convert_table_format
/usr/bin/mysql_fix_extensions
/usr/bin/mysql_install_db #初始化mysql数据文件目录的工具
/usr/bin/mysql_plugin #配置mysql服务端插件的工具
/usr/bin/mysql_secure_installation #提高mysql安装的安装设置的工具
/usr/bin/mysql_setpermission
/usr/bin/mysql_tzinfo_to_sql
/usr/bin/mysql_upgrade
/usr/bin/mysql_zap
/usr/bin/mysqlbug
/usr/bin/mysqld_multi #管理多个mysql服务实例的工具
/usr/bin/mysqld_safe #mysql服务端启动脚本
/usr/bin/mysqld_safe_helper
/usr/bin/mysqldumpslow #慢查询日志文件分析工具
/usr/bin/mysqlhotcopy
/usr/bin/mysqltest
/usr/bin/perror
/usr/bin/replace
/usr/bin/resolve_stack_dump
/usr/bin/resolveip
/usr/lib/systemd/system/mariadb.service #mariadb服务的unit文件
/usr/lib/tmpfiles.d/mariadb.conf
/usr/lib64/mysql/INFO_BIN
/usr/lib64/mysql/INFO_SRC
/usr/lib64/mysql/mysqlbug
/usr/lib64/mysql/plugin
......中间省略很多插件模块
/usr/lib64/mysql/plugin/sql_errlog.so
/usr/libexec/mariadb-prepare-db-dir
/usr/libexec/mariadb-wait-ready
/usr/libexec/mysqld
......中间省略很多文档文件
/usr/share/mysql/README.mysql-cnf
/usr/share/mysql/errmsg-utf8.txt
/usr/share/mysql/fill_help_tables.sql
/usr/share/mysql/my-huge.cnf
/usr/share/mysql/my-innodb-heavy-4G.cnf
/usr/share/mysql/my-large.cnf
/usr/share/mysql/my-medium.cnf
/usr/share/mysql/my-small.cnf
/usr/share/mysql/mysql_performance_tables.sql
/usr/share/mysql/mysql_system_tables.sql
/usr/share/mysql/mysql_system_tables_data.sql
/usr/share/mysql/mysql_test_data_timezone.sql
/var/lib/mysql #默认mysql数据文件目录
/var/log/mariadb  #mysql日志文件目录
/var/log/mariadb/mariadb.log
/var/run/mariadb #mysql运行进程pid文件目录
4.2、简单配置并启动
[root@www ~]# grep -A4 '\[mysqld\]' /etc/my.cnf.d/server.cnf
[mysqld]
skip-name-resolve=ON
lower_case_table_names=1
innodb_file_per_table=ON

在上面配置文件的[mysqld]分组后面写入一下配置:
含义分别为:
跳过IP地址反向解析;
忽略字符大小敏感;
每个表一个数据文件;

启动服务:
[root@www ~]# systemctl start mariadb.service
[root@www ~]# systemctl status mariadb.service
mariadb.service - MariaDB database server
   Loaded: loaded (/usr/lib/systemd/system/mariadb.service; disabled)
   Active: active (running) since Sat 2018-12-22 13:52:26 CST; 35s ago
  Process: 27786 ExecStartPost=/usr/libexec/mariadb-wait-ready $MAINPID (code=exited, status=0/SUCCESS)
  Process: 27706 ExecStartPre=/usr/libexec/mariadb-prepare-db-dir %n (code=exited, status=0/SUCCESS)
 Main PID: 27785 (mysqld_safe)
   CGroup: /system.slice/mariadb.service
           ├─27785 /bin/sh /usr/bin/mysqld_safe --basedir=/usr
           └─27983 /usr/libexec/mysqld --basedir=/usr --datadir=/var/lib/mysql --plugin-dir=/usr/lib64/mysql/plugin --log-error=/var/log/mariadb/ma...

Dec 22 13:52:24 www.yanhui.com mariadb-prepare-db-dir[27706]: MySQL manual for more instructions.
Dec 22 13:52:24 www.yanhui.com mariadb-prepare-db-dir[27706]: Please report any problems at http://mariadb.org/jira
Dec 22 13:52:24 www.yanhui.com mariadb-prepare-db-dir[27706]: The latest information about MariaDB is available at http://mariadb.org/.
Dec 22 13:52:24 www.yanhui.com mariadb-prepare-db-dir[27706]: You can find additional information about the MySQL part at:
Dec 22 13:52:24 www.yanhui.com mariadb-prepare-db-dir[27706]: http://dev.mysql.com
Dec 22 13:52:24 www.yanhui.com mariadb-prepare-db-dir[27706]: Consider joining MariaDB's strong and vibrant community:
Dec 22 13:52:24 www.yanhui.com mariadb-prepare-db-dir[27706]: https://mariadb.org/get-involved/
Dec 22 13:52:25 www.yanhui.com mysqld_safe[27785]: 181222 13:52:25 mysqld_safe Logging to '/var/log/mariadb/mariadb.log'.
Dec 22 13:52:25 www.yanhui.com mysqld_safe[27785]: 181222 13:52:25 mysqld_safe Starting mysqld daemon with databases from /var/lib/mysql
Dec 22 13:52:26 www.yanhui.com systemd[1]: Started MariaDB database server.
[root@www ~]# ss -tnlp|grep :3306
LISTEN     0      50                        *:3306                     *:*      users:(("mysqld",27983,13))
[root@www ~]# ps aux|grep mysql
mysql     27785  0.0  0.0 115344  1696 ?        Ss   13:52   0:00 /bin/sh /usr/bin/mysqld_safe --basedir=/usr
mysql     27983  1.6  4.0 971412 82748 ?        Sl   13:52   0:00 /usr/libexec/mysqld --basedir=/usr --datadir=/var/lib/mysql --plugin-dir=/usr/lib64mysql/plugin --log-error=/var/log/mariadb/mariadb.log --pid-file=/var/run/mariadb/mariadb.pid --socket=/var/lib/mysql/mysql.sock
root      28021  0.0  0.0 112640   960 pts/1    S+   13:52   0:00 grep --color=auto mysql
4.3、用户名和密码安装设置
#要在mysql启动的情况下调用mysql_secure_installation
[root@www ~]# mysql_secure_installation

NOTE: RUNNING ALL PARTS OF THIS SCRIPT IS RECOMMENDED FOR ALL MariaDB
      SERVERS IN PRODUCTION USE!  PLEASE READ EACH STEP CAREFULLY!

In order to log into MariaDB to secure it, we'll need the current
password for the root user.  If you've just installed MariaDB, and
you haven't set the root password yet, the password will be blank,
so you should just press enter here.

Enter current password for root (enter for none):   #第一次默认root密码为空,回车即可
OK, successfully used password, moving on...

Setting the root password ensures that nobody can log into the MariaDB
root user without the proper authorisation.

Set root password? [Y/n] Y  #是否设置root登录密码,肯定要设置,默认root是mysql的管理员账号
New password:
Re-enter new password:
Password updated successfully!
Reloading privilege tables..
 ... Success!


By default, a MariaDB installation has an anonymous user, allowing anyone
to log into MariaDB without having to have a user account created for
them.  This is intended only for testing, and to make the installation
go a bit smoother.  You should remove them before moving into a
production environment.

Remove anonymous users? [Y/n] y  #是否移除匿名用户,这里就是用户名为空的账户,一定要删除。
 ... Success!

Normally, root should only be allowed to connect from 'localhost'.  This
ensures that someone cannot guess at the root password from the network.

Disallow root login remotely? [Y/n] n  #是否禁止root远程登录,禁止后只能通过本地回环或localhost登录,根据实际需要设置,我这里就跳过没有禁止。
 ... skipping.

By default, MariaDB comes with a database named 'test' that anyone can
access.  This is also intended only for testing, and should be removed
before moving into a production environment.

Remove test database and access to it? [Y/n] n #是否删除默认的test数据库,可以删也可以不删,没有多大意义。
 ... skipping.

Reloading the privilege tables will ensure that all changes made so far
will take effect immediately.

Reload privilege tables now? [Y/n] y  #是否重新加载权限配置内容到内存中,要加载一起,立即生效权限表的配置
 ... Success!

Cleaning up...

All done!  If you've completed all of the above steps, your MariaDB
installation should now be secure.

Thanks for using MariaDB!
4.4、DDL简单概述和DML简单概述
DDL一共有这些分类:
DML一共有这些分类:
DDL是数据定义语句;DML是数据维护语句。
入门常用的DDL语句:CREATE, ALTER, DROP, SHOW
入门常用的DML语句:INSERT, DELETE, UPDATE, SELECT
4.5、DDL和DML简单举例
(1) 连接数据库查看帮助信息
连接mysql数据库,可以使用mysql命令。
语法结构:mysql [options] db_name
常用选项:
-h, --host=name:指定连接的主机名或ip;
 -u, --user=name :指定用于认证mysql数据库登录的用户名;
-p, --password[=name]:指定连接用户的认证密码;
-P, --port=#:指定连接mysql实例的端口;
-D, --database=name:指定连接的数据库;(也可以不使用这个选项后边直接接单个数据库)

[root@www ~]# mysql -h127.0.0.1 -uroot -P3306 -p
Enter password:
Welcome to the MariaDB monitor.  Commands end with ; or \g.
Your MariaDB connection id is 9
Server version: 5.5.60-MariaDB MariaDB Server

Copyright (c) 2000, 2018, Oracle, MariaDB Corporation Ab and others.

Type 'help;' or '\h' for help. Type '\c' to clear the current input statement.

MariaDB [(none)]>

MariaDB [(none)]> \h   #输入的\h可以查看帮助信息

General information about MariaDB can be found at
http://mariadb.org

List of all MySQL commands:
Note that all text commands must be first on line and end with ';'
?         (\?) Synonym for `help'.
clear     (\c) Clear the current input statement. #清楚当前输入语句
connect   (\r) Reconnect to the server. Optional arguments are db and host.  #重新连接
delimiter (\d) Set statement delimiter.
edit      (\e) Edit command with $EDITOR.
ego       (\G) Send command to mysql server, display result vertically.
exit      (\q) Exit mysql. Same as quit. #退出交互式接口
go        (\g) Send command to mysql server.
help      (\h) Display this help.
nopager   (\n) Disable pager, print to stdout.
notee     (\t) Don't write into outfile.
pager     (\P) Set PAGER [to_pager]. Print the query results via PAGER.
print     (\p) Print current command.
prompt    (\R) Change your mysql prompt.
quit      (\q) Quit mysql. #退出交互式接口
rehash    (\#) Rebuild completion hash.
source    (\.) Execute an SQL script file. Takes a file name as an argument.
status    (\s) Get status information from the server.  #查看状态信息
system    (\!) Execute a system shell command. #在mysql交互式接口执行系统命令
tee       (\T) Set outfile [to_outfile]. Append everything into given outfile.
use       (\u) Use another database. Takes database name as argument. #切换到指定数据库
charset   (\C) Switch to another charset. Might be needed for processing binlog with multi-byte charsets.
warnings  (\W) Show warnings after every statement.
nowarning (\w) Don't show warnings after every statement.

For server side help, type 'help contents'
(2) DDL举例
(a) CREATE
CREATE DATABASE
CREATE TABLE
在mysql接口单独查看帮助文档:HELP CREATE DATABASE或HELP CREATE TABLE

创建一个数据库,名字叫testdb1,字符集为utf8:
MariaDB [(none)]> CREATE DATABASE IF NOT EXISTS `testdb1` DEFAULT CHARACTER SET utf8;
Query OK, 1 row affected (0.00 sec)

切换到testdb1数据库,创建一张表叫student,有两个字段,一个是id,一个是name:
MariaDB [(none)]> USE testdb1
Database changed
MariaDB [testdb1]> CREATE TABLE `student`(id int,name varchar(40));
Query OK, 0 rows affected (0.01 sec)

MariaDB [testdb1]> DESC student
    -> ;
+-------+-------------+------+-----+---------+-------+
| Field | Type        | Null | Key | Default | Extra |
+-------+-------------+------+-----+---------+-------+
| id    | int(11)     | YES  |     | NULL    |       |
| name  | varchar(40) | YES  |     | NULL    |       |
+-------+-------------+------+-----+---------+-------+
2 rows in set (0.00 sec)

(b) DROP
DROP DATABASE
DROP TABLE
把上面的创建的testdb1数据库的表student删除,以及把创建的数据库testdb1删除。
MariaDB [testdb1]> DROP TABLE `student`;
Query OK, 0 rows affected (0.01 sec)

MariaDB [testdb1]> DROP DATABASE testdb1;
Query OK, 0 rows affected (0.00 sec)

(c) ALTER
ALTER DATABASE
ALTER TABLE
创建一个数据库testdb,使用默认字符集(latin1),然后使用ALTER 语句修改其字符集为utf8
MariaDB [(none)]> CREATE DATABASE IF NOT EXISTS testdb;
Query OK, 1 row affected (0.00 sec)

MariaDB [(none)]> SHOW CREATE DATABASE testdb\G
*************************** 1. row ***************************
       Database: testdb
Create Database: CREATE DATABASE `testdb` /*!40100 DEFAULT CHARACTER SET latin1 */
1 row in set (0.01 sec)

MariaDB [(none)]> ALTER DATABASE `testdb` DEFAULT CHARACTER SET utf8;
Query OK, 1 row affected (0.00 sec)

MariaDB [(none)]> SHOW CREATE DATABASE `testdb`\G
*************************** 1. row ***************************
       Database: testdb
Create Database: CREATE DATABASE `testdb` /*!40100 DEFAULT CHARACTER SET utf8 */
1 row in set (0.01 sec)

使用testdb数据库,创建表student默认继承数据库的字符集,然后把表student的utf8字符集改成latin1:
MariaDB [(none)]> USE testdb
Database changed
MariaDB [testdb]> CREATE TABLE student(id int,name varchar(20));
Query OK, 0 rows affected (0.01 sec)

MariaDB [testdb]> SHOW CREATE TABLE student\G
*************************** 1. row ***************************
       Table: student
Create Table: CREATE TABLE `student` (
  `id` int(11) DEFAULT NULL,
  `name` varchar(20) DEFAULT NULL
) ENGINE=InnoDB DEFAULT CHARSET=utf8
1 row in set (0.00 sec)

MariaDB [testdb]> ALTER TABLE `student` DEFAULT CHARSET=latin1;
Query OK, 0 rows affected (0.01 sec)
Records: 0  Duplicates: 0  Warnings: 0

MariaDB [testdb]> SHOW CREATE TABLE student\G
*************************** 1. row ***************************
       Table: student
Create Table: CREATE TABLE `student` (
  `id` int(11) DEFAULT NULL,
  `name` varchar(20) CHARACTER SET utf8 DEFAULT NULL
) ENGINE=InnoDB DEFAULT CHARSET=latin1
1 row in set (0.00 sec)

给表student加上主键:
MariaDB [testdb]> ALTER TABLE `student` ADD PRIMARY KEY(id);
Query OK, 0 rows affected (0.02 sec)
Records: 0  Duplicates: 0  Warnings: 0

MariaDB [testdb]> SHOW CREATE TABLE student\G
*************************** 1. row ***************************
       Table: student
Create Table: CREATE TABLE `student` (
  `id` int(11) NOT NULL DEFAULT '0',
  `name` varchar(20) CHARACTER SET utf8 DEFAULT NULL,
  PRIMARY KEY (`id`)
) ENGINE=InnoDB DEFAULT CHARSET=latin1
1 row in set (0.00 sec)
(3) DML举例
(a) SELECT
指定字段查询mysql数据库的user表。
MariaDB [testdb]> USE mysql
Reading table information for completion of table and column names
You can turn off this feature to get a quicker startup with -A

Database changed
MariaDB [mysql]> SELECT host,user,password FROM user;
+-----------+------+-------------------------------------------+
| host      | user | password                                  |
+-----------+------+-------------------------------------------+
| localhost | root | *6AB9DB55EC23A383510F14B21C10FA16561B6A1A |
| 127.0.0.1 | root | *6AB9DB55EC23A383510F14B21C10FA16561B6A1A |
| ::1       | root | *6AB9DB55EC23A383510F14B21C10FA16561B6A1A |
+-----------+------+-------------------------------------------+
3 rows in set (0.00 sec)

(b) INSERT
向student表中一次加入多条记录:
MariaDB [testdb]> INSERT INTO student(id,name) VALUES(1,'linghuchong'),(2,'yangguo'),(3,'xiaotang');
Query OK, 3 rows affected (0.00 sec)
Records: 3  Duplicates: 0  Warnings: 0

MariaDB [testdb]> SELECT * FROM student;
+----+-------------+
| id | name        |
+----+-------------+
|  1 | linghuchong |
|  2 | yangguo     |
|  3 | xiaotang    |
+----+-------------+
3 rows in set (0.00 sec)

(c) UPDATE
把id为3的学生的名字修改为"guojing"
MariaDB [testdb]> UPDATE student SET name='guojing' WHERE id=3;
Query OK, 1 row affected (0.00 sec)
Rows matched: 1  Changed: 1  Warnings: 0

MariaDB [testdb]> SELECT * FROM student;
+----+-------------+
| id | name        |
+----+-------------+
|  1 | linghuchong |
|  2 | yangguo     |
|  3 | guojing     |
+----+-------------+
3 rows in set (0.00 sec)
4.6、创建一个用户用于站点的动态资源动态登录
(1) 安装php
yum install php
(2) 测试数据库的php代码1
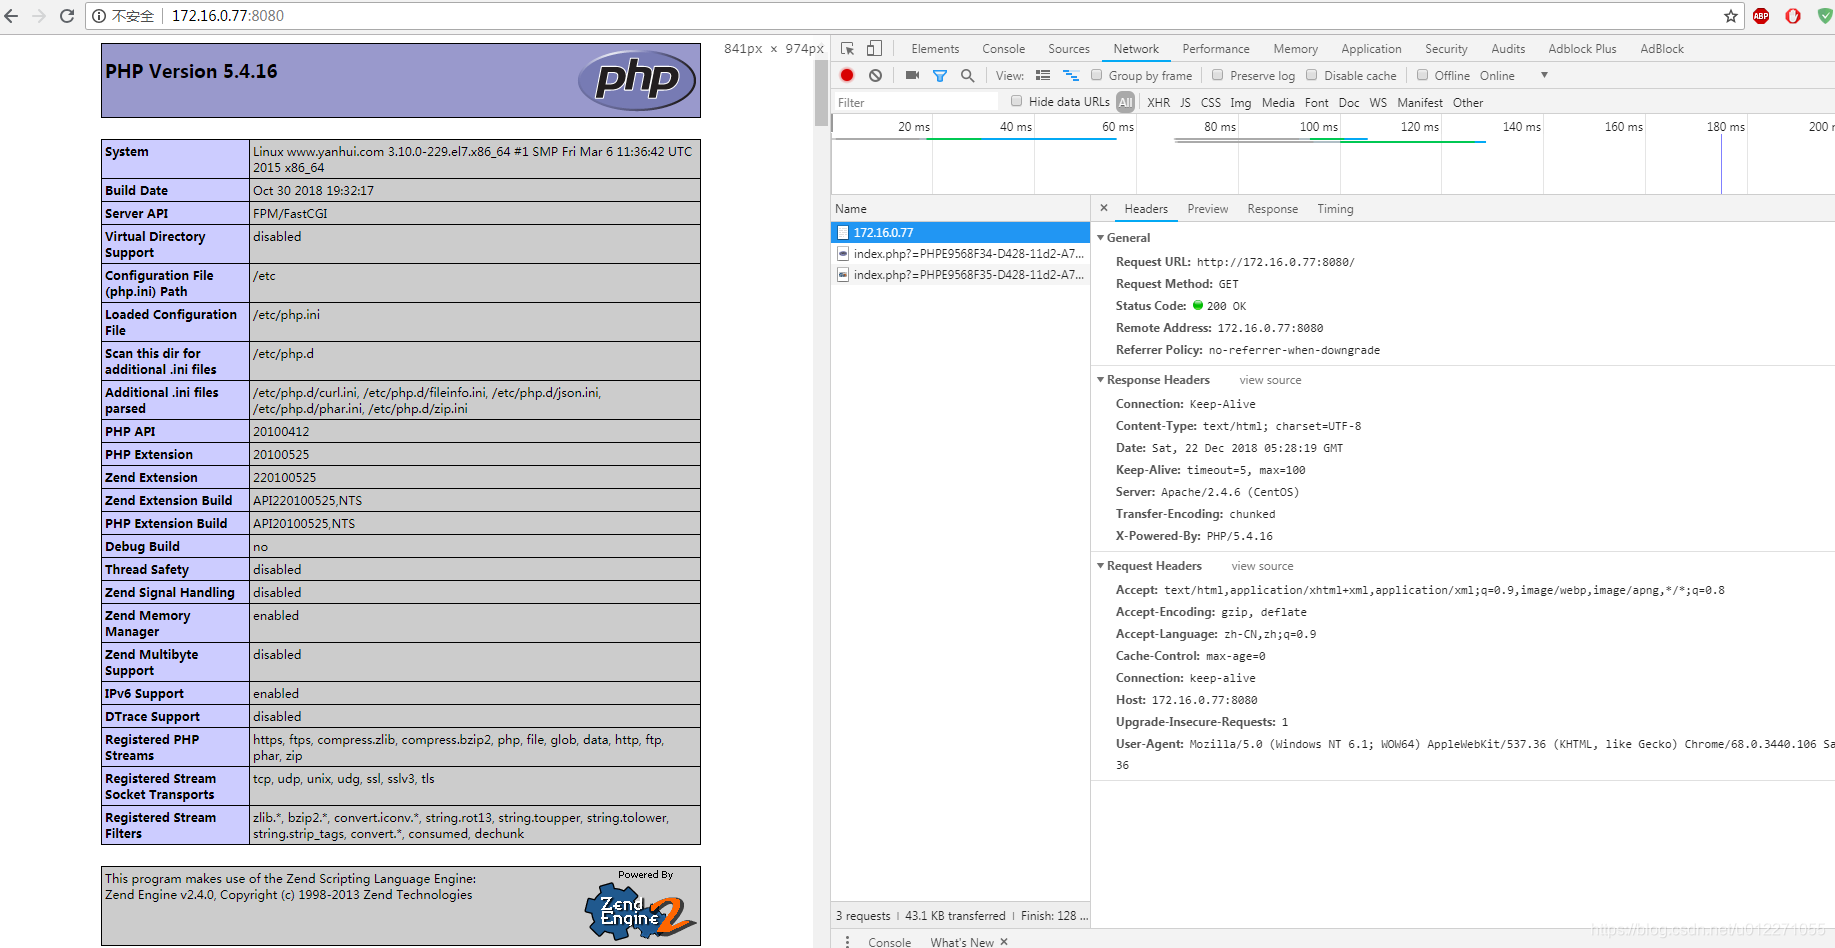
[root@www php]# cat query.php
<?php
$mysqli = new mysqli("127.0.0.1","root","yanhui.com","testdb",3306);
if (mysqli_connect_error()) {
echo "Could not connect to the database.";
exit ;
}
echo $mysqli->host_info . "\n";
?>
(3) 测试数据库的php代码2
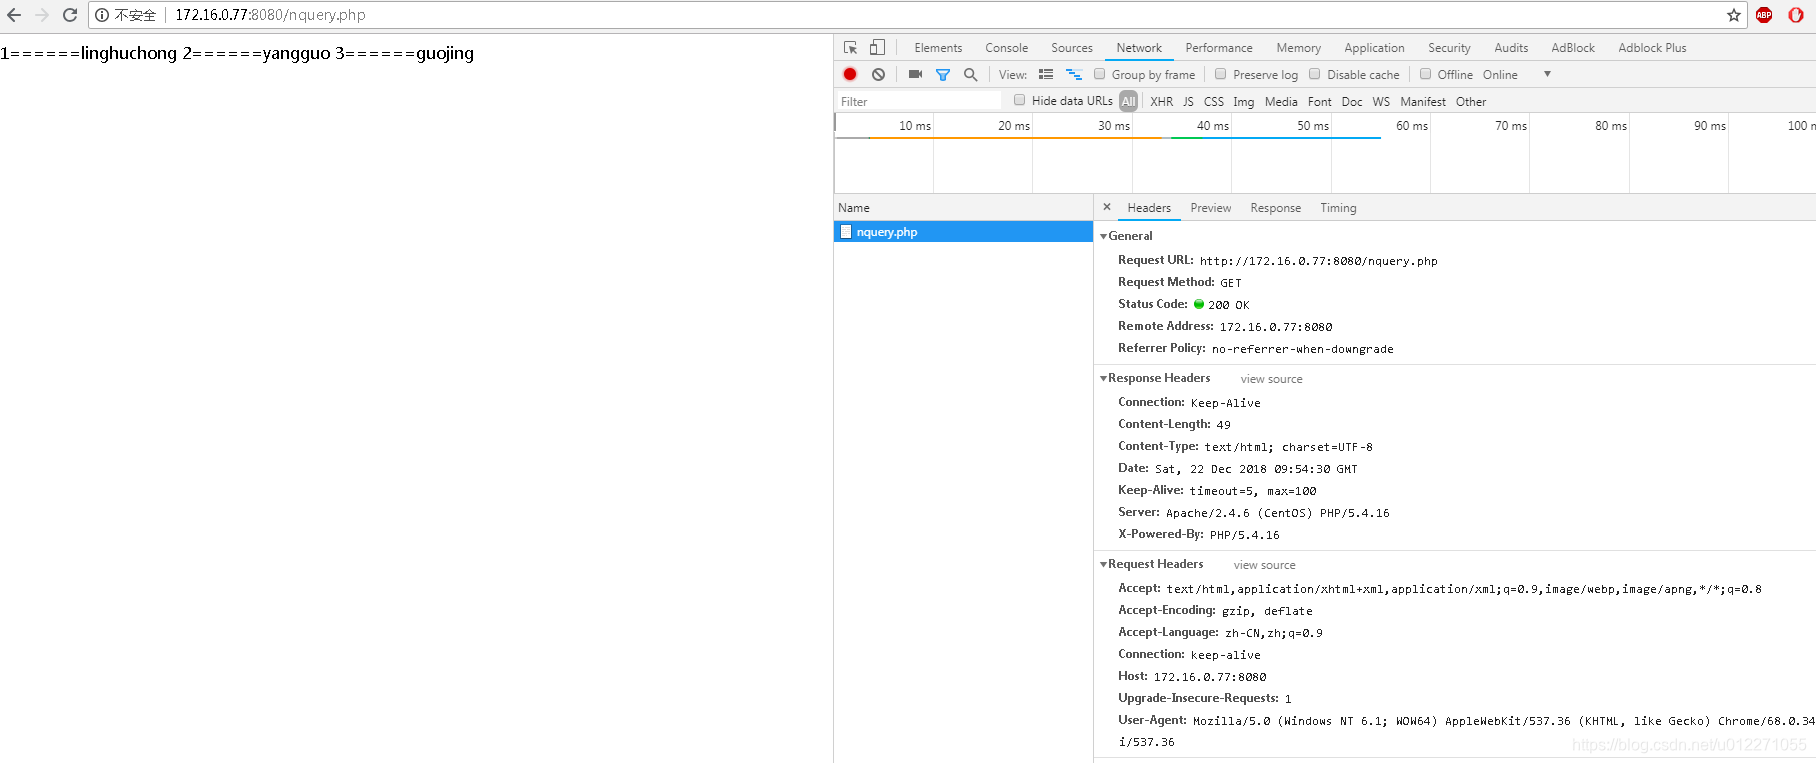
[root@www php]# cat nquery.php
<?php
$mysqli = new mysqli("127.0.0.1","root","yanhui.com","testdb",3306);
if (mysqli_connect_error()) {
echo "Could not connect to the database.";
exit ;
}
#echo $mysqli->host_info . "\n";
$result=$mysqli->query("SELECT id,name FROM student");
while( $row=$result->fetch_row() )
{
echo $row[0]."======".$row[1];
echo "\n";
}
?>
[root@www php]# php nquery.php
1======linghuchong
2======yangguo
3======guojing
(4) 为了支持html格式,特地加入了一些元素
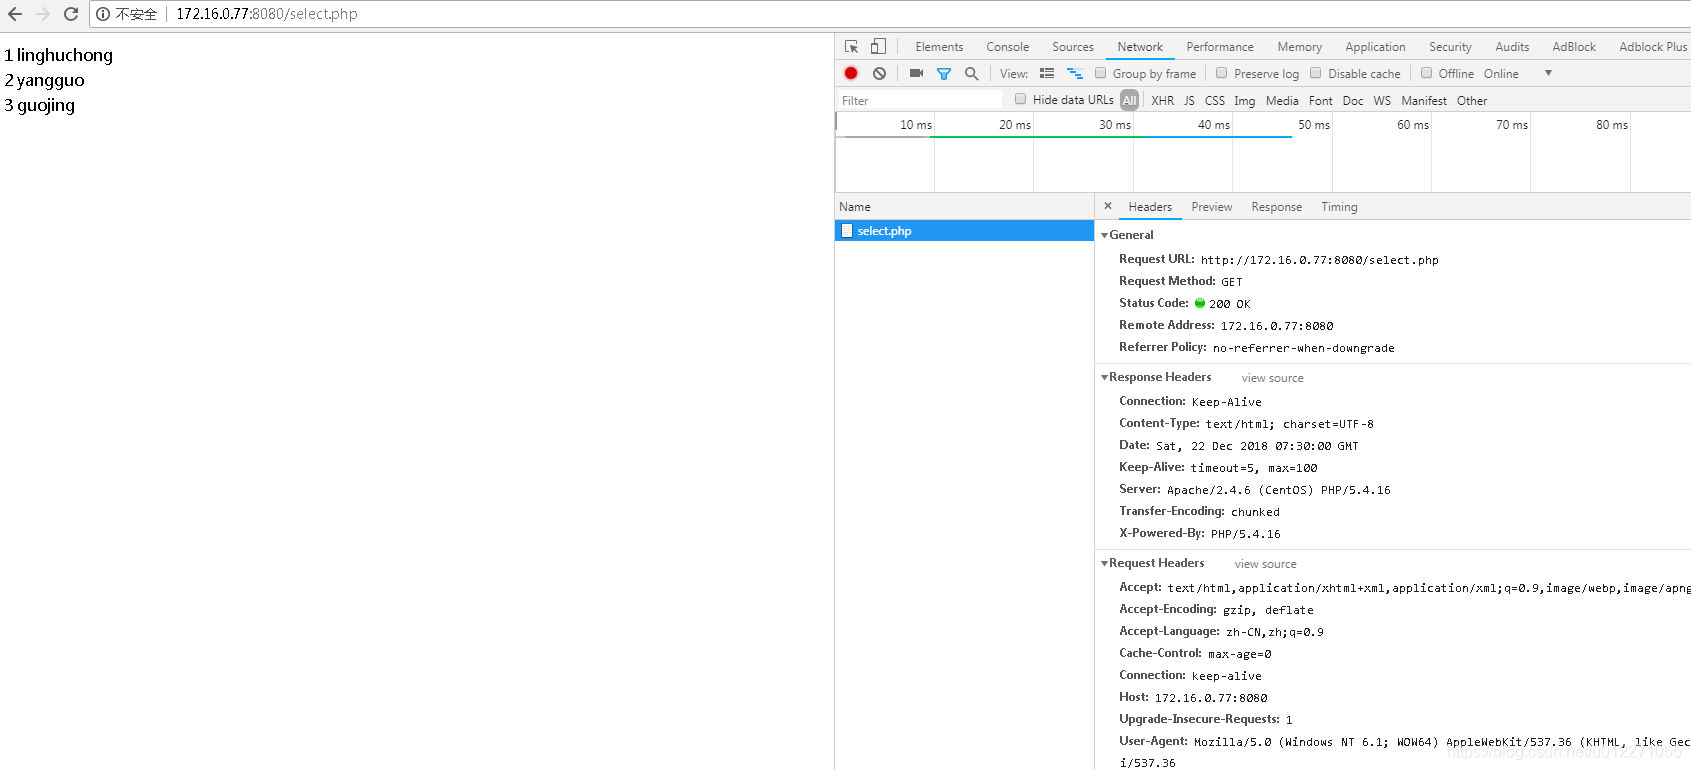
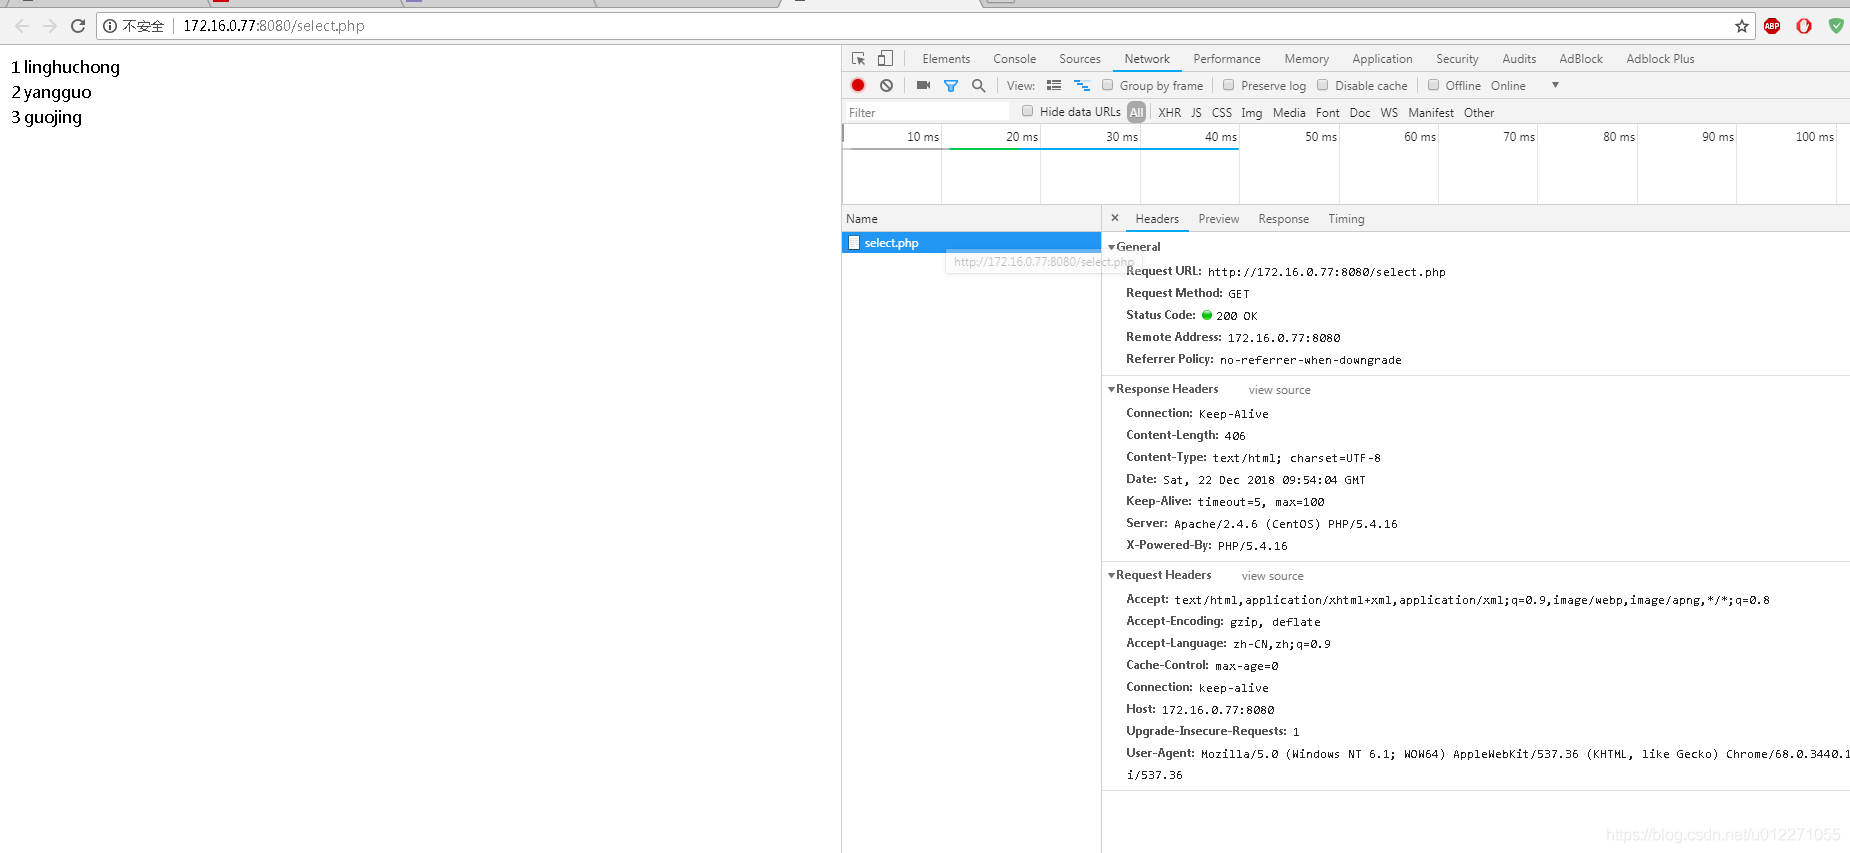
[root@www php]# cat select.php
<?php
$db_host = '127.0.0.1'; //使用的主机名称
$db_user = 'root'; //使用的数据库用户名
$db_pwd = 'yanhui.com'; //使用的数据库密码
$db_name ='testdb'; //使用的数据库名称
$db_port = 3306; //使用数据库的端口
$conn = mysqli_connect($db_host, $db_user, $db_pwd, $db_name, $db_port)or die("链接失败".mysqli_error());
$sql = "select id,name from student";
echo('<table>');
if($res=mysqli_query($conn, $sql)){
while ($row= mysqli_fetch_array($res)){
echo '<tr><td>'.$row[0].'</td><td class="sno">'.$row[1].'</td><td class="cno">'.$row[2].'</td><td class="score">'.$row[3].'</td><td class="create_time">'.$row[4].'</td><td>'.$row[5].'</td></tr>';
}
}
echo('</table>');
?>
测试结果:
上面讲到的处理动态资源都是利用php-fpm来处理,现在我们使用php的模块来处理:
确保php软件有安装。如果没有执行:yum install php
[root@www conf.d]# rpm -ql php
/etc/httpd/conf.d/php.conf   #为httpd调用php模块准备的配置文件
/etc/httpd/conf.modules.d/10-php.conf #加载模块的配置文件爱你
/usr/lib64/httpd/modules/libphp5.so #这个是最重要的,就是php的模块,可以直接处理
/usr/share/httpd/icons/php.gif
/var/lib/php/session

模仿/etc/httpd/conf/d/php.conf准备了一份虚拟主机配置,微调了一下:
[root@www conf.d]# cat /etc/httpd/conf.d/vhost2.conf
Listen 8080
<VirtualHost *:8080>
    DocumentRoot /data/web/php
    DirectoryIndex index.php index.html
    <FilesMatch \.php$>
        SetHandler application/x-httpd-php
    </FilesMatch>
    AddType text/html .php
    php_value session.save_handler "files"
    php_value session.save_path    "/var/lib/php/session"
    <Directory "/data/web/php">
        Options None
        AllowOverride None
        Require all granted
    </Directory>
</VirtualHost>
下面会截图我们之前写的select.php等文件。

停止php-fpm,重启httpd服务:
systemctl stop php-fpm.service
httpd -t
systemctl restart httpd.service
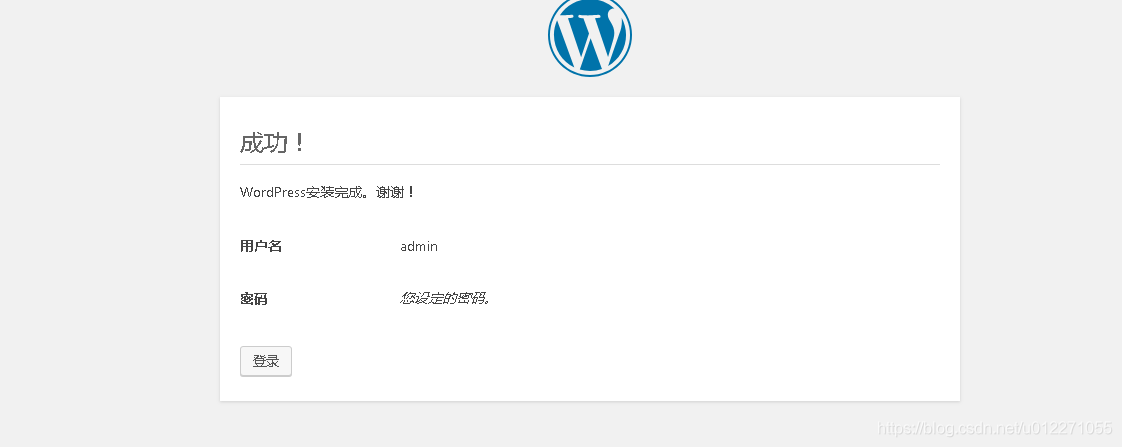
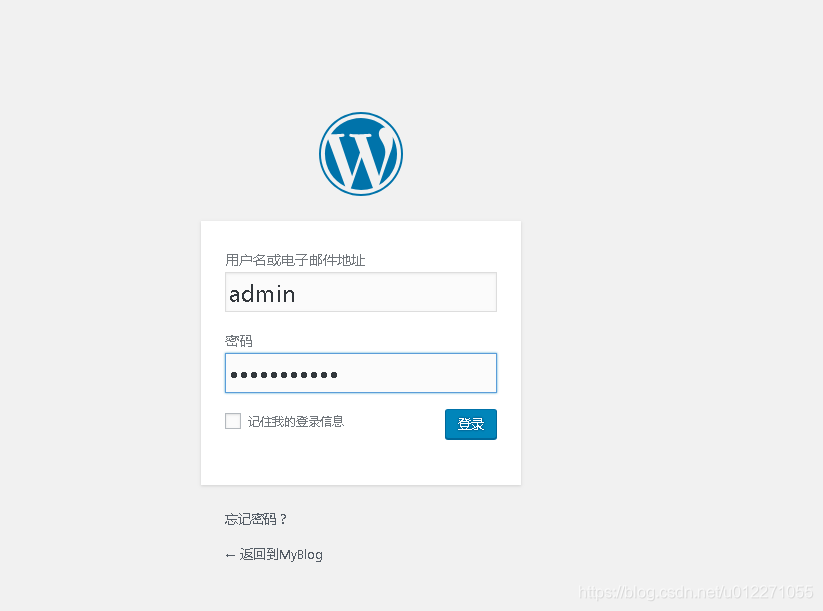
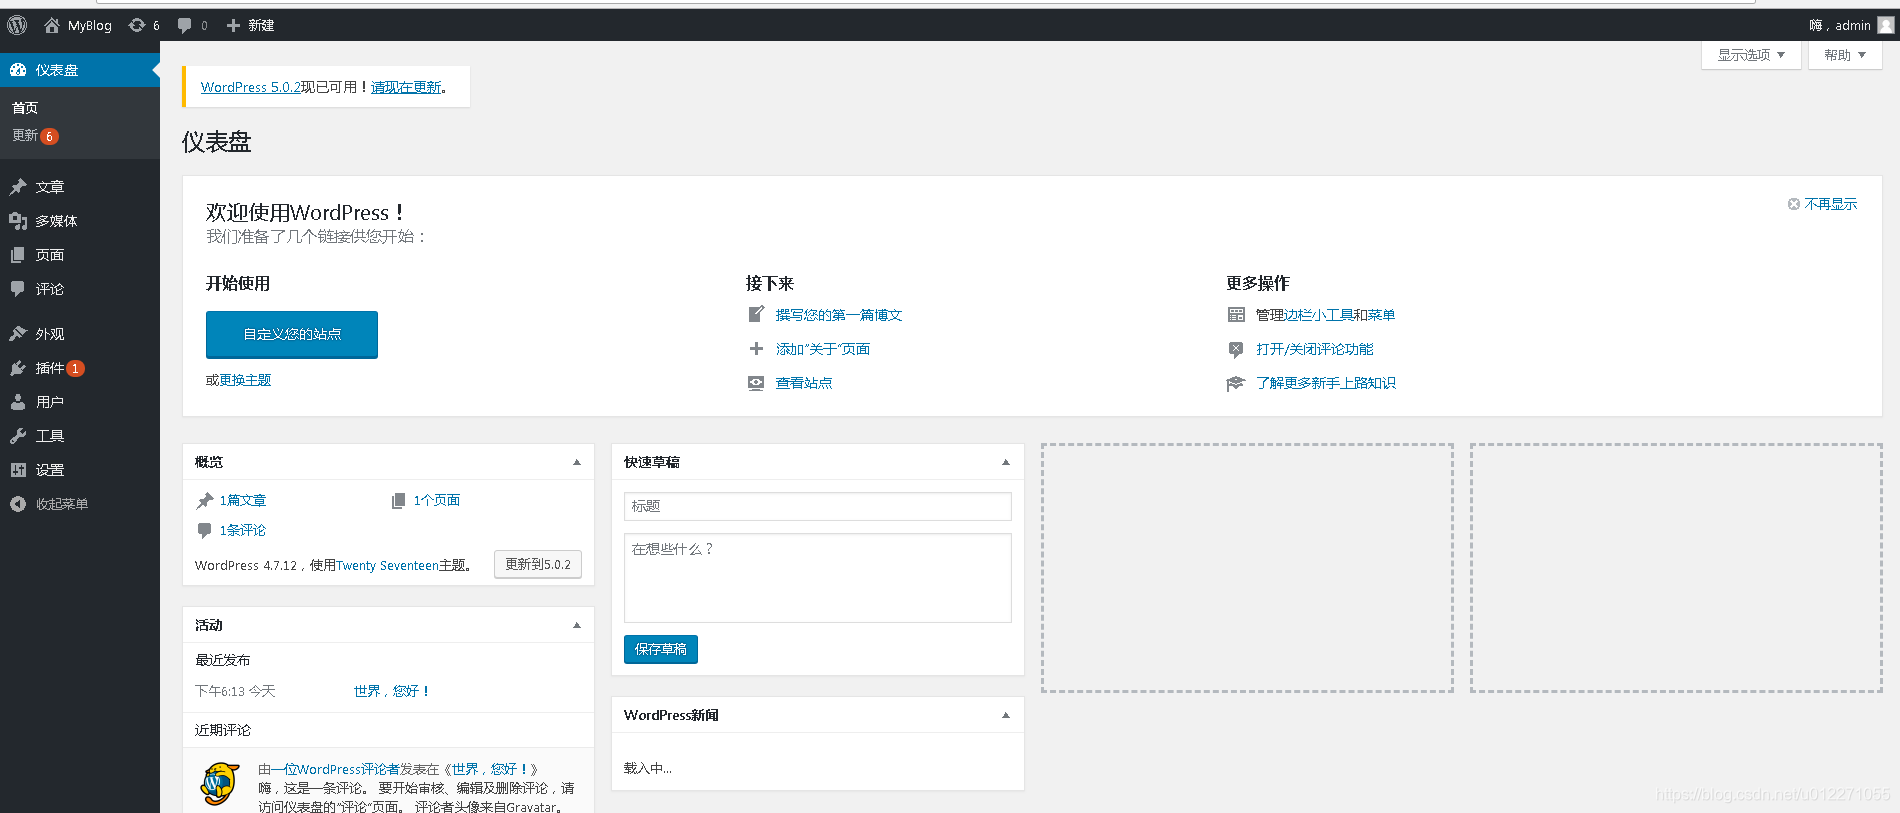
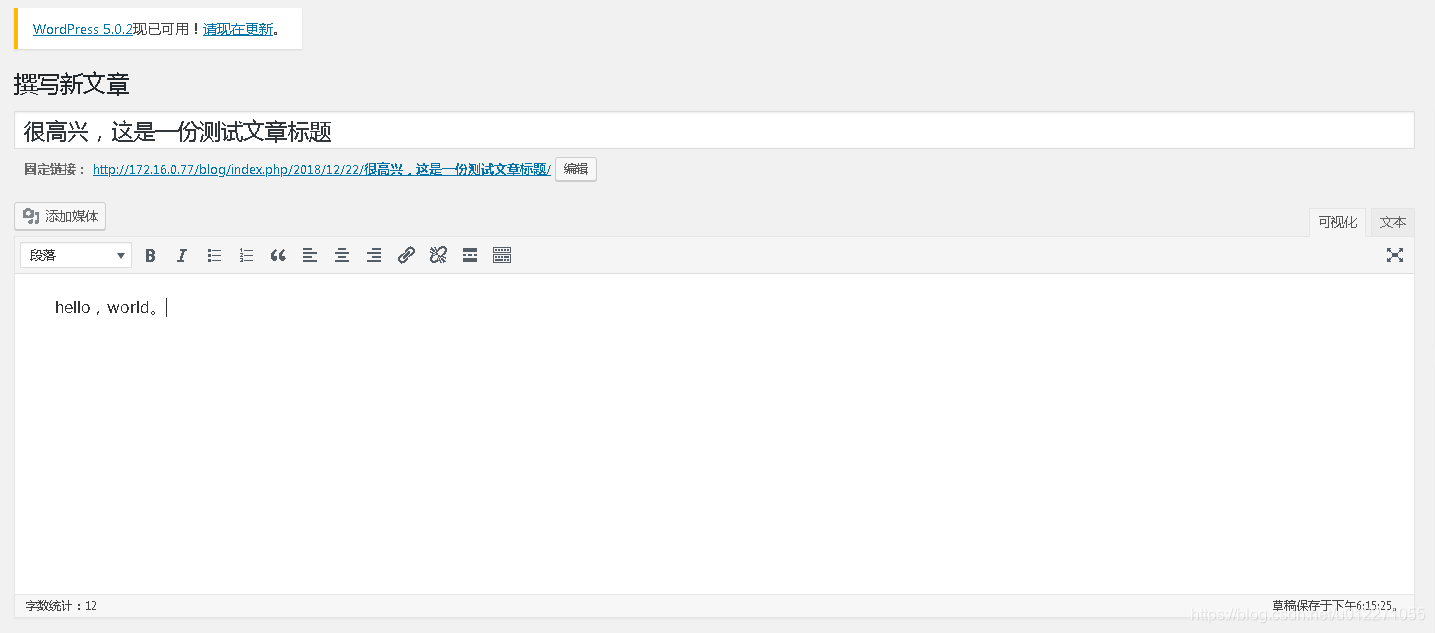
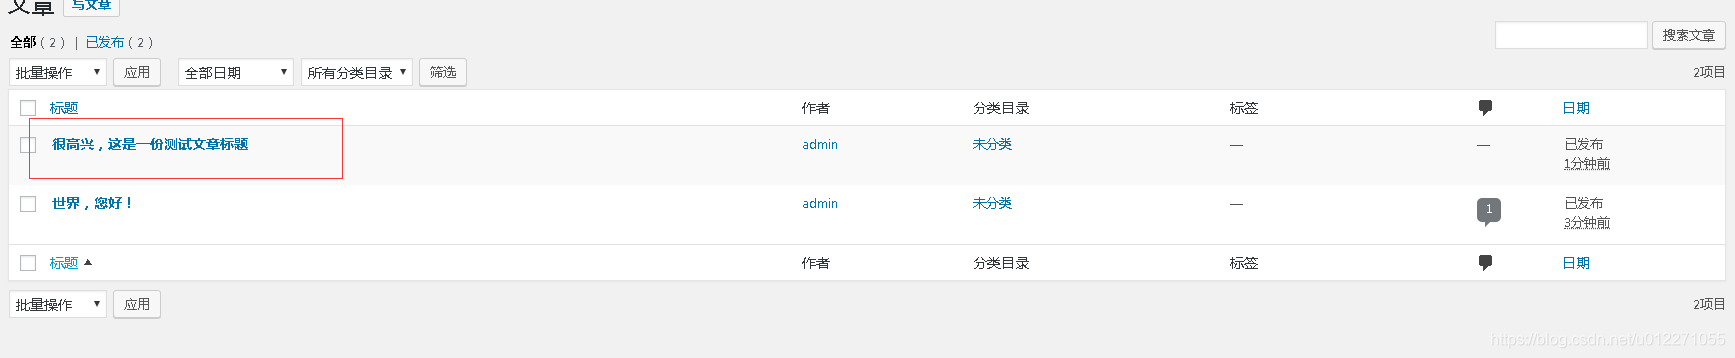
五、使用开源软件wordpress搭建博客平台并实现简单的访问
wordpress下载列表:
https://cn.wordpress.org/download/releases/
这一部分我们利用php的模块来直接处理动态内容。
解压wordpress的软件包,然后拷贝重命名blog到站点目录(/data/web/html):
[root@www tmp]# pwd
/var/tmp
[root@www tmp]# ls
systemd-private-QfxXKM  systemd-private-YwqxhJ  wordpress-4.7.4-zh_CN.tar.gz  yum-root-VeNnpu
[root@www tmp]# tar -xf wordpress-4.7.4-zh_CN.tar.gz
[root@www tmp]# ls
systemd-private-QfxXKM  systemd-private-YwqxhJ  wordpress  wordpress-4.7.4-zh_CN.tar.gz  yum-root-VeNnpu
[root@www tmp]# cp -ar wordpress /data/web/html/blog

修改权限后,页面访问:
[root@www html]# ls -l
total 12
drwxr-xr-x 5 nobody 65534 4096 Apr 23  2017 blog
-rw-r--r-- 1 root   root    35 Dec 22 16:00 hello.php
-rw-r--r-- 1 root   root    23 Dec 22 15:51 index.php
[root@www html]# chown -R apache:apache blog
[root@www html]# ls -l
total 12
drwxr-xr-x 5 apache apache 4096 Apr 23  2017 blog
-rw-r--r-- 1 root   root     35 Dec 22 16:00 hello.php
-rw-r--r-- 1 root   root     23 Dec 22 15:51 index.php
初始访问截图:
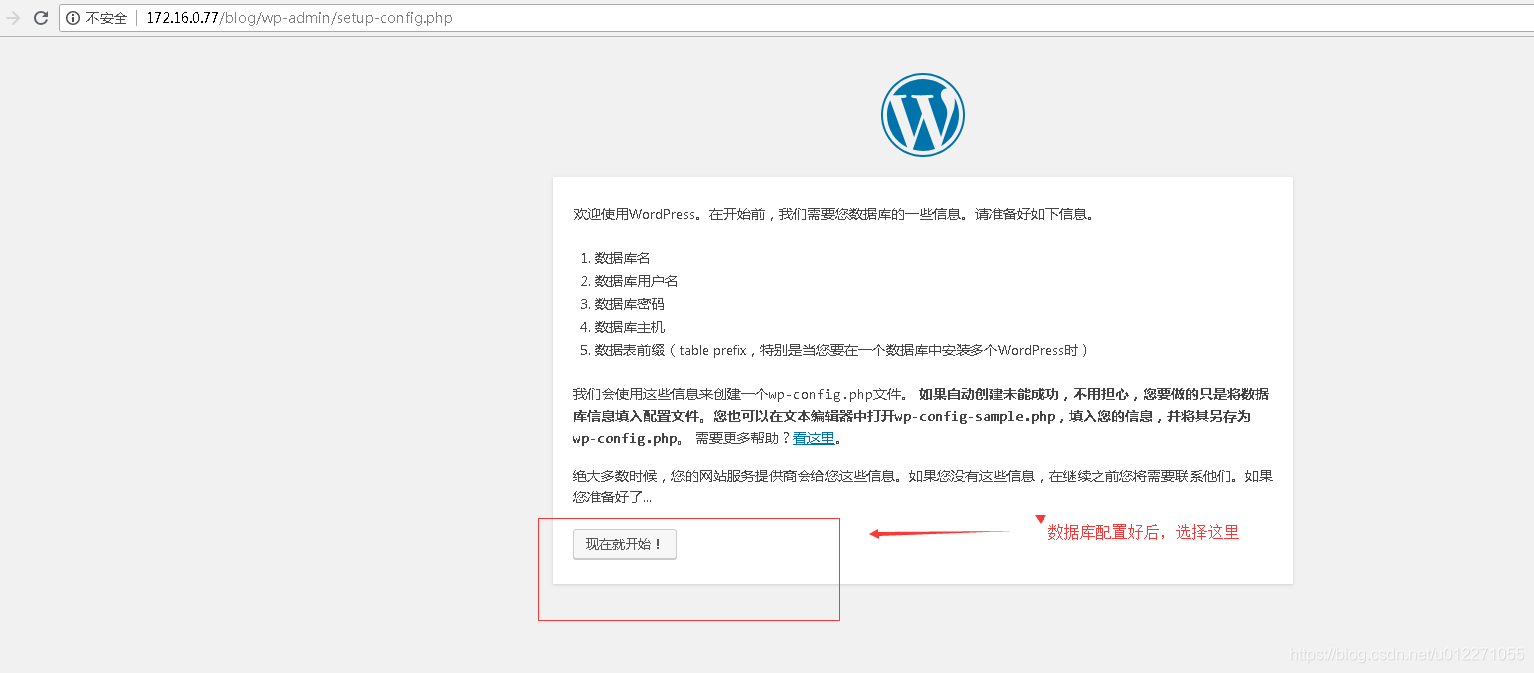
http://172.16.0.77/blog #要设置主页文件index.php
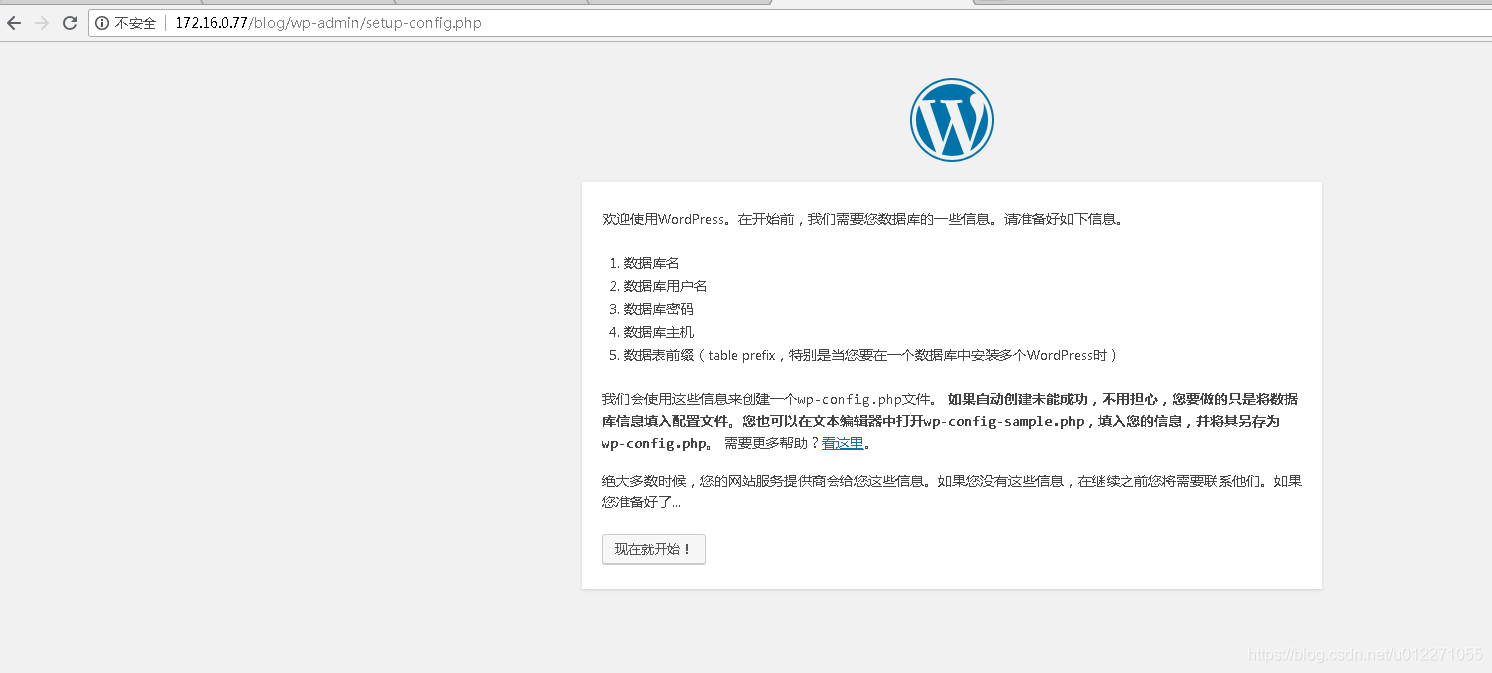
根据页面提示,我们直接去调整blog下的wp-config.php文件(复制一份wp-config-sample.php到wp-config.php):
[root@www html]# cd /data/web/html/blog/
[root@www blog]# ls -l wp-config.php
ls: cannot access wp-config.php: No such file or directory
[root@www blog]# cp wp-config-sample.php wp-config.php

修改前:

// ** MySQL 设置 - 具体信息来自您正在使用的主机 ** //
/** WordPress数据库的名称 */
define('DB_NAME', 'database_name_here');

/** MySQL数据库用户名 */
define('DB_USER', 'username_here');

/** MySQL数据库密码 */
define('DB_PASSWORD', 'password_here');

/** MySQL主机 */
define('DB_HOST', 'localhost');

/** 创建数据表时默认的文字编码 */
define('DB_CHARSET', 'utf8');


修改后:
// ** MySQL 设置 - 具体信息来自您正在使用的主机 ** //
/** WordPress数据库的名称 */
define('DB_NAME', 'web_blog');

/** MySQL数据库用户名 */
define('DB_USER', 'blog');

/** MySQL数据库密码 */
define('DB_PASSWORD', 'BLOG1234blog*');

/** MySQL主机 */
define('DB_HOST', '127.0.0.1');

/** 创建数据表时默认的文字编码 */
define('DB_CHARSET', 'utf8');

去数据库授权用户,并登录测试后创建对应数据库:
授权语句(这里为了方便就给一个ALL权限):
GRANT ALL ON web_blog.* TO blog@'127.0.0.1' IDENTIFIED BY 'BLOG1234blog*';
CREATE DATABASE IF NOT EXISTS  `web_blog` DEFAULT CHARACTER SET utf8;

MariaDB [(none)]> GRANT ALL ON web_blog.* TO blog@'127.0.0.1' IDENTIFIED BY 'BLOG1234blog*';
Query OK, 0 rows affected (0.00 sec)

MariaDB [(none)]> CREATE DATABASE IF NOT EXISTS  `web_blog` DEFAULT CHARACTER SET utf8;
Query OK, 1 row affected (0.00 sec)

MariaDB [(none)]> SELECT host,user,password FROM mysql.user;
+-----------+------+-------------------------------------------+
| host      | user | password                                  |
+-----------+------+-------------------------------------------+
| localhost | root | *6AB9DB55EC23A383510F14B21C10FA16561B6A1A |
| 127.0.0.1 | root | *6AB9DB55EC23A383510F14B21C10FA16561B6A1A |
| ::1       | root | *6AB9DB55EC23A383510F14B21C10FA16561B6A1A |
| 127.0.0.1 | blog | *338B01CA4946C78F9E8BB1616DB01AA0AC18D418 |
+-----------+------+-------------------------------------------+
4 rows in set (0.00 sec)

测试访问:
[root@www blog]# mysql -h127.0.0.1 -ublog -P3306 -p --default-character-set=utf8 web_blog
Enter password:
Welcome to the MariaDB monitor.  Commands end with ; or \g.
Your MariaDB connection id is 8
Server version: 5.5.60-MariaDB MariaDB Server

Copyright (c) 2000, 2018, Oracle, MariaDB Corporation Ab and others.

Type 'help;' or '\h' for help. Type '\c' to clear the current input statement.

MariaDB [web_blog]> SHOW TABLES;
Empty set (0.00 sec)

MariaDB [web_blog]>