- 解压到安装目录
- 在根目录建立data文件夹
- 建立my.ini文件 代码如下


# Other default tuning values
# MySQL Server Instance Configuration File
# ----------------------------------------------------------------------
# Generated by the MySQL Server Instance Configuration Wizard
#
#
# Installation Instructions
# ----------------------------------------------------------------------
#
# On Linux you can copy this file to /etc/my.cnf to set global options,
# mysql-data-dir/my.cnf to set server-specific options
# (@localstatedir@ for this installation) or to
# ~/.my.cnf to set user-specific options.
#
# On Windows you should keep this file in the installation directory
# of your server (e.g. C:\Program Files\MySQL\MySQL Server X.Y). To
# make sure the server reads the config file use the startup option
# "--defaults-file".
#
# To run run the server from the command line, execute this in a
# command line shell, e.g.
# mysqld --defaults-file="D:\GreenSoft\MySQL\my.ini"
#
# To install the server as a Windows service manually, execute this in a
# command line shell, e.g.
# mysqld --install mysql --defaults-file="D:\GreenSoft\MySQL\my.ini"
#
# And then execute this in a command line shell to start the server, e.g.
# net start mysql
#
#
# Guildlines for editing this file
# ----------------------------------------------------------------------
#
# In this file, you can use all long options that the program supports.
# If you want to know the options a program supports, start the program
# with the "--help" option.
#
# More detailed information about the individual options can also be
# found in the manual.
#
# For advice on how to change settings please see
# http://dev.mysql.com/doc/refman/8.0/en/server-configuration-defaults.html
#
#
# CLIENT SECTION
# ----------------------------------------------------------------------
#
# The following options will be read by MySQL client applications.
# Note that only client applications shipped by MySQL are guaranteed
# to read this section. If you want your own MySQL client program to
# honor these values, you need to specify it as an option during the
# MySQL client library initialization.
#


[client]
no-beep

# pipe
# socket=0.0
port=3306


[mysql]

default-character-set=utf8


[mysqld]

# 这是8.0.4的新特性 caching_sha2_password,在linux上面使用命宁 mysql -uroot -proot 可以链接,但是使用windows下面的navict链接不成功
default_authentication_plugin = mysql_native_password

# These are commonly set, remove the # and set as required.
character-set-server = utf8
basedir = D:\Program Files\mysql-8.0.11-winx64
datadir = D:\Program Files\mysql-8.0.11-winx64\data
port = 3306
server_id = 1


# Remove leading # and set to the amount of RAM for the most important data
# cache in MySQL. Start at 70% of total RAM for dedicated server, else 10%.
innodb_buffer_pool_size = 128M

# Remove leading # to turn on a very important data integrity option: logging
# changes to the binary log between backups.
# log_bin

# General and Slow logging.
log-output=FILE
general-log=0
general_log_file="CUPID.log"
slow-query-log=1
slow_query_log_file="CUPID-slow.log"
long_query_time=10

# Binary Logging.
# log-bin

# Error Logging.
log-error="CUPID.err"


# Remove leading # to set options mainly useful for reporting servers.
# The server defaults are faster for transactions and fast SELECTs.
# Adjust sizes as needed, experiment to find the optimal values.
# join_buffer_size = 128M
# sort_buffer_size = 2M
# read_rnd_buffer_size = 2M

# 8.0.4版本的时候,用的是这个sql_mode,但在8.0.11版本中会报错,改成下面那个
# sql_mode=STRICT_TRANS_TABLES,NO_ZERO_IN_DATE,NO_ZERO_DATE,ERROR_FOR_DIVISION_BY_ZERO,NO_AUTO_CREATE_USER,NO_ENGINE_SUBSTITUTION
sql-mode="STRICT_TRANS_TABLES,NO_ENGINE_SUBSTITUTION"

default-storage-engine=INNODB

innodb_log_file_size = 512M
binlog_format='MIXED'
max_allowed_packet = 1G
# innodb_file_per_table = 1
# innodb_file_format = Barracuda

# 大小写是否敏感,0敏感 Linux下默认为0, Windows下默认值是 1, MacOS下默认值是 2(0敏感)
lower_case_table_names = 1

innodb_strict_mode = 0
max_connections = 500
- 管理员模式进入cmd
- cd:到mysql安装目录的bin下
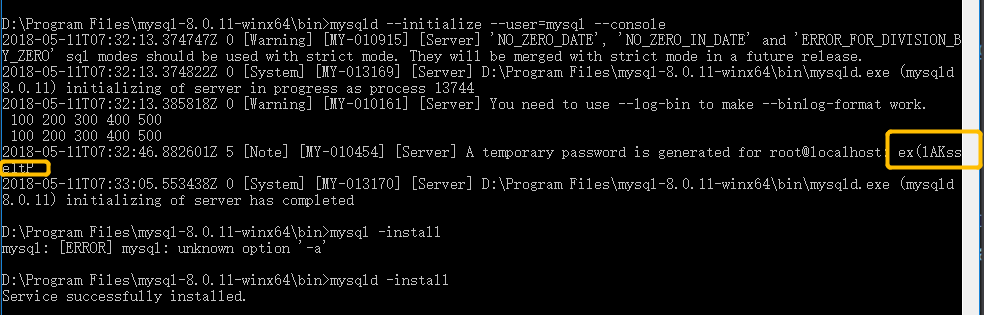
- 初始化mysql
mysqld --initialize --user=mysql --console
-
上面黄色的框,是自动生成的mysql临时密码,一会我们要用这个登录mysql服务
- 安装mysql服务
mysqld -install
- 开启服务
net start mysql
- 登录服务
mysql -uroot -p临时密码
- 修改密码
set password = 'root';