使用caffe训练模型只需要以下几个步骤:
(1)准备好数据;
(2)写好模型配置文件;
(3)写好优化配置文件;
(4)命令行执行;
这样就可以得到训练的模型.caffemodel文件了
1.caffe的下载与安装:
(1)下载
(2)安装

(3)caffe的下载与安装以及一些基本的介绍官网已经描述地比较详细,这里不再重复;
2.caffe的使用接口有命令行,python跟matlab,个人觉得训练模型的时候使用命令行已经足够简单了,至于训练好的模型可以使用python与matlab的接口进行调用,本文先描述基于命令行的模型训练,以LeNet模型为例;
LeNet模型
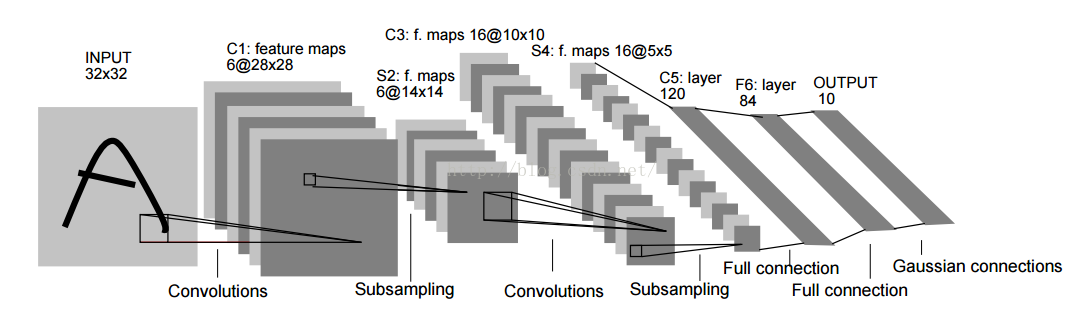
PS:LeNet是手写数字库MNIST上应用比较经典的模型,具有7层网络结构,分别是卷积-下采样-卷积-下采样-全连-全连-分类层,具体网络细节可以参考文章:
Gradient based learning applied to document recognition
1.安装编译完caffe后,其主目录下有:

2.训练模型之前需要先准备好训练数据MNIST,执行以下命令可以下载MNIST数据库:

3.由于caffe支持的数据类型不包括图像类型,所以常规做法需要将图像类型转为lmdb类型:

4.准备好数据之后,我们需要定义我们的网络模型,在caffe中是通过.prototxt配置文件来定义的,执行以下命令:

可以看到各个网络层是如何定义的:
(1)输入层(数据层):
- layer {
- name: "mnist" //表示层名
- type: "Data" //表示层的类型
- top: "data"
- top: "label"
- include {
- phase: TRAIN //表示仅在训练阶段起作用
- }
- transform_param {
- scale: 0.00390625 //将图像像素值归一化
- }
- data_param {
- source: "examples/mnist/mnist_train_lmdb" //数据来源
- batch_size: 64 //训练时每个迭代的输入样本数量
- backend: LMDB //数据类型
- }
- }
- layer {
- name: "conv1"
- type: "Convolution"
- bottom: "data" //输入是data
- top: "conv1" //输出是卷积特征
- param {
- lr_mult: 1 //权重参数w的学习率倍数
- }
- param {
- lr_mult: 2 //偏置参数b的学习率倍数
- }
- convolution_param {
- num_output: 20
- kernel_size: 5
- stride: 1
- weight_filler { //权重参数w的初始化方案,使用xavier算法
- type: "xavier"
- }
- bias_filler {
- type: "constant" //偏置参数b初始化化为常数,一般为0
- }
- }
- }
(3)下采样层(pool):
- layer {
- name: "pool1"
- type: "Pooling"
- bottom: "conv1"
- top: "pool1"
- pooling_param {
- pool: MAX
- kernel_size: 2
- stride: 2
- }
- }
(4)全连层:
- layer {
- name: "ip1"
- type: "InnerProduct"
- bottom: "pool2"
- top: "ip1"
- param {
- lr_mult: 1
- }
- param {
- lr_mult: 2
- }
- inner_product_param {
- num_output: 500
- weight_filler {
- type: "xavier"
- }
- bias_filler {
- type: "constant"
- }
- }
- }
- layer {
- name: "relu1"
- type: "ReLU"
- bottom: "ip1"
- top: "ip1"
- }
- layer {
- name: "accuracy"
- type: "Accuracy"
- bottom: "ip2"
- bottom: "label"
- top: "accuracy"
- include {
- phase: TEST
- }
- }
- layer {
- name: "loss"
- type: "SoftmaxWithLoss"
- bottom: "ip2"
- bottom: "label"
- top: "loss"
- }
5.定义完网络模型,还需要配置关于模型优化的文件:

配置文件如下:
- # The train/test net protocol buffer definition
- net: "examples/mnist/lenet_train_test.prototxt" //设定网络模型配置文件的路径
- # test_iter specifies how many forward passes the test should carry out.
- # In the case of MNIST, we have test batch size 100 and 100 test iterations,
- # covering the full 10,000 testing images.
- test_iter: 100
- # Carry out testing every 500 training iterations.
- test_interval: 500
- # The base learning rate, momentum and the weight decay of the network.
- base_lr: 0.01
- momentum: 0.9
- weight_decay: 0.0005
- # The learning rate policy
- lr_policy: "inv"
- gamma: 0.0001
- power: 0.75
- # Display every 100 iterations
- display: 100
- # The maximum number of iterations
- max_iter: 10000
- # snapshot intermediate results
- snapshot: 5000
- snapshot_prefix: "examples/mnist/lenet"
- # solver mode: CPU or GPU
- solver_mode: GPU
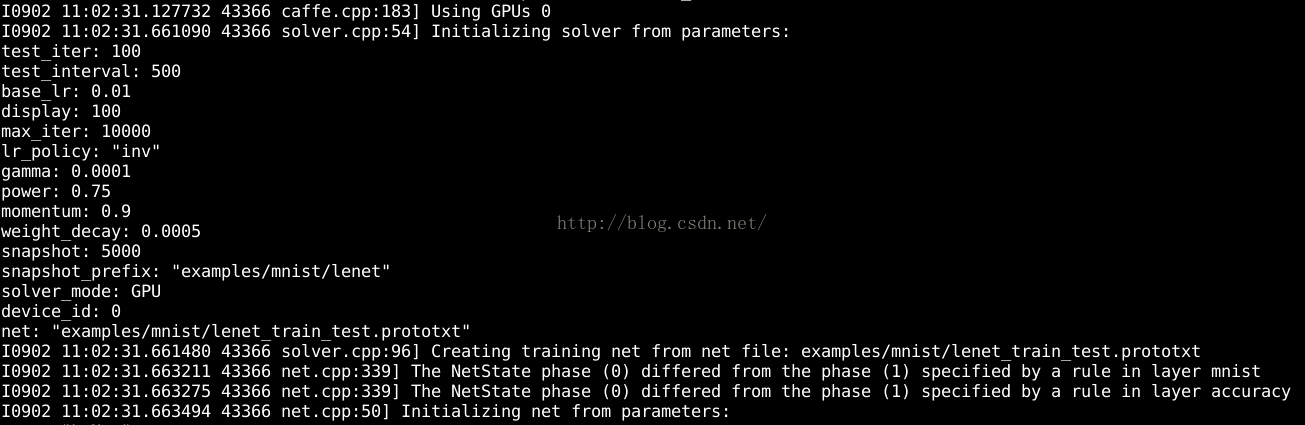
6.接下来一步就是进行训练了,直接执行命令就可以:

执行后可以看到:首先会读取配置文件初始化网络跟优化器:
紧接着开始优化:
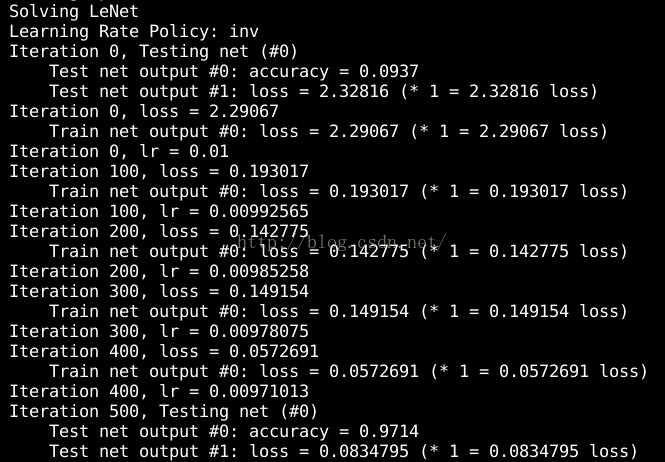
可以看到训练过程中每100次迭代就会显示一个loss,每500次迭代就会计算一次test准确率,总共10000次迭代,这些都可以在配置文件中设置;
7.训练完之后的模型就保存在.caffemodel文件中,该文件可以被c,python,matlab等调用;