1.绘制图像

        var canvas = document.getElementById("demoCanvas");
        var pencil = canvas.getContext("2d");
        var img = document.querySelector('img');

        /*
        * pencil.drawImage()
        * 绘制图象, 有三种使用方式。
        * */

        /**
         *1.三参数版本:将图象绘制到指定的坐标
         * 必须在img 图象加载完毕之后使用
         * img.onload = function(){
         *  pencil.drawImage(img, 10, 10)
         * }
         * */

        /**
         * 2.五参数版本:
         * 把图象绘制到指定的坐标,并指定其大小
         * img.onload = function(){
         * pencil.drawImage(img, 10, 10, 200, 200)
         * }
         * */

        /**
         * 3.九参数版本:
         * 把裁剪到的部分图象绘制到指定的坐标, 并制定其大小
         * */
        img.onload =function () {
            pencil.drawImage(img, 10, 120, 400, 400, 10, 10, 200, 200);
        }
2.帧动画
        var canvas = document.getElementById("demoCanvas");
        var pencil = canvas.getContext("2d");
        var img = document.querySelector('img');

        img.onload =function () {

//            pencil.drawImage(img, 10, 120, 400, 400, 10, 10, 200, 200);
            var i = 0;
            setInterval(function () {
                //绘制新的图象时需要先清除画布
                pencil.clearRect(0, 0, canvas.width, canvas.height);
                //绘制每一帧
                /**
                 * 裁剪的x轴, 用来控制每一排不同的帧,
                 * 裁剪的y轴, 用来控制当前行走的方向(绘制的那一排)*/
                pencil.drawImage(img, img.width/4 *i, img.height/4 * 3, img.width/4, img.height/4,
                    10, 10, 200, 200 );
                if(++i >= 4){
                    i = 0;
                }
            }, 200);
        }
3.对象版帧动画

<!DOCTYPE html>
<html lang="en">
<head>
<meta charset="UTF-8">
<title>Title</title>
<style>
canvas{
border:1px solid red;
}
img{
display:none;
}
</style>
</head>
<body>
<canvas id="demoCanvas" width="500" height="500">
<p>你的浏览器不支持Canvas</p>
</canvas>
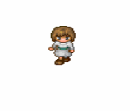
<img src = "./image/NPC5.png"/>
<script>
var canvas = document.getElementById("demoCanvas");
var pencil = canvas.getContext("2d");
var img = document.querySelector('img');
//混入式继承(copy)
function extend(o1, o2){
for(let key in o2){
if(o2.hasOwnProperty(key)){
o1[key] = o2[key];
}
}
}
/**
* constructor{ person } 构造函数
* param{ pencil: context} 绘制环境
* param{ img: Image} 绘制的图象
* param{ widthFrame:number } 图象一排有多少人
* param{ heightFrame:number}图象一列有多少人
* param{ x:number}指定人物绘制的x轴坐标
* param{ y:number}指定人物绘制的y轴坐标
* param{ renderWidth: number }人物绘制时的宽
* param{ renderHeight: number}人物绘制时的高
* */
function Person(pencil, img, widthFrame, heightFrame, x, y, renderWidth, renderHeight){
this.pencil = pencil;
this.img = img;
this.widthFrame = widthFrame;
this.heightFrame = heightFrame;
//图象绘制时的坐标和大小
this.x = x;
this.y = y;
this.renderWidth = renderWidth;
this.renderHeight = renderHeight;
//求一个人的宽和高
this.width = this.img.width/ this.widthFrame;
this.height = this.img.height/ this.heightFrame;
//当前绘制某个方向的第几帧
this.currentFrame = 0;
//当前行走的方向,默认是第一排
this.direction = 0;
}
/**
* drawImage(img, sx, sy, swidth, sheight, x, y, width, height)
* 参数说明:
* img 规定要使用的图象或视频
* sx 开始剪切的x坐标位置
* sy 开始剪切的y坐标位置
* swidth 被剪切图象的宽度
* sheight 被剪切图像的高度
* x 在画布上放置图象的位置
* y 在画布上放置图象的位置
* */
extend( Person.prototype,{
draw :function(){
this.pencil.drawImage(this.img,
this.width * this.currentFrame, this.height * this.direction, this.width, this.height,
this.x, this.y, this.renderWidth, this.renderHeight);
}
});
img.onload =function () {
var person = new Person(pencil, img, 4, 4, 50, 50, 50, 50);
//修改小人的行走方向
person.direction = 0;
setInterval(function () {
pencil.clearRect(0, 0, canvas.width, canvas.height);
person.draw();
person.currentFrame = ++person.currentFrame >= person.widthFrame ?0:person.currentFrame;
}, 200);
}
</script>
</body>
</html>上下左右可以控制小人移动方向

        var canvas = document.getElementById("demoCanvas");
        var pencil = canvas.getContext("2d");
        var img = document.querySelector('img');

        //混入式继承(copy)
        function extend(o1, o2){
            for(let key in o2){
                if(o2.hasOwnProperty(key)){
                    o1[key] = o2[key];
                }
            }
        }

        /**
         * constructor{ person } 构造函数
         * param{ pencil: context} 绘制环境
         * param{ img: Image} 绘制的图象
         * param{ widthFrame:number } 图象一排有多少人
         * param{ heightFrame:number}图象一列有多少人
         * param{ x:number}指定人物绘制的x轴坐标
         * param{ y:number}指定人物绘制的y轴坐标
         * param{ renderWidth: number }人物绘制时的宽
         * param{ renderHeight: number}人物绘制时的高
         * */

        function Person(pencil, img, widthFrame, heightFrame, x, y, renderWidth, renderHeight){

            this.pencil = pencil;
            this.img = img;
            this.widthFrame = widthFrame;
            this.heightFrame = heightFrame;

            //图象绘制时的坐标和大小
            this.x = x;
            this.y = y;
            this.renderWidth = renderWidth;
            this.renderHeight = renderHeight;

            //求一个人的宽和高
            this.width = this.img.width/ this.widthFrame;
            this.height = this.img.height/ this.heightFrame;

            //当前绘制某个方向的第几帧
            this.currentFrame = 0;

            //当前行走的方向,默认是第一排
            this.direction = 0;
        }

        /**
         * drawImage(img, sx, sy, swidth, sheight, x, y, width, height)
         * 参数说明:
         * img 规定要使用的图象或视频
         * sx 开始剪切的x坐标位置
         * sy 开始剪切的y坐标位置
         * swidth 被剪切图象的宽度
         * sheight 被剪切图像的高度
         * x 在画布上放置图象的位置
         * y 在画布上放置图象的位置
         * */
        extend( Person.prototype,{
            draw :function(){
                    this.pencil.drawImage(this.img,
                        this.width * this.currentFrame, this.height * this.direction, this.width, this.height,
                        this.x, this.y, this.renderWidth, this.renderHeight);
            },
            bind:function () {
                var self = this;

                document.addEventListener('keydown', function (e) {
                    switch(e.keyCode){
                        case 37:
                            self.direction =1;break;
                        case 38:
                            self.direction =3;break;
                        case 39:
                            self.direction =2;break;
                        case 40:
                            self.direction =0;break;
                    }
                })
            },
            // 更新小人下一阵绘制时的数据
            update:function () {
                switch (this.direction){
                    /**
                     * 向下走y轴加, 向左走x轴减, 向上走y轴减, 向右走x轴加*/
                    case 0:
                        this.y += 2;
                        this.y = this.y > this.pencil.canvas.height? -this.height:this.y;
                        break;
                    case 1:
                        this.x -= 2;
                        this.x = this.x < -this.width ? this.pencil.canvas.width: this.x;
                        break;
                    case 2:
                        this.x += 2;
                        this.x = this.x < -this.width? this.pencil.canvas.width: this.x;
                        break;
                    case 3:
                        this.y -= 2;
                        this.y = this.y < -this.height? this.pencil.canvas.height: this.y;
                        break;
                }
            }
        });

        img.onload =function () {
            var person = new Person(pencil, img, 4, 4, 50, 50, 50, 50);
            person.bind();
            //修改小人的行走方向

            person.direction = 0;

            setInterval(function () {
                pencil.clearRect(0, 0, canvas.width, canvas.height);
                person.draw();
                person.currentFrame = ++person.currentFrame >= person.widthFrame ? 0:person.currentFrame;
                //计算下一次绘制时, 小人的位置
                person.update()
            }, 200);

        }
4.平移

        var canvas = document.getElementById("demoCanvas");
        var pencil = canvas.getContext("2d");

        /*平移坐标轴:
        * pencil.translate(x轴平移量, y轴平移量)
        * pencil.fillRext(x, y, width, height)
        * 备注:这个平移相当于是复制一份出来*/
        pencil.fillRect(10,10,50,50);
        pencil.translate(100, 100);
        pencil.fillRect(10,10,50,50);
        pencil.translate(100, 100);
        pencil.fillRect(10,10,50,50);
5.旋转

        var canvas = document.getElementById("demoCanvas");
        var pencil = canvas.getContext("2d");

        /**
         * 旋转坐标轴:
         * pencil。rotate(旋转的弧度)
         * 备注:已绘制的不会受到影响
         * */
        pencil.translate(100, 100);
        pencil.fillRect(0, 0, 50, 50);

        //旋转坐标轴,在按照同样的坐标绘制填充矩形
        pencil.rotate(Math.PI/6);
        pencil.fillStyle = 'pink';
        pencil.fillRect(0, 0, 50, 50);


        //旋转坐标轴,在按照同样的坐标绘制填充矩形
        pencil.rotate(Math.PI/6);
        pencil.fillStyle = 'skyBlue';
        pencil.fillRect(0, 0, 50, 50);
6.缩放

var canvas = document.getElementById("demoCanvas");
var pencil = canvas.getContext("2d");
/**
* 缩放坐标轴:
* pencil.scale(x轴缩放的比值, y轴缩放到的比值
* 备注:已绘制的不会受到影响
* */
pencil.translate(100, 100);
pencil.fillRect(0, 0, 50, 50);
//缩放坐标轴,在按照同样的坐标绘制填充矩形
pencil.scale(0.5, 0.5);
pencil.fillStyle = 'pink';
pencil.fillRect(0, 0, 50, 50);
//缩放坐标轴,在按照同样的坐标绘制填充矩形
pencil.scale(0.5, 0.5);
pencil.fillStyle = 'skyBlue';
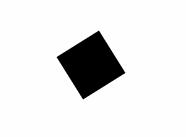
pencil.fillRect(0, 0, 50, 50);7.绘制一个旋转矩形

        var canvas = document.getElementById("demoCanvas");
        var pencil = canvas.getContext("2d");

        // 在100,100点绘制一个宽50,高50的矩形(旋转45度)。

        // 这样会有问题,
        // 因为旋转的中心是坐标轴的0,0点,
        // 如果能够让旋转的中心是图形的中心,
        // 那么就可以完成旋转图形的绘制。
        /* ctx.rotate( Math.PI / 180 * 45 );
         ctx.fillRect( 100, 100, 50, 50 );*/

        /*
         * 绘制一个旋转图形的步骤:
         * 1、先平移坐标轴到图形的中心
         * 2、旋转坐标轴
         * 3、绘制图形( 需要注意,平移旋转之后,坐标体系变化,不能按照之前定好的坐标来绘制旋转图形 )
         * */

        // 正常情况下的参考矩形
        pencil.fillStyle = 'pink';
        pencil.fillRect( 100, 100, 50, 50 );

        // 平移到矩形的中心
        pencil.translate( 125, 125 );
        // 旋转坐标系
        pencil.rotate( Math.PI / 180 * 45 );
        // 绘制图形
        pencil.fillStyle = 'skyBlue';
        pencil.fillRect( -25, -25, 50, 50 );
8.旋转矩形
        var canvas = document.getElementById("demoCanvas");
        var pencil = canvas.getContext("2d");

        pencil.translate(125, 125);
        setInterval(function () {
           pencil.clearRect(-50, -50, canvas.width, canvas.height);
            //旋转坐标系
            pencil.rotate(Math.PI/ 180*4);
            //绘制图形
            pencil.fillRect(-25, -25, 50, 50);
       }, 50);