LayaBox案例分享 小程序开篇(1)
不知不觉后端搬砖六年了,回想过去,什么也没留下,突然觉得是时候写点什么了。
为什么我要选择小程序呢,主要是觉得上手简单,易于传播,同时可以投放广告。我的第一个小程序主要是想总结下这几年的编程积累,同时分享出来。分为基础内容和实战篇,目前仅上线了基础内容。目前我已开发了一个小程序和一款基于LayaBox的小游戏。先把小程序的讲解完,然后会分享LayaBox开发的小游戏,目前小游戏在申请软著,申请后会全部分享出来给大家分享,请期待。
大家可以体验一下,请扫码:

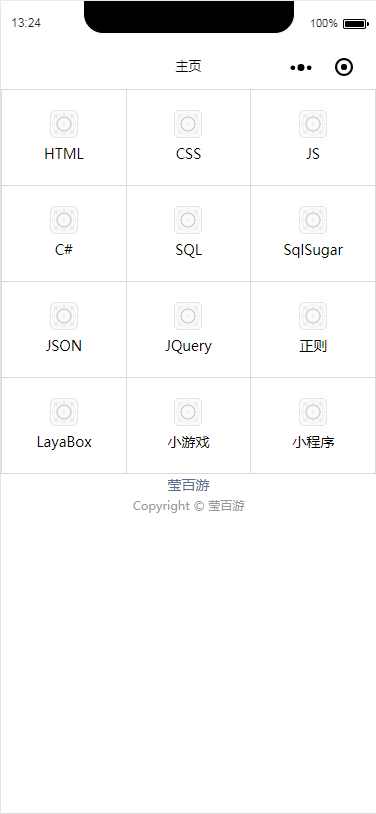
闲话少聊,我们开始正事。先把我的小程序运行效果图发一下。PS:(前端太烂,勿喷,欢迎高手不吝赐教)


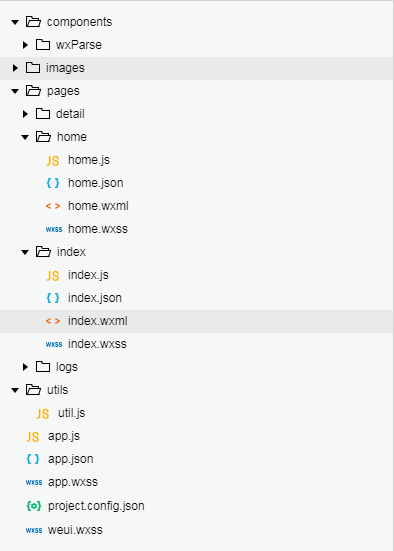
关于小程序文档结构的内容大家可以扫上边的二位码在小程序里查看或者去查看官方文档。
UI界面基于WEUI,目前处于学习阶段,欢迎大家加群交流,我会在评论区留言。
页面内容:
<view class="container">
  <view class="userinfo">
    <button wx:if="{{!hasUserInfo && canIUse}}" open-type="getUserInfo" bindgetuserinfo="getUserInfo"> 获取头像昵称 </button>
    <block wx:else>
      <image bindtap="bindViewTap" class="userinfo-avatar" src="{{userInfo.avatarUrl}}" mode="cover"></image>
      <text class="userinfo-nickname">{{userInfo.nickName}}</text>
    </block>
  </view>
  <view class="usermotto">
    <text class="user-motto">
        我们坚持分享基于LayaBox开发的微信小游戏,并在这里讲解开发步骤,同时分享一些公共模块给大家!!!
    </text>
  </view>
  <view class="usermotto">
    <text class="user-motto">Copyright © 2019</text>
  </view>
  <view>
    <text class="user-motto">{{motto}}</text>
  </view>
</view>
这个首页的创建大家可以直接创一个快速启动项目,不需要过多修改。
脚本文件
const app = getApp()

Page({
  data: {
    motto: ' 莹百游 All Rights Reserved.',
    userInfo: {},
    hasUserInfo: false,
    canIUse: wx.canIUse('button.open-type.getUserInfo')
  },
  //事件处理函数
  bindViewTap: function() {
    wx.navigateTo({
      url: '../logs/logs'
    })
  },
  onLoad: function () {
    if (app.globalData.userInfo) {
      this.setData({
        userInfo: app.globalData.userInfo,
        hasUserInfo: true
      });
      wx.redirectTo({
        url: '../home/home'
      });
    } else if (this.data.canIUse){
      // 由于 getUserInfo 是网络请求,可能会在 Page.onLoad 之后才返回
      // 所以此处加入 callback 以防止这种情况
      app.userInfoReadyCallback = res => {
        this.setData({
          userInfo: res.userInfo,
          hasUserInfo: true
        });
        wx.redirectTo({
          url: '../home/home'
        });
      }
    } else {
      // 在没有 open-type=getUserInfo 版本的兼容处理
      wx.getUserInfo({
        success: res => {
          app.globalData.userInfo = res.userInfo
          this.setData({
            userInfo: res.userInfo,
            hasUserInfo: true
          })
          wx.redirectTo({
            url: '../home/home'
          });
        }
      })
    }
  },
  getUserInfo: function(e) {
    app.globalData.userInfo = e.detail.userInfo
    this.setData({
      userInfo: e.detail.userInfo,
      hasUserInfo: true
    })
    wx.redirectTo({
      url: '../home/home'
    });
  }
})
这段脚本我们几乎不要修改什么内容,就可以实现用户授权获取用户头像和昵称,我们只需要在里面实现跳转页面就好了。
本项目目前三个界面,我会分3篇讲解,希望大家关注。全部代码我会在第三篇分享出来给大家,希望大家加V群一起学习。