一、概念
tracker-server:
跟踪服务器, 主要做调度工作, 起负载均衡的作用。 在内存中记录集群中所有存储组和存储服务器的状态信息, 是客户端和数据服务器交互的枢纽。 相比GFS中的master更为精简, 不记录文件索引信息, 占用的内存量很少。
storage-server:
存储服务器( 又称:存储节点或数据服务器) , 文件和文件属性( metadata) 都保存到存储服务器上。 Storage server直接利用OS的文件系统调用管理文件。
group:
组, 也可称为卷。 同组内服务器上的文件是完全相同的 ,同一组内的storage server之间是对等的, 文件上传、 删除等操作可以在任意一台storage server上进行 。
meta data:
文件相关属性,键值对( Key Value Pair) 方式,如:width=1024,heigth=768 。
二、部署
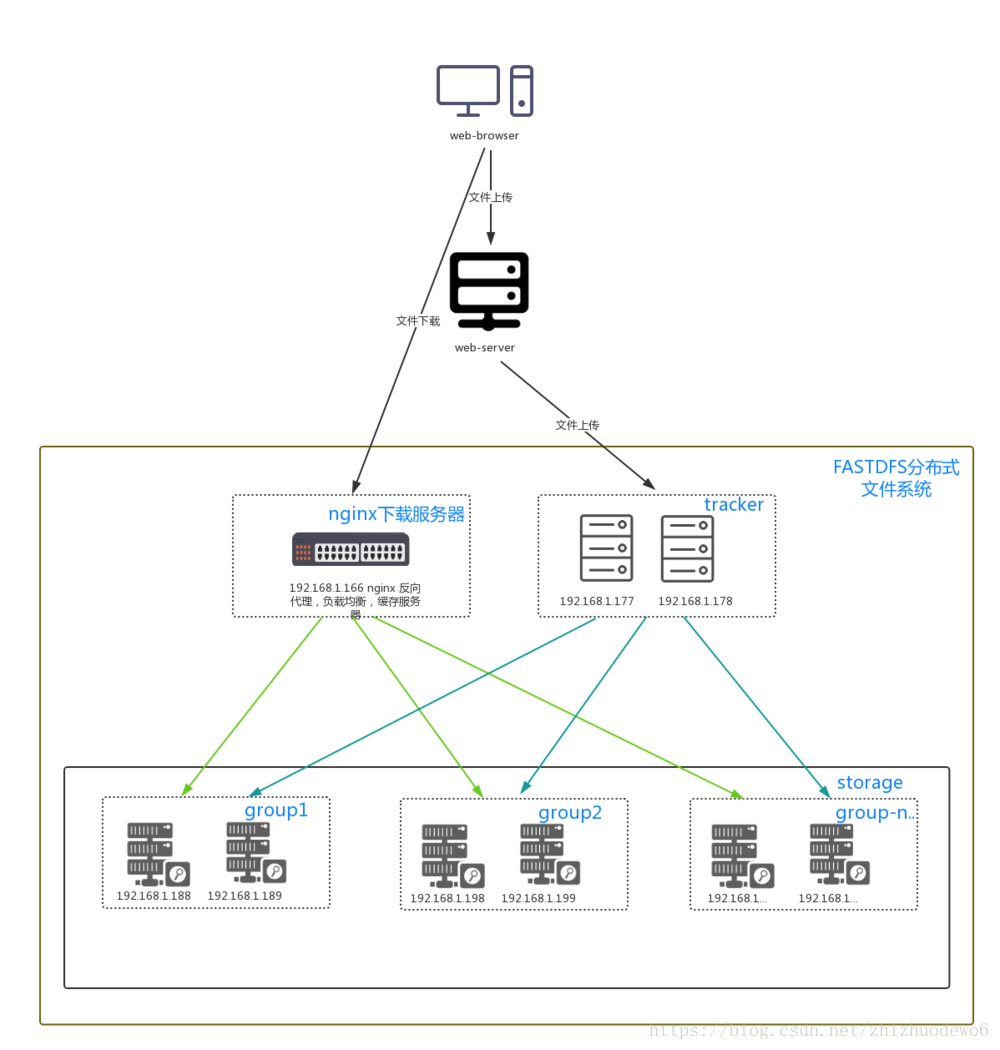
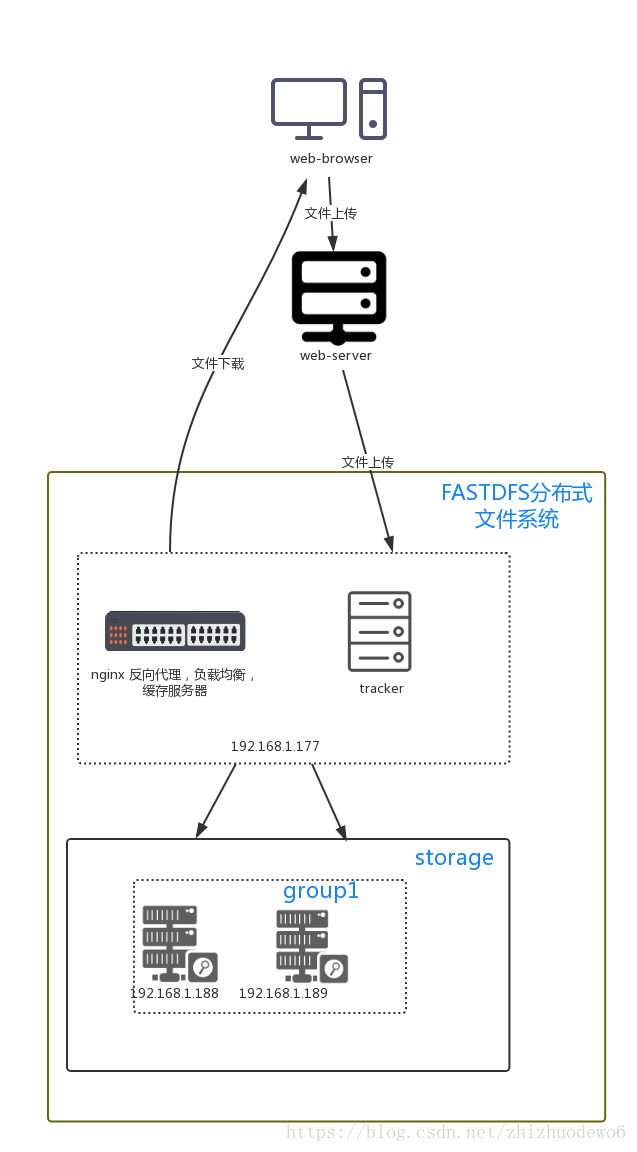
192.168.1.177安装fastdfs的tracker节点,以及nginx反向代理服务器用于下载服务。
192.168.1.188,192.168.1.189安装fastdfs的storage节点,默认分一组,一组内两台机器互为备份.
注意:为了做到高可用,一个group建议分为两台以上的机器。
三、编译和安装所需的依赖包
# yum install make cmake gcc gcc-c++四.安装 libfastcommon,这里是通过wget下载(我喜欢这种方式)。
1、下载:
wget https://github.com/happyfish100/libfastcommon/archive/V1.0.7.tar.gz

2、解压
将 libfastcommonV1.0.7.tar.gz解压至/usr/local/下:
tar -zxvf libfastcommonV1.0.7.tar.gz -C /usr/local/3、切换目录到:/usr/local/libfastcommon-1.0.7/ 下,接着进行编译和安装;
cd /usr/local/libfastcommon-1.0.7/
./make.sh           #编译
./make.sh install   #安装
安装后的截图:

4、libfastcommon安装好后会在/usr/lib64 目录下生成 libfastcommon.so 库文件;

注意:由于FastDFS程序引用usr/lib目录所以需要将/usr/lib64下的库文件拷贝至/usr/lib下。
cp libfastcommon.so /usr/lib五、安装tracker,即安装FastDFS
1、下载安装 FastDFS,这里也是通过wget下载。
wget https://github.com/happyfish100/fastdfs/archive/V5.05.tar.gz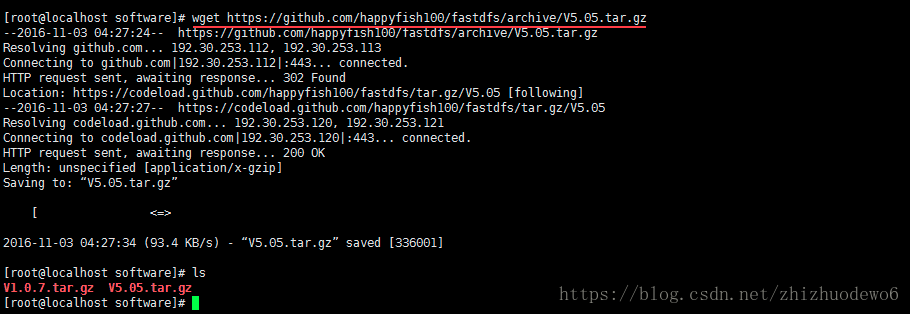
2、将5.05.tar.gz 解压至/usr/local/下
tar -zxvf V5.05.tar.gz -C /usr/local
3、切换目录到: /usr/local/fastdfs-5.05/ 下即解压后的目录,编译和安装;
cd /usr/local/fastdfs-5.05
./make.sh
./make.sh install
安装后的截图:

4、安装成功将安装目录下的conf下的文件拷贝到/etc/fdfs/下;
cp /usr/local/fastdfs-5.05/conf/* /etc/fdfs/
六、配置和启动tracker
(1)切换目录到: /etc/fdfs/ 目录下;
(2)拷贝一份新的tracker配置文件
cp tracker.conf.sample tracker.conf(3)修改tracker.conf ; vim tracker.conf
base_path=/home/yuqing/fastdfs  改为:  base_path=/home/fastdfs
http.server_port  改为: 80
base_path=/home/fastdfs
http.server_port=80 #配置http端口(4)创建 /home/fastdfs 目录
mkdir /home/fastdfs(5)启动tracker,运行如下命令:
/usr/bin/fdfs_trackerd /etc/fdfs/tracker.conf restart
注意:在/home/fastdfs/ 目录下生成两个目录, 一个是数据,一个是日志;
七、配置和启动storage
由于上面已经安装过FastDFS,这里只需要配置storage就好了;
(1)切换目录到: /etc/fdfs/ 目录下;
(2)拷贝一份新的storage配置文件
cp storage.conf.sample storage.conf(3)修改storage.conf ; vim storage.conf
group_name=group1 #配置组名
base_path=/home/yuqing/fastdfs    改为:  base_path=/home/fastdfs

#store存放文件的位置(store_path)
store_path0=/home/yuqing/fastdfs  改为: store_path0=/home/fdfs_storage
#如果有多个挂载磁盘则定义多个store_path,如下
#store_path1=.....
#store_path2=......

#配置tracker服务器:IP
tracker_server=192.168.172.20:22122
#如果有多个则配置多个tracker
#tracker_server=192.168.101.4:22122

#配置http端口
http.server_port=88
(4)创建 /home/fdfs_storage 目录
mkdir /home/fdfs_storage(5)启动storage, 运行命令如下:
/usr/bin/fdfs_storaged /etc/fdfs/storage.conf restart启动完成后进入 /home/fdfs_storage/data 目录下,显示目录如下:

八、使用FastDFS自带工具测试
(1)切换目录到 /etc/fdfs/ 目录下;
(2)拷贝一份新的client配置文件
cp client.conf.sample client.conf(3)修改client.conf ; vim client.conf,修改基本路径和tracker_server如下:

注意:若tracker有多个,可以配置多个,如下:
#tracker_server=......
#tracker_server=......
(4)拷贝一张图片wo.jpg 到Centos服务器上的 / 目录下;
(5)进行测试,运行如下:(运行测试程序,读取/etc/fdfs/client.conf 文件,上传/home目录下的.jpg文件)
/usr/bin/fdfs_test /etc/fdfs/client.conf upload /home/wo.jpg结果如下,表示搭建成功;

以上图中的文件地址:http://192.168.172.20/group1/M00/00/00/wKisFFpBG9eAHaQvAAAWKd1hQR4158_big.jpg 对应storage服务器上的/home/fdfs_storage/data/00/00/wKisFFpBG9eAHaQvAAAWKd1hQR4158_big.jpg文件;
由于现在还没有和nginx整合无法使用http下载。
九、FastDFS 和nginx整合
1 在tracker上安装 nginx
在每个tracker上安装nginx,的主要目的是做负载均衡及实现高可用。如果只有一台tracker可以不配置nginx。
一个tracker对应多个storage,通过nginx对storage负载均衡;
2 在storage 上安装nginx
1.下载 fastdfs-nginx-module,这里是通过wget下载(我喜欢这种方式)。
wget https://github.com/happyfish100/fastdfs-nginx-module/archive/10d1729c043c18550258cd6cb56cbf337624a397.zip注意:fastdfs-nginx-module与FastDFS版本必须对应,否则会报错,在nginx安装时,对应的版本可以参考github上的说明。
github地址: https://github.com/happyfish100/fastdfs-nginx-module/blob/master/HISTORY
出现问题解决方案文档地址:https://www.jianshu.com/p/218913cccc95
由于我们的FastDFS是5.05,所以我们对应的使用1.17版本。
2、解压 fastdfs-nginx-module.tar.gz 到 /usr/local目录下;
unzip -o master.zip -d /usr/local
3、切换目录到: /usr/local/fastdfs-nginx-module-master/src/ 目录下
cd /usr/local/fastdfs-nginx-module-master/src/
4、修改config文件,将文件中的所有 /usr/local/ 路径改为 /usr/

修改完成后:

5、将fastdfs-nginx-module-/src下的mod_fastdfs.conf拷贝至/etc/fdfs/下
cp mod_fastdfs.conf /etc/fdfs/6、并修改 /etc/fdfs/mod_fastdfs.conf 的内容;vi /etc/fdfs/mod_fastdfs.conf
base_path=/tmp 修改为 base_path=/home/fastdfs
base_path=/home/fastdfs
tracker_server=192.168.172.20:22122
#tracker_server=192.168.172.20:22122 #(多个tracker配置多行)
url_have_group_name=true        #url中包含group名称
store_path0=/home/fdfs_storage  #指定文件存储路径(上面配置的store路径)
(7)将libfdfsclient.so拷贝至/usr/lib下
cp /usr/lib64/libfdfsclient.so /usr/lib/(8)创建nginx/client目录
mkdir -p /var/temp/nginx/client十、Nginx的安装
1、下载:
wget-c https://nginx.org/download/nginx-1.10.1.tar.gz(2)解压 nginx-1.10.1.tar.gz 到 /usr/local目录下;
tar -zxvf nginx-1.10.1.tar.gz -C /usr/local/
(3)安装nginx的依赖库
yum install gcc-c++
yum install pcre
yum install pcre-devel
yum install zlib
yum install zlib-devel
yum install openssl
yum install openssl-devel(4)进入nginx解压的目录下:cd /usr/local/nginx-1.10.1/
(5)加入模块命令配置
./configure \
--prefix=/usr/local/nginx \
--pid-path=/var/run/nginx/nginx.pid \
--lock-path=/var/lock/nginx.lock \
--error-log-path=/var/log/nginx/error.log \
--http-log-path=/var/log/nginx/access.log \
--with-http_gzip_static_module \
--http-client-body-temp-path=/var/temp/nginx/client \
--http-proxy-temp-path=/var/temp/nginx/proxy \
--http-fastcgi-temp-path=/var/temp/nginx/fastcgi \
--http-uwsgi-temp-path=/var/temp/nginx/uwsgi \
--http-scgi-temp-path=/var/temp/nginx/scgi \
--add-module=/usr/local/fastdfs-nginx-module/src
该处为命令,所以需要拷贝出去执行。特备注意里面的path所写路径要与服务器真正的路径对应,特别是--add-module=/usr/local/fastdfs-nginx-module/src要与fastdfs-nginx-module真正安装的路径对应。
(6)编译并安装
make && make install
安装成功后查看生成的目录,如下所示:

(7)拷贝配置文件到 /etc/fdfs 下;
cd /usr/local/fastdfs-5.05/conf
cp http.conf mime.types /etc/fdfs/
(8)修改nginx配置文件

mkdir /usr/local/nginx/logs # 创建logs目录
cd /usr/local/nginx/conf/
vim nginx.conf
做如下的修改:


说明:
(a.) server_name指定本机ip;
(b.) location /group1/M00/:group1为nginx 服务FastDFS的分组名称,M00是FastDFS自动生成编号,对应store_path0=/home/fdfs_storage,如果FastDFS定义store_path1,这里就是M01
(9)nginx的启动
cd /usr/local/nginx/sbin/
./nginx
查询nginx进程

(10) fastdfs 和 nginx 服务的开机自启动: http://www.cnblogs.com/yufeng218/p/8215381.html
十一、在浏览器中访问上传到fastDFS的图片
因为Centos系统有防火墙,需要先关闭掉,才可以在浏览器中访问;
(1)CentOS 7.0默认使用的是firewall作为防火墙;若没有启用iptables 作为防火墙,则使用以下方式关闭防火墙:
systemctl stop firewalld.service #停止firewall
systemctl disable firewalld.service #禁止firewall开机启动
firewall-cmd --state #查看默认防火墙状态(关闭后显示notrunning,开启后显示running) 
(2)若已经启用iptables作为防火墙,则使用以下方式关闭:
service iptables stop  #临时关闭防火墙
chkconfig iptables off #永久关闭防火墙
防火墙的相关链接:http://www.jb51.net/article/101576.htm
http://www.linuxidc.com/Linux/2015-05/117473.htm
(3)在谷歌浏览器中访问刚才上传的图片:
刚才上传的图片地址为:http://192.168.172.20/group1/M00/00/00/wKisFFpBG9eAHaQvAAAWKd1hQR4158_big.jpg
参考文章:
https://www.cnblogs.com/yufeng218/p/8111961.html
https://www.jianshu.com/p/218913cccc95
十三、总结:
在本次安装中,所有安装包解压后都放到 /usr/local/目录下,然后在该目录下进行编译与安装(install),安装完毕后会对应的在/usr/lib64/中生成.so包,然后需要对应的将其拷贝到/usr/lib/目录下。安装完FastDFS后,tracker、storage的配置文件都需要拷贝到/etc/fdfs/目录下,包含:tracker.conf、storage.conf、client.conf,FastDFS安装nginx,需要安装nginx、fastdfs-nginx-module,他们也是将源码解压到/usr/local/目录下,配置文件mod_fastdfs.conf需要配置tracker的地址、文件的存储路径,nginx在安装时需要加入fastdfs-nginx-module模块,通过命令,在nginx.conf配置文件中加入为FastDfs的server,其中包括外界访问的ip地址,还有FastDfs的storage的group地址。
十四、关于springboot集成FastDFS
请参考该文章:https://blog.csdn.net/ityouknow/article/details/79078175
十五、常用命令
启动tracker
/usr/bin/fdfs_trackerd /etc/fdfs/tracker.conf restart重启tracker
/usr/bin/restart.sh /usr/bin/fdfs_trackerd /etc/fdfs/tracker.conf启动storage
/usr/bin/fdfs_storaged /etc/fdfs/storage.conf restart重启storage
/usr/bin/restart.sh /usr/bin/fdfs_storaged /etc/fdfs/storage.conf启动nginx
cd /usr/local/nginx/sbin/
./nginx
重启nginx
cd /usr/local/nginx/sbin/
./nginx -t
./nginx -s reload
nginx查看日志:
/usr/local/nginx/logs十六、最终总结
通过上述步骤搭建的fdsfDfs系统,当通过nginx通过http访问文件时,在不加校验,即不加Token时是没有问题的,当开启校验后,就会出现问题,nginx报各种错,访问不到文件。一开始推断是由于每个模块版本的问题导致的,但是这时没有发现用java写的生成token的程序本身就有问题,而通过官方给的java客户端访问也是不成功,因为本身官网的生成token的程序也有问题,因为生成token时,文件路径不应加上group。而最终我还是重现按照官网教程进行了各模块的安装。
官网教程地址:https://github.com/happyfish100/fastdfs/wiki
接下来我就按照官网教程进行了重新安装,注意教程中所有安装完的效果都是在启动或重启tracker、storage、nginx,关闭防火墙的前提下进行。特别注意在生成token时,文件路径不要携带group。
十七、http校验
参考文章:https://www.cnblogs.com/Leo_wl/p/7705158.html
官网未找到相关说明
1、进入/etc/fdfs
cd /etc/fdfs2、修改http.conf
vim /etc/fdfs/http.conf修改内容如下:
http.mime_types_filename=mime.types

# 设置为true表示开启token验证
http.anti_steal.check_token=true

# 设置token失效的时间单位为秒(s)
http.anti_steal.token_ttl=900

# 密钥,跟客户端即java程序中配置文件的fastdfs.http_secret_key保持一致
http.anti_steal.secret_key=123456

# 如果token检查失败,返回的页面
http.anti_steal.token_check_fail=/home/error.jpg

# if support multi regions for HTTP Range
# default value is true
http.multi_range.enabed = true
重启服务
2、配置客户端,即java
connect_timeout = 2
network_timeout = 30
charset = UTF-8
http.tracker_http_port = 8888
http.anti_steal_token = true
http.secret_key = 123456

tracker_server = 192.168.32.129:22122
注意:这里有http.tracker_http_port端口好应与/usr/local/nginx/conf/nginx.conf中的listen中端口号一致,即与storage配置文件/etc/fdfs/storage.conf中的http.server_port=8888端口号一致。
3、启动客户端程序,即可以通过校验访问文件,例如如下地址:
http://192.168.32.129:8888/group1/M00/00/00/wKgggVvASFGAUzvbAADvriHGzsI112.png?token=4edd27279a76e01450b5f65500fd12d4&ts=1539328079十八、客户端
FastDFSClient.java内容如下:
import org.csource.common.MyException;
import org.csource.common.NameValuePair;
import org.csource.fastdfs.*;
import org.slf4j.Logger;
import org.slf4j.LoggerFactory;
import org.springframework.core.io.ClassPathResource;

import java.io.ByteArrayInputStream;
import java.io.IOException;
import java.io.InputStream;
import java.io.UnsupportedEncodingException;
import java.security.NoSuchAlgorithmException;
import java.time.Instant;
import java.util.Properties;

import static org.springframework.util.StringUtils.getFilename;

/**
 xi
 */
public class FastDFSClient {
    private static final Logger logger = LoggerFactory.getLogger(FastDFSClient.class);

    private static TrackerClient trackerClient;
    private static TrackerServer trackerServer;
    private static StorageServer storageServer;
    private static StorageClient storageClient;

    static {
        try {
            ClientGlobal.init("fdfs_client.conf");
            trackerClient = new TrackerClient();
            trackerServer = trackerClient.getConnection();
            storageServer = trackerClient.getStoreStorage(trackerServer);
        } catch (Exception e) {
            logger.error("FastDFS Client Init Fail!", e);
        }
    }

    public static String[] upload(FastDFSFile file) {
        logger.info("File Name: " + file.getName() + "File Length:" + file.getContent().length);

        NameValuePair[] meta_list = new NameValuePair[1];
        meta_list[0] = new NameValuePair("author", file.getAuthor());

        long startTime = System.currentTimeMillis();
        String[] uploadResults = null;
        try {
            storageClient = new StorageClient(trackerServer, storageServer);
            uploadResults = storageClient.upload_file(file.getContent(), file.getExt(), meta_list);
        } catch (IOException e) {
            logger.error("IO Exception when uploadind the file:" + file.getName(), e);
        } catch (Exception e) {
            logger.error("Non IO Exception when uploadind the file:" + file.getName(), e);
        }
        logger.info("upload_file time used:" + (System.currentTimeMillis() - startTime) + " ms");

        if (uploadResults == null) {
            logger.error("upload file fail, error code:" + storageClient.getErrorCode());
        }
        String groupName = uploadResults[0];
        String remoteFileName = uploadResults[1];

        logger.info("upload file successfully!!!" + "group_name:" + groupName + ", remoteFileName:" + " " + remoteFileName);
        return uploadResults;
    }

    public static FileInfo getFile(String groupName, String remoteFileName) {
        try {
            storageClient = new StorageClient(trackerServer, storageServer);
            return storageClient.get_file_info(groupName, remoteFileName);
        } catch (IOException e) {
            logger.error("IO Exception: Get File from Fast DFS failed", e);
        } catch (Exception e) {
            logger.error("Non IO Exception: Get File from Fast DFS failed", e);
        }
        return null;
    }

    public static InputStream downFile(String groupName, String remoteFileName) {
        try {
            storageClient = new StorageClient(trackerServer, storageServer);
            byte[] fileByte = storageClient.download_file(groupName, remoteFileName);
            InputStream ins = new ByteArrayInputStream(fileByte);
            return ins;
        } catch (IOException e) {
            logger.error("IO Exception: Get File from Fast DFS failed", e);
        } catch (Exception e) {
            logger.error("Non IO Exception: Get File from Fast DFS failed", e);
        }
        return null;
    }

    public static void deleteFile(String groupName, String remoteFileName)
            throws Exception {
        storageClient = new StorageClient(trackerServer, storageServer);
        int i = storageClient.delete_file(groupName, remoteFileName);
        logger.info("delete file successfully!!!" + i);
    }

    public static String getTrackerUrl() throws IOException {
        return "http://" + trackerServer.getInetSocketAddress().getHostString() + ":" + ClientGlobal.getG_tracker_http_port() + "/";
    }

    /**
     2      * 获取访问服务器的token,拼接到地址后面
     3      *
     4      * @param filepath 文件路径 M00/00/00/wKgzgFnkTPyAIAUGAAEoRmXZPp876.jpeg
     5      * @param httpSecretKey 密钥
     6      * @return 返回token,如: token=078d370098b03e9020b82c829c205e1f&ts=1508141521
     7      */
    public static String getToken(String filepath){
         int ts;
         String token = null;
         String file_url="";
         try {
             if (ClientGlobal.g_anti_steal_token) {
                 ts = (int) (System.currentTimeMillis() / 1000);
                 String key=ClientGlobal.g_secret_key;
                 token = ProtoCommon.getToken(filepath, ts, ClientGlobal.g_secret_key);
                 file_url += "?token=" + token + "&ts=" + ts;
             }
         } catch (UnsupportedEncodingException e) {
             e.printStackTrace();
         } catch (NoSuchAlgorithmException e) {
             e.printStackTrace();
         } catch (MyException e) {
             e.printStackTrace();
         }
        return file_url;
     }
}
web程序如下:
import com.hongdaoai.datastore.common.annotation.SysLog;
import com.hongdaoai.datastore.common.controller.BaseController;
import com.hongdaoai.datastore.fastdfs.FastDFSClient;
import com.hongdaoai.datastore.fastdfs.FastDFSFile;
import lombok.extern.slf4j.Slf4j;
import org.csource.fastdfs.StorageClient1;
import org.slf4j.Logger;
import org.slf4j.LoggerFactory;
import org.springframework.context.annotation.Scope;
import org.springframework.web.bind.annotation.*;
import org.springframework.web.multipart.MultipartFile;

import javax.servlet.http.HttpServletRequest;
import java.io.BufferedReader;
import java.io.IOException;
import java.io.InputStream;
import java.io.InputStreamReader;
import java.math.BigDecimal;
import java.util.Arrays;

@RestController
@RequestMapping("hdzy/datastore")
@Scope("prototype") //设置该类不是单例
@Slf4j
public class DataFileController extends BaseController {
    private static final Logger logger = LoggerFactory.getLogger(DataFileController.class);

    /**
     * 上传文件
     * @return
     */
    @SysLog(isLog = true)
    @PostMapping("/book/upload")
    @ResponseBody
    public Object fileUploadForBook(@RequestParam("file") MultipartFile multipartFile) throws IOException {
        String[] fileAbsolutePath={};
        String fileName=multipartFile.getOriginalFilename();
        String ext = fileName.substring(fileName.lastIndexOf(".") + 1);
        byte[] file_buff = null;
        InputStream inputStream=multipartFile.getInputStream();
        if(inputStream!=null){
            int len1 = inputStream.available();
            file_buff = new byte[len1];
            inputStream.read(file_buff);
        }
        inputStream.close();
        FastDFSFile file = new FastDFSFile(fileName, file_buff, ext);
        try {
            fileAbsolutePath = FastDFSClient.upload(file);  //upload to fastdfs
        } catch (Exception e) {
            logger.error("upload file Exception!",e);
        }
        if (fileAbsolutePath==null) {
            logger.error("upload file failed,please upload again!");
        }
        String group_name=fileAbsolutePath[0];
        String remote_filename=fileAbsolutePath[1];
//        String path=FastDFSClient.getTrackerUrl()+fileAbsolutePath[0]+ "/"+fileAbsolutePath[1];
        String path=FastDFSClient.getTrackerUrl()+group_name+ StorageClient1.SPLIT_GROUP_NAME_AND_FILENAME_SEPERATOR+remote_filename+FastDFSClient.getToken(remote_filename);
        return path;
    }
}
fdfs_client.conf内容如下:
connect_timeout = 2
network_timeout = 30
charset = UTF-8
http.tracker_http_port = 8888
http.anti_steal_token = true
http.secret_key = 123456

tracker_server = 192.168.32.129:22122