一.新建一个ReactNative 项目
步骤:1.进入终端使用终端命令:react-native init 项目名称
2.使用cd进入项目文件路径
3.运行reacnative 项目 终端命令:react-native run-ios 或者 在reacnative 项目中找到IOS文件夹,打开直接在xcode中运行。
二.解决引入组建没有提示的问题
步骤:去github 上下载ReactNative-LiveTemplate 根据github 上给的安装提示进行安装(很简单)三. https://reactnative.cn/#content (ReactNative的中文网站)
1.学习组建的过程中如果不明确的可以直接到 ReactNative的中文网站去学习
import React, {Component} from 'react';
//1.1首先检查组建view是否引入,记住render内部 顶层只能有一个View,两个平齐的View就会报错
import {Platform, StyleSheet, Text, View, TabBarIOS} from 'react-native';

export default class App extends Component {
  render() {

 return (

<View style={styles.container}>

    <Text style={styles.welcome}>你好</Text>

</View>

    );

 }

}
//1.2可以设置组建的样式
const styles = StyleSheet.create({
container: {
flex: 1,
justifyContent: 'center',
alignItems: 'center',
backgroundColor: 'red'
}
});
运行项目,Command+R 刷新界面。
四. Flexbox 布局:主轴/侧轴
4.1 style 中flexDirection:决定主轴的方向,有row 和 column 两个值
4.2 style 中指定justifyContent可以决定其子元素沿着主轴的排列方式
值有:flex-start、center、flex-end、space-around、space-between以及space-evenly
4.3 style 中指定alignItems可以决定其子元素沿着次轴(与主轴垂直的轴,比如若主轴方向为row,则次轴方向为column)的排列方式。
值有:flex-start、center、flex-end以及stretch
4.4相对定位:相对原来位置进行移动position:'relative'
4.5绝对定位:相对父类,positon:'absolute'
五.Image
1.获取本地文件夹的图片
<Image source={require('./imgs/back.png')}/>
Image如果是双标签的时候,图片是作为背景图展示的。
2.获取IOS /Images.xcassets 文件夹下的图片和 网络上的图片;此处image必须设置宽高
六:举例 6张图片居中显示
1.先在React Native 项目中,新建-》localData文件夹-〉新建localData.json 在里面创建json 数据,同时吧相应的图片放到IOS/Images.xcassets文件下
//localData.json 如下
[{"icon":"icon_bus.png","title":"单肩包-0"},
  {"icon":"icon_bus.png","title":"单肩包-1" },
  { "icon":"icon_bus.png","title":"单肩包-2" },
  { "icon":"icon_bus.png","title":"单肩包-3" },
  {  "icon":"icon_bus.png","title":"单肩包-4" },
  { "icon":"icon_bus.png","title":"单肩包-5" }]

//导入本地数据
var  localData = require('./localData/localData.json');
//项目需要用到的常量
let  cols = 3;
let imageWidth = 90;
var marginWidth = (require('Dimensions').get('window').width - cols*imageWidth)/ (cols+1);
export default class App extends Component {
render() {
  return (
      <View style={styles.container}>
        {this.renderItem()}
      </View>
  );
}
renderItem(){
  var  items = [];
  for (var  i = 0 ;i<localData.length;i++){
      var item = localData[i];
      items.push(
          <View key={i} style={styles.innerView}>
            <Image source={{uri:item.icon}} style={styles.imageStyles}></Image>
            <Text>{item.title}</Text>
          </View>
      );
  }
  return items;
}

}

const styles = StyleSheet.create({
  container: {
      flex: 1,
      flexDirection:"row",
      flexWrap:'wrap',
      marginTop:40,

  },
  imageStyles:{
      width:70,
      height:70
  },
  innerView:{
      backgroundColor:'red',
      width:imageWidth,
      height:120,
      alignItems:"center",
      justifyContent:"center",
      marginTop:20,
      marginLeft:marginWidth
  }
});
七:不透明触摸 TouchableOpacity 点击会改变透明度
onpress:接受的是一个箭头函数:()=>this.clickBtn()
箭头函数的箭头=>之前是一个空括号、单个的参数名、或用括号括起的多个参数名,而箭头之后可以是一个表达式
(作为函数的返回值),或者是用花括号括起的函数体(需要自行通过return来返回值,否则返回的是undefined)
export default class App extends Component {
    render() {
        return (
            <View style={styles.container} >
               <TouchableOpacity style={styles.btnStyle}
        //注意箭头函数 ()=>this.clickBtn()
                               onPress={()=>this.clickBtn()}>
                   <Text style={styles.textStyle}>登陆</Text>
               </TouchableOpacity>
            </View>
        )
    }
    clickBtn(){
      alert(0)
    }
}
八:组件的生命周期
8.1 ES5: getDefaultProps(){} 初始化属性,只读不能修改
ES6:组件类名 App.defaultProps
8.2 ES5: getInitialState(){} 初始化属性,既能读也能写
export default class App extends Component {
    //构造器
    constructor(props){
        super(props)
        this.state = {like:false}
    }
}
8.3 ES5: render(){ } 初始化界面,既能读也能写
8.4 ES5: componentDidMount:处理一些耗时的操作,比如网络请求 定时器
九:Scrollview
9.1 ScrollView必须有一个确定的高度才能正常工作
9.2 一般来说我们会给ScrollView设置flex: 1以使其自动填充父容器的空余空间,但前提条件是所有的父容器本身也设置了flex或者指定了高度,否则就会导致无法正常滚动
9.3 • 转义字符可以变成滚动视图的小圆点。<Text>•</Text>设置绝对定位时必须设置宽度。
9.4 onMomentumScrollEnd 当scrollview一帧滚动完毕
export default class App extends Component {
    constructor(props) {
        super(props);
        this.state={selectedPage:0}
    }
    render(){
        return(
            <View>
                <ScrollView
                    horizontal={true}
                    showsHorizontalScrollIndicator={false }
                    //箭头函数有个隐藏的参数,比如e 就是隐藏函数,当前对象。
                    onMomentumScrollEnd={(e) => this.IndicatorScrollEnabled(e)}
                >
                </ScrollView>
            </View>
        );
    }
    IndicatorScrollEnabled (e) {
        //求出横向偏移量
         var offset = e.nativeEvent.contentOffset.x;
        //当前野页
         let cutrrentpage = offset / screenWidth;
         this.setState ({
             selectedPage:cutrrentpage,
         })
    }
}
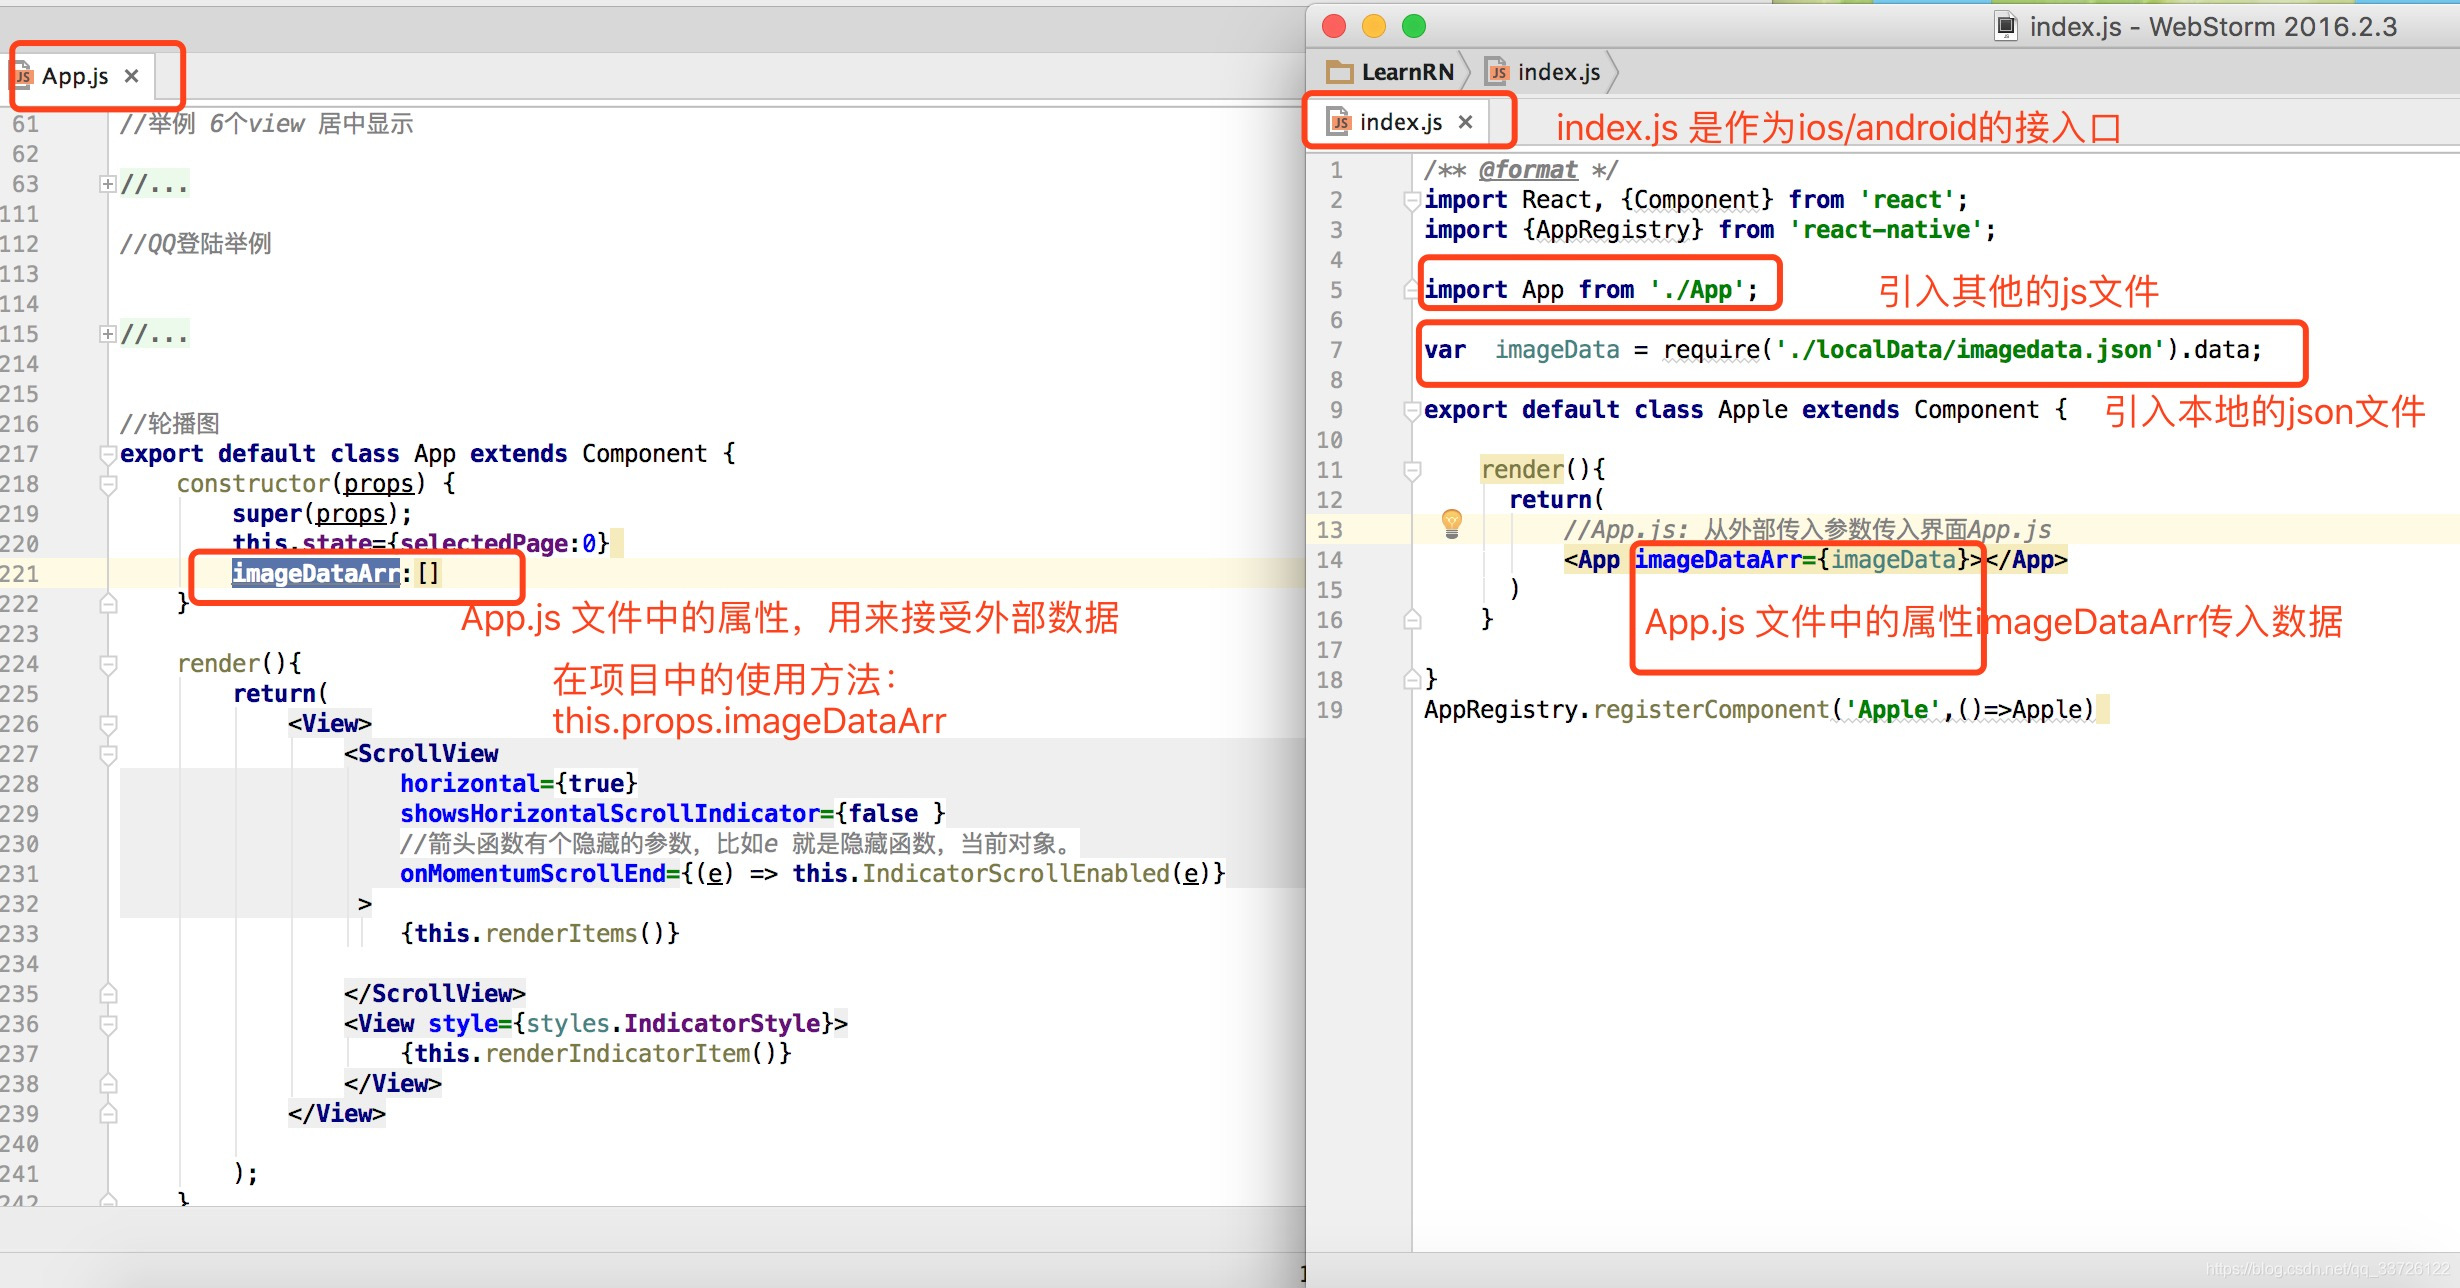
十: index.js 为IOS/Android端 共用的文件,同时从index.js 文件传入参数到其他文件
11.在项目中使用第三方库:轮播图()
1.1 在终端进入到rn项目的根目录下,含有android +ios +index.js 等等文件路径下。
执行npm i react-timer-mixin --save 命令,完成之后进入到node_modules文件夹下,然后可以查看是否含有 react-native-swiper文件夹
1.2 ES6 :导入第三方库的写法 :import Swiper from 'react-native-swiper'; 切记首字母大写“Swiper”
1.3 使用方法可以去看下 node_modules文件夹的readme 跟 github 上的 react-native-swiper