webpack 中输出管理主要运用了两个插件:
- html-webpack-plugin
- clean-webpack-plugin
这两个插件可以满足常规的输出管理需求。
html-webpack-plugin会在输出目录创建一个全新的index.html(当然你也可以自己命名),将所有相关的bundle自动添加到html中,这样就可以不用每次更改完还需要自己手动去更改html的。
还有个相当的好处就是,可以使用hash,也就是版本号,这样可以有效的应对缓存问题。
例子:
安装:
npm install --save-dev html-webpack-pluginwebpack.config.js
const path = require('path');
const HtmlWebpackPlugin = require('html-webpack-plugin');
module.exports = {
entry: {
app: './src/index.js',
print: './src/print.js'
},
output:{
filename: '[name].bundle.js',
path: path.resolve(__dirname, 'dist')
},
plugins:[
new HtmlWebpackPlugin({
title: 'Output Management',
filename: 'index-[hash:5].html'
})
]
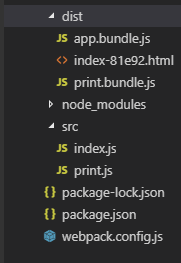
}; 输出:
如果使用了版本号,几次更改输出后,输出目录必然是杂乱的,这时候就需要用到clean-webpack-plugin插件。
这个插件可以清楚旧文件,只留下当前构建后生成的文件。
例子:
安装:
npm install --save-dev clean-webpack-pluginwebpack.config.js
扫描二维码关注公众号,回复:
4837366 查看本文章

const path = require('path');
const HtmlWebpackPlugin = require('html-webpack-plugin');
const CleanWebpackPlugin = require('clean-webpack-plugin')

module.exports = {
    entry: {
        app: './src/index.js',
        print: './src/print.js'
    },
    output:{
        filename: '[name].bundle.js',
        path: path.resolve(__dirname, 'dist')
    },
    plugins:[
        new HtmlWebpackPlugin({
            title: 'Output Management',
            filename: 'index-[hash:5].html'
        }),
        new CleanWebpackPlugin(['dist'])
    ]
};