为了学习机器学习深度学习和文本挖掘方面的知识,需要获取一定的数据,新浪微博的大量数据可以作为此次研究历程的对象
一、环境准备
二、scrapy组件和数据流介绍

1、Scrapy architecture
组件Scrapy Engine
引擎负责控制数据流在系统中所有组件中流动,并在相应动作发生时触发事件。
调度器(Scheduler)
调度器从引擎接受request并将他们入队,以便之后引擎请求他们时提供给引擎。
下载器(Downloader)
下载器负责获取页面数据并提供给引擎,而后提供给spider。
Spiders
Spider是Scrapy用户编写用于分析response并提取item(即获取到的item)或额外跟进的URL的类。 每个spider负责处理一个特定(或一些)网站。Item PipelineItem Pipeline负责处理被spider提取出来的item。典型的处理有清理、 验证及持久化(例如存取到数据库中)。
下载器中间件(Downloader middlewares)
下载器中间件是在引擎及下载器之间的特定钩子(specific hook),处理Downloader传递给引擎的response。 其提供了一个简便的机制,通过插入自定义代码来扩展Scrapy功能。更多内容请看 下载器中间件(Downloader Middleware) 。
Spider中间件(Spider middlewares)
Spider中间件是在引擎及Spider之间的特定钩子(specific hook),处理spider的输入(response)和输出(items及requests)。 其提供了一个简便的机制,通过插入自定义代码来扩展Scrapy功能。更多内容请看 Spider中间件(Middleware) 。
2、数据流(Data flow)
Scrapy中的数据流由执行引擎控制,其过程如下:
1.引擎打开一个网站(open a domain),找到处理该网站的Spider并向该spider请求第一个要爬取的URL(s)。
2.引擎从Spider中获取到第一个要爬取的URL并在调度器(Scheduler)以Request调度。
3.引擎向调度器请求下一个要爬取的URL。
4.调度器返回下一个要爬取的URL给引擎,引擎将URL通过下载中间件(请求(request)方向)转发给下载器(Downloader)。
5.一旦页面下载完毕,下载器生成一个该页面的Response,并将其通过下载中间件(返回(response)方向)发送给引擎。
6.引擎从下载器中接收到Response并通过Spider中间件(输入方向)发送给Spider处理。
7.Spider处理Response并返回爬取到的Item及(跟进的)新的Request给引擎。
8.引擎将(Spider返回的)爬取到的Item给Item Pipeline,将(Spider返回的)Request给调度器。
9.(从第二步)重复直到调度器中没有更多地request,引擎关闭该网站。
以上组件和数据流的部分是参考别的的介绍,觉得描述的挺好,比较容易理解整个框架的结构。下面是干货:
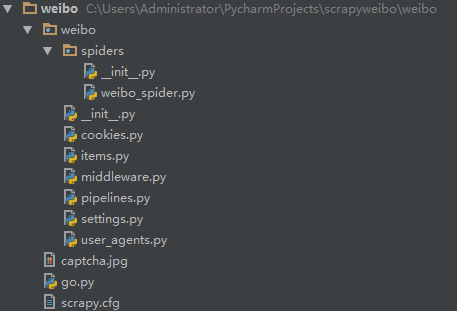
三、scrapy工程对象
1、item.py的内容:
# encoding=utf-8

from scrapy.item import Item, Field


class InformationItem(Item):
    #关注对象的相关个人信息
    _id = Field()  # 用户ID
    Info = Field() # 用户基本信息
    Num_Tweets = Field()  # 微博数
    Num_Follows = Field()  # 关注数
    Num_Fans = Field()  # 粉丝数
    HomePage = Field() #关注者的主页


class TweetsItem(Item):
    #微博内容的相关信息
    _id = Field()  # 用户ID
    Content = Field()  # 微博内容
    Time_Location = Field()  # 时间地点
    Pic_Url = Field()  # 原图链接
    Like = Field()  # 点赞数
    Transfer = Field()  # 转载数
    Comment = Field()  # 评论数
定义了两个类,InformationItem获取关注列表用户的个人信息,TweetsItem获取微博内容
2、weibo_spider.py的内容:
# coding=utf-8
from scrapy.spider import Spider
from scrapy.http import Request
from scrapy.selector import Selector
from weibo.items import InformationItem,TweetsItem
import re
import requests
from bs4 import BeautifulSoup


class Weibo(Spider):
    name = "weibospider"
    redis_key = 'weibospider:start_urls'
    #可以从多个用户的关注列表中获取这些用户的关注对象信息和关注对象的微博信息
    start_urls = ['http://weibo.cn/0123456789/follow','http://weibo.cn/0123456789/follow']
    #如果通过用户的分组获取关注列表进行抓取数据,需要调整parse中如id和nextlink的多个参数
    #strat_urls = ['http://weibo.cn/attgroup/show?cat=user¤tPage=2&rl=3&next_cursor=20&previous_cursor=10&type=opening&uid=1771329897&gid=201104290187632788&page=1']
    url = 'http://weibo.cn'
    #group_url = 'http://weibo.cn/attgroup/show'
    #把已经获取过的用户ID提前加入Follow_ID中避免重复抓取
    Follow_ID = ['0123456789']
    TweetsID = []

    def parse(self,response):
        #用户关注者信息
        informationItems = InformationItem()
        selector = Selector(response)

        print selector
        Followlist = selector.xpath('//tr/td[2]/a[2]/@href').extract()
        print "输出关注人ID信息"
        print len(Followlist)

        for each in Followlist:
            #选取href字符串中的id信息
            followId = each[(each.index("uid")+4):(each.index("rl")-1)]
            print followId
            follow_url = "http://weibo.cn/%s" % followId
            #通过筛选条件获取需要的微博信息,此处为筛选原创带图的微博
            needed_url = "http://weibo.cn/%s/profile?hasori=1&haspic=1&endtime=20160822&advancedfilter=1&page=1" % followId
            print follow_url
            print needed_url
            #抓取过数据的用户不再抓取:
            while followId not in self.Follow_ID:
                yield Request(url=follow_url, meta={"item": informationItems, "ID": followId, "URL": follow_url}, callback=self.parse1)
                yield Request(url=needed_url, callback=self.parse2)
                self.Follow_ID.append(followId)

        nextLink = selector.xpath('//div[@class="pa"]/form/div/a/@href').extract()
        #查找下一页,有则循环
        if nextLink:
            nextLink = nextLink[0]
            print nextLink
            yield Request(self.url + nextLink, callback=self.parse)
        else:
            #没有下一页即获取完关注人列表之后输出列表的全部ID
            print self.Follow_ID
            #yield informationItems

    def parse1(self, response):
        """ 通过ID访问关注者信息 """
        #通过meta把parse中的对象变量传递过来
        informationItems = response.meta["item"]
        informationItems['_id'] = response.meta["ID"]
        informationItems['HomePage'] = response.meta["URL"]
        selector = Selector(response)
        #info = ";".join(selector.xpath('//div[@class="ut"]/text()').extract())  # 获取标签里的所有text()
        info = selector.xpath('//div[@class="ut"]/span[@class="ctt"]/text()').extract()
        #用/分开把列表中的各个元素便于区别不同的信息
        allinfo = '  /  '.join(info)
        try:
            #exceptions.TypeError: expected string or buffer
            informationItems['Info'] = allinfo
        except:
            pass
        #text2 = selector.xpath('body/div[@class="u"]/div[@class="tip2"]').extract()
        num_tweets = selector.xpath('body/div[@class="u"]/div[@class="tip2"]/span/text()').extract()  # 微博数
        num_follows = selector.xpath('body/div[@class="u"]/div[@class="tip2"]/a[1]/text()').extract()  # 关注数
        num_fans = selector.xpath('body/div[@class="u"]/div[@class="tip2"]/a[2]/text()').extract()  # 粉丝数
        #选取'[' ']'之间的内容
        if num_tweets:
            informationItems["Num_Tweets"] = (num_tweets[0])[((num_tweets[0]).index("[")+1):((num_tweets[0]).index("]"))]
        if num_follows:
            informationItems["Num_Follows"] = (num_follows[0])[((num_follows[0]).index("[")+1):((num_follows[0]).index("]"))]
        if num_fans:
            informationItems["Num_Fans"] = (num_fans[0])[((num_fans[0]).index("[")+1):((num_fans[0]).index("]"))]

        yield informationItems

    #获取关注人的微博内容相关信息
    def parse2(self, response):

        selector = Selector(response)
        tweetitems = TweetsItem()
        #可以直接用request的meta传递ID过来更方便
        IDhref = selector.xpath('//div[@class="u"]/div[@class="tip2"]/a[1]/@href').extract()
        ID = (IDhref[0])[1:11]
        Tweets = selector.xpath('//div[@class="c"]')


        # 跟parse1稍有不同,通过for循环寻找需要的对象
        for eachtweet in Tweets:
            #获取每条微博唯一id标识
            mark_id = eachtweet.xpath('@id').extract()
            print mark_id
            #当id不为空的时候加入到微博获取列表
            if mark_id:
                #去重操作,对于已经获取过的微博不再获取
                while mark_id not in self.TweetsID:
                    content = eachtweet.xpath('div/span[@class="ctt"]/text()').extract()
                    timelocation = eachtweet.xpath('div[2]/span[@class="ct"]/text()').extract()
                    pic_url = eachtweet.xpath('div[2]/a[2]/@href').extract()
                    like = eachtweet.xpath('div[2]/a[3]/text()').extract()
                    transfer = eachtweet.xpath('div[2]/a[4]/text()').extract()
                    comment = eachtweet.xpath('div[2]/a[5]/text()').extract()

                    tweetitems['_id'] = ID
                    #把列表元素连接且转存成字符串
                    allcontents = ''.join(content)
                    #内容可能为空 需要先判定
                    if allcontents:
                        tweetitems['Content'] = allcontents
                    else:
                        pass
                    if timelocation:
                        tweetitems['Time_Location'] = timelocation[0]
                    if pic_url:
                        tweetitems['Pic_Url'] = pic_url[0]
                    # 返回字符串中'[' ']'里的内容
                    if like:
                        tweetitems['Like'] = (like[0])[((like[0]).index("[")+1):((like[0]).index("]"))]
                    if transfer:
                        tweetitems['Transfer'] = (transfer[0])[((transfer[0]).index("[")+1):((transfer[0]).index("]"))]
                    if comment:
                        tweetitems['Comment'] = (comment[0])[((comment[0]).index("[")+1):((comment[0]).index("]"))]
                    #把已经抓取过的微博id存入列表
                    self.TweetsID.append(mark_id)
                    yield tweetitems
            else:
                #如果selector语句找不到id 查看当前查询语句的状态
                print eachtweet

        tweet_nextLink = selector.xpath('//div[@class="pa"]/form/div/a/@href').extract()
        if tweet_nextLink:
            tweet_nextLink = tweet_nextLink[0]
            print tweet_nextLink
            yield Request(self.url + tweet_nextLink, callback=self.parse2)
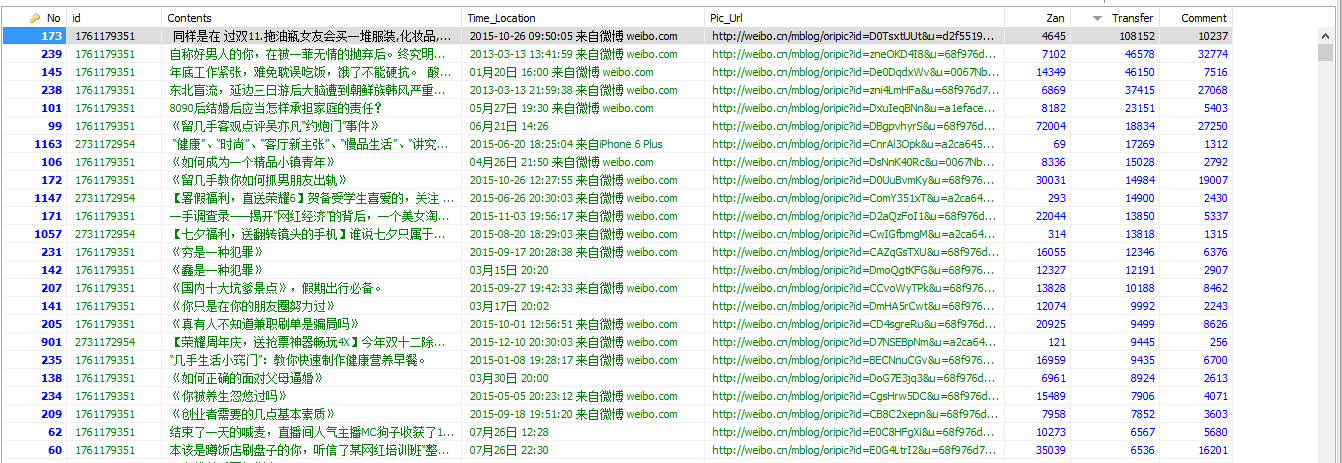
每个微博用户都有唯一的标识uid,此uid是获取需要对象的关键。修改start_url里面的ID(0123456789),比如换成留几手的ID(1761179351),即把地址换成你想获取的用户的关注人列表的信息,可以对多个用户的关注列表用redis_keyf方式进行分布式操作。内容比较多就不一一介绍,代码不理解的可以留言探讨,本人也是模仿着别人的框架写出来的代码,不是科班出身,代码写的比较渣渣,大神可以帮忙指点一二。
3、获取cookies模拟登陆微博:
# encoding=utf-8

import requests
from selenium import webdriver
import time
from PIL import Image
import urllib2
from bs4 import BeautifulSoup
import re
import urllib
在myAcount中输入你自己拥有的微博账号密码,就可以模拟登陆微博啦:
4、数据管道pipeline存入MySQL数据库:
# -*- coding: utf-8 -*-
import MySQLdb
from items import InformationItem,TweetsItem

DEBUG = True

if DEBUG:
    dbuser = 'root'
    dbpass = '123456'
    dbname = 'tweetinfo'
    dbhost = '127.0.0.1'
    dbport = '3306'
else:
    dbuser = 'XXXXXXXX'
    dbpass = 'XXXXXXX'
    dbname = 'tweetinfo'
    dbhost = '127.0.0.1'
    dbport = '3306'


class MySQLStorePipeline(object):
    def __init__(self):
        self.conn = MySQLdb.connect(user=dbuser, passwd=dbpass, db=dbname, host=dbhost, charset="utf8",
                                    use_unicode=True)
        self.cursor = self.conn.cursor()
        #建立需要存储数据的表

        # 清空表(测试阶段):
        self.cursor.execute("truncate table followinfo;")
        self.conn.commit()
        self.cursor.execute("truncate table tweets;")
        self.conn.commit()

    def process_item(self, item, spider):
        #curTime = datetime.datetime.now()
        if isinstance(item, InformationItem):
            print "开始写入关注者信息"
            try:
                self.cursor.execute("""INSERT INTO followinfo (id, Info, Num_Tweets, Num_Follows, Num_Fans, HomePage)
                                VALUES (%s, %s, %s, %s, %s, %s)""",
                                    (
                                        item['_id'].encode('utf-8'),
                                        item['Info'].encode('utf-8'),
                                        item['Num_Tweets'].encode('utf-8'),
                                        item['Num_Follows'].encode('utf-8'),
                                        item['Num_Fans'].encode('utf-8'),
                                        item['HomePage'].encode('utf-8'),
                                    )
                                    )

                self.conn.commit()
            except MySQLdb.Error, e:
                print "Error %d: %s" % (e.args[0], e.args[1])

        elif isinstance(item, TweetsItem):
            print "开始写入微博信息"
            try:
                self.cursor.execute("""INSERT INTO tweets (id, Contents, Time_Location, Pic_Url, Zan, Transfer, Comment)
                                VALUES (%s, %s, %s, %s, %s, %s, %s)""",
                                    (
                                        item['_id'].encode('utf-8'),
                                        item['Content'].encode('utf-8'),
                                        item['Time_Location'].encode('utf-8'),
                                        item['Pic_Url'].encode('utf-8'),
                                        item['Like'].encode('utf-8'),
                                        item['Transfer'].encode('utf-8'),
                                        item['Comment'].encode('utf-8')
                                    )
                                    )
                self.conn.commit()

            except MySQLdb.Error, e:
                print "出现错误"
                print "Error %d: %s" % (e.args[0], e.args[1])

        return item
MySQL部署好之后只要输入自己的用户名密码就可以存到数据库当中去
CREATE DATABASE tweetinfo DEFAULT CHARACTER SET utf8 COLLATE utf8_general_ci;
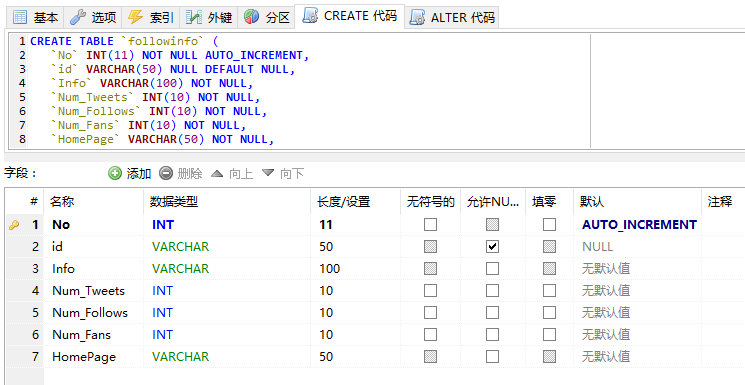
CREATE TABLE `followinfo` (
    `No` INT(11) NOT NULL AUTO_INCREMENT,
    `id` VARCHAR(50) NULL DEFAULT NULL,
    `Info` VARCHAR(100) NOT NULL,
    `Num_Tweets` INT(10) NOT NULL,
    `Num_Follows` INT(10) NOT NULL,
    `Num_Fans` INT(10) NOT NULL,
    `HomePage` VARCHAR(50) NOT NULL,
    PRIMARY KEY (`No`)
)
COLLATE='utf8_general_ci'
ENGINE=MyISAM
AUTO_INCREMENT=5
;
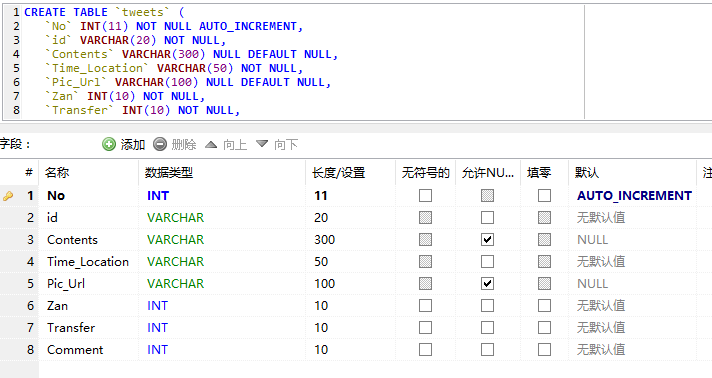
创建表格tweets
CREATE TABLE `tweets` (
    `No` INT(11) NOT NULL AUTO_INCREMENT,
    `id` VARCHAR(20) NOT NULL,
    `Contents` VARCHAR(300) NULL DEFAULT NULL,
    `Time_Location` VARCHAR(50) NOT NULL,
    `Pic_Url` VARCHAR(100) NULL DEFAULT NULL,
    `Zan` INT(10) NOT NULL,
    `Transfer` INT(10) NOT NULL,
    `Comment` INT(10) NOT NULL,
    PRIMARY KEY (`No`)
)
COLLATE='utf8_general_ci'
ENGINE=MyISAM
AUTO_INCREMENT=944
;
5、中间组建middleware:
# encoding=utf-8
import random
from cookies import cookies
from user_agents import agents


class UserAgentMiddleware(object):
    """ 换User-Agent """

    def process_request(self, request, spider):
        agent = random.choice(agents)
        request.headers["User-Agent"] = agent


class CookiesMiddleware(object):
    """ 换Cookie """

    def process_request(self, request, spider):
        cookie = random.choice(cookies)
        request.cookies = cookie
6、设置相关settings:
# coding=utf-8

BOT_NAME = 'weibo'

SPIDER_MODULES = ['weibo.spiders']
NEWSPIDER_MODULE = 'weibo.spiders'

USER_AGENT = 'Mozilla/5.0 (Macintosh; Intel Mac OS X 10_8_3) AppleWebKit/536.5 (KHTML, like Gecko) Chrome/19.0.1084.54 Safari/536.5'

'''