版权声明:本文为博主原创文章,未经博主允许不得转载。 https://blog.csdn.net/yu_hongrun/article/details/81736561
查了很多教程和博客,基本都是把Spring Boot和Spring Data JPA放在一起用,个人用不惯JPA,所以直接Mybatis了,毕竟现在大部分人用的都是Mybatis,这章主要是写一个基础表的增删改查
首先搭建一个Spring Boot项目,搭建教程上一章节有,不在详细介绍了,项目结构和启动类如下,
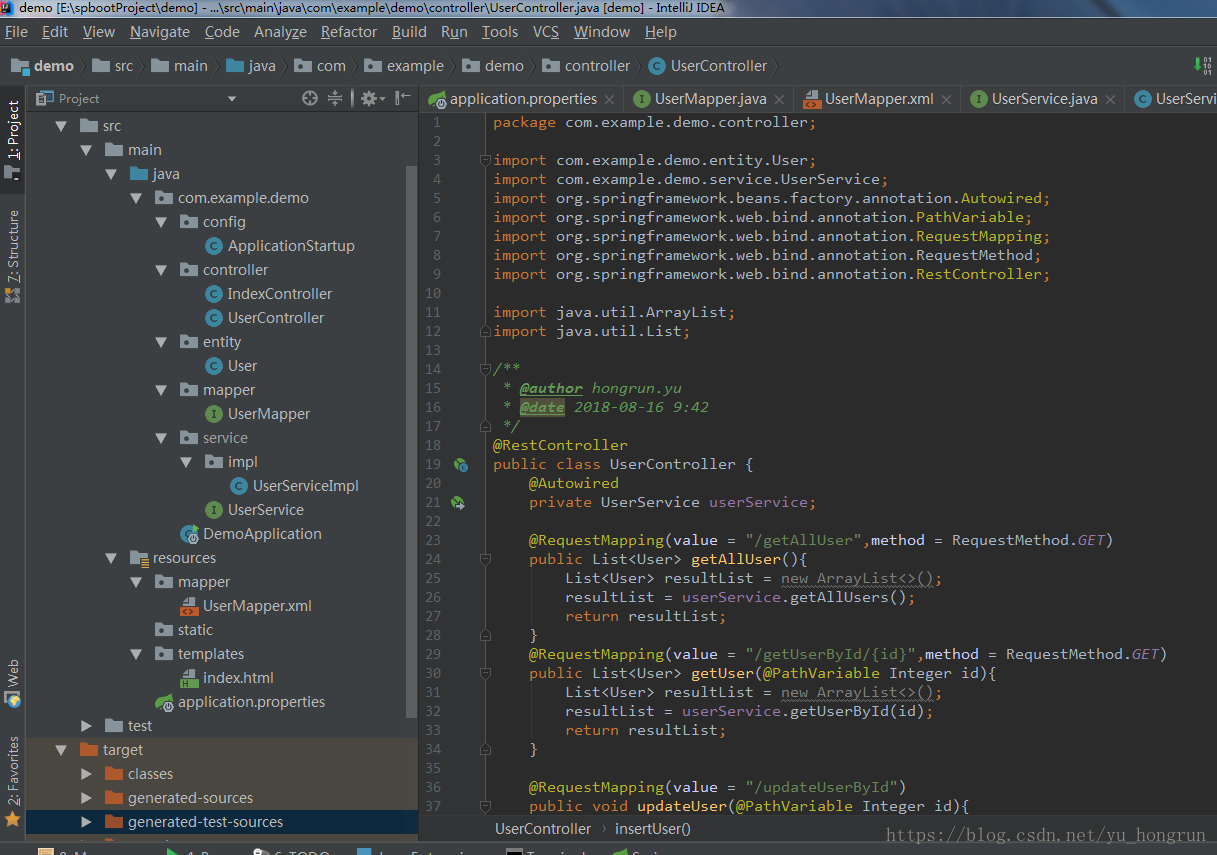
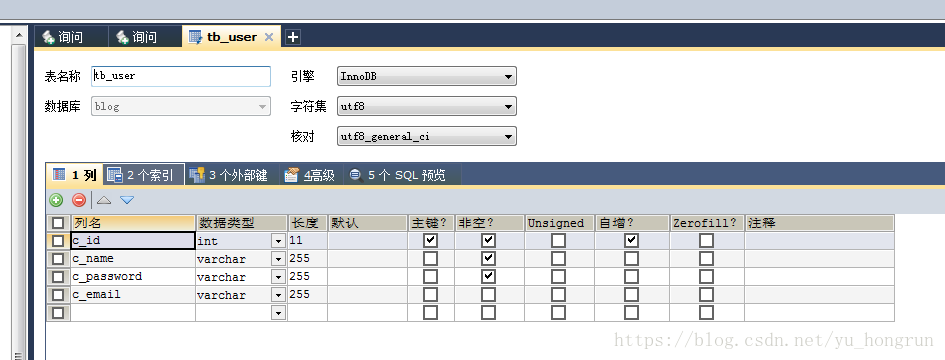
数据库字段也很简单,主键设为自增
然后新建实体类User,同时生成两个构造器和toString方法
package com.example.demo.controller;

import com.example.demo.entity.User;
import com.example.demo.service.UserService;
import org.springframework.beans.factory.annotation.Autowired;
import org.springframework.web.bind.annotation.PathVariable;
import org.springframework.web.bind.annotation.RequestMapping;
import org.springframework.web.bind.annotation.RequestMethod;
import org.springframework.web.bind.annotation.RestController;

import java.util.ArrayList;
import java.util.List;

/**
 * @author hongrun.yu
 * @date 2018-08-16 9:42
 */
@RestController
public class UserController {
    @Autowired
    private UserService userService;

    @RequestMapping(value = "/getAllUser",method = RequestMethod.GET)
    public List<User> getAllUser(){
        List<User> resultList = new ArrayList<>();
        resultList = userService.getAllUsers();
        return resultList;
    }
    @RequestMapping(value = "/getUserById/{id}",method = RequestMethod.GET)
    public List<User> getUser(@PathVariable Integer id){
        List<User> resultList = new ArrayList<>();
        resultList = userService.getUserById(id);
        return resultList;
    }

    @RequestMapping(value = "/updateUserById")
    public void updateUser(@PathVariable Integer id){
        userService.updateUserEmailById(id);
    }

    @RequestMapping(value = "/deleteUserById/{id}")
    public void deleteUser(@PathVariable Integer id){
        userService.deleteUserById(id);
    }

    @RequestMapping(value = "/insertUser")
    public void insertUser(){
        User user=new User();
        user.setEmail("asdasd");
        user.setName("asdasdas");
        user.setPassword("asdasd");
        userService.insertUser(user);
    }
}
接下来写Dao层的代码,在写Dao层代码前,要先对application.properties文件进行配置
debug=false
trace=false

server.port=8080
server.path=http://localhost

# Druid连接池配置,官方配置参考:https://github.com/alibaba/druid/tree/master/druid-spring-boot-starter
spring.datasource.druid.url=jdbc:mysql://localhost:3306/blog?useUnicode=true&characterEncoding=utf8
spring.datasource.druid.username=root
spring.datasource.druid.password=root
spring.datasource.druid.initial-size=5
spring.datasource.druid.max-active=20
spring.datasource.druid.min-idle=10
spring.datasource.druid.max-wait=10
spring.datasource.druid.filters=stat,wall
spring.datasource.druid.filter.stat.log-slow-sql=true
spring.datasource.druid.filter.stat.slow-sql-millis=2000

# Druid WebStatFilter配置,说明请参考Druid Wiki,配置_配置WebStatFilter
spring.datasource.druid.web-stat-filter.enabled=true
spring.datasource.druid.web-stat-filter.url-pattern=/*
spring.datasource.druid.web-stat-filter.exclusions=*.gif,*.png,*.jpg,*.html,*.js,*.css,*.ico,/druid/*

# Druid StatViewServlet配置,说明请参考Druid Wiki,配置_StatViewServlet配置
spring.datasource.druid.stat-view-servlet.enabled=true
spring.datasource.druid.stat-view-servlet.url-pattern=/druid/*
spring.datasource.druid.stat-view-servlet.reset-enable=true
spring.datasource.druid.stat-view-servlet.login-username=admin
spring.datasource.druid.stat-view-servlet.login-password=admin
spring.datasource.druid.stat-view-servlet.allow=
spring.datasource.druid.stat-view-servlet.deny=

#Mybatis配置,官方参考:http://www.mybatis.org/spring-boot-starter/mybatis-spring-boot-autoconfigure/
mybatis.mapper-locations=classpath*:mapper/*Mapper.xml

# Redis配置,官方参考:https://docs.spring.io/spring-boot/docs/2.0.0.RELEASE/reference/htmlsingle/#common-application-properties
spring.redis.database=0
spring.redis.host=127.0.0.1
spring.redis.port=6379
spring.redis.password=
spring.redis.timeout=5000

#视图模型
spring.thymeleaf.prefix=classpath:/templates/
spring.thymeleaf.suffix=.html
spring.thymeleaf.cache=false
spring.thymeleaf.mode=HTML5
spring.thymeleaf.encoding=UTF-8
spring.thymeleaf.check-template-location=true
# 静态资源
spring.mvc.static-path-pattern=/static/**
然后是Mapper接口和xml文件,增删改查基础方法
@Mapper
public interface UserMapper {
    List<User> getUserById(@Param("id") Integer id);
    List<User> getAllUser();
    void updateUserEmailById(@Param("id") Integer id);
    void deleteUserById(@Param("id") Integer id);
    void insertUser(User user);
}
xml文件
<?xml version="1.0" encoding="UTF-8" ?>
<!DOCTYPE mapper PUBLIC "-//mybatis.org//DTD Mapper 3.0//EN" "http://mybatis.org/dtd/mybatis-3-mapper.dtd" >
<mapper namespace="pers.hong.demo.mapper.UserMapper">
    <resultMap id="BaseMap" type="user">
        <id column="id" property="id" jdbcType="BIGINT"/>
        <result column="name" property="name" jdbcType="VARCHAR"/>
        <result column="password" property="password" jdbcType="VARCHAR"/>
        <result column="email" property="email" jdbcType="VARCHAR"/>
    </resultMap>
    <sql id="BaseColumn">
        id,name,password,email
    </sql>
    <insert id="insertUser" parameterType="user">
        INSERT INTO t_user
        (name,password,email)
        VALUE
        (#{name},#{password},#{email})
    </insert>
    <update id="updateUserEmailById" parameterType="Integer">
        UPDATE t_user
        SET
        <if test="name != null ">name = #{name}</if>
        <if test="password != null">password = #{password}</if>
        email = #{email}
    </update>
    <delete id="deleteUserById" parameterType="Integer">
        DELETE FROM t_user
        WHERE id = #{id}
    </delete>
    <select id="getUserById" resultMap="BaseMap" parameterType="Integer">
        SELECT
        <include refid="BaseColumn"/>
        FROM t_user
        WHERE id = #{id}
    </select>
    <select id="getAllUser" resultMap="BaseMap">
        SELECT
        <include refid="BaseColumn"/>
        FROM t_user
    </select>

</mapper>
然后是service和实现层的代码,其实这一步没什么太大必要,因为demo没有做什么业务操作,但是为了后面对项目进行扩展,就先写着了
public interface UserService {
    List<User> getAllUsers();
    List<User> getUserById(@Param("id") Integer id);
    void updateUserEmailById(@Param("id") Integer id);
    void deleteUserById(@Param("id") Integer id);
    void insertUser(User user);
}

----------------------------------------------------------

@Service
public class UserServiceImpl implements UserService {
    //若Autowired报错就用Resource
    @Autowired
    private UserMapper userMapper;

    @Override
    public List<User> getAllUsers() {
        return userMapper.getAllUser();
    }

    @Override
    public List<User> getUserById(Integer id) {
        return userMapper.getUserById(id);
    }

    @Override
    public void updateUserEmailById(Integer id) {
        userMapper.updateUserEmailById(id);
    }

    @Override
    public void deleteUserById(Integer id) {
        userMapper.deleteUserById(id);
    }

    @Override
    public void insertUser(User user) {
        userMapper.insertUser(user);
    }
}
最后是controller层
package pers.hong.demo.controller;

import org.springframework.beans.factory.annotation.Autowired;
import org.springframework.web.bind.annotation.PathVariable;
import org.springframework.web.bind.annotation.RequestMapping;
import org.springframework.web.bind.annotation.RequestMethod;
import org.springframework.web.bind.annotation.RestController;
import pers.hong.demo.entity.User;
import pers.hong.demo.service.UserService;

import java.util.ArrayList;
import java.util.List;

/**
 * @Description:
 * @Auther: hong
 * @Date: 2018/8/9/009 17:03
 */
@RestController
public class UserController {
    @Autowired
    private UserService userService;

    @RequestMapping(value = "/getAllUser",method = RequestMethod.GET)
    public List<User> getAllUser(){
        List<User> resultList = new ArrayList<>();
        resultList = userService.getAllUsers();
        return resultList;
    }

    @RequestMapping(value = "/getUserById/{id}",method = RequestMethod.GET)
    public List<User> getUser(@PathVariable Integer id){
        List<User> resultList = new ArrayList<>();
        resultList = userService.getUserById(id);
        return resultList;
    }

    @RequestMapping(value = "/updateUserById")
    public void updateUser(@PathVariable Integer id){
        userService.updateUserEmailById(id);
    }

    @RequestMapping(value = "/deleteUserById/{id}")
    public void deleteUser(@PathVariable Integer id){
        userService.deleteUserById(id);
    }

    @RequestMapping(value = "/insertUser")
    public void insertUser(){
         User user=new User();
        user.setEmail("asdasd");
        user.setName("asdasdas");
        user.setPassword("asdasd");
        userService.insertUser(user);
    }
}
基本增删改查就完成了,让我们在浏览器中测试一下
