Spring Boot、MyBatis、Thymeleaf 简单增删改查
源码地址:https://gitee.com/Azure_Sky/SpringStudy.git
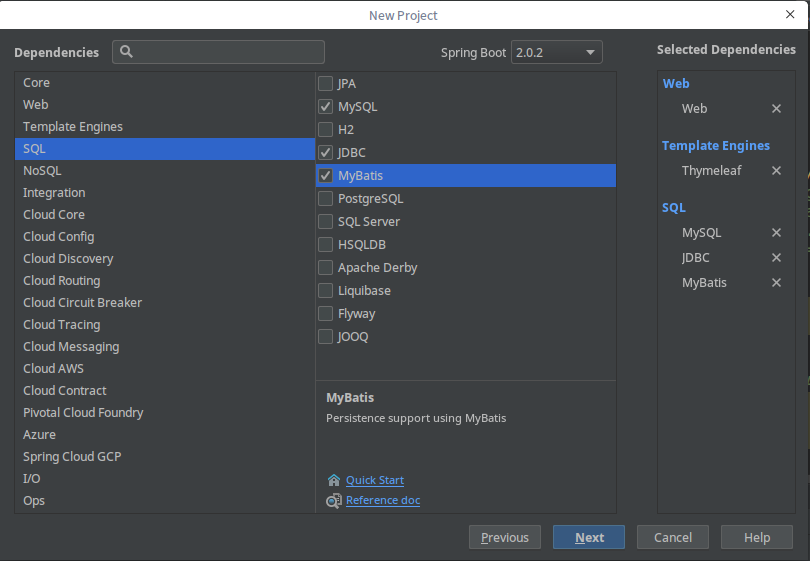
一、创建项目
1。新建项目


二、创建数据库及数据表
数据库名为thymeleaf、数据表名称db_article各字段如下

三、配置数据库连接信息,在application.properties文件中配置数据库连接信息
spring.datasource.driver-class-name=com.mysql.jdbc.Driver
spring.datasource.url=jdbc:mysql://localhost:3306/thymeleaf?UseUnicode=true&characterEncoding=UTF-8
spring.datasource.username=root
spring.datasource.password=123456
spring.thymeleaf.cache=false
四、在resources下新建mybatis.cfg.xml配置文件,内容如下:
<?xml version="1.0" encoding="UTF-8" ?>
<!DOCTYPE configuration PUBLIC "-/mybatis.org//DTD Config 3.0//EN"
        "http://mybatis.org/dtd/mybatis-3-config.dtd">
<configuration>
    <!--引入外部配置文件-->
    <properties resource="application.properties"></properties>
    <!--为Java Bean起类别名-->
    <typeAliases>
        <package name="com.example.demo.beans"></package>
    </typeAliases>

    <!--配置mybatis运行环境-->
    <environments default="mybatis">
        <environment id="mybatis">
            <transactionManager type="JDBC"></transactionManager>
            <dataSource type="POOLED">
                <property name="driver" value="${spring.datasource.driver-class-name}"></property>
                <property name="url" value="${spring.datasource.url}"></property>
                <property name="username" value="${spring.datasource.username}"></property>
                <property name="password" value="${spring.datasource.password}"></property>
            </dataSource>
        </environment>
    </environments>
    <mappers>
        <package name="com/example/demo/mapper"></package>
    </mappers>
</configuration>
五、在java下的com.example.demo下创建如下包
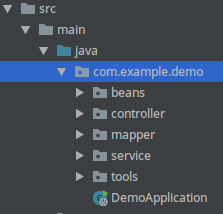
beans存放实体类,controller存放控制器,mapper存放mybatis映射文件与接口文件,service存放事务类,tools存放工具类,DemoApplication为启动类
1.在beans下新建实体类(Article类),代码如下:
package com.example.demo.beans;

import java.util.Date;

public class Article {
    private int id;
    private String title;
    private String author;
    private String content;
    private Date createdate;

    //省略set和get方法
}
2.在mapper下新建ArticleMapper接口,内容如下:
package com.example.demo.mapper;

import com.example.demo.beans.Article;

import java.util.List;

public interface ArticleMapper {
    /**
     * 查询所有的文章信息
     * @return 所有的文章信息
     * @throws Exception
     */
    public List<Article> selectAllArticle() throws Exception;


    /**
     * 添加文章
     * @param article 添加的文章信息
     * @return 添加成功后的文章信息
     * @throws Exception
     */
    public int addArticle(Article article) throws Exception;

    /**
     * 编辑文章信息
     * @param article 编辑后的文章信息
     * @return 成功返回true、否则返回false
     * @throws Exception
     */
    public int editArticle(Article article) throws Exception;

    /**
     * 根据文章id删除文章信息
     * @param id 文章id
     * @return 成功返回true,否则返回false
     * @throws Exception
     */
    public int deleteArticle(int id) throws Exception;

    /**
     * 根据文章id取得文章信息
     * @param id 文章id
     * @return 返回文章信息
     * @throws Exception
     */
    public Article getArticleById(int id) throws Exception;
}
在mapper下新建ArticleMapper.xml文件,内容如下:
<?xml version="1.0" encoding="UTF-8" ?>
<!DOCTYPE mapper
        PUBLIC "-//mybatis.org//DTD Mapper 3.0//EN"
        "http://mybatis.org/dtd/mybatis-3-mapper.dtd">
<mapper namespace="com.example.demo.mapper.ArticleMapper">
    <!--自定义返回结果集-->
    <resultMap id="articleMap" type="Article">
        <id property="id" column="id" javaType="java.lang.Integer"/>
        <result property="title" column="title" javaType="java.lang.String"/>
        <result property="author" column="author" javaType="java.lang.String"/>
        <result property="content" column="content" javaType="java.lang.String"/>
        <result property="createdate" column="createdate" javaType="java.util.Date"/>
    </resultMap>

    <select id="selectAllArticle" resultMap="articleMap">
        select * from tb_article
    </select>

    <insert id="addArticle" parameterType="com.example.demo.beans.Article"
            useGeneratedKeys="true" keyProperty="id">
        insert into tb_article(title,author,content,createdate)
        values(#{title},#{author},#{content},#{createdate})
    </insert>

    <update id="editArticle" parameterType="com.example.demo.beans.Article">
        update tb_article set title=#{title},author=#{author}
        ,content=#{content},createdate=#{createdate} where id=#{id}
    </update>

    <delete id="deleteArticle">
        delete from tb_article where id=#{id}
    </delete>


    <select id="getArticleById" parameterType="int" resultType="com.example.demo.beans.Article">
        select * from tb_article where id=#{id}
    </select>
</mapper>
3.在service下新建ArticleService类,内容如下:
package com.example.demo.service;

import com.example.demo.beans.Article;
import com.example.demo.mapper.ArticleMapper;
import com.example.demo.tools.DBTools;
import org.apache.ibatis.session.SqlSession;
import org.apache.ibatis.session.SqlSessionFactory;
import org.springframework.stereotype.Service;

import java.util.List;
@Service
public class ArticleService {
    /**
     * 取得所有文章信息
     * @return 所有文章信息集合
     */
    public List<Article> getAllArticles(){
        SqlSession session=DBTools.getSession();
        ArticleMapper mapper=session.getMapper(ArticleMapper.class);
        List<Article> articles=null;
        try {
            articles=mapper.selectAllArticle();
            session.commit();
        } catch (Exception e) {
            e.printStackTrace();
            session.rollback();
        }finally{
            session.close();
        }
        return articles;
    }


    /**
     * 发表文章
     * @param article 发表的文章信息
     * @return 如果发表成功,返回true,否则返回false
     */
    public boolean addArticle(Article article){
        SqlSession session=DBTools.getSession();
        ArticleMapper mapper=session.getMapper(ArticleMapper.class);

        int result=0;
        try {
            result=mapper.addArticle(article);
            session.commit();
        } catch (Exception e) {
            e.printStackTrace();
            session.rollback();
        }finally{
            session.close();
        }
        if(result>0){
            return true;
        }else{
            return false;
        }
    }

    /**
     * 根据文章ID取得文章内容
     * @param id 文章id
     * @return 文章实体类对象
     */
    public Article getArticleById(int id){
        SqlSession session=DBTools.getSession();
        ArticleMapper mapper=session.getMapper(ArticleMapper.class);

        Article article=null;
        try {
            article=mapper.getArticleById(id);
            session.commit();
        } catch (Exception e) {
            session.rollback();
            e.printStackTrace();
        }finally{
            session.close();
        }
        return article;
    }

    /**
     * 根据Id删除文章信息
     * @param id 欲删除文章的id
     * @return 如果删除成功,返回true,否则返回false
     */
    public boolean deleteArticleById(int id){
        SqlSession session=DBTools.getSession();
        ArticleMapper mapper=session.getMapper(ArticleMapper.class);

        int result=0;
        try {
            result=mapper.deleteArticle(id);
            session.commit();
        } catch (Exception e) {
            e.printStackTrace();
            session.rollback();
        }finally{
            session.close();
        }
        return result>0;
    }


    /**
     * 编辑文章信息
     * @param article 修改后的文章信息
     * @return 如果编辑成功,返回true,否则返回false
     */
    public boolean editArticle(Article article){
        SqlSession session=DBTools.getSession();
        ArticleMapper mapper=session.getMapper(ArticleMapper.class);

        int result=0;
        try {
            result=mapper.editArticle(article);
            session.commit();
        } catch (Exception e) {
            e.printStackTrace();
            session.rollback();
        }finally{
            session.close();
        }

        return result>0;
    }

}
4.在tools下新建DBTools类,用于获得SqlSession对象,内容如下:
package com.example.demo.tools;

import org.apache.ibatis.io.Resources;
import org.apache.ibatis.session.SqlSession;
import org.apache.ibatis.session.SqlSessionFactory;
import org.apache.ibatis.session.SqlSessionFactoryBuilder;


import java.io.IOException;
import java.io.Reader;

public class DBTools {
    private static SqlSessionFactory sessionFactory;
    static{
        try {
            Reader reader= Resources.getResourceAsReader("mybatis.cfg.xml");
            sessionFactory=new SqlSessionFactoryBuilder().build(reader);
        } catch (IOException e) {
            e.printStackTrace();
        }
    }

    public static SqlSession getSession(){
        return sessionFactory.openSession();
    }
}
5.在controller下新建ArticleController控制器,代码如下:
package com.example.demo.controller;

import com.example.demo.beans.Article;
import com.example.demo.service.ArticleService;
import org.springframework.beans.factory.annotation.Autowired;
import org.springframework.stereotype.Controller;
import org.springframework.ui.Model;
import org.springframework.web.bind.annotation.PathVariable;
import org.springframework.web.bind.annotation.RequestMapping;
import org.springframework.web.bind.annotation.RequestMethod;
import org.springframework.web.bind.annotation.ResponseBody;

import java.util.Date;
import java.util.List;

@Controller
public class ArticleController {
    @Autowired
    private ArticleService articleService;

    /**
     * 显示所有的文章信息
     * @param model 传递给View的数据
     * @return View视图
     */
    @RequestMapping("/article")
    public String showArtiles(Model model){
        List<Article> articles=articleService.getAllArticles();
        model.addAttribute("articles",articles);
        return "/article/index";
    }


    /**
     * 调用发表文章视图
     * @return 发表文章视图页面
     */
    @RequestMapping(value="/createArticle",method = RequestMethod.GET)
    public String create(){
        return "/article/create";
    }

    /**
     * 发表文章逻辑,将文章信息保存到数据库中
      * @param article 发表文章视图传递过来的文章信息
     * @return 所有文章列表页
     */
    @RequestMapping(value = "/saveArticle",method = RequestMethod.POST)
    public String create(Article article){
        article.setCreatedate(new Date());
        if(articleService.addArticle(article)){
            return "redirect:/article";//跳转到文章列表页
        }else{
            return "/article/create";
        }
    }


    /**
     * 文章详细内容页
     * @param id 文章的ID
     * @return 返回文章的详细内容
     */
    @RequestMapping(value = "/details/{id}",method = RequestMethod.GET)
    public String details(@PathVariable("id") int id, Model model){
        Article article=articleService.getArticleById(id);
        model.addAttribute("article",article);
        return "/article/details";
    }

    /**
     * 删除文章
     * @param id 欲删除文章的id
     * @return 如果删除成功,返回到文章列表页,不成功也返回到文章列表页
     */
    @RequestMapping(value="/delete/{id}",method = RequestMethod.GET)
    public String deleteArticle(@PathVariable("id") int id){
        if(articleService.deleteArticleById(id)){
            return "redirect:/article";//跳转到文章列表页
        }
        return "redirect:/article";
    }

    /**
     * 编辑文章信息
     * @param id 欲编辑文章的id
     * @param model 欲编辑文章的信息,用于在视图中进行显示
     * @return 编辑文章的视图表单
     */
    @RequestMapping(value="/edit/{id}",method = RequestMethod.GET)
    public String edit(@PathVariable("id") int id,Model model){
        Article article=articleService.getArticleById(id);
        model.addAttribute("article",article);
        return "/article/edit";
    }

    /**
     * 编辑文章逻辑 将修改后的文章信息更新到数据库
     * @param article
     * @return
     */
    @RequestMapping(value = "/updateArticle",method = RequestMethod.POST)
    public String edit(Article article,Model model){
        if(articleService.editArticle(article)){
            return "redirect:/article";//跳转到文章列表页
        }
        model.addAttribute("article",article);
        return "/article/edit";
    }

    @RequestMapping("/")
    @ResponseBody
    public String hello(){
        return "Hello thymeleaf";
    }

    @RequestMapping("/test")
    public String testLayout(){
        return "/test";
    }
}
六、创建视图层`
resources下下目录结构如下:
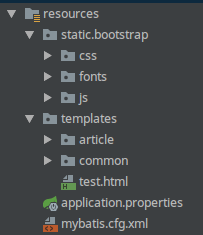
1.引入BootStrap、jQuery
在static下新建bootstrap,将下载到的bootstrap文件下的css、fonts、js目录复制到bootstrap目录下,将jQuery文件复制到js目录下,
2.在templates下创建article和common两个目录
article目录用于存放article的所有视图
common用于存放布局页面
3.在common下创建布局页,内容如下:
<!DOCTYPE html>
<html lang="en" xmlns:th="http://www.thymeleaf.org">
<head>
    <meta charset="UTF-8">
    <title th:text="${title}">Title</title>

    <!--引入BootsStrap样式-->
    <link rel="stylesheet" type="text/css"
          th:href="@{/bootstrap/css/bootstrap.css}">

    <!--引入自定义样式-->
    <link rel="stylesheet" type="text/css" th:href="@{/bootstrap/css/main.css}">

    <!--引入js文件-->
    <script th:src="@{/bootstrap/js/jquery.min.js}"></script>
    <script th:src="@{/bootstrap/js/bootstrap.js}"></script>

</head>
<body>
<!--最外层容器-->
<div id="wrap" class="container">
    <!--页面头部-->
    <header>
        <nav class="navbar navbar-default">
            <div class="container-fluid">
                <!-- Brand and toggle get grouped for better mobile display -->
                <div class="navbar-header">
                    <button type="button" class="navbar-toggle collapsed" data-toggle="collapse" data-target="#bs-example-navbar-collapse-1" aria-expanded="false">
                        <span class="sr-only">Toggle navigation</span>
                        <span class="icon-bar"></span>
                        <span class="icon-bar"></span>
                        <span class="icon-bar"></span>
                    </button>
                    <a class="navbar-brand" href="#">Brand</a>
                </div>

                <!-- Collect the nav links, forms, and other content for toggling -->
                <div class="collapse navbar-collapse" id="bs-example-navbar-collapse-1">
                    <ul class="nav navbar-nav">
                        <li class="active">
                            <a href="#" th:href="@{/}">首页</a>
                        </li>
                        <li><a href="#" th:href="@{/test}">测试</a></li>
                        <li><a href="#" th:href="@{/article}">技术文章</a></li>
                    </ul>
                    <form class="navbar-form navbar-right">
                        <div class="form-group">
                            <input type="text" class="form-control" placeholder="请输入文章名">
                        </div>
                        <button type="submit" class="btn btn-default">Search</button>
                    </form>
                </div><!-- /.navbar-collapse -->
            </div><!-- /.container-fluid -->
        </nav>
    </header>
    <!-- 页面主体部分-->
    <div id="main_content" th:include="::main_content">

    </div>
    <!--页面底部-->
    <footer class="row">
        <div class="col-md-12">
            <ul>
                <li><a href="#">GitHub仓库地址</a></li>
                <li><a th:href="@{http://www.my.oschina.net/u/3537796/blog}">博客</a></li>
                <li><a th:href="@{http://www.bootcss.com}">BootStrap</a></li>
                <li><a th:href="@{http://www.w3school.com.cn/jquery}">jQueryfttk</a></li>
            </ul>
        </div>
        <div class="col-md-12">
            <p>
                CopyRight:BlueMonkey 地址:中国河南
            </p>
        </div>
    </footer>
</div>
</body>
</html>
4.在article目录下,新建index.html文件,内容如下:
<!DOCTYPE html>
<html lang="en" xmlns:th="http://www.thymeleaf.org"
      th:replace="common/layout(title='测试布局')">

<div th:fragment="main_content">
    <table class="table table-hover">
        <tr>
            <td>编号</td>
            <td>标题</td>
            <td>发表日期</td>
            <td></td>
        </tr>
        <tr th:each="article:${articles}">
            <td th:text="${article.getId()}"></td>
            <td th:text="${article.getTitle()}"></td>
            <td th:text="${article.getCreatedate()}"></td>
            <td>
                <a th:href="@{'/edit/'+${article.getId()}}">编辑文章</a>
                <a th:href="@{'/details/'+${article.getId()}}">文章内容</a>
                <a th:href="@{'/delete/'+${article.getId()}}" onclick="alert('确定要删除文章吗?')">删除文章</a>
            </td>
        </tr>
    </table>
</div>
</html>
5.在article下新建details.html文件,内容如下:
<!DOCTYPE html>
<html lang="en" xmlns:th="http://www.thymeleaf.org"
th:replace="common/layout(title='测试布局')">
<div th:fragment="main_content">
<article class="text-center">
<h3 th:text="${article.getTitle()}"></h3>
<h4 th:text="${article.getAuthor()}"></h4>
<p th:text="${article.getContent()}" class="text-left"></p>
<h4 th:text="${article.getCreatedate()}" class="text-right"></h4>
</article>
</div>
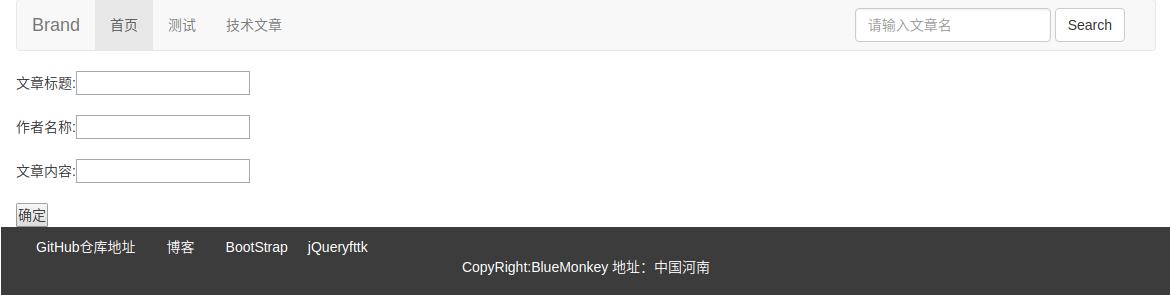
</html>6.在article下新建create.html文件,内容如下:
<!DOCTYPE html>
<html lang="en" xmlns:th="http://www.thymeleaf.org"
    th:replace="common/layout(title='发表文章')">
    <!--发表文章信息表单-->
    <div th:fragment="main_content">
        <form action="/saveArticle" method="post">
            文章标题:<input type="text" name="title"><br/><br/>
            作者名称:<input type="text" name="author"><br/><br/>
            文章内容:<input type="text" name="content"><br/><br/>
            <input type="submit" value="确定">
        </form>

    </div>
</html>
7.在article目录下,新建edit.html文件,内容如下:
<!DOCTYPE html>
<html lang="en" xmlns:th="http://www.thymeleaf.org"
th:replace="common/layout(title='编辑文章')">
<!--发表文章信息表单-->
<div th:fragment="main_content">
<form action="/updateArticle" method="post">
<input type="hidden" name="id" th:value="${article.getId()}">
<input type="hidden" name="createdate" th:value="${article.getCreatedate()}">
文章标题:<input type="text" name="title" th:value="${article.getTitle()}"><br/><br/>
作者名称:<input type="text" name="author" th:value="${article.getAuthor()}"><br/><br/>
文章内容:<input type="text" name="content" th:value="${article.getContent()}"><br/><br/>
<input type="submit" value="确定">
</form>
</div>
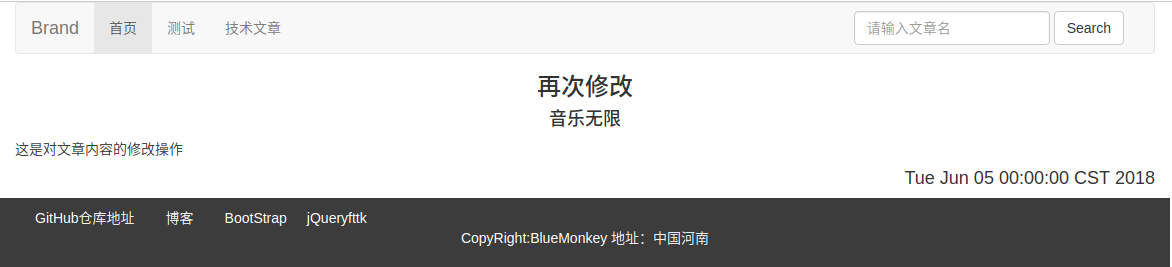
</html>七、运行结果

八、补充搜索文章
1.修改mapper下的ArticleMapper接口,添加如下代码
/**
     * 根据文章标题查询文章信息
     * @param title
     * @return 查询到的文章信息
     * @throws Exception
     */
    public List<Article> getArticleByTitle(String title) throws Exception;
2.修改ArticleMapper.xml文件,添加如下配置
<select id="getArticleByTitle" parameterType="String" resultMap="articleMap">
        select * from tb_article where title like "%"#{title}"%"
    </select>
3.修改service下的ArticleService
/**
     * 查找文章,根据标题模糊查找
     * @param title 文章标题
     * @return 如果有返回相应的文章信息,无则返回null
     */
    public List<Article> searchArticleByTitle(String title){
        List<Article> articles=null;
        SqlSession session=DBTools.getSession();
        ArticleMapper mapper=session.getMapper(ArticleMapper.class);

        try {
            articles=mapper.getArticleByTitle(title);
        } catch (Exception e) {
            e.printStackTrace();
        }finally {
            session.close();
        }
        return articles;
    }
4.修改controller下的ArticleController类,
/**
     * 查找文章,根据标题模糊
     * @param title 标题
     * @param model 返回数据
     * @return 如果不为空返回数据,为空返回错误页
     */
    @RequestMapping(value = "/searchArticle",method = RequestMethod.POST)
    public String searchArticle(String title,Model model){
        List<Article> articles=articleService.searchArticleByTitle(title);
        if(!articles.isEmpty()){
            model.addAttribute("articles",articles);
            return "/article/searchResult";
        }else{
            model.addAttribute("info","没有你要查找的结果");
            return "/common/error";
        }
    }
5.在resources下templates下的article下,新建searchResult.html文件,
<!DOCTYPE html>
<html lang="en" xmlns:th="http://www.thymeleaf.org"
      th:replace="common/layout(title='测试布局')">

<div th:fragment="main_content">
    <table class="table table-hover">
        <tr>
            <td>编号</td>
            <td>标题</td>
            <td>发表日期</td>
            <td></td>
        </tr>
        <tr th:each="article:${articles}">
            <td th:text="${article.getId()}"></td>
            <td th:text="${article.getTitle()}"></td>
            <td th:text="${article.getCreatedate()}"></td>
        </tr>
    </table>
</div>
</html>
6.在common下新建error.html
<!DOCTYPE html>
<html lang="en" xmlns:th="http://www.thymeleaf.org"
      th:replace="common/layout(title='测试布局')">

<div th:fragment="main_content">
    <h3 th:text="${info}">错误消息</h3>
</div>
</html>