第一步:系统磁盘分区:
1:检查磁盘信息
[root@iZuf6gxpvk73jkbx2r5h1bZ ~]# fdisk –l
2:进入分区的磁盘
  [root@iZ28ubyqhl0Z ~]# fdisk /dev/vdb
    Command (m for help): n #新建分区
    Command actioncd
       e   extended
       p   primary partition (1-4)

p #添加主分区
Partition number (1-4): 1 #分区开始
First cylinder (1-65270, default 1):
Using default value 1
Last cylinder, +cylinders or +size{K,M,G} (1-65270, default 65270): #分区结束默认值是回车
Using default value 65270

Command (m for help): t #更改磁盘类型
Selected partition 1
Hex code (type L to list codes): 8e
Changed system type of partition 1 to 8e (Linux LVM)

Command (m for help): w # w保存分区退出
The partition table has been altered!

Calling ioctl() to re-read partition table.
Syncing disks.
3:创建逻辑卷
[root@iZ28ubyqhl0Z ~]# pvcreate /dev/vdb1  #创建物理卷
  Physical volume "/dev/xvdb1" successfully created

[root@iZ28ubyqhl0Z ~]# vgcreate -s 128M vgdata /dev/vdb1 #创建逻辑卷组
  Volume group "vgdata" successfully created

[root@iZ28ubyqhl0Z ~]# lvcreate -L 499G -n lvdata vgdata #创建逻辑卷
  Logical volume "lvdata" created

[root@iZ28ubyqhl0Z ~]# mkfs.ext4 /dev/vgdata/lvdata #格式化磁盘
mke2fs 1.41.12 (17-May-2010)
Filesystem label=
OS type: Linux
Block size=4096 (log=2)
Fragment size=4096 (log=2)
Stride=0 blocks, Stripe width=0 blocks
32702464 inodes, 130809856 blocks
6540492 blocks (5.00%) reserved for the super user
First data block=0
Maximum filesystem blocks=4294967296
3992 block groups
32768 blocks per group, 32768 fragments per group
8192 inodes per group
Superblock backups stored on blocks:
        32768, 98304, 163840, 229376, 294912, 819200, 884736, 1605632, 2654208,
        4096000, 7962624, 11239424, 20480000, 23887872, 71663616, 78675968,
        102400000

Writing inode tables: done
Creating journal (32768 blocks): done
Writing superblocks and filesystem accounting information: done

This filesystem will be automatically checked every 32 mounts or
180 days, whichever comes first.  Use tune2fs -c or -i to override.
4:挂载逻辑卷
[root@iZ28ubyqhl0Z ~]# mkdir /app #建议在根目录下的文件夹app

[root@iZ28ubyqhl0Z ~]# mount /dev/vgdata/lvdata /app #手动用mount 挂载逻辑

[root@iZ28ubyqhl0Z ~]# df –h #查看挂载的情况
5:设置开机启动/固话挂载
[root@iZuf6gxpvk73jkbx2r5h1bZ ~]# vi /etc/fstab       #修改命令
/dev/vgdata/lvdata      /app        ext4    defaults        0 0      在底部添加
6:系统swqp分区挂载
[root@iZ28ubyqhl0Z ~]# dd if=/dev/zero of=/app/swap bs=1024 count=16000000 #添加交换分区16GB
16000000+0 records in
16000000+0 records out
16384000000 bytes (16 GB) copied, 341.336 s, 48.0 MB/s
[root@iZ28ubyqhl0Z ~]# mkswap /app/swap
[root@iZ28ubyqhl0Z ~]# swapon /app/swap   #创建交换分区文件
[root@iZ28ubyqhl0Z ~]# swapon –a  #激活交换分区
[root@iZ28ubyqhl0Z ~]# free -m  #查看分区中的swap
	             total       used       free     shared    buffers     cached
Mem:         64427       1588      62838        255         20        843
-/+ buffers/cache:        724      63703
Swap:        15624          0      15624
[root@iZuf6gxpvk73jkbx2r5h1bZ ~]# vi /etc/fstab       #修改命令
/app/swap       swap                    swap    defaults        0 0
第二步:创建oracle用户
[root@iZ28ubyqhl0Z ~]# groupadd oinstall
[root@iZ28ubyqhl0Z ~]# groupadd dba
[root@iZ28ubyqhl0Z home]# useradd -g oinstall -G dba oracle
[root@iZ28ubyqhl0Z home]# passwd oracle
第三步:修改系统的内核参数
[root@iZ28ubyqhl0Z home]# vi /etc/sysctl.conf
kernel.shmall = 2097152                           修改
kernel.shmmax = 2147483648
kernel.shmmni = 4096							添加
kernel.sem = 250 32000 100 128
fs.file-max = 6815744
net.ipv4.ip_local_port_range = 9000 65500
net.core.rmem_default = 1048576
net.core.rmem_max = 4194304
net.core.wmem_default = 262144
net.core.wmem_max = 1048576
fs.aio-max-nr= 1048576

[root@bogon ~]# sysctl -p #重启生效内核参数

[root@iZ28ubyqhl0Z home]# vi /etc/security/limits.conf
oracle soft   nofile 65536					添加
oracle hard   nofile 65536
oracle soft   nproc   2047
oracle hard   nproc   16384

[root@iZ28ubyqhl0Z home]# vi /etc/pam.d/login
session    required     pam_limits.so			添加
第四步:建立安装目录和配置环境变量
已经有安装的目录/app
[root@bogon ~]# mkdir /app/oracle
[root@iZ28ubyqhl0Z home]# chown -R oracle:oinstall /app
[root@iZ28ubyqhl0Z home]# chmod -R 755 /app
修改oracle用户的环境变量
[root@iZ28ubyqhl0Z home]#su - oracle
[oracle@iZ28ubyqhl0Z home] $ vi .bash_profile
umask 022												添加在最后一句之前
PATH=/bin:/usr/bin:/usr/local/bin:/usr/X11R6/bin:/sbin
LD_LIBRARY_PATH=/usr/lib:/usr/X11R6/lib
ORACLE_BASE=/app/oracle
ORACLE_HOME=$ORACLE_BASE/product/11.2.0/dbhome_1
ORACLE_SID=oracle11
LD_LIBRARY_PATH=$ORACLE_HOME/rdbms/lib:$ORACLE_HOME/lib:$LD_LIBRARY_PATH
PATH=$ORACLE_HOME/bin:$PATH
export PATH LD_LIBRARY_PATH
export ORACLE_BASE ORACLE_HOME ORACLE_SID
export NLS_LANG=AMERICAN_AMERICA.AL32UTF8
export LC_ALL=en_US.UTF-8

[oracle@iZ28ubyqhl0Z ~] $ source .bash_profile					执行环境变量
第五步:安装VNC图形界面
1、下载vncserver
[oracle@iZ28ubyqhl0Z ~] $ su - root
[root@iZ28ubyqhl0Z ~]# yum -y groupinstall "Desktop"
[root@iZ28ubyqhl0Z ~]# yum -y groupinstall "X Window System"
[root@iZ28ubyqhl0Z ~]# yum install tigervnc tigervnc-server
Is this ok [y/N]: y
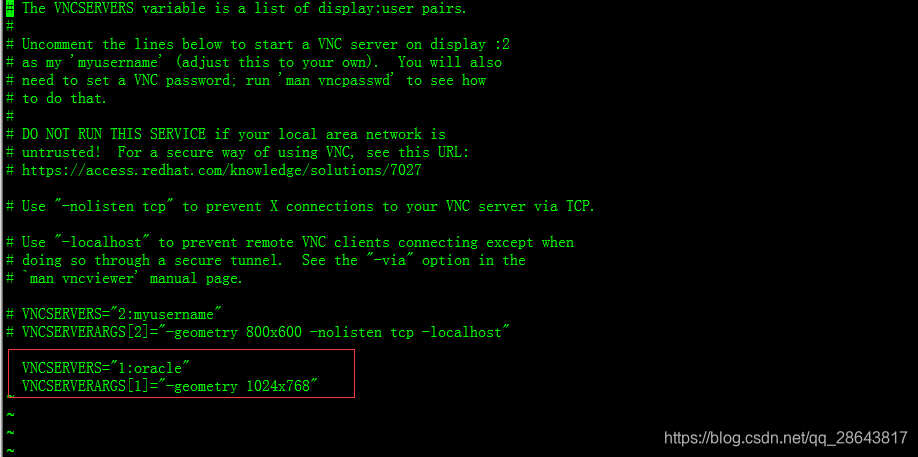
2、配置vncserver
[root@iZ28ubyqhl0Z ~]# cd /etc/sysconfig
[root@iZ28ubyqhl0Z ~]# vi vncservers
VNCSERVERS="1:oracle"
 VNCSERVERARGS[1]="-geometry 1024x768"
将文件中的内容按照截图中修改
3、启动vncserver
[oracle@iZ28ubyqhl0Z ~]$ vncserver
回车后系统会提示让你输入一个密码,这个密码是vnc连接密码,和系统密码没有关系。启动后系统会提示出一个进程号为1的窗口。
提示:
- 1、若进入后系统显示灰屏的话需要修改 ~/.vnc/xstartup 文件,找到最后一行,
将 #twm & #注释掉这一行
gnome-session & #添加这一行 - 2、如果需要以图形界面控制服务器的话就需要安装gnome界面。 方法如下
yum groupinstall “Desktop”
yum groupinstall “X Window System”
yum groupinstall “Chinese Support” - 3、如果vncserver以root方式登录,但安装数据库输入netca命令,进入不了,那么就切换oracle用户进行vnc,具体操作(首先先建立oracle用户)
(1)、停止vnc service vncserver stop
(2)、修改/etc/sysconfig/vncserver ,将root改成oracle
(3)、切换到oracle用户,设置vncserver密码,#vncpasswd
(4)、重新启动vnc service vncserver start
第六步:在oracle用户下启动VNC服务
[oracle@iZ28ubyqhl0Z ~]$ vncserver
You will require a password to access your desktops.
Password:
Verify:
xauth:  creating new authority file /home/oracle/.Xauthority

New 'iZ28ubyqhl0Z:1 (oracle)' desktop is iZ28ubyqhl0Z:1
Creating default startup script /home/oracle/.vnc/xstartup
Starting applications specified in /home/oracle/.vnc/xstartup
Log file is /home/oracle/.vnc/iZ28ubyqhl0Z:1.log
[oracle@iZ28ubyqhl0Z ~]$ ps -aef|grep vnc				查看vpn是否运行
oracle    2153     1  2 16:19 pts/1    00:00:00 /usr/bin/Xvnc :1 -desktop iZ28ubyqhl0Z:1 (oracle) -auth /home/oracle/.Xauthority -geometry 1024x768 -rfbwait 30000 -rfbauth /home/oracle/.vnc/passwd -rfbport 5901 -fp catalogue:/etc/X11/fontpath.d -pn
oracle    2161  2160  0 16:19 pts/1    00:00:00 vncconfig -iconic
oracle    2339  2121  0 16:20 pts/1    00:00:00 grep vn
用远程工具中登录,输入IP地址加后面的号码 输入密码进入

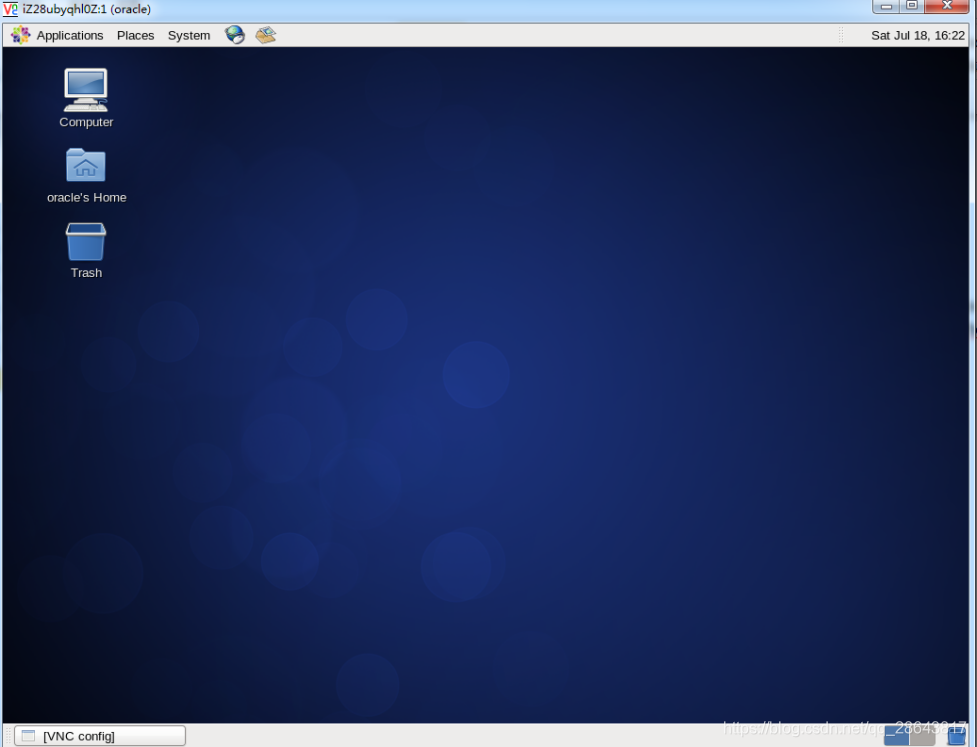
第七步:安装oracle软件(在上图中/客户的桌面安装)
上传oracle文件到oracle目录,然后解压上传的压缩文件,解压使用
1.Unzip命令
[root@iZ28ubyqhl0Z ~]# cd /app/oracle
[root@iZ28ubyqhl0Z ~]# unzip linux.x64_11gR2_database_1of2
[root@iZ28ubyqhl0Z ~]# unzip linux.x64_11gR2_database_2of2
利用unzip命令解压缩的时候,出现-bash: unzip: command not found的错误。
unzip——命令没有找到,其原因肯定是没有安装unzip。利用一句命令就可以解决了。
[root@oracledb~]#yum install -y unzip zip
2.开始安装oracle软件
[root@iZ28ubyqhl0Z ~]# yum -y install gcc gcc-c++ make binutils compat-libstdc++-33 elfutils-libelf elfutils-libelf-devel glibc glibc-common glibc-devel libaio libaio-devel libgcc libstdc++ libstdc++-devel unixODBC unixODBC-devel

[root@iZ28ubyqhl0Z ~]# yum install glibc* gcc* make* compat-db* libstdc* libXp* libXtst* compat-libstdc++* -y

[root@iZwz9hk3x36ces4zc6n1v5Z pingtai]# rpm -q binutils compat-libstdc++-33 elfutils-libelf elfutils-libelf-devel gcc gcc-c++ glibc glibc-common glibc-devel glibc-headers kernel-headers ksh libaio libaio-devel libgcc libgomp libstdc++ libstdc++-devel make numactl-devel sysstat unixODBC unixODBC-devel(此步骤检查有没有丢失的依赖包)
第八步 安装oracle软件(在上图中/vpn桌面安装)
[oracle@iZ28ubyqhl0Z ~]
cd database/
[oracle@iZ28ubyqhl0Z ~]$./runlnstaller
弹出图形安装界面
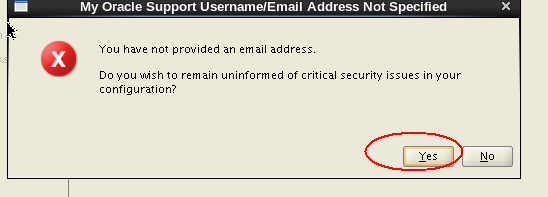
1.取消沟-----下一步------yes(提示没有填写邮箱)

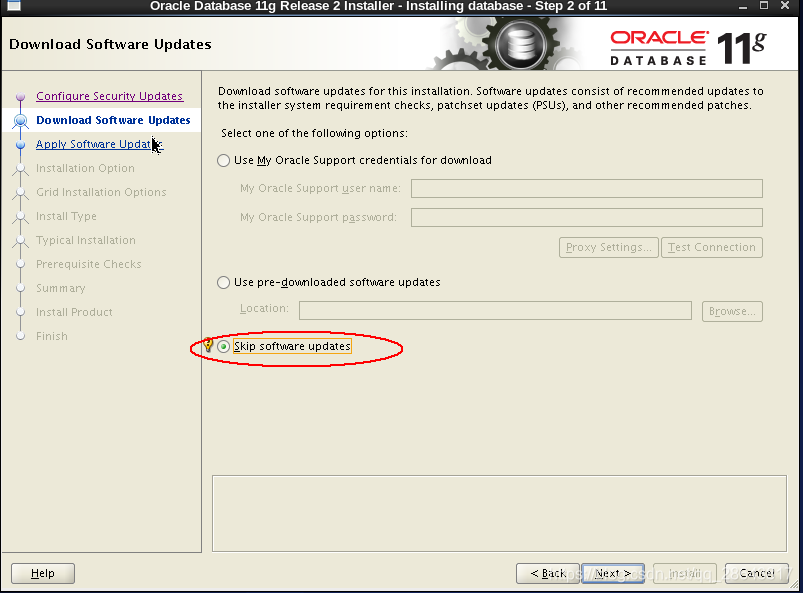
2. 勾选“Skip software updates”不更新 ------下一步
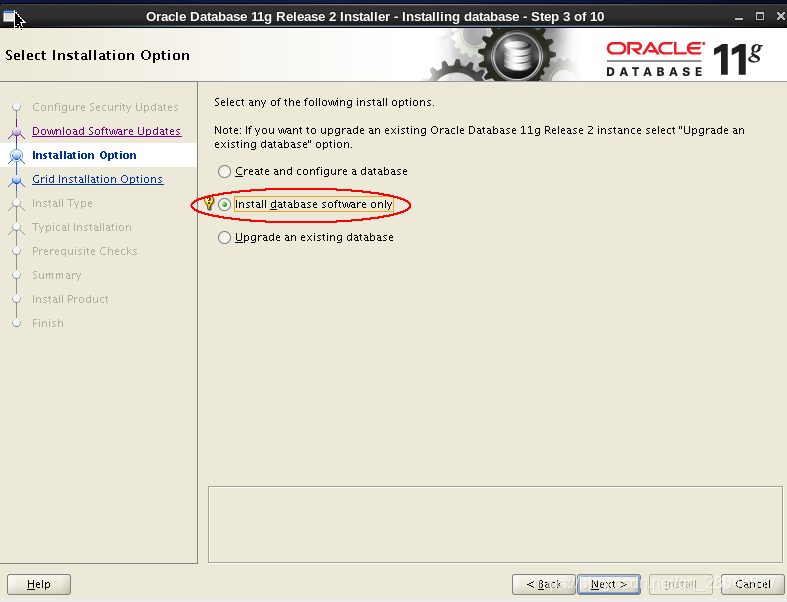
3. 勾选“install database software only”只安装软件------下一步
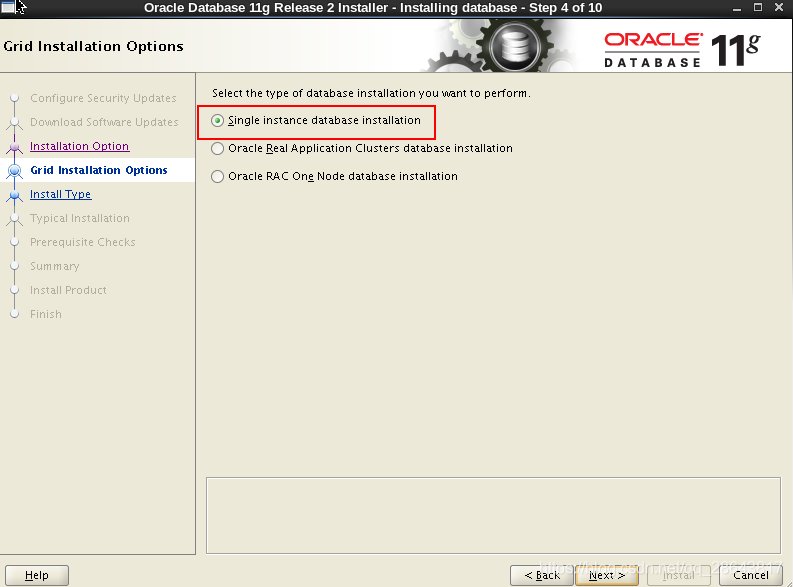
4. 勾选“single instance database installtion” 创建单实例的数据库安装—下一步
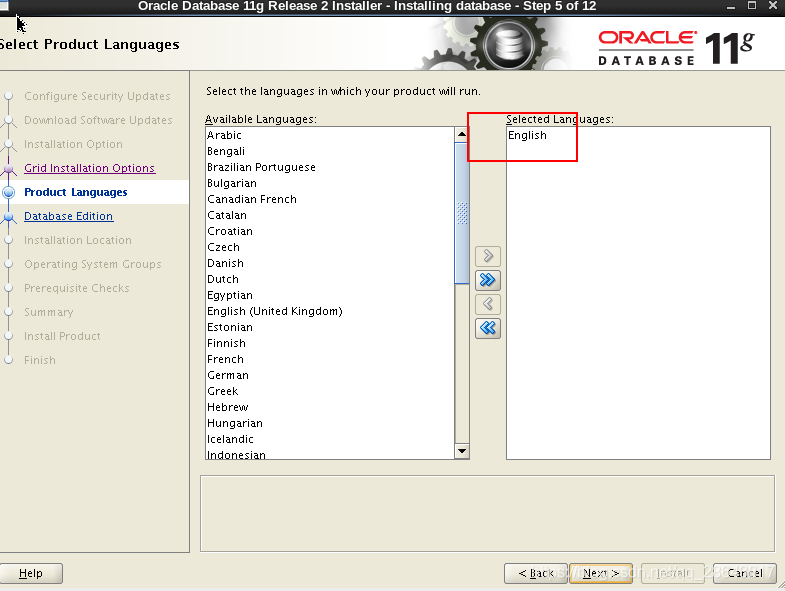
5.安装语言 使用默认英文 下一步
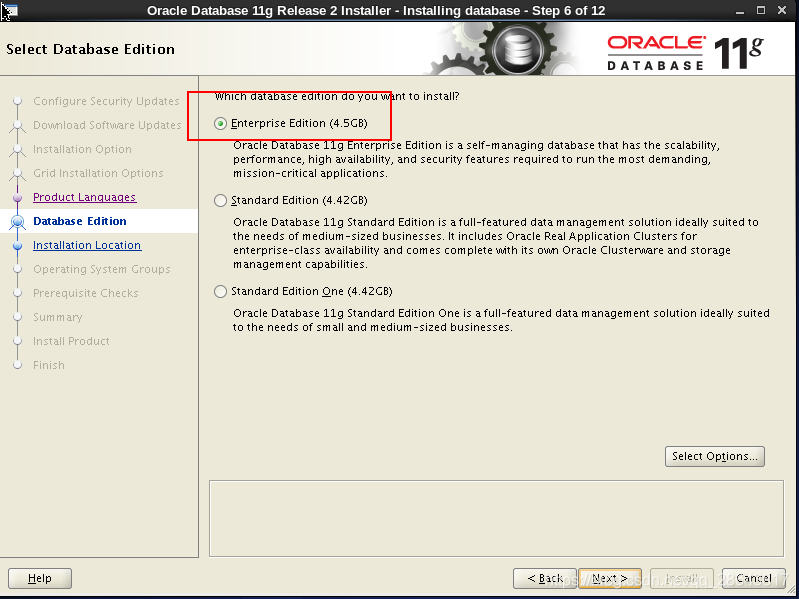
6.勾选 “Enterprise Edition(4.5G)”安装企业版—下一步
7. Oracle安装路径自动识别到了配置的变量,下一步
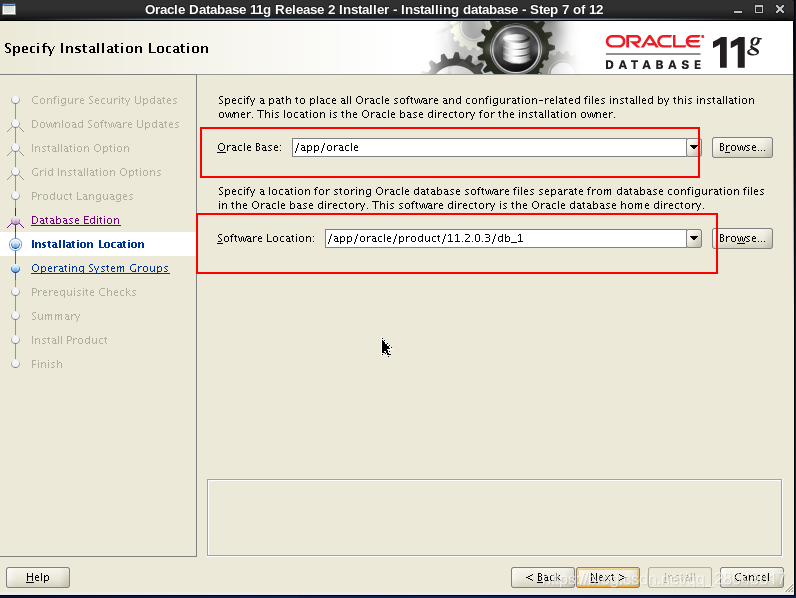
8.安装文件的路径文件目录,自动识别。下一步
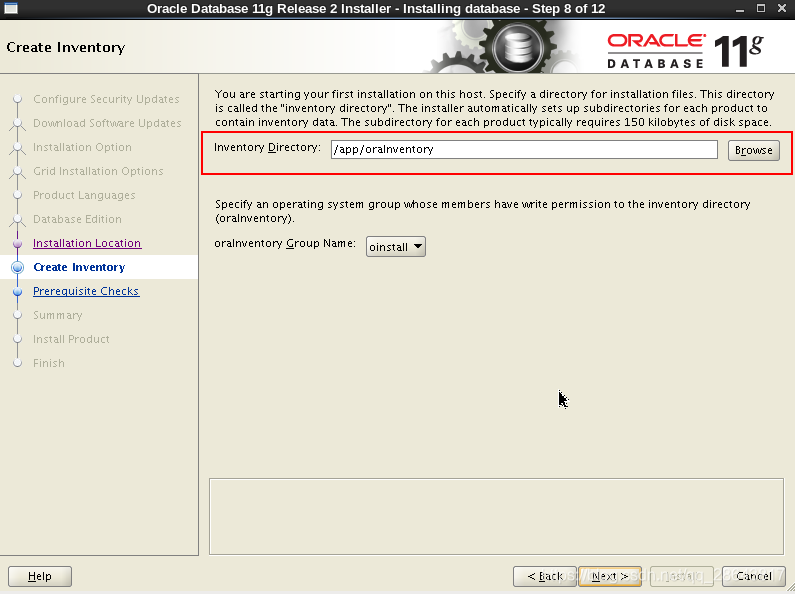
9.选择组的所属,下一步
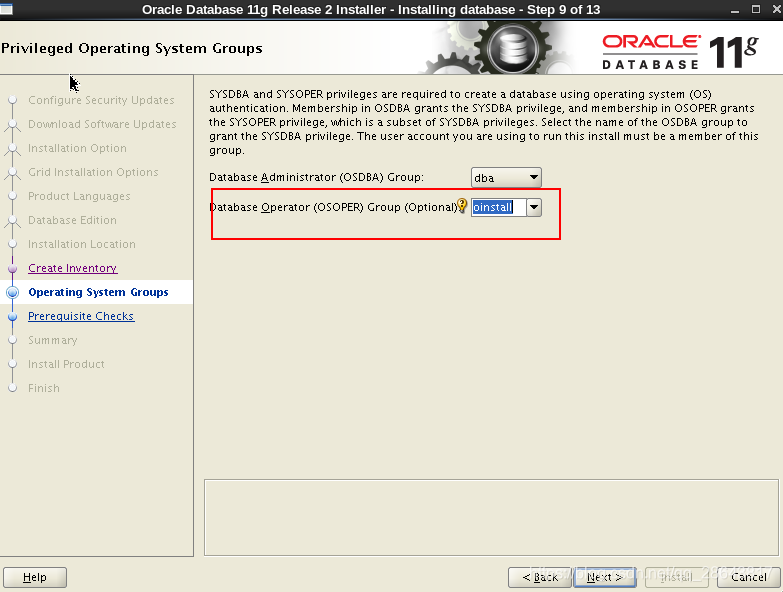
10.开始检查安装的系统的文件的参数信息
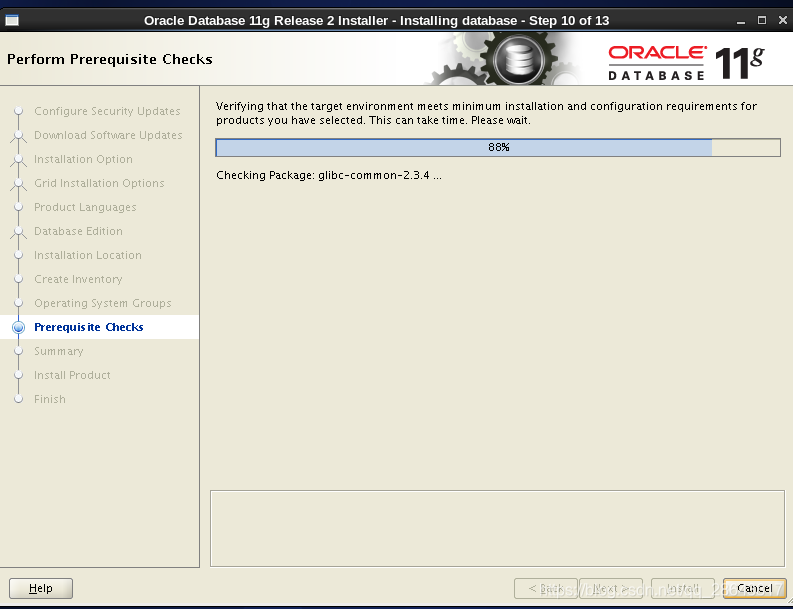
11.以上是需要调整的一些内核和缺少的包体信息,需要完成后,再继续 下一步
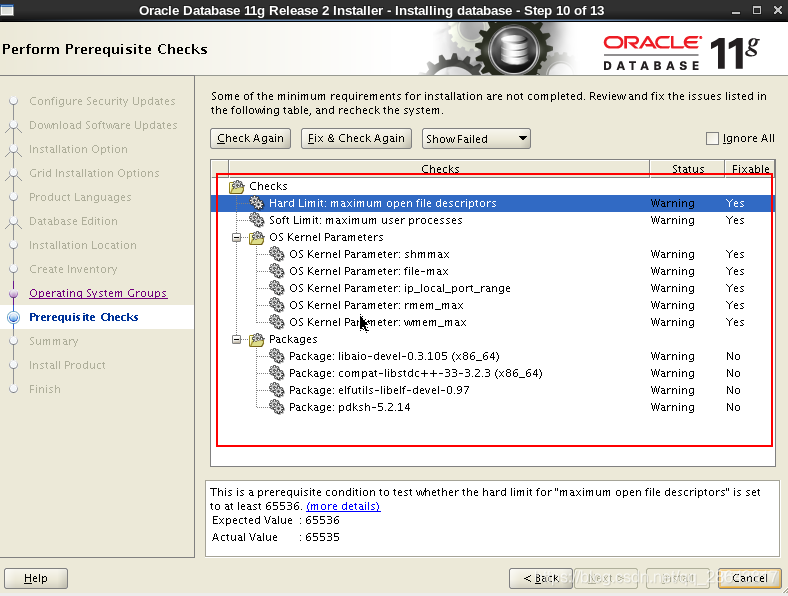
12.所有缺少的包信息,我这边全部做完后后 下一步,开始安装
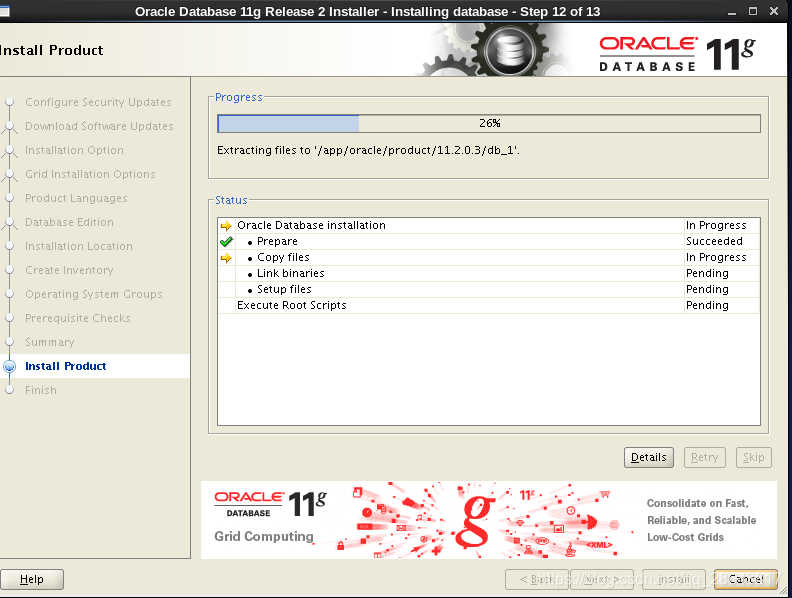
13.
14.显示的安装进度信息
不执行 需要root的用户下依次执行以上的脚本
[root@iZ28ubyqhl0Z ~]# /app/oraInventory/orainstRoot.sh
Changing permissions of /app/oraInventory.
Adding read,write permissions for group.
Removing read,write,execute permissions for world.

Changing groupname of /app/oraInventory to oinstall.
The execution of the script is complete.
[root@iZ28ubyqhl0Z ~]# /app/oracle/product/11.2.0.3/db_1/root.sh
Performing root user operation for Oracle 11g

The following environment variables are set as:
    ORACLE_OWNER= oracle
    ORACLE_HOME=  /app/oracle/product/11.2.0.3/db_1

Enter the full pathname of the local bin directory: [/usr/local/bin]:
   Copying dbhome to /usr/local/bin ...
   Copying oraenv to /usr/local/bin ...
   Copying coraenv to /usr/local/bin ...
Creating /etc/oratab file...
Entries will be added to the /etc/oratab file as needed by
Database Configuration Assistant when a database is created
Finished running generic part of root script.
Now product-specific root actions will be performed.
Finished product-specific root actions.
执行完成后点击 OK

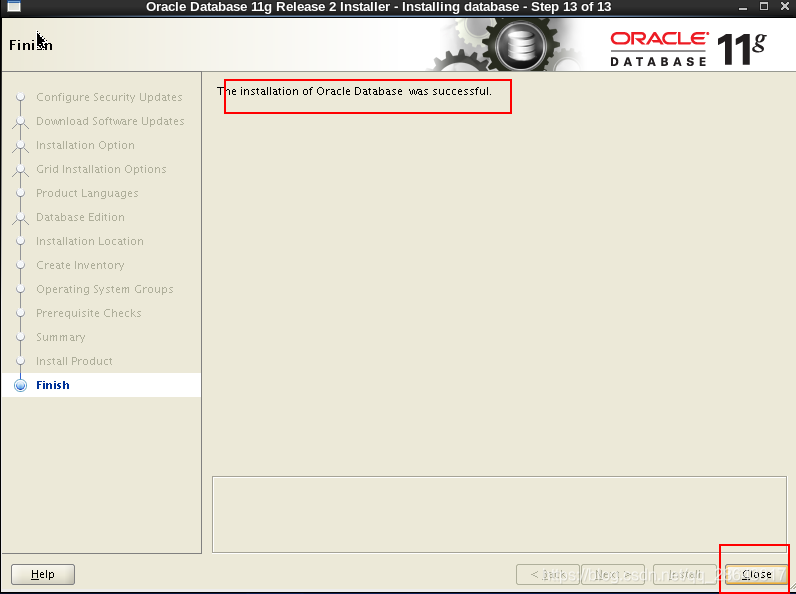
15.提示你软件已经安装成功了。
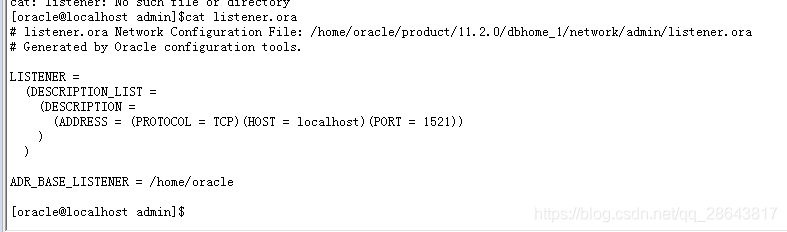
第九步 配置oracle数据的监听
在图形界面的vnc中,命令行中 输入netca
1.[oracle@iZ28ubyqhl0Z ~]$netca
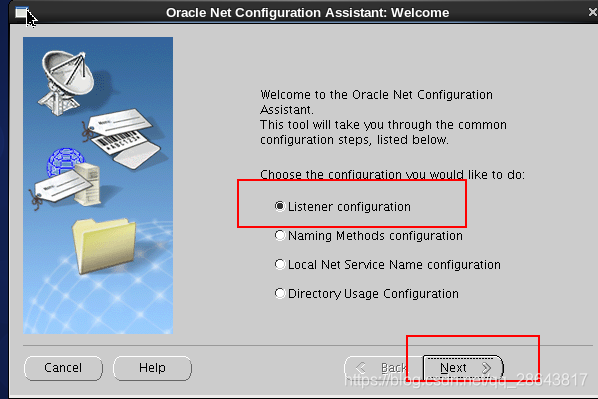
2.点击下一步 下一步 完成即可;
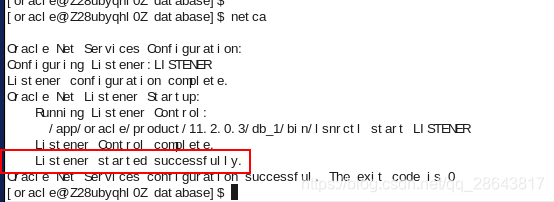
3.以上提示监听配置成功,且是启动了;
第十步建立oracle数据库的实例
在图形界面使用dbca命令建立实例(安装oracle的时候,忘记去执行 一个root.sh文件了,当然,需要用root用户执行:
1.解决办法:
[root@localhost 10.2.0]# cd /app/oracle/product/11.2.0/dbhome_1/
[root@localhost 10.2.0]# ./root.sh(创建/etc/oratab文件)
以oracle用户执行
2.
[oracle@iZ28ubyqhl0Z ~]$dbca

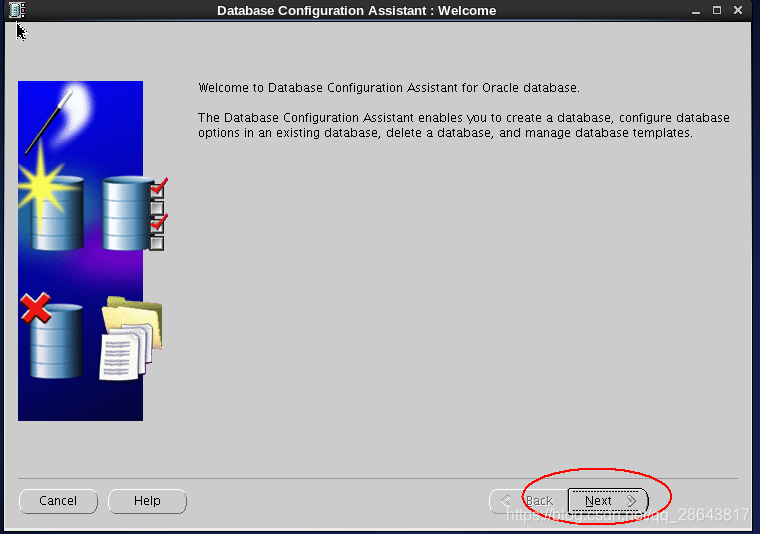
3.开始配置实例,下一步

4.创建一个数据实例,下一步

5.选择创建的模版,下一步
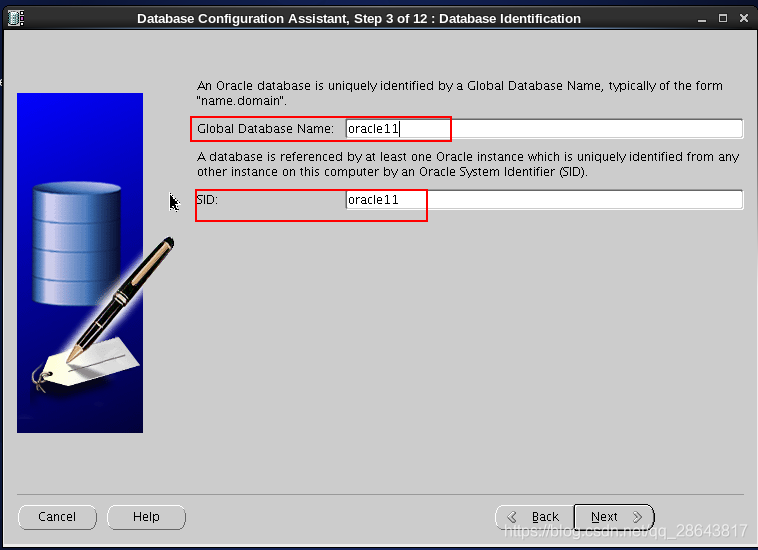
6.输入实例的名字为:oracle11 下一步
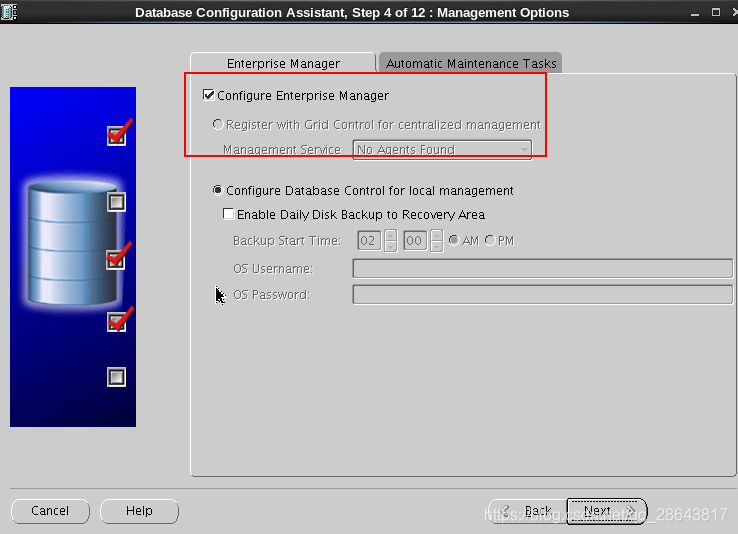
7.默认是配置管理的EM的,直接下一步
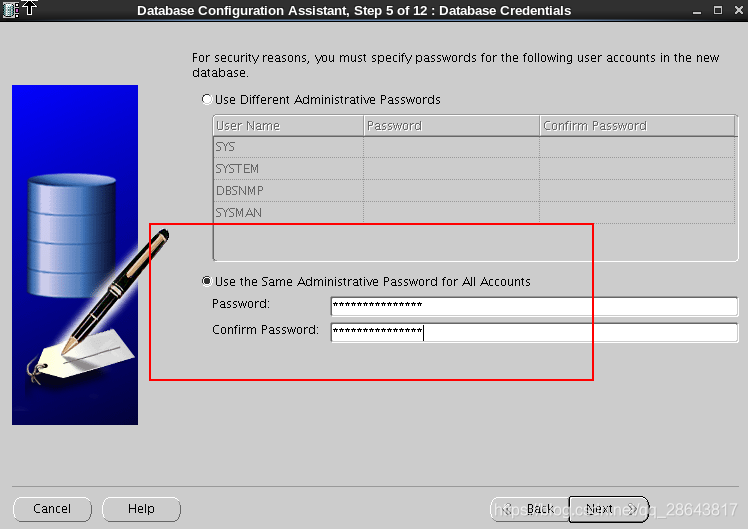
8.设置数据库的用户统一的密码

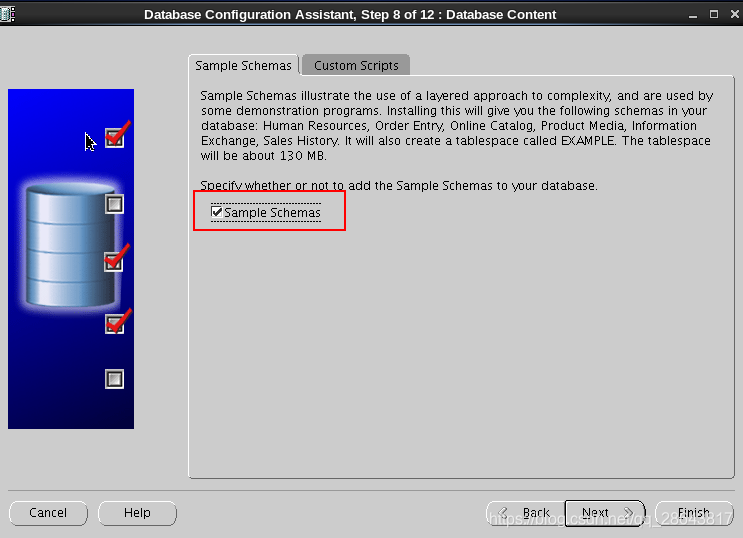
9.默认设置,下一步
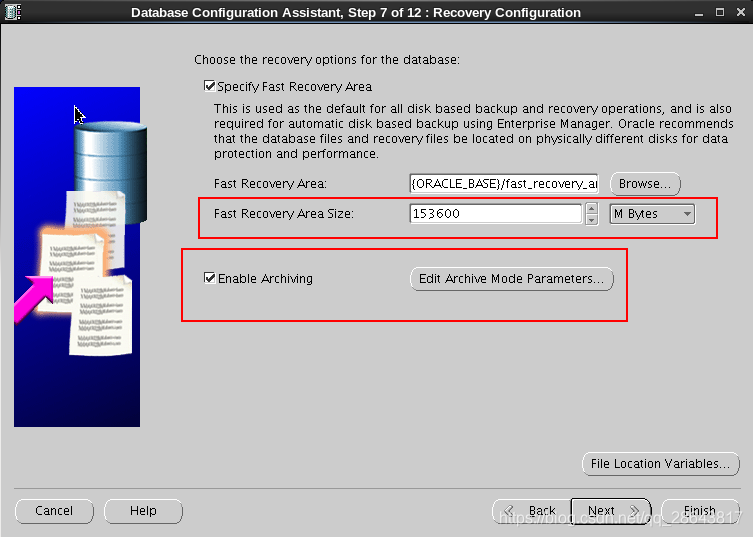
10.开启归档模式,设置快速恢复区大小为150GB;
例子,11.下一步
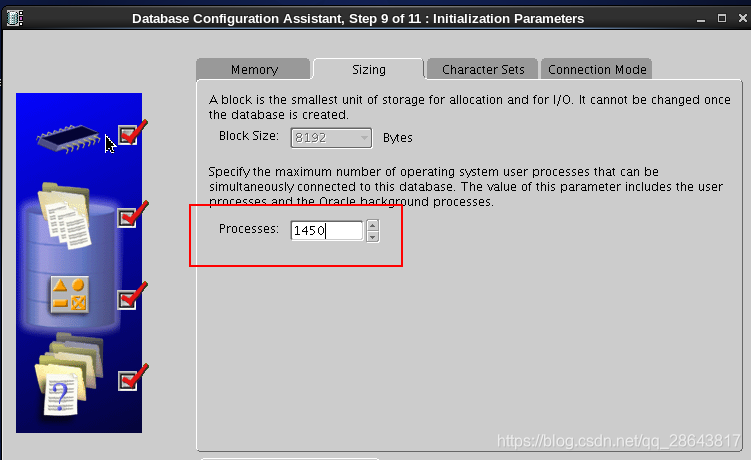
12.进程数量设置为1450
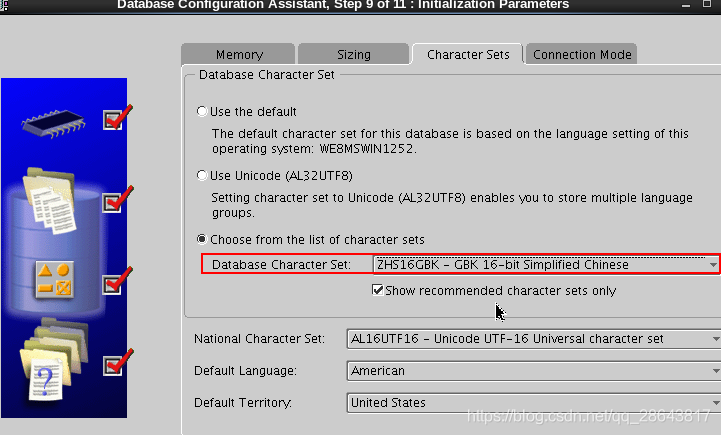
13、数据库的字符集设置成简体中文的
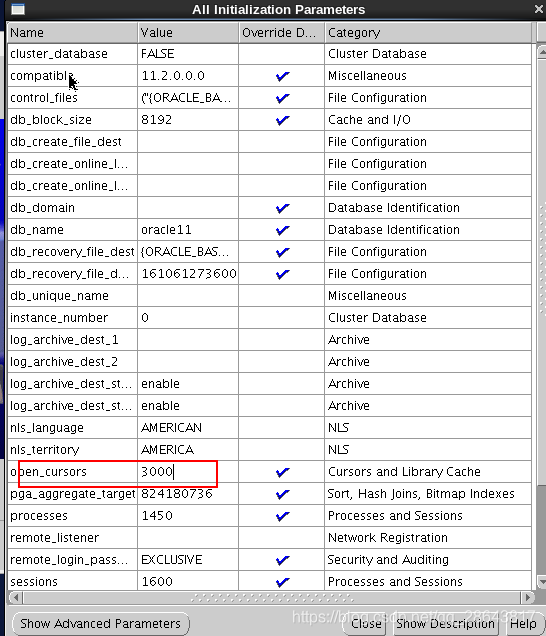
14.游标的大小设置为3000 (需要修改进程数限制)
15.以root身份
[root@bogon oracle]#cd /etc/security/limits.d/
[root@bogon oracle]#vim 90-nproc.conf
#* soft nproc 1024
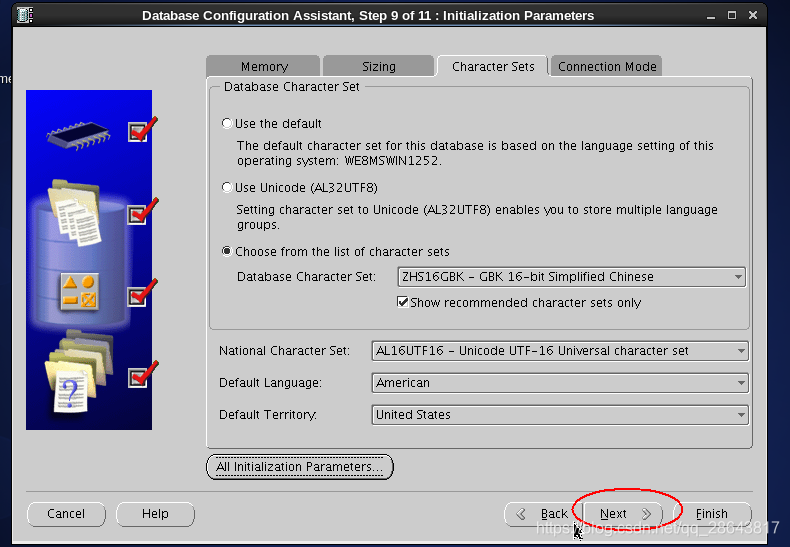
16.设置完成直接下一步
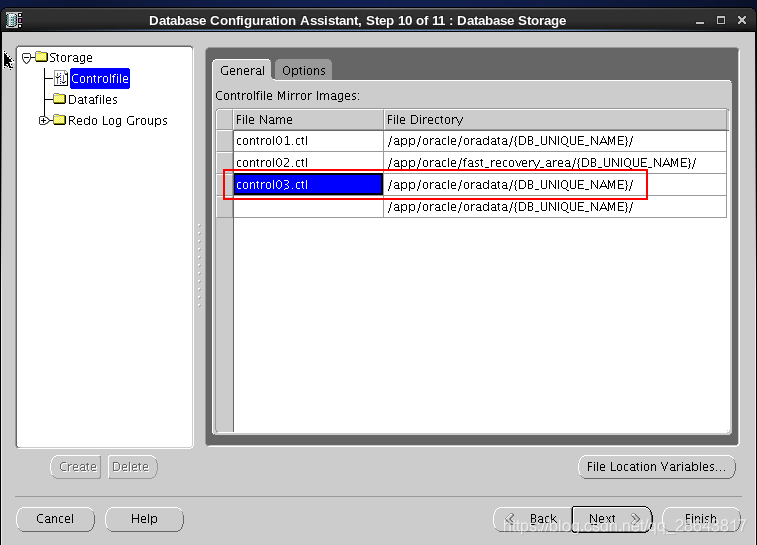
17.控制文件系统默认是2个,建议增加1个控制文件;
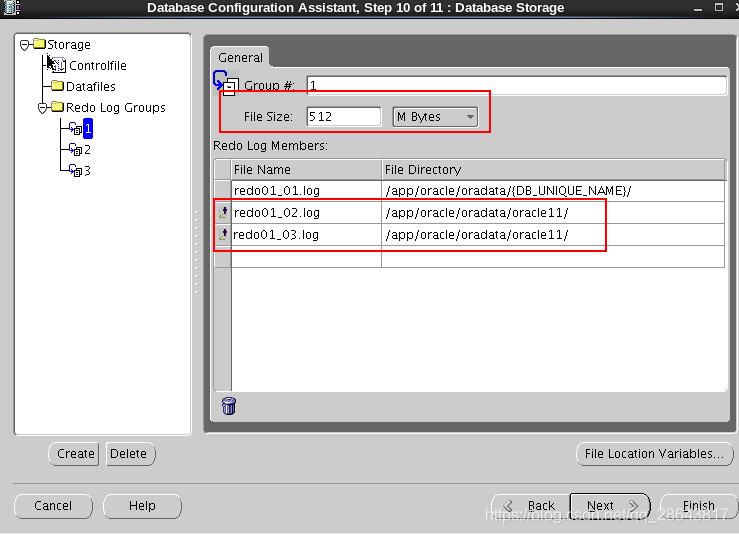
18.重做日志文件1组3个成员,每组的文件大小为512MB
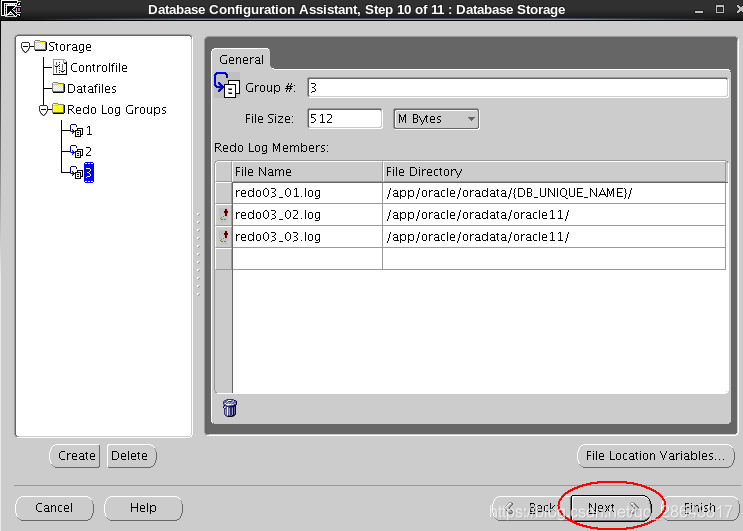
19.设置完成 下一步
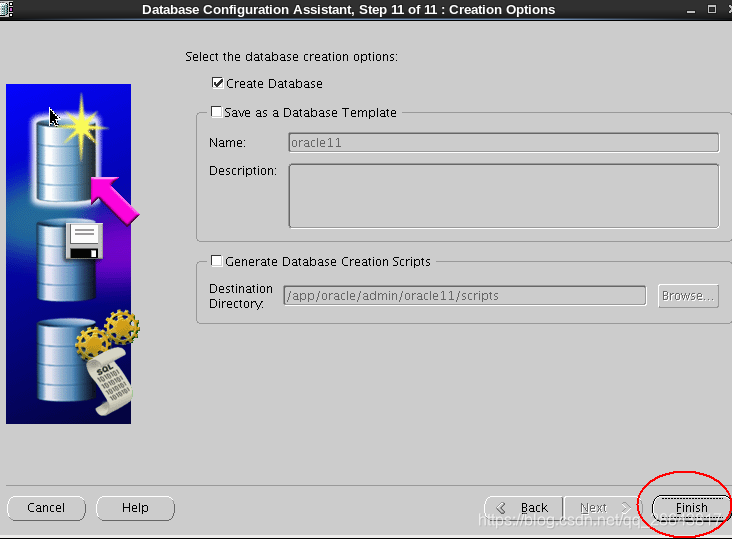
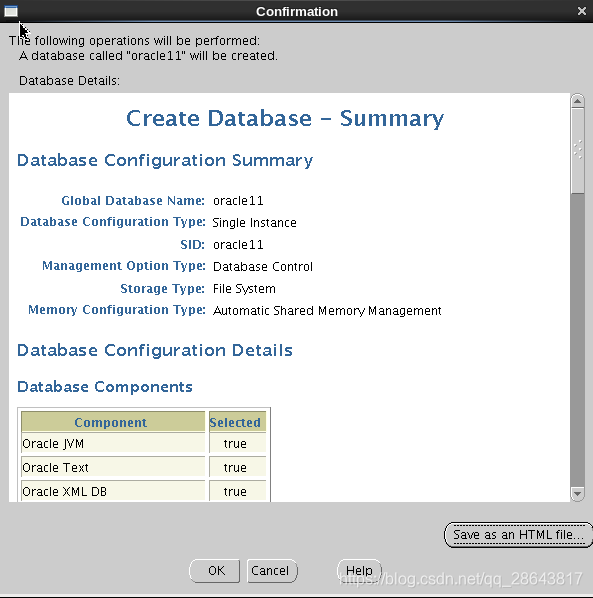
20.显示配置信息,点击OK
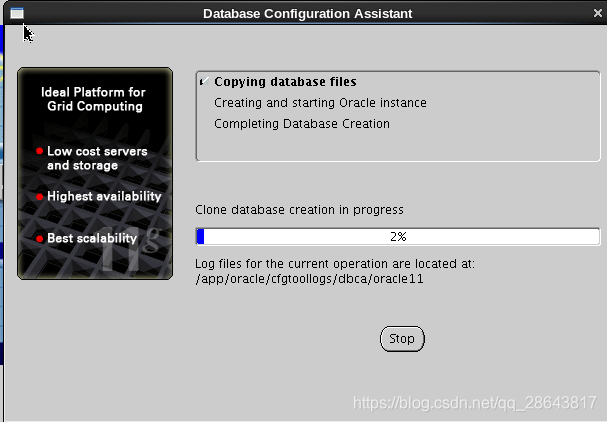
21.开始配置数据库的实例信息;

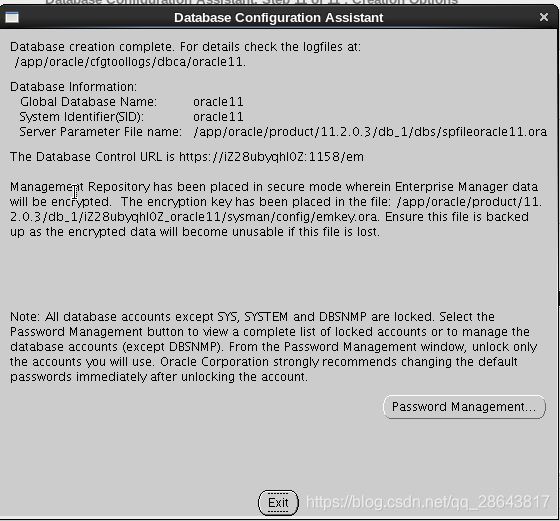
22.出现以上界面就是安装完成了
第十一 关闭启动的VNC服务
 [oracle@iZ28ubyqhl0Z ~]$ ps -aef|grep vnc
    oracle    2153     1  0 16:19 pts/1    00:00:18 /usr/bin/Xvnc :1 -desktop iZ28ubyqhl0Z:1 (oracle) -auth /home/oracle/.Xauthority -geometry 1024x768 -rfbwait 30000 -rfbauth /home/oracle/.vnc/passwd -rfbport 5901 -fp catalogue:/etc/X11/fontpath.d -pn
    oracle    2161  2160  0 16:19 pts/1    00:00:00 vncconfig -iconic
    oracle    5952  5868  0 17:49 pts/3    00:00:00 grep vnc

 [oracle@iZ28ubyqhl0Z ~]$ vncserver -kill :1
2.检查vncserver开机不启动
[root@iZ28ubyqhl0Z ~]# chkconfig --list vncserver
vncserver       0:off   1:off   2:off   3:off   4:off   5:off   6:off
3.配置防火墙规则
[root@oracledb ~]#vim /etc/sysconfig/iptables    (配置看文档)
[root@oracledb ~]# service iptables restart
[root@oracledb ~]# service iptables status
[root@oracledb ~]# chkconfig iptables on
4.查看数据库是否连接成功
root用户登录
2:切换到用户oracle用户操作
命令:su – oracle
3:查看数据库监听是否正常
命令:lsnrctl status
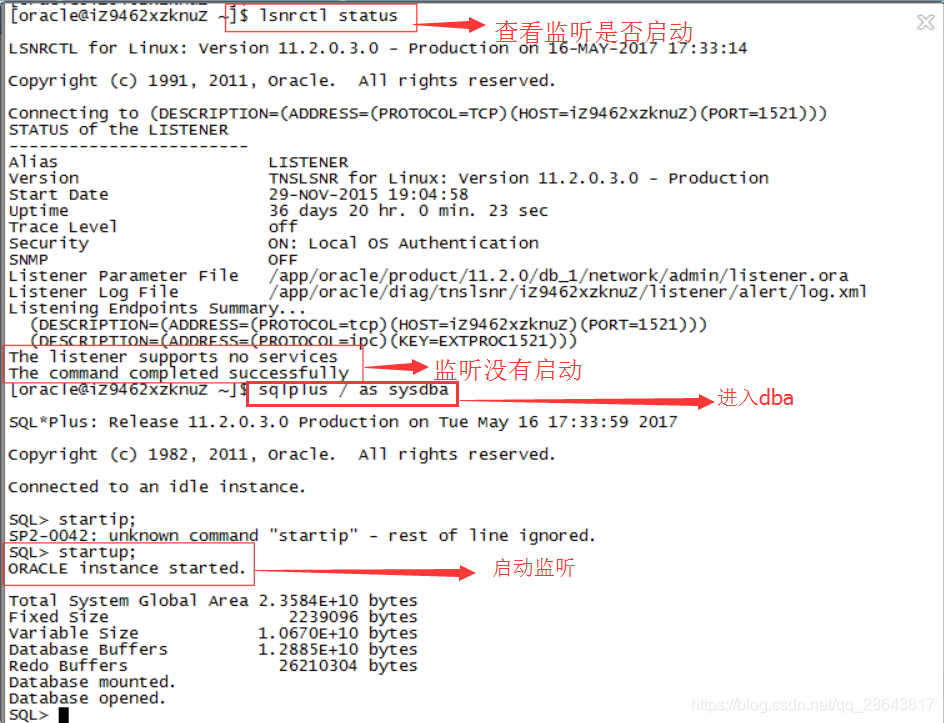
4:进入SQLPLUS
命令:sqlplus / as sysdba
5:启动监听
命令:startup
第十二 修改oarcle的密码文件不过期
在linux系统的oracle操作系统用户下操作
1.[oracle@app1 ~]$ sqlplus / as sysdba

SQL*Plus: Release 11.2.0.3.0 Production on Fri Jul 31 12:04:45 2015

Copyright (c) 1982, 2011, Oracle.  All rights reserved.


Connected to:
Oracle Database 11g Enterprise Edition Release 11.2.0.3.0 - 64bit Production
With the Partitioning, OLAP, Data Mining and Real Application Testing options

2.SQL> alter profile default limit password_life_time unlimited;
3.SQL> alter user system identified by 123456; 为system添加口令
Profile altered.
1、查看用户的proifle是哪个,一般是default:
sql>Select username,PROFILE FROM dba_users;
2、查看指定概要文件(如default)的密码有效期设置:
sql> Select * FROM dba_profiles s Where s.PROFILE='DEFAULT' AND RESOURCE_NAME='PASSWORD_LIFE_TIME';
3、将密码有效期由默认的180天修改成“无限制”:
sql>Alter PROFILE DEFAULT LIMIT PASSWORD_LIFE_TIME UNLIMITED;
修改之后不需要重启动数据库,会立即生效。
第十三 安装sql客户端,连接oracle
在Windows机中以管理员身份安装oracle10g client和plsql developer
1.配置oracle net 添加新的
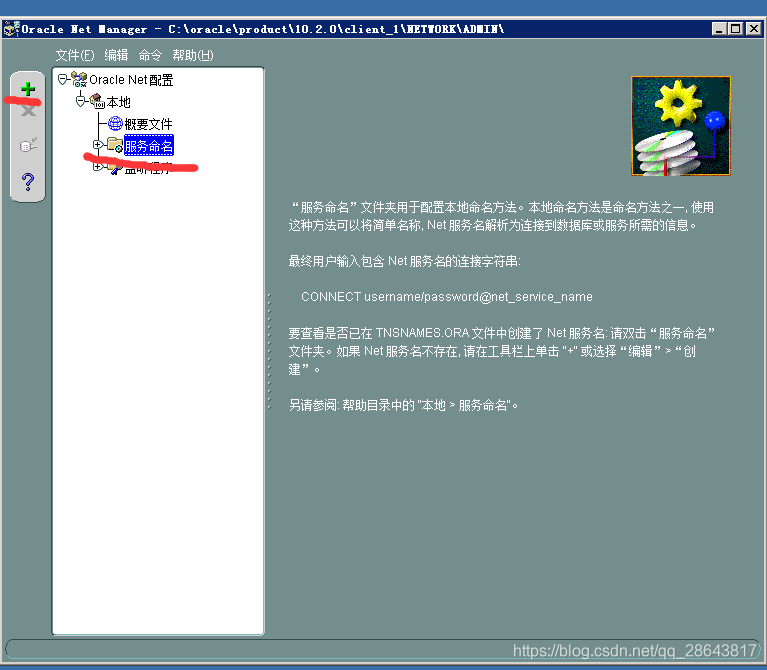
2.自定义名—下一步
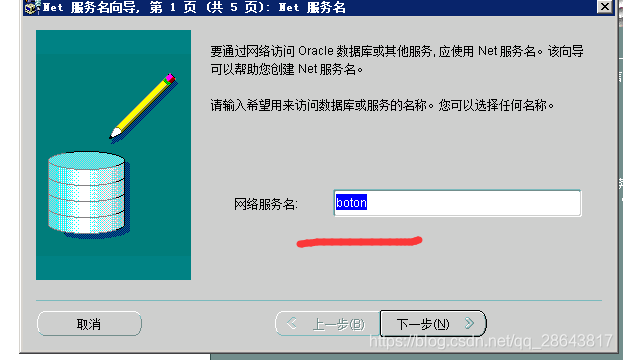
3.下一步
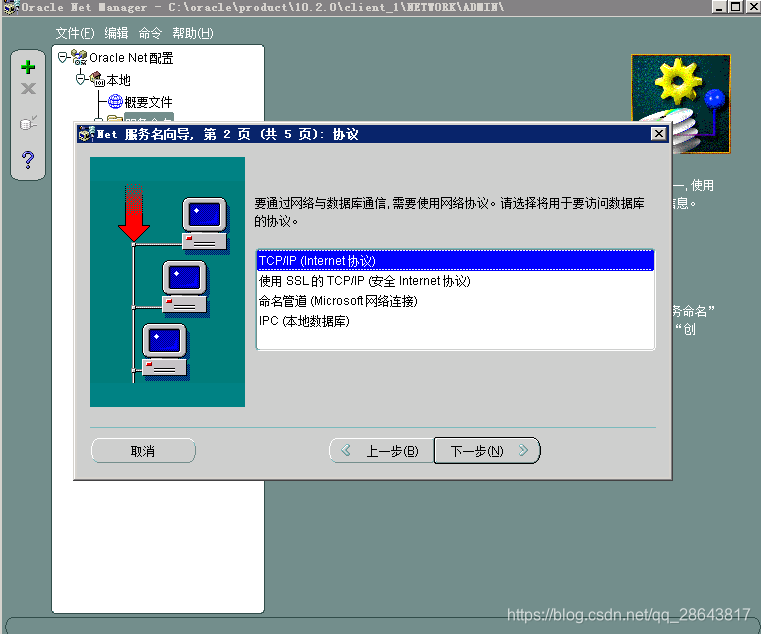
4.填写远程连接的oracle数据库的ip ----下一步
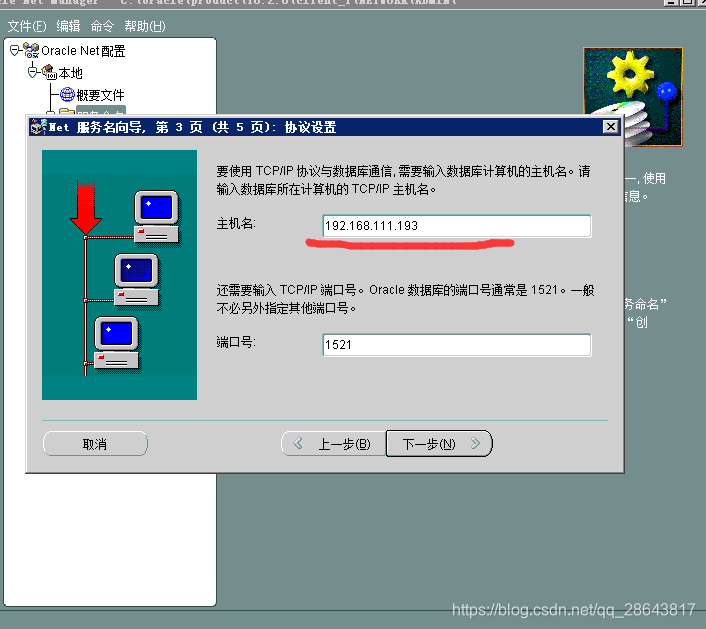
5.填写数据库实例名称----下一步
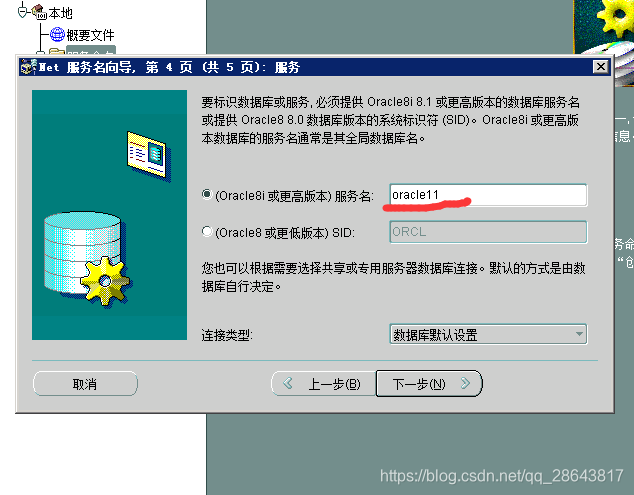
6.测试

7.更改登录—输入管理员名—密码—测试
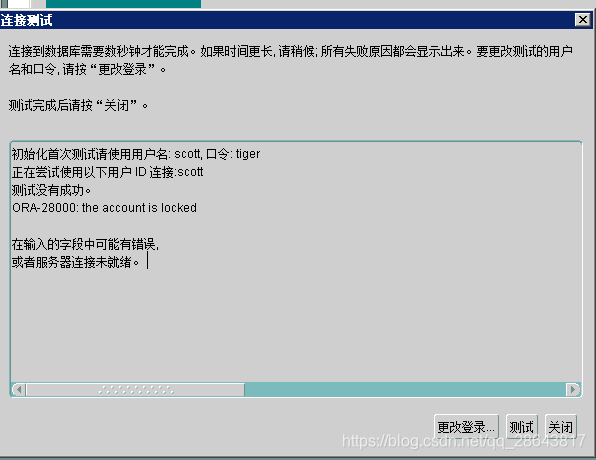
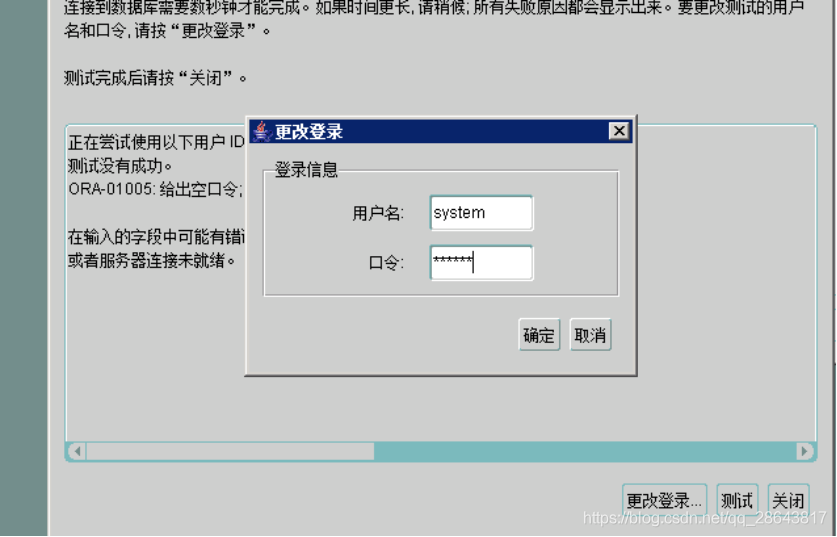
点击测试显示成功,则完成
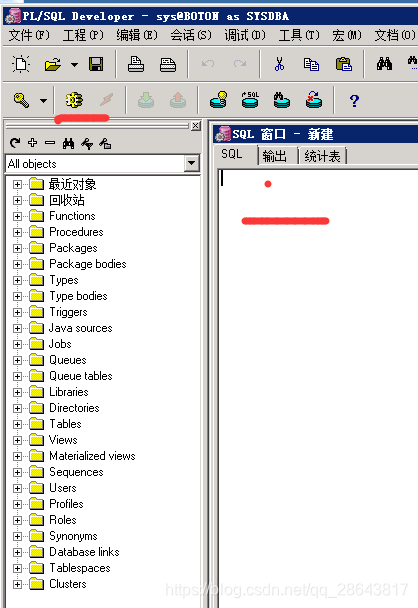
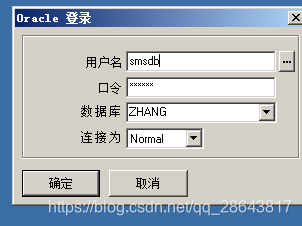
8.登录plsql 用户sys 密码(创实例的管理员密码)
第十四 建立热盘的表空间()
在软件中新建—打开—SQL窗口—输入命令—执行
热盘表空间名称:SMSDB_DATA和SMSDB_INDX
1.在oracle的sys用下执行:
CREATE TABLESPACE SMSDB_DATA DATAFILE '/app/oracle/oradata/oracle11/SMSDB_DATA01.dbf' SIZE 20G,
'/app/oracle/oradata/oracle11/SMSDB_DATA02.dbf' SIZE 20G,
'/app/oracle/oradata/oracle11/SMSDB_DATA03.dbf' SIZE 20G,
'/app/oracle/oradata/oracle11/SMSDB_DATA04.dbf' SIZE 20G,
'/app/oracle/oradata/oracle11/SMSDB_DATA05.dbf' SIZE 20G,
'/app/oracle/oradata/oracle11/SMSDB_DATA06.dbf' SIZE 20G LOGGING EXTENT MANAGEMENT LOCAL UNIFORM SIZE 10M SEGMENT SPACE MANAGEMENT AUTO;
2.增加表空间数据文件
alter TABLESPACE SMSDB_DATA add DATAFILE '/app/oracle/oradata/oracle11/SMSDB_DATA20.dbf' SIZE 10G,
'/app/oracle/oradata/oracle11/SMSDB_DATA21.dbf' SIZE 10G,
'/app/oracle/oradata/oracle11/SMSDB_DATA22.dbf' SIZE 10G
AUTOEXTEND ON  next 2M MAXSIZE UNLIMITED;
3.建立热盘表空间:SMSDB_INDX
在oracle的sys用下执行:
CREATE TABLESPACE SMSDB_INDX DATAFILE
'/app/oracle/oradata/oracle11/SMSDB_INDX_01.dbf' SIZE 15G,
'/app/oracle/oradata/oracle11/SMSDB_INDX_02.dbf' SIZE 15G,
'/app/oracle/oradata/oracle11/SMSDB_INDX_03.dbf' SIZE 15G LOGGING EXTENT MANAGEMENT LOCAL UNIFORM SIZE 2M SEGMENT SPACE MANAGEMENT AUTO;
4.创建smsdb用户和授予权限
create user smsdb identified by 123456 default tablespace SMSDB_DATA;
grant RESOURCE,SELECT_CATALOG_ROLE,connect to smsdb;
grant RESOURCE,SELECT_CATALOG_ROLE,connect to smsdb;
grant create any table,create any procedure to smsdb;
grant debug any procedure ,debug connect session to smsdb;
alter user smsdb quota unlimited on SMSDB_DATA;
alter user smsdb quota unlimited on SMSDB_INDX;
grant create database link to smsdb;
grant select any table to smsdb;
grant IMP_FULL_DATABASE to smsdb;
Grant read,write on directory P_DIR to smsdb;
5.查询表空间名字:
select name from v$tablespace;
6.查询表空间的限制情况:
select TABLESPACE_NAME ,USERNAME,MAX_BYTES from dba_ts_quotas where username='SMSDB';
7.查看赋予用户的权限:
select * from user_sys_privs;
select * from user_role_privs;
*****安装完后,会出来一个对话框,提示用root用户执行这两个脚本:
[root@oracledb ~]# /app/oraInventory/orainstRoot.sh
[root@oracledb ~]# /app/oracle/product/11.2.0/dbhome_1/root.sh
*****客户登陆不上平台,访问服务器失败:
解决办法:使用root登录,然后su - oracle
1.[oracle@oracledb ~]# lsnrctl status 查看数据库以及数据库监听情况
2.[oracle@oracledb ~]# lsnrctl start 启动监听
3.[oracle@oracledb ~]# lsnrctl stop 停止监听
startup 启动监听
检查数据库是否正常:
[oracle@oracledb ~]# sqlplus / as sysdba 登陆数据库
输入这条sql语句进行测试: SQL> Select status from v$instance;
若是open 表示正常(正常的话就请客户那边联系 移动测 看下同步服务是否正常)
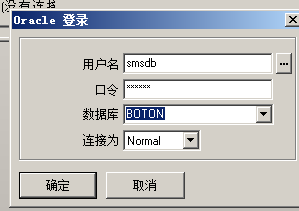
1.对比库
完善库用户smsdb—连接为normal—工具—比较表数据库—目标会话-登录—比较—点对勾
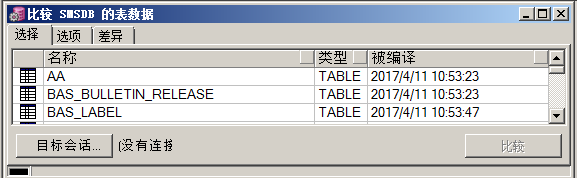

退出完善数据库
第十五 初始化数据库
Smsdb用户登录—新建—命令窗口—输入语句 @C:\oracle\init.txt; (@+初始化脚本的路径)