从三个基础结构到事件上报流程
声明:这篇博客大部分来自
https://blog.csdn.net/u014545515/article/details/53507567?utm_source=blogxgwz1
我跟着这篇博客的思路一路下来,觉得非常有收货,也写入自己的感悟。
广泛,并且深入
					-沉默犀牛
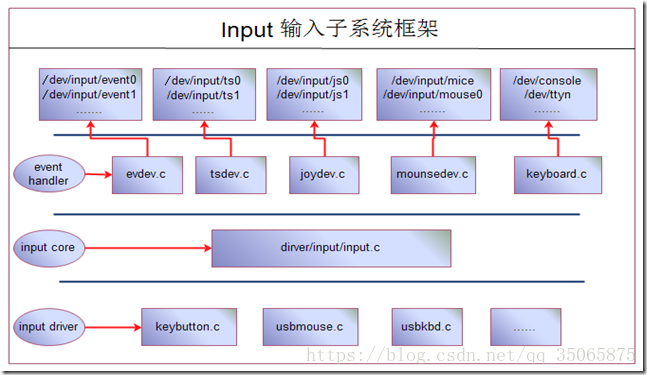
三个层级
事件处理层:evdev.c 、mousedev.c
核心层:input.c
设备驱动层:touchscreen、mouse
事件处理层:通过核心层的API获取输入事件上报的数据,定义API与应用层交互
核心层:为事件处理层和设备驱动层提供接口API
设备驱动层:采集输入设备的数据信息,通过核心层提供的API上报数据
基础数据结构
struct input_dev:会在具体input driver 层中被填充
struct input_handle:会在event handler层和input driver层注册设备时通过input_dev或input_handler间接调用
struct input_handler:会在event handler层(如evdev.c)中被实例化
input_dev
struct input_dev {
	const char *name;	/*导出到用户空间的相关信息,在sys文件可以看到*/
	const char *phys;
	const char *uniq;
	struct input_id id;	/*与input_handler匹配用的id*/

	unsigned long propbit[BITS_TO_LONGS(INPUT_PROP_CNT)];		/*输入设备的事件支持位图*/
	unsigned long evbit[BITS_TO_LONGS(EV_CNT)];			/*支持所有事件*/
	unsigned long keybit[BITS_TO_LONGS(KEY_CNT)];		/*按键事件*/
	unsigned long relbit[BITS_TO_LONGS(REL_CNT)];		/*相对位移事件*/
	unsigned long absbit[BITS_TO_LONGS(ABS_CNT)];		/*绝对位移事件*/
	unsigned long mscbit[BITS_TO_LONGS(MSC_CNT)];		/*其它事件*/
	unsigned long ledbit[BITS_TO_LONGS(LED_CNT);		/*LED事件*/
	unsigned long sndbit[BITS_TO_LONGS(SND_CNT)];		/*声音事件*/
	unsigned long ffbit[BITS_TO_LONGS(FF_CNT)];			/*受力事件*/
	unsigned long swbit[BITS_TO_LONGS(SW_CNT)];			/*开关机事件*/

	unsigned int hint_events_per_packet;

	unsigned int keycodemax;
	unsigned int keycodesize;
	void *keycode;

	int (*setkeycode)(struct input_dev *dev,
			  const struct input_keymap_entry *ke,
			  unsigned int *old_keycode);
	int (*getkeycode)(struct input_dev *dev,
			  struct input_keymap_entry *ke);

	struct ff_device *ff;

	unsigned int repeat_key;					//最近一次的按键值
	struct timer_list timer;

	int rep[REP_CNT];

	struct input_mt *mt;

	struct input_absinfo *absinfo;

	unsigned long key[BITS_TO_LONGS(KEY_CNT)];			//反应设备当前的按键状态
	unsigned long led[BITS_TO_LONGS(LED_CNT)];			//反应设备当前的led状态
	unsigned long snd[BITS_TO_LONGS(SND_CNT)];			//反应设备当前的声音输入状态
	unsigned long sw[BITS_TO_LONGS(SW_CNT)];			//反应设备当前的开关状态

	int (*open)(struct input_dev *dev);		//第一次打开设备时调用,初始化设备用
	void (*close)(struct input_dev *dev);	//最后一个应用程序释放设备时用,关闭设备
	int (*flush)(struct input_dev *dev, struct file *file);		//用于处理传递给设备的事件,如LED事件
	int (*event)(struct input_dev *dev, unsigned int type, unsigned int code, int value);

	struct input_handle __rcu *grab;	//当前占有该设备的input_handle

	spinlock_t event_lock;
	struct mutex mutex;

	unsigned int users;
	bool going_away;

	struct device dev;

	struct list_head	h_list;		//该链表头用于链接此input_dev所关联的input_handle
	struct list_head	node;		//用于将此input_dev链接到input_dev_list

	unsigned int num_vals;
	unsigned int max_vals;
	struct input_value *vals;

	bool devres_managed;
};
input_handler
struct input_handler {

	void *private;
																			/*event用于处理事件*/
	void (*event)(struct input_handle *handle, unsigned int type, unsigned int code, int value);

	void (*events)(struct input_handle *handle,
		       const struct input_value *vals, unsigned int count);
	bool (*filter)(struct input_handle *handle, unsigned int type, unsigned int code, int value);
	bool (*match)(struct input_handler *handler, struct input_dev *dev);

																	/*connect用于建立handler和device的联系*/
	int (*connect)(struct input_handler *handler, struct input_dev *dev, const struct input_device_id *id);

	void (*disconnect)(struct input_handle *handle);	/*disconnect用于解除handler和device的联系*/
    void (*start)(struct input_handle *handle);
	void (*start)(struct input_handle *handle);

	bool legacy_minors;
	int minor;			//次设备号
	const char *name;

	const struct input_device_id *id_table;		//用于和input_dev匹配

	struct list_head	h_list;	//用于链接和此input_handler相关的input_handle
	struct list_head	node;	//用于将该input_handler链入input_handler_list
};
input_handle
struct input_handle {

	void *private;

	int open;			//记录设备的打开次数(有多少个应用程序访问设备)
	const char *name;

	struct input_dev *dev;				//指向所属的device
	struct input_handler *handler;		//指向所属的handler

	struct list_head	d_node;		//用于将此input_handle链入所属input_dev的h_list链表
	struct list_head	h_node;		//用于将此input_handle链入所属input_handler的h_list链表
};
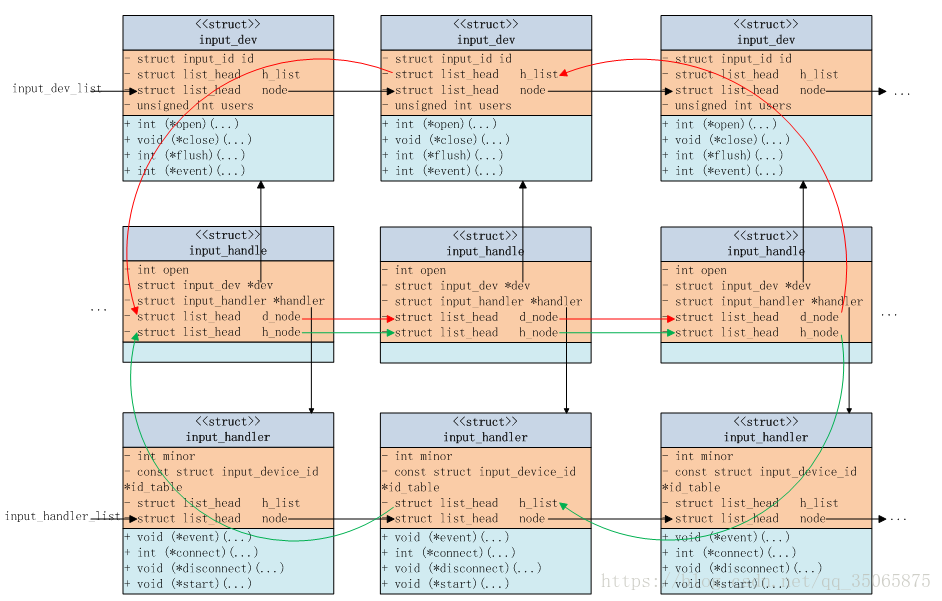
这个图中的红线和绿线连错了
input_handle中的d_node 和 h_node的任务是把该input_handle链入到所属的input_dev和input_handler中,所以红线和绿线应该连在同一列的input_dev和input_handler中才对
三大结构体关系浅析
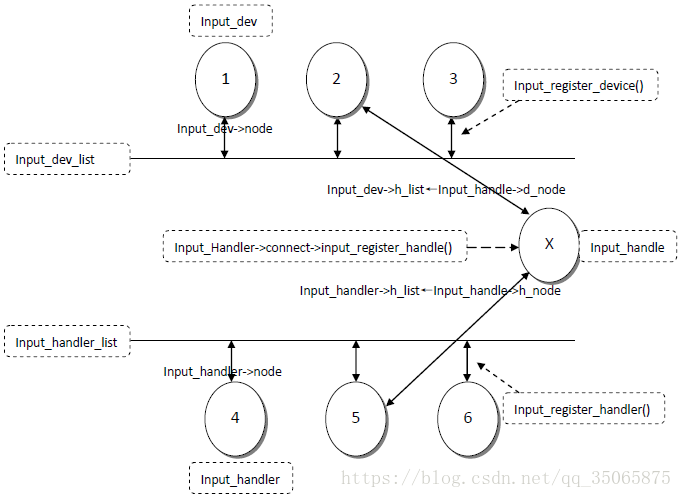
1.input_handle 是连接 input_device 和 input_handler 的桥梁
2.input_device可以通过input_handle找到input_handler,同样的input_handler可以通过input_handle找到input_device
3.一个device可能对应多个handler,而一个handler也不能只处理一个device,比如说一个鼠标,它可以对应evdev_handler,也可以对应mouse_handler,因此当其注册时与系统中的handler进行匹配,就有可能产生两个实例,一个是evdev,另一个是mousedev,而任何一个实例中都只有一个handle,至于以何种方式来传递事件,就由用户程序打开哪个实例来决定
4.后面一个情况很容易理解,一个事件驱动不能只为一个甚至一种设备服务,系统中可能有多种设备都能使用这类handler,比如event handler就可以匹配所有的设备
5.在input子系统中,有8种事件驱动,每种事件驱动最多可以对应32个设备,因此dev实例总数最多可以达到256个
1) input_dev
以下用synapticsTP驱动的代码为例子,分析代码如何实现。无关input subsystem的省略了
static int synaptics_rmi4_probe
	(struct i2c_client *client, const struct i2c_device_id *dev_id)
{
	int retval;
	unsigned char intr_status[4];
	struct synaptics_rmi4_data *rmi4_data;
	const struct synaptics_rmi4_platform_data *platformdata =
						client->dev.platform_data;


	/* Allocate and initialize the instance data for this client */
	rmi4_data = kcalloc(2, sizeof(struct synaptics_rmi4_data),			//开辟该驱动的数据结构空间
			    GFP_KERNEL);
	if (!rmi4_data)
		return -ENOMEM;

	rmi4_data->input_dev = input_allocate_device();	 //分配一个input_dev,其中设置了一些互斥锁、链表头、和名字
	if (rmi4_data->input_dev == NULL) {
		retval = -ENOMEM;
		goto err_input;
	}

	...
	...
	...

	rmi4_data->input_dev->name	= DRIVER_NAME;
	rmi4_data->input_dev->phys	= "Synaptics_Clearpad";
	rmi4_data->input_dev->id.bustype = BUS_I2C;
	rmi4_data->input_dev->dev.parent = &client->dev;
	input_set_drvdata(rmi4_data->input_dev, rmi4_data);

	//设置参数,用的MT_PROTOCOL_B

	set_bit(EV_SYN, rmi4_data->input_dev->evbit);
	set_bit(EV_KEY, rmi4_data->input_dev->evbit);
	set_bit(EV_ABS, rmi4_data->input_dev->evbit);

	input_set_abs_params(rmi4_data->input_dev, ABS_MT_POSITION_X, 0,
					rmi4_data->sensor_max_x, 0, 0);
	input_set_abs_params(rmi4_data->input_dev, ABS_MT_POSITION_Y, 0,
					rmi4_data->sensor_max_y, 0, 0);
	input_set_abs_params(rmi4_data->input_dev, ABS_MT_TOUCH_MAJOR, 0,
						MAX_TOUCH_MAJOR, 0, 0);
	input_mt_init_slots(rmi4_data->input_dev,
				rmi4_data->fingers_supported, 0);

	...

	retval = request_threaded_irq(client->irq, NULL,				//设置中断处理函数 synaptics_rmi4_irq
					synaptics_rmi4_irq,
					platformdata->irq_type,
					DRIVER_NAME, rmi4_data);
	if (retval) {
		dev_err(&client->dev, "%s:Unable to get attn irq %d\n",
				__func__, client->irq);
		goto err_query_dev;
	}

	retval = input_register_device(rmi4_data->input_dev);		//注册到input core中
	if (retval) {
		dev_err(&client->dev, "%s:input register failed\n", __func__);
		goto err_free_irq;
	}
	...
	return retval;
	...
	...
}
关注一下input_register_device()函数
int input_register_device(struct input_dev *dev)
{
	...
	/* Every input device generates EV_SYN/SYN_REPORT events. */
	__set_bit(EV_SYN, dev->evbit);

	 /*  事件类型由input_dev的evbit成员来表示,
    在这里将其EV_SYN置位,表示设备支持所有的事件。
    注意,一个设备可以支持一种或者多种事件类型

    #define EV_SYN              0x00    //表示设备支持所有的事件
    #define EV_KEY              0x01    //键盘或者按键,表示一个键码
    #define EV_REL              0x02    //鼠标设备,表示一个相对的光标位置结果
    #define EV_ABS              0x03    //手写板产生的值,其是一个绝对整数值
    #define EV_MSC              0x04    //其他类型
    #define EV_LED              0x11    //LED灯设备
    #define EV_SND              0x12    //蜂鸣器,输入声音
    #define EV_REP              0x14    //允许重复按键类型
    #define EV_PWR              0x16    //电源管理事件
    */

	/* KEY_RESERVED is not supposed to be transmitted to userspace. */
	__clear_bit(KEY_RESERVED, dev->keybit);

 	...


	if (!dev->rep[REP_DELAY] && !dev->rep[REP_PERIOD]) {
		dev->timer.data = (long) dev;
		dev->timer.function = input_repeat_key;
		dev->rep[REP_DELAY] = 250;
		dev->rep[REP_PERIOD] = 33;
	}

	 /*
     * rep主要是处理重复按键,如果没有定义dev->rep[REP_DELAY]和 dev->rep[REP_PERIOD],
     * 则将其赋值为默认值。dev->rep[REP_DELAY]是指第一次按下多久算一次,这里是250ms,
     * dev->rep[REP_PERIOD]指如果按键没有被抬起,每33ms算一次。
     */

    //如果dev没有定义getkeycode和setkeycode,则赋默认值。
    //他们的作用一个是获得键的扫描码,一个是设置键的扫描码

	if (!dev->getkeycode)
		dev->getkeycode = input_default_getkeycode;

	if (!dev->setkeycode)
		dev->setkeycode = input_default_setkeycode;

	error = device_add(&dev->dev);			/*将input_dev封装的dev注册到sysfs*/
	if (error)
		goto err_free_vals;
	...
	 /*将input_dev挂在input_dev_list上*/
	list_add_tail(&dev->node, &input_dev_list);	//将新分配的input设备连接到input_dev_list链表上

	list_for_each_entry(handler, &input_handler_list, node)	//宏for循环
		input_attach_handler(dev, handler);

		 //input_attach_handler的主要功能就是调用了两个函数,
		 //一个input_match_device进行配对,
		 //一个connect处理配对成功后续工作,遍历input_handler_list链表,配对 input_dev 和 input_handler
		 //input_attach_handler 这个函数是配对的关键

	/*
     * 这里先把input_dev挂载到input_dev_list 链表上,然后对每个挂载到input_handler_list 的handler
     * 调用input_attach_handler(dev, handler); 去匹配。 所有的input_dev挂载到input_dev_list 链表上
     * 所有的handler挂载到input_handler_list 上
     */
	...
}
这个函数就是为input_dev设置默认值,然后将其挂在input_dev_list上,与挂在input_handler_list中的handler相匹配,如果匹配成功,就调用handler的connect函数
接下来看看 input_attach_handler是怎么做的
static int input_attach_handler(struct input_dev *dev, struct input_handler *handler)
{
	const struct input_device_id *id;
	int error;

	id = input_match_device(handler, dev);	 /*匹配id*/
	if (!id)
		return -ENODEV;

	error = handler->connect(handler, dev, id);	 /*如果匹配,则调用具体的handler的connect函数*/

	//evdev_connect函数做配对后的善后工作,分配一个evdev结构体,
    //并初始化相关成员,evdev结构体中有input_handle结构,初始化并注册之。

	if (error && error != -ENODEV)
		pr_err("failed to attach handler %s to device %s, error: %d\n",
		       handler->name, kobject_name(&dev->dev.kobj), error);

	return error;
}
关于input_match_device函数,它是通过匹配id来确认匹配的,看handler的id是否支持,在事件处理层有这么一段代码,以evdev.c为例:
static const struct input_device_id evdev_ids[] = {
	{ .driver_info = 1 },	/* Matches all devices */
	{ },			/* Terminating zero entry */
};
这是对 input_handler 的成员id_table 的初始化
evdev_ids没有定义flag,也没有定义匹配属性值
这个evdev_ids的意思就是:evdev_handler可以匹配所有input_dev设备
也就是所有的input_dev发出的事件,都可以由evdev_handler来处理
特别注意,input_attach_handler中通过handler调用的connect函数,是在事件处理层定义并实现的,以evdev.c为例,则connect函数就是evdev_connect
evdev_connect()函数主要用来连接input_dev和input_handler,这样事件的流通链才能建立,流通链建立后,事件才知道被谁处理,或者处理后将向谁返回结果
2) input_handler
input_handler 是在event handler层进行实例化的,在evdev.c中:
static struct input_handler evdev_handler = {
	.event		= evdev_event,
	.events		= evdev_events,
	.connect	= evdev_connect,
	.disconnect	= evdev_disconnect,
	.legacy_minors	= true,
	.minor		= EVDEV_MINOR_BASE,
	.name		= "evdev",
	.id_table	= evdev_ids,
};

static int __init evdev_init(void)
{
	return input_register_handler(&evdev_handler);
}

static void __exit evdev_exit(void)
{
	input_unregister_handler(&evdev_handler);
}

module_init(evdev_init);
module_exit(evdev_exit);
可以看出,evdev_handler的注册是放在平台初始化函数中进行的,也就是说,evdev.c一旦加载,就会执行evdev_init函数,则input_register_handler函数立即执行
int input_register_handler(struct input_handler *handler)
{
	struct input_dev *dev;
	int error;

	error = mutex_lock_interruptible(&input_mutex);
	if (error)
		return error;

	INIT_LIST_HEAD(&handler->h_list);

	list_add_tail(&handler->node, &input_handler_list);

	list_for_each_entry(dev, &input_dev_list, node)
		input_attach_handler(dev, handler);

	input_wakeup_procfs_readers();

	mutex_unlock(&input_mutex);
	return 0;
}
由此可见,input_register_handler和input_register_device本质上做了一样的事情(都是在找与自己匹配的input_dev/input_handler),input_attach_handler也会调用handler->connect
接下来看看evdev.c中的connect函数:
static int evdev_connect(struct input_handler *handler, struct input_dev *dev,
			 const struct input_device_id *id)
{
	struct evdev *evdev;
	int minor;
	int dev_no;
	int error;

	 /*
     * EVDEV_MINORS定义为32.表示evdev_handler所表示的32个设备文件.
     * evdev_table是一个struct evdev类型的全局数组.struct evdev是模块使用的封装结构
     * 在evdev_table找到为空的那一项,当找到为空的一项,便结束for循环。
     * 这时,minor就是数组中第一项为空的序号
     */

	minor = input_get_new_minor(EVDEV_MINOR_BASE, EVDEV_MINORS, true);
	if (minor < 0) {
		error = minor;
		pr_err("failed to reserve new minor: %d\n", error);
		return error;
	}

	evdev = kzalloc(sizeof(struct evdev), GFP_KERNEL);
	if (!evdev) {
		error = -ENOMEM;
		goto err_free_minor;
	}

	 /*
     * 对分配的evdev结构进行初始化,
     * 主要对链表、互斥锁和等待队列做必要的初始化。
     * 在evdev中,封装了一个handle结构,这个结构与handler是不同的。
     * 可以把handle看成是handler和input device的信息集合体,
     * 这个结构用来联系匹配成功的handler和input device。
     */

	INIT_LIST_HEAD(&evdev->client_list);
	spin_lock_init(&evdev->client_lock);
	mutex_init(&evdev->mutex);
	init_waitqueue_head(&evdev->wait);
	evdev->exist = true;

	dev_no = minor;
	/* Normalize device number if it falls into legacy range */
	if (dev_no < EVDEV_MINOR_BASE + EVDEV_MINORS)
		dev_no -= EVDEV_MINOR_BASE;
	dev_set_name(&evdev->dev, "event%d", dev_no);

	evdev->handle.dev = input_get_device(dev);
	evdev->handle.name = dev_name(&evdev->dev);
	evdev->handle.handler = handler;
	evdev->handle.private = evdev;

	 /*
     * 在设备驱动模型中注册一个evdev->dev的设备,并初始化一个evdev->dev的设备
     * 这里,使evdev->dev所属的类指向input_class
     * 这样在/sysfs中创建的设备目录就会在/sys/class/input/下显示
     */

	evdev->dev.devt = MKDEV(INPUT_MAJOR, minor);
	evdev->dev.class = &input_class;
	evdev->dev.parent = &dev->dev;
	evdev->dev.release = evdev_free;
	device_initialize(&evdev->dev);

	 /*
     *input_register_handle完成的主要功能是:
     *list_add_tail_rcu(&handle->d_node, &dev->h_list);
     *list_add_tail(&handle->h_node, &handler->h_list);
	 */

	error = input_register_handle(&evdev->handle);
	if (error)
		goto err_free_evdev;

	cdev_init(&evdev->cdev, &evdev_fops);
	evdev->cdev.kobj.parent = &evdev->dev.kobj;
	error = cdev_add(&evdev->cdev, evdev->dev.devt, 1);
	if (error)
		goto err_unregister_handle;

	error = device_add(&evdev->dev); //将evdev->device注册到sysfs文件系统中
	if (error)
		goto err_cleanup_evdev;

	return 0;

 err_cleanup_evdev:
	evdev_cleanup(evdev);
 err_unregister_handle:
	input_unregister_handle(&evdev->handle);
 err_free_evdev:
	put_device(&evdev->dev);
 err_free_minor:
	input_free_minor(minor);
	return error;
}
如上,input_dev和input_handler注册时都要调用的handler->connect,所要完成的最主要的任务,就是填充并注册input_handle(顺便初始化了一些链表头、锁、等待队列)
input_register_handle函数把handle通过d_node挂到input_dev的h_list,通过h_node挂到handler的h_list上,这样input_dev、input_handler、input_handle就联系起来了,可与前面的框图对照
事件上报流程
在input driver中,完成对input_dev参数的设定,把input_dev注册到input core中,然后在适当的时候(比如,外部触发中断)由input_driver层把键值填充成包,发送给input core层,input core会把数据交给(与发送数据的input_dev匹配的)input_handler处理,处理后的结果上报给用户空间
在此用几句话,总结一下上面讲述的内容:
Q1:input_dev怎么注册到input core?
A1:以TP为例,在driver的probe中填充input_dev必要的成员,设置好input需要的参数,调用input_register_device注册到input core上
Q2:input_handler怎么注册到input core?
A2:在平台初始化期间,以模块的形式,注册到core上
Q3:input_dev 和 input_handler怎么匹配?通过什么紧紧的联系在一起?
A3:input_dev注册到input core后,就开始遍历input_handler_list上跟自己匹配的handler,同理,input_handler注册到input core后,也开始遍历input_dev_list上跟自己匹配的dev,(用id匹配)成功匹配好后,就调用handler->connect函数来生成一个input_handle,把input_dev和input_handler联系到一起
Q4:之前说过,把input_dev把键值上报给core后,交由匹配的handler来处理,那是怎么处理的呢?
A4:
1.event handler层与上层交互,用到了一个实例化的file_operations,以evdev为例,这个实例化对象就是evdev_fops,这里面的成员函数就是对上层提供的接口,当上层要进行读操作,就会调用evdev_read函数
2.这个evdev_read函数的最后,实现了一个等待队列来等待事件,没有事件就阻塞。(我们只有在触摸按键事件发生,中断到来,我们采取上报按键事件,并唤醒阻塞,让event handler层的evdev_read将键值最终通过copy_to_user送到用户空间)
3.既然把键值交由给了input_handler来处理,那肯定是input_handler控制唤醒了阻塞,实现把键值上报给用户空间了,接下来看看怎么控制唤醒了阻塞
4.在TP的driver中断服务函数中,一定调用了input_sync来把键值上报给core,然后经历以下的调用流程:input_sync->input_event->input_handle_event->input_pass_values->input_to_handler,在input_to_handler中就调用了handler->events和handler->event,这里出现的handler->events和handler->event就是event handler层定义的evdev_handler的成员函数evdev_events、evdev_event。evdev_event最终也调用了evdev_events,然后调用evdev_pass_values,evdev_pass_values这个函数最终调用了wake_up_interruptible函数,唤醒了睡眠,这就与上面说的evdev_read函数联系上了。
我们在evdev_read函数中通过等待队列实现了阻塞,等待输入事件的随机发生
而在触摸按键事件随机发生后,设备驱动层代码通过input_report_abs等函数上报数据,逐级调用,通过在事件处理层evdev.c里定义的evdev_handler->events处理事件,最终调用到evdev_pass_values并唤醒睡眠
一旦在evdev_read中的等待队列被唤醒,则进入下一轮循环上报新的键值给用户空间