随着RESTful编程模型的流行,越来越多的团队开始基于RESTful来构建自己的API接口,不管是大到企业级的网关API,还是小到部门小组间的服务调用,RESTful都越来越被青睐。
一般我们构建API的目的是为了适配多终端,比如,IOS,Andriod,H5 Web,而通常都是一个或多个团队在负责,而这时就需要我们编写一份接口文档,并同步给不同的团队。这是我们最常用的方法之一,但此时,就不得不面临两个问题:
- 接口数量太多,类型太繁杂(需要考虑HTTP,TCP等不同的技术细节),导致输出一份高质量的接口文档需要耗费大量的人力时间。
- 随着时间的推移,修改接口后必然需要修改文档,而此时还涉及到同步信息到不同团队,如果没有一个同步保证机制,很容易就出现不一致的情况。
为了解决上面的问题,本文将介绍RESTful API的好伙伴Swagger,它可以很容易的整合到Spring Web系里(Spring MVC和Spring Boot)中,并配合组织出强大的RESTful API文档。它最大的特色在于,让维护文档和修改代码整合为一体(这也是程序猿们最喜欢的方式之一),可以让我们在修改代码逻辑的同时方便的修改文档说明。具体效果如下图所示:
添加Spring Boot启动类
新建一个类:TestController,如下所示,加入最简单的启动代码,也可以参考《Spring Boot实践折腾记》的boot_start工程来启动一个Restful API接口的Spring Boot的工程。
@EnableAutoConfiguration
@RestController
public class TestController {

    public static void main(String[] args) {
        SpringApplication.run(TestController.class,args);
    }

}
再自定义一个User对象,如下:
public class User {

    private int id;

    private String name;
    private String phone;
    private String address;

    public User() {
    }
//省略get、set
}
添加Swagger2依赖
在pom.xml中加入Swagger2的依赖,这里使用最新版2.8.0。
<dependency>
    <groupId>io.springfox</groupId>
    <artifactId>springfox-swagger2</artifactId>
    <version>2.8.0</version>
</dependency>
<dependency>
    <groupId>io.springfox</groupId>
    <artifactId>springfox-swagger-ui</artifactId>
    <version>2.8.0</version>
</dependency>
创建Swagger2配置类
创建Swagger2的配置类ConfigSwagger2。
@Configuration
@EnableSwagger2
public class ConfigSwagger2 {

    @Bean
    public Docket writeRestApi() {
        return new Docket(DocumentationType.SWAGGER_2)
                .apiInfo(apiInfo())
                .select()
                .apis(RequestHandlerSelectors.basePackage("com.hjf.boot.demo.swagger"))
                .paths(PathSelectors.any())
                .build();
    }

    private ApiInfo apiInfo() {
        return new ApiInfoBuilder()
                .title("在Spring Boot中使用Swagger自动构建RESTful APIs文档")
                .description("示例来自:http://blog.csdn.net/mickjoust")
                .termsOfServiceUrl("")
                .contact("mickjoust")
                .version("1.0")
                .build();
    }
}如上代码所示,我们通过@Configuration注解,让Spring Boot来加载该类配置。再通过@EnableSwagger2注解来启用Swagger2。
通过@Bean注解来让writeRestApi函数创建类型为Docket的Bean(也就是Swagger要使用的返回对象,同时加入到Spring的IoC容器来管理)。
apiInfo()方法用来创建该API的基本信息(这些信息最后会展现在文档页面中)。
select()函数返回一个ApiSelectorBuilder实例用来控制哪些接口暴露给Swagger来展现,本例采用指定扫描的包路径来定义——Swagger会扫描该包下所有Controller定义的API,并产生文档内容(除了被@ApiIgnore指定的请求)。
添加API和文档描述
在完成了上述配置后,这时已经能够产生一个空的接口文档,启动boot程序,访问:http://localhost:8080/swagger-ui.html,如下所示:

注意,这里其实启动会报错,原因是因为swagger使用了jacson的data-bind依赖,需要添加依赖:
<dependency>
    <groupId>com.fasterxml.jackson.core</groupId>
    <artifactId>jackson-databind</artifactId>
    <version>2.9.4</version>
</dependency>接下来,我们需要自己增加API接口和对应描述说明。如下所示,我们通过@ApiOperation注解来给API增加说明、通过@ApiImplicitParams、@ApiImplicitParam注解来给参数增加说明。
@EnableAutoConfiguration
@RestController
@RequestMapping("/use")
@ComponentScan
public class TestController {
public static void main(String[] args) {
SpringApplication.run(TestController.class,args);
}
//模拟保存用户信息
static Map<Integer, User> users = new HashMap<>();
static
{
User user1 = new User(1,"john","18012345678","cd");
User user2 = new User(2,"marry","18012345678","bj");
User user3 = new User(3,"jack","18012345678","sz");
users.put(1,user1);
users.put(2,user2);
users.put(3,user3);
}
@ApiOperation(value="创建用户", notes="传一个表单数据")
@ApiImplicitParam(name = "User", value = "用户详细实体user", required = true, dataType = "User")
@RequestMapping(value="", method=RequestMethod.POST)
public String postUser(@RequestBody User user) {
users.put(user.getId(), user);
return "success";
}
@ApiOperation(value="获取用户", notes="根据id查询信息")
@ApiImplicitParam(name = "id", value = "用户ID", required = true, dataType = "Integer")
@RequestMapping(value="/{id}", method=RequestMethod.GET)
public User getUser(@PathVariable Long id) {
return users.get(id);
}
@ApiOperation(value="更新用户", notes="根据id来指定更新对象")
@ApiImplicitParams({
@ApiImplicitParam(name = "id", value = "用户ID", required = true, dataType = "Long"),
@ApiImplicitParam(name = "User", value = "用户详细实体user", required = true, dataType = "User")
})
@RequestMapping(value="/{id}", method=RequestMethod.PUT)
public String putUser(@PathVariable Integer id, @RequestBody User user) {
User user$ = users.get(id);
user$.setName(user.getName());
users.put(id, user$);
return "success";
}
@ApiOperation(value="删除用户", notes="根据id删除用户信息")
@ApiImplicitParam(name = "id", value = "用户ID", required = true, dataType = "Long")
@RequestMapping(value="/{id}", method=RequestMethod.DELETE)
public String deleteUser(@PathVariable Integer id) {
users.remove(id);
return "success";
}
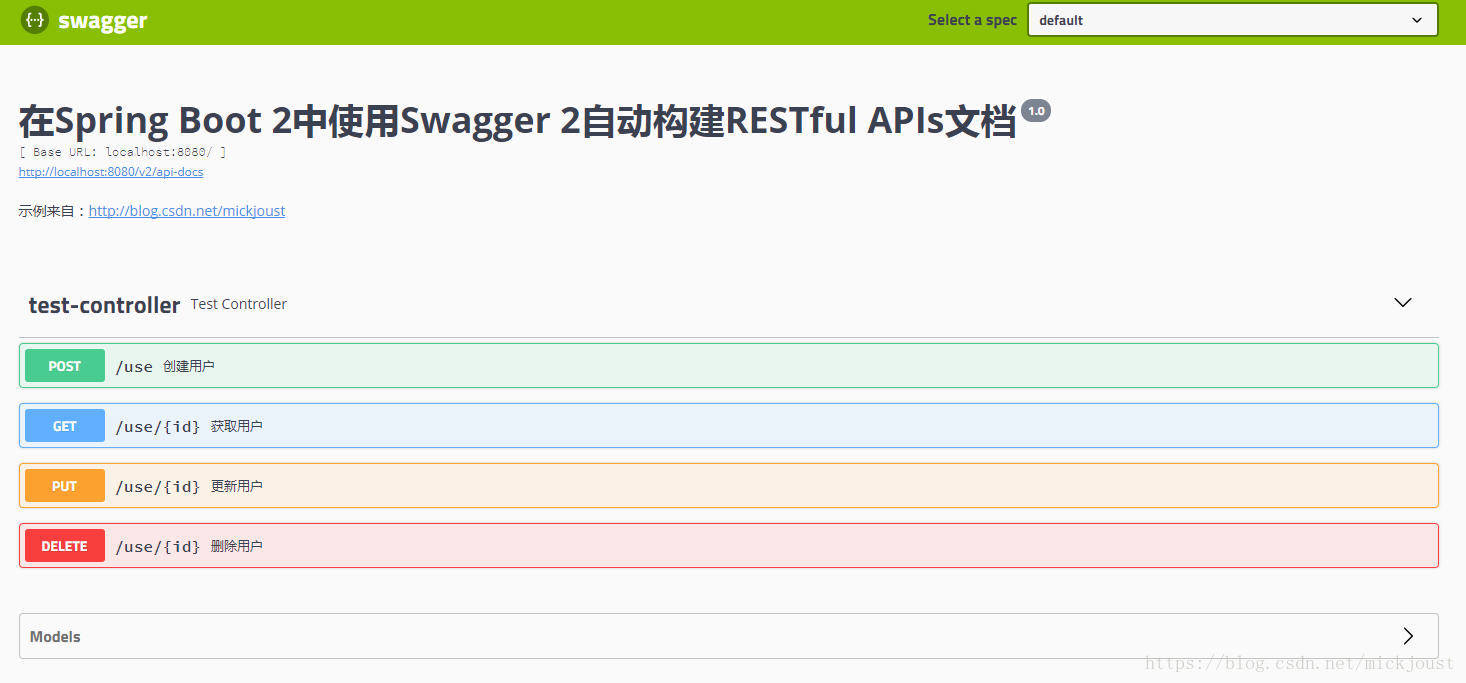
}启动程序,这时我们就能看到定义的4个接口和对应的接口描述了,点击控制器还能看都具体的接口,还可以看到更具体的信息,比如以获取用户信息的API为例,如下图所示。
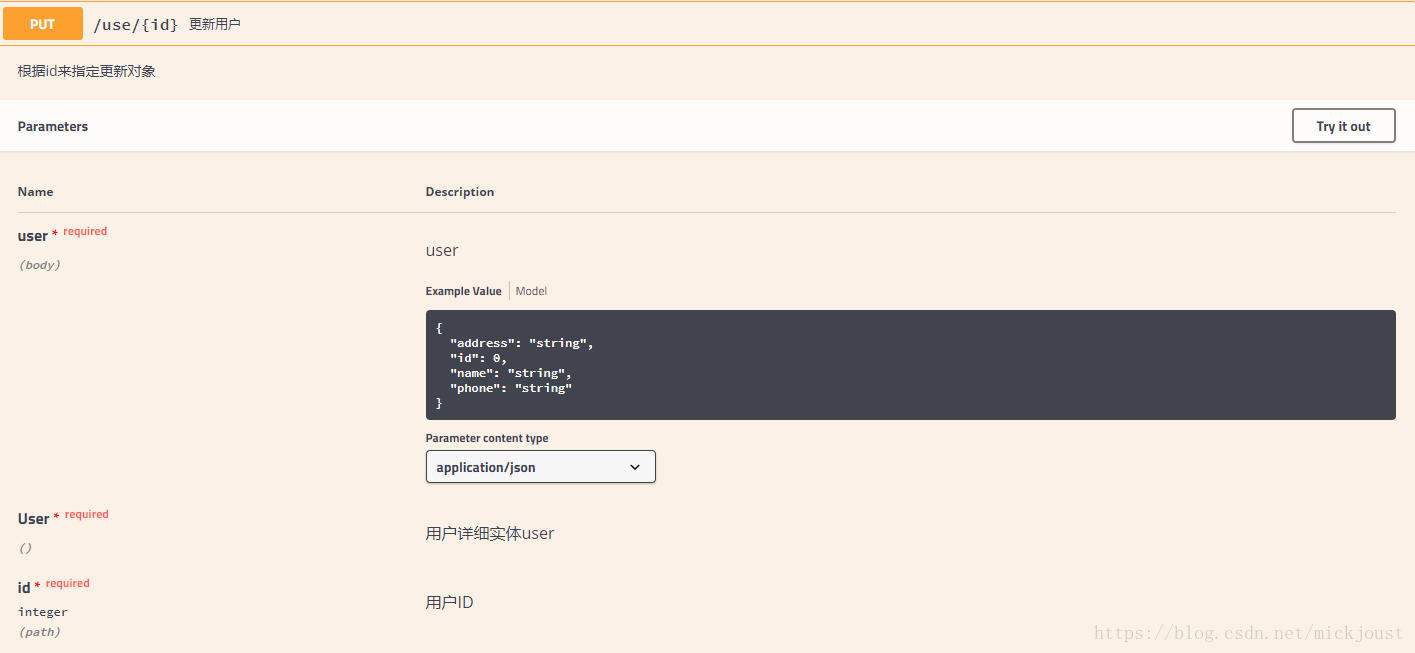
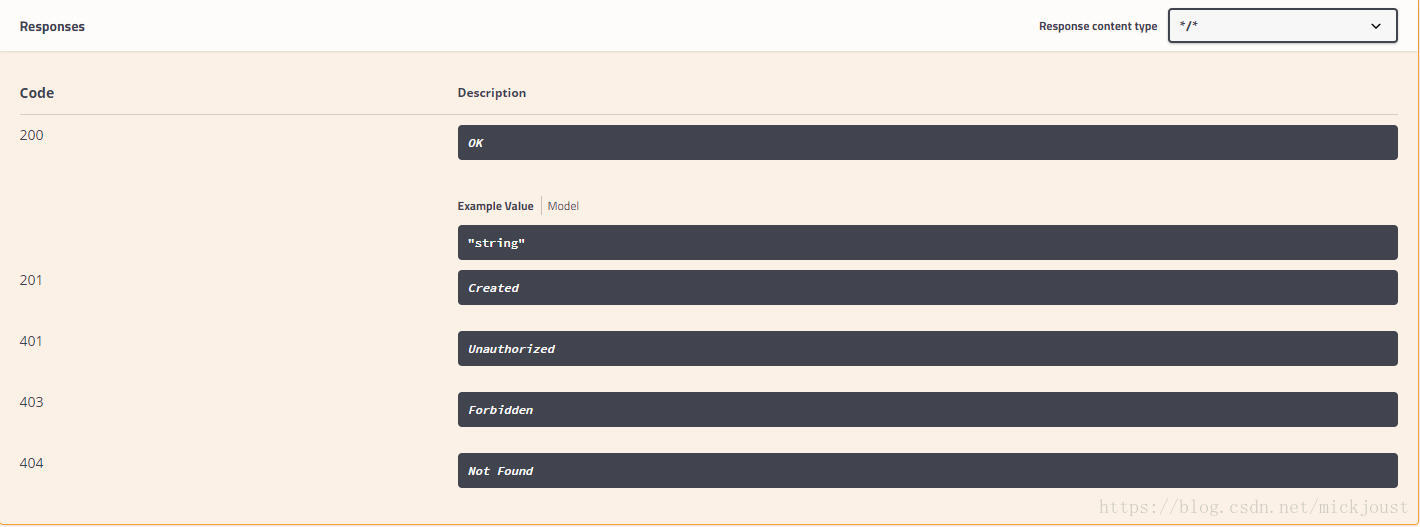
API调试
在上图请求的页面中,我们看到Parameter一栏有个输入框?
是的,Swagger除了查看接口功能外,还提供了调试测试功能,点击“Try it out!”按钮,会出现相应的参数编辑,然后点击执行按钮“Excute”,即可完成了一次请求调用!
因此,在构建RESTful API的同时,加入swagger来对API文档进行管理,是个不错的选择。
思考一个问题:如果现在让你设计一个API网关,你该如何让API能自动发布到网关上?
这是我们下次要尝试解决的问题。
完整示例:[ boot-swagger ](因为网络问题暂未上传代码)
参考资源
1、Swagger官方网站
2、Spring Boot