
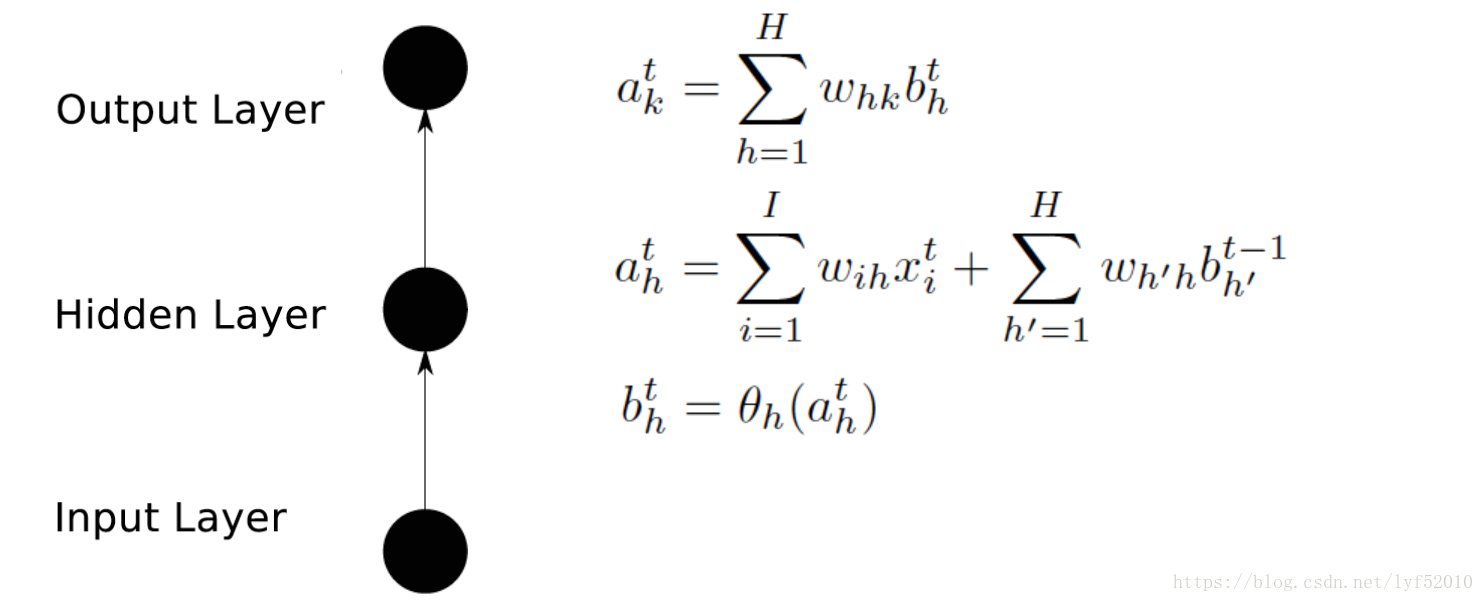
本文用到的公式基本来自Alex的论文,其中a表示汇集计算的值,b表示经过激活函数计算的值,w是不同节点之间连接的参数(具体睡谁连谁看下标),带下标k的是输出层,带下标h的是隐藏层相关的,除此之外你看到所有带括号的的函数都是激活函数, ϵ 和 δ 的定义看公式,L 是最后的Loss function,这里没有给出具体的计算方法,因为这和NN是一样的,可以看到输出层和普通的NN是完全一样的,接收隐藏层传入的数据并乘以参数求和,只是每一个计算出来的值都有个时间上标t,表示它是t时刻的那个节点。
而隐藏层的计算就是和NN不同的地方,从之前的拓扑图也看到了,隐藏层会接受来自上一时间隐藏层传入的数据,在公式里也体现出来了:第一个求和是和NN一致的,接收来自输入层的数据,第二个是接收来自上一隐藏层的数据。
参考链接:https://blog.csdn.net/Dark_Scope/article/details/47056361

LSTM(Long-Short Term Memory)
原生的RNN会遇到一个很大的问题,叫做 The vanishing gradient problem for RNNs,也就是后面时间的节点对于前面时间的节点感知力下降,也就是忘事儿,这也是NN在很长一段时间内不得志的原因,网络一深就没法训练了,深度学习那一套东西暂且不表,RNN解决这个问题用到的就叫LSTM,简单来说就是你不是忘事儿吗?我给你拿个小本子把事记上,好记性不如烂笔头嘛,所以LSTM引入一个核心元素就是Cell。
与其说LSTM是一种RNN结构,倒不如说LSTM是RNN的一个魔改组件,把上面看到的网络中的小圆圈换成LSTM的block,就是所谓的LSTM了。那它的block长什么样子呢?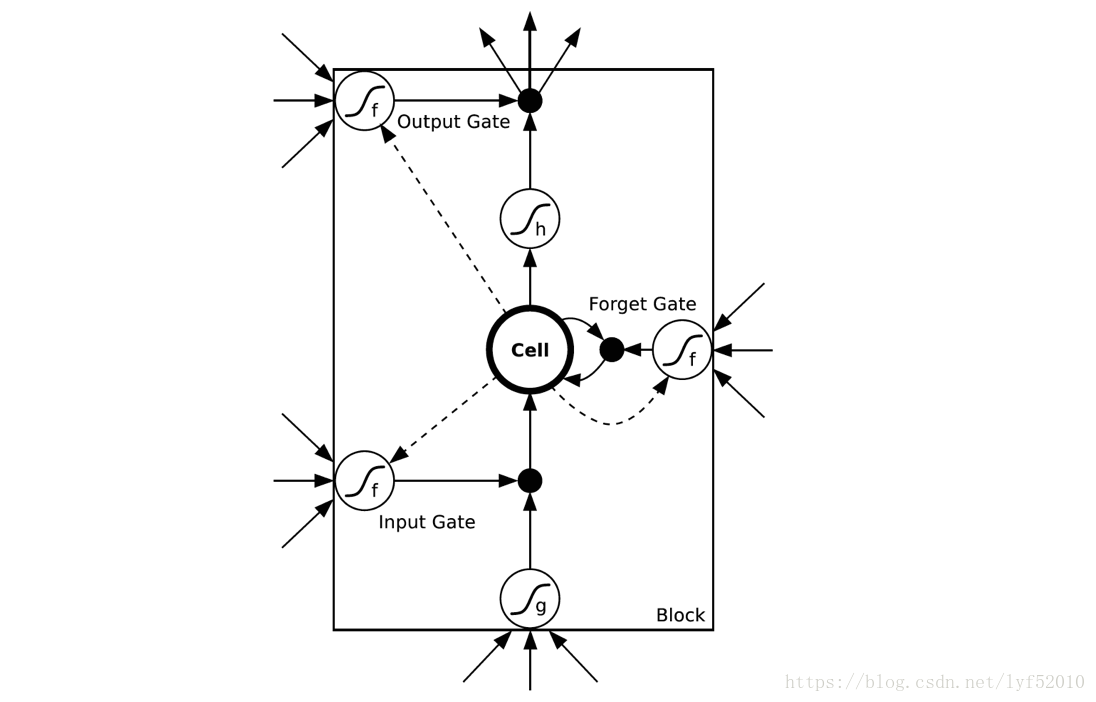
怎么这么复杂……不要怕,下文慢慢帮你缕清楚。理解LSTM最方便的就是结合上面这个图,先简单介绍下里面有几个东西:
- Cell,就是我们的小本子,有个叫做state的参数东西来记事儿的
- Input Gate,Output Gate,在参数输入输出的时候起点作用,算一算东西
- Forget Gate:不是要记东西吗,咋还要Forget呢。这个没找到为啥就要加入这样一个东西,因为原始的LSTM在这个位置就是一个值1,是连接到下一时间的那个参数,估计是以前的事情记太牢了,最近的记不住就不好了,所以要选择性遗忘一些东西。(没找到解释设置这个东西的动机,还望指正)
在阅读下面公式说明的时候时刻记得这个block上面有一个输出节点,下面有一个输入节点,block只是中间的隐层小圆圈
参考链接:
1. 常用类https://blog.csdn.net/u010089444/article/details/60963053
class tf.contrib.rnn.BasicLSTMCell
BasicLSTMCell 是最简单的一个LSTM类,没有实现clipping,projection layer,peep-hole等一些LSTM的高级变种,仅作为一个基本的basicline结构存在,如果要使用这些高级变种,需用class tf.contrib.rnn.LSTMCell这个类。
使用方式:
lstm = rnn.BasicLSTMCell(lstm_size, forget_bias=1.0, state_is_tuple=True)- 1
Args:
num_units: int, The number of units in the LSTM cell.
forget_bias: float, The bias added to forget gates.
state_is_tuple: If True, accepted and returned states are 2-tuples of the c_state and m_state. If False, they are concatenated along the column axis. The latter behavior will soon be deprecated.
activation: Activation function of the inner states.
说明:
- num_units 是指一个Cell中神经元的个数,并不是循环层的Cell个数。这里有人可能会疑问:循环层的Cell数目怎么表示?答案是通过如下代码中的 time_step_size确定(X_split 中划分出的arrays数量为循环层的Cell个数):
X_split = tf.split(XR, time_step_size, 0)- 1
- 在任意时刻 t ,LSTM Cell会产生两个内部状态 ct和ht (关于RNN与LSTM的介绍可参考:循环神经网络与LSTM)。当state_is_tuple=True时,上面讲到的状态ct和ht 就是分开记录,放在一个二元tuple中返回,如果这个参数没有设定或设置成False,两个状态就按列连接起来返回。官方说这种形式马上就要被deprecated了,所有我们在使用LSTM的时候要加上state_is_tuple=True。
class tf.contrib.rnn.DropoutWrapper
RNN中的dropout和cnn不同,在RNN中,时间序列方向不进行dropout,也就是说从t-1时刻的状态传递到t时刻进行计算时,这个中间不进行memory的dropout;如下图所示,Dropout仅应用于虚线方向的输入,即仅针对于上一层的输出做Dropout。
因此,我们在代码中定义完Cell之后,在Cell外部包裹上dropout,这个类叫DropoutWrapper,这样我们的Cell就有了dropout功能!
lstm = tf.nn.rnn_cell.DropoutWrapper(lstm, output_keep_prob=keep_prob)- 1
Args:
cell: an RNNCell, a projection to output_size is added to it.
input_keep_prob: unit Tensor or float between 0 and 1, input keep probability; if it is float and 1, no input dropout will be added.
output_keep_prob: unit Tensor or float between 0 and 1, output keep probability; if it is float and 1, no output dropout will be added.
seed: (optional) integer, the randomness seed.
class tf.contrib.rnn.MultiRNNCell
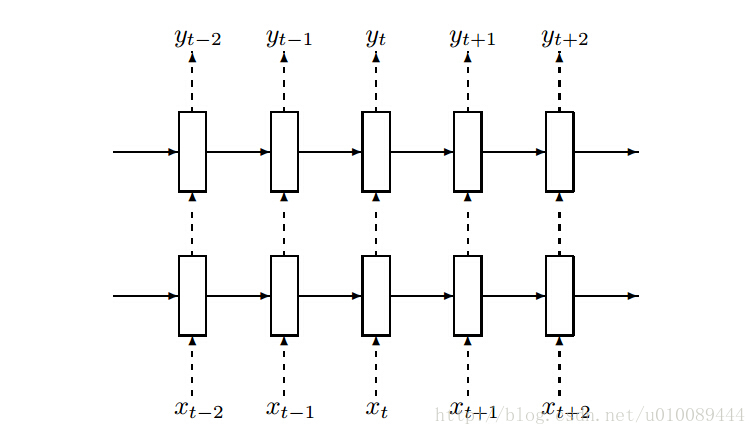
如果希望整个网络的层数更多(例如上图表示一个两层的RNN,第一层Cell的output还要作为下一层Cell的输入),应该堆叠多个LSTM Cell,tensorflow给我们提供了MultiRNNCell,因此堆叠多层网络只生成这个类即可:
lstm = tf.nn.rnn_cell.MultiRNNCell([lstm] * num_layers, state_is_tuple=True)- 1
2. 代码
MNIST数据集的格式与数据预处理代码 input_data.py的讲解请参考 :Tutorial (2)
# -*- coding: utf-8 -*-
import tensorflow as tf
from tensorflow.contrib import rnn

import numpy as np
import input_data

# configuration
#                        O * W + b -> 10 labels for each image, O[? 28], W[28 10], B[10]
#                       ^ (O: output 28 vec from 28 vec input)
#                       |
#      +-+  +-+       +--+
#      |1|->|2|-> ... |28| time_step_size = 28
#      +-+  +-+       +--+
#       ^    ^    ...  ^
#       |    |         |
# img1:[28] [28]  ... [28]
# img2:[28] [28]  ... [28]
# img3:[28] [28]  ... [28]
# ...
# img128 or img256 (batch_size or test_size 256)
#      each input size = input_vec_size=lstm_size=28

# configuration variables
input_vec_size = lstm_size = 28 # 输入向量的维度
time_step_size = 28 # 循环层长度

batch_size = 128
test_size = 256

def init_weights(shape):
    return tf.Variable(tf.random_normal(shape, stddev=0.01))


def model(X, W, B, lstm_size):
    # X, input shape: (batch_size, time_step_size, input_vec_size)
    # XT shape: (time_step_size, batch_size, input_vec_size)
    XT = tf.transpose(X, [1, 0, 2])  # permute time_step_size and batch_size,[28, 128, 28]

    # XR shape: (time_step_size * batch_size, input_vec_size)
    XR = tf.reshape(XT, [-1, lstm_size]) # each row has input for each lstm cell (lstm_size=input_vec_size)

    # Each array shape: (batch_size, input_vec_size)
    X_split = tf.split(XR, time_step_size, 0) # split them to time_step_size (28 arrays),shape = [(128, 28),(128, 28)...]


    # Make lstm with lstm_size (each input vector size). num_units=lstm_size; forget_bias=1.0
    lstm = rnn.BasicLSTMCell(lstm_size, forget_bias=1.0, state_is_tuple=True)

    # Get lstm cell output, time_step_size (28) arrays with lstm_size output: (batch_size, lstm_size)
    # rnn..static_rnn()的输出对应于每一个timestep,如果只关心最后一步的输出,取outputs[-1]即可
    outputs, _states = rnn.static_rnn(lstm, X_split, dtype=tf.float32)  # 时间序列上每个Cell的输出:[... shape=(128, 28)..]

    # Linear activation
    # Get the last output
    return tf.matmul(outputs[-1], W) + B, lstm.state_size # State size to initialize the stat

mnist = input_data.read_data_sets("MNIST_data/", one_hot=True) # 读取数据

# mnist.train.images是一个55000 * 784维的矩阵, mnist.train.labels是一个55000 * 10维的矩阵
trX, trY, teX, teY = mnist.train.images, mnist.train.labels, mnist.test.images, mnist.test.labels

# 将每张图用一个28x28的矩阵表示,(55000,28,28,1)
trX = trX.reshape(-1, 28, 28)
teX = teX.reshape(-1, 28, 28)

X = tf.placeholder("float", [None, 28, 28])
Y = tf.placeholder("float", [None, 10])

# get lstm_size and output 10 labels
W = init_weights([lstm_size, 10])  # 输出层权重矩阵28×10
B = init_weights([10])  # 输出层bais

py_x, state_size = model(X, W, B, lstm_size)

cost = tf.reduce_mean(tf.nn.softmax_cross_entropy_with_logits(logits=py_x, labels=Y))
train_op = tf.train.RMSPropOptimizer(0.001, 0.9).minimize(cost)
predict_op = tf.argmax(py_x, 1)

session_conf = tf.ConfigProto()
session_conf.gpu_options.allow_growth = True

# Launch the graph in a session
with tf.Session(config=session_conf) as sess:
    # you need to initialize all variables
    tf.global_variables_initializer().run()

    for i in range(100):
        for start, end in zip(range(0, len(trX), batch_size), range(batch_size, len(trX)+1, batch_size)):
            sess.run(train_op, feed_dict={X: trX[start:end], Y: trY[start:end]})

        test_indices = np.arange(len(teX))  # Get A Test Batch
        np.random.shuffle(test_indices)
        test_indices = test_indices[0:test_size]

        print(i, np.mean(np.argmax(teY[test_indices], axis=1) ==
                         sess.run(predict_op, feed_dict={X: teX[test_indices]})))