一, vue开发环境搭建
1, 开发工具
WebStorm或Visual Studio Code
2, 下载安装nodejs
## 后端开发环境 Eclipse + JDK + Tomcat 等不再赘述
二, vue测试项目搭建
1, 新建文件夹作为项目路径
E:\vueDemo
2, 安装npm
打开Visual Studio Code, 打开文件夹vueDemo, 运行指令:
npm install -g cnpm --registry=https://registry.npm.taobao.org
3, 安装vue-cli脚手架
cnpm install vue-cli -g

4, 查看vue是否安装成功
vue --version
5, 安装webpack
vue init webpack
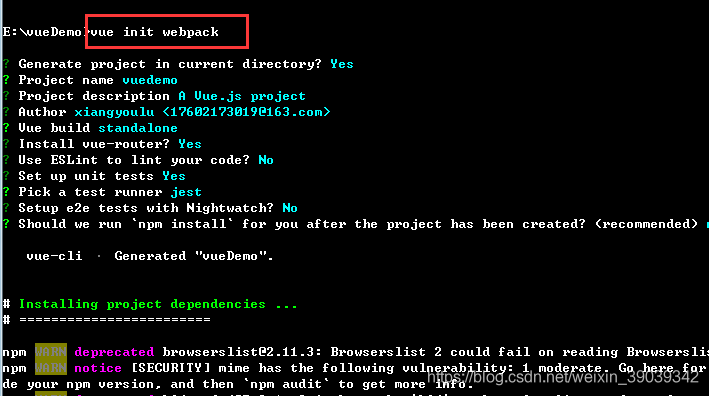
6, 安装相关依赖文件
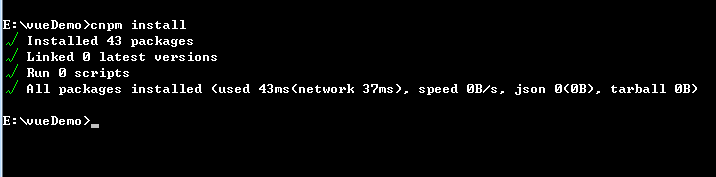
进入项目文件夹(自定义新建一个)下, 执行 cnpm install 来安装下载到模板中的package.json中的依赖,安装完成后会在项目文件夹下自动生成node-module文件来存放安装的依赖文件。
cnpm install
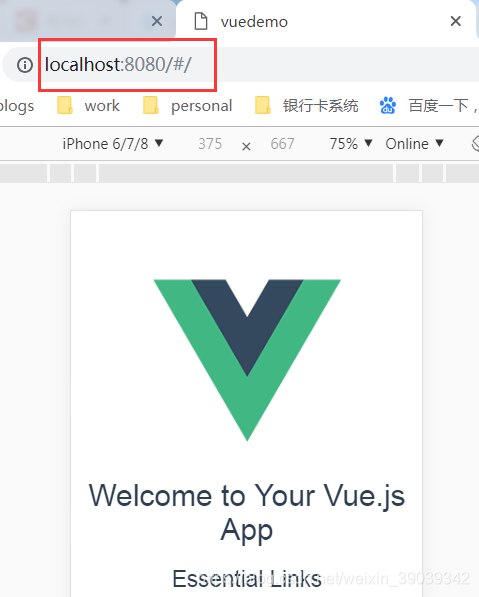
7, 运行项目执行 npm run dev (注:此时不能用cnpm来运行,必须是npm)
8, 运行成功后, 测试访问
http://10.171.1.34:8080/#/, 出现欢迎界面即ok, 至此vue项目基础框架算是搭建成功
三, vue实现简易登陆功能
1, 在components里,新建登陆页面login.vue
<template>
  <div class="login">
    {{ message }}<br/><br/>
    <input v-model="username" placeholder="用户名"><br/><br/>
    <input v-model="password" placeholder="密码"><br/><br/>
    <button v-on:click="login">登陆 </button>
  </div>
</template>

<script src="https://cdn.staticfile.org/vue-resource/1.5.1/vue-resource.min.js"></script>
<script>
    export default {
      name: "login",
      data() {
        return {
          message: 'Hello Vue!',
          username: '',
          password: ''
        }
      },
      http: {
        headers: {'Content-Type': 'application/x-www-form-urlencoded; charset=UTF-8'},
        headers: {'Access-Control-Allow-Origin': '*'}
      },
      methods: {
        login: function () {
          var _this = this;
          console.log(_this.username + _this.password);
          $.ajax({
              url: 'http://10.171.1.34:8088/ssm_test/login.do',
              type: 'GET',
              dataType: 'JSONP',
              data: {
                  name: _this.username,
                  pwd: _this.password
              },
              success: function (res) {
                console.log("登陆成功");
              },
              error: function (err) {
                console.log("返回出错了");
              }
        });

        }
      }

    }
</script>

<style scoped>

</style>
2, 新建登陆失败页面fail.vue
<template>
  <div class="hello">
    <h2>{{ msg }}</h2>
  </div>
</template>

<script>
export default {
  name: 'HelloWorld',
  data () {
    return {
      msg: '登陆失败'
    }
  }
}
</script>

<!-- Add "scoped" attribute to limit CSS to this component only -->
<style scoped>
h1, h2 {
  font-weight: normal;
}
ul {
  list-style-type: none;
  padding: 0;
}
li {
  display: inline-block;
  margin: 0 10px;
}
a {
  color: #42b983;
}
</style>
3, 将组件添加到路由表中,在router下的index.js文件
import Vue from 'vue'
import Router from 'vue-router'
import HelloWorld from '@/components/HelloWorld'
import login from '@/components/login'
import fail from '@/components/fail'

Vue.use(Router)

export default new Router({
  routes: [
    {
      path: '/',
      name: 'HelloWorld',
      component: HelloWorld
    }, {
      path: '/login',//系统的首页面url
      name: 'login',
      component: login//对应上文的import
    },  {
      path: '/fail',
      name: 'fail',
      component: fail
    }
  ]
})
4.main.js文件添加vue-resource,
支持http请求,如果未安装依赖包,先npm安装依赖(npm install vue-resource)
// The Vue build version to load with the `import` command
// (runtime-only or standalone) has been set in webpack.base.conf with an alias.
import Vue from 'vue'
import App from './App'
import router from './router'

import VueResource from 'vue-resource'
import $ from 'jquery'

Vue.use(VueResource);
Vue.use($);


Vue.config.productionTip = false

/* eslint-disable no-new */
new Vue({
  el: '#app',
  router,
  components: { App },
  template: '<App/>'
})
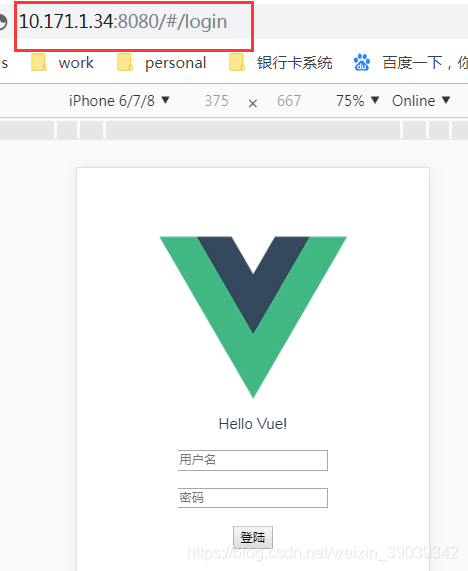
5, 启动测试
npm run dev, 测试登陆: http://10.171.1.34:8080/#/login, 出现登陆界面即ok
四, 登陆功能前后端数据交互的实现
1, 后端对应登陆接口的开发
2, 前后端数据交互
3, 跨域问题的处理