版权声明:源于开源_为之开源 https://blog.csdn.net/qq827245563/article/details/85247367
一.Thymeleaf简单整合
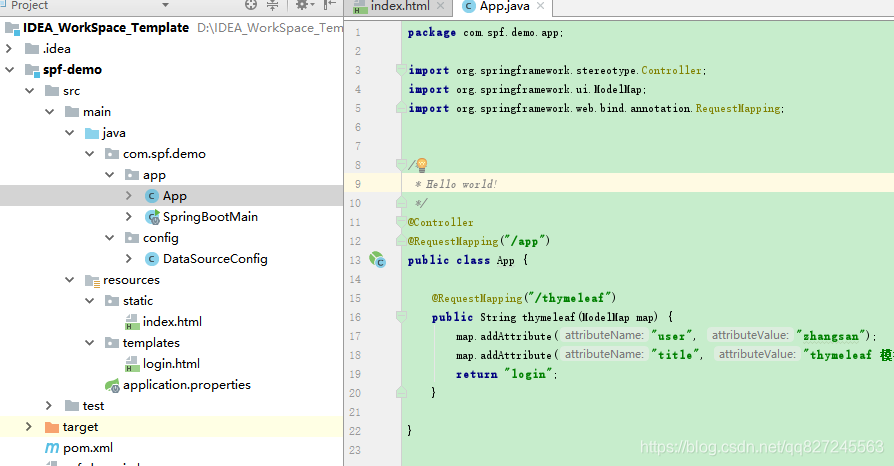
1.项目结构
2.pom依赖
<?xml version="1.0" encoding="UTF-8"?>

<project xmlns="http://maven.apache.org/POM/4.0.0" xmlns:xsi="http://www.w3.org/2001/XMLSchema-instance"
         xsi:schemaLocation="http://maven.apache.org/POM/4.0.0 http://maven.apache.org/xsd/maven-4.0.0.xsd">
    <modelVersion>4.0.0</modelVersion>

    <parent>
        <groupId>org.springframework.boot</groupId>
        <artifactId>spring-boot-starter-parent</artifactId>
        <version>2.1.1.RELEASE</version>
        <relativePath/> <!-- lookup parent from repository -->
    </parent>

    <groupId>com.spf.demo</groupId>
    <artifactId>spf-demo</artifactId>
    <version>1.0-SNAPSHOT</version>

    <packaging>jar</packaging>

    <properties>
        <project.build.sourceEncoding>UTF-8</project.build.sourceEncoding>
        <maven.compiler.source>1.8</maven.compiler.source>
        <maven.compiler.target>1.8</maven.compiler.target>
    </properties>

    <dependencies>
        <dependency>
            <groupId>org.springframework.boot</groupId>
            <artifactId>spring-boot-starter</artifactId>
        </dependency>

        <dependency>
            <groupId>org.springframework.boot</groupId>
            <artifactId>spring-boot-starter-web</artifactId>
        </dependency>
        <dependency>
            <groupId>org.springframework.boot</groupId>
            <artifactId>spring-boot-starter-jdbc</artifactId>
        </dependency>

        <dependency>
            <groupId>org.springframework.boot</groupId>
            <artifactId>spring-boot-starter-logging</artifactId>
        </dependency>

        <dependency>
            <groupId>org.springframework.boot</groupId>
            <artifactId>spring-boot-starter-test</artifactId>
            <scope>test</scope>
        </dependency>

        <dependency>
            <groupId>mysql</groupId>
            <artifactId>mysql-connector-java</artifactId>
            <version>5.1.45</version>
        </dependency>

        <dependency>
            <groupId>org.springframework.boot</groupId>
            <artifactId>spring-boot-starter-thymeleaf</artifactId>
        </dependency>

    </dependencies>

    <build>
        <pluginManagement><!-- lock down plugins versions to avoid using Maven defaults (may be moved to parent pom) -->
            <plugins>
                <plugin>
                    <groupId>org.springframework.boot</groupId>
                    <artifactId>spring-boot-maven-plugin</artifactId>
                </plugin>
            </plugins>
        </pluginManagement>
    </build>
</project>
3.application配置文件
###Tomcat Config
server.port=8080
server.tomcat.uri-encoding=UTF-8

####DataSource Config
spring.datasource.platform=mysql
spring.datasource.url=jdbc:mysql://127.0.0.1:3306/lpinfo?useSSL=false&useUnicode=true&characterEncoding=utf8
spring.datasource.driverClassName=com.mysql.jdbc.Driver
spring.datasource.username=root
spring.datasource.password=123456

###SPBdefaultLoggin Config
logging.level.root=info
#设置文件,如会在该项目下生成日志文件
logging.file=spf_demo.log
#设置文件会在某个文件夹下生成文件写入日志
#logging.path=/usr/log/spf_demo.log

####thymeleaf Config
# 模板格式
spring.thymeleaf.mode=HTML5
spring.thymeleaf.encoding=UTF-8
spring.thymeleaf.servlet.content-type=text/html
spring.thymeleaf.cache=false
4.控制层
package com.spf.demo.app;

import org.springframework.stereotype.Controller;
import org.springframework.ui.ModelMap;
import org.springframework.web.bind.annotation.RequestMapping;


/**
 * Hello world!
 */
@Controller
@RequestMapping("/app")
public class App {

    @RequestMapping("/thymeleaf")
    public String thymeleaf(ModelMap map) {
        map.addAttribute("user", "zhangsan");
        map.addAttribute("title", "thymeleaf 模板测试");
        return "login";
    }

}
5.index页 放在static文件下 默认访问到
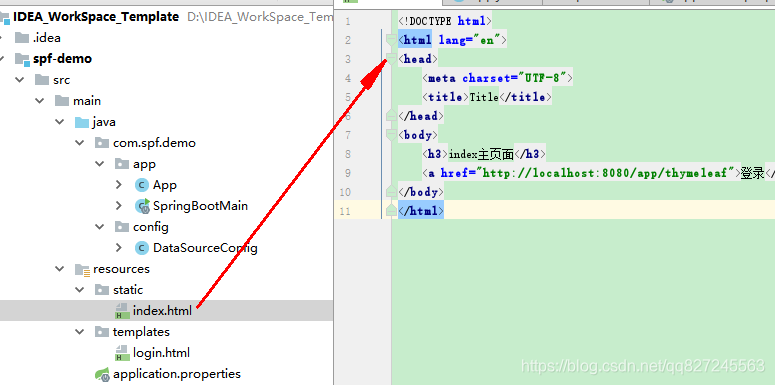
6.index请求控制层-->跳转登录页面

7.运行结果
扫描二维码关注公众号,回复:
4660825 查看本文章


二.Thymeleaf语法语法讲解
1.语法图解
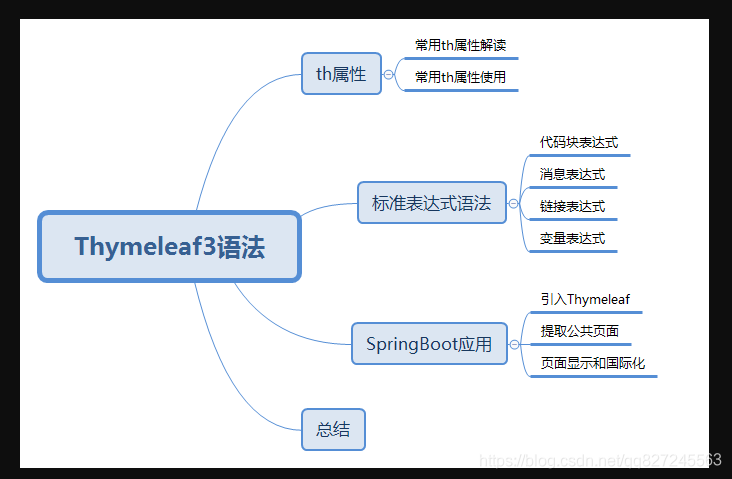
表达式语言
Thymeleaf模板引擎在进行模板渲染时,还会附带一个Context存放进行模板渲染的变量,在模板中定义的表达式本质上就是从Context中获取对应的变量的值:
<p>Today is: <span th:text="${today}">13 february 2011</span>.</p>URL
URL在Web应用模板中占据着十分重要的地位,需要特别注意的是Thymeleaf对于URL的处理是通过语法@{...}来处理的。Thymeleaf支持绝对路径URL:
<a th:href="@{http://www.thymeleaf.org}">Thymeleaf</a>另外,如果需要Thymeleaf对URL进行渲染,那么务必使用th:href,th:src等属性,下面是一个例子
<a href="details.html" th:href="@{http://localhost:8080/gtvg/order/details(orderId=${o.id})}">view</a>

<!-- Will produce '/gtvg/order/details?orderId=3' (plus rewriting) -->
<a href="details.html" th:href="@{/order/details(orderId=${o.id})}">view</a>

<!-- Will produce '/gtvg/order/3/details' (plus rewriting) -->
<a href="details.html" th:href="@{/order/{orderId}/details(orderId=${o.id})}">view</a>
运算符
在表达式中可以使用各类算术运算符,例如+, -, *, /, %
th:with="isEven=(${prodStat.count} % 2 == 0)"循环
渲染列表数据是一种非常常见的场景,例如现在有n条记录需要渲染成一个表格<table>,该数据集合必须是可以遍历的,使用th:each标签:
 <table>
    <tr>
      <th>NAME</th>
      <th>PRICE</th>
      <th>IN STOCK</th>
    </tr>
    <tr th:each="prod : ${prods}">
      <td th:text="${prod.name}">Onions</td>
      <td th:text="${prod.price}">2.41</td>
      <td th:text="${prod.inStock}? #{true} : #{false}">yes</td>
    </tr>
  </table>
条件求值
If/Unless
Thymeleaf中使用th:if和th:unless属性进行条件判断,下面的例子中,<a>标签只有在th:if中条件成立时才显示:
<a th:href="@{/login}" th:unless=${session.user != null}>Login</a>Switch
Thymeleaf同样支持多路选择Switch结构:
<div th:switch="${user.role}">
  <p th:case="'admin'">User is an administrator</p>
  <p th:case="#{roles.manager}">User is a manager</p>
</div>
Utilities
为了模板更加易用,Thymeleaf还提供了一系列Utility对象(内置于Context中),可以通过#直接访问:
#dates#calendars#numbers#stringsarrayslistssetsmaps- ...
下面用一段代码来举例一些常用的方法: