IntelliJ IDEA创建spring cloud(eureka)订单商品项目
spring cloud是基于springboot的一种协调多个微服务的框架。spring cloud包含多个微服务集群的解决方案,本文将使用eureka来实现一个简单的订单商品项目。https://download.csdn.net/download/wujingchangye/10869048
下面先简单说明下单体架构的优缺点:
- 优点:部署简单,技术简单
- 缺点:系统启动较慢,系统的隔离性较差,可伸缩性较差,系统的修改周期较长
为了克服其缺点需要引入微服务架构,微服务架构风格是一种将单一应用程序开发为一组小服务的方法,每一个服务运行在自己的进程中,服务间的通信采用轻量级通信机制,通常用的是HTTP资源API,这些服务围绕的业务能力构建并且通过全自动部署机制独立部署,这些服务公用一个最小型的集中式的管理,服务可用不同的语言开发,使用不同的数据存储技术。
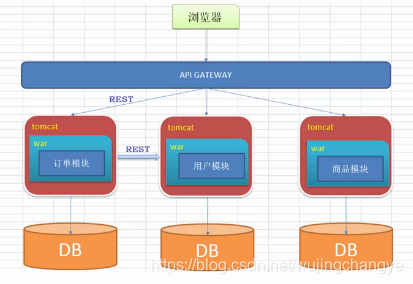
对于商品的微服务而言,商品服务是服务的提供者,订单服务是服务的消费者。
对于订单微服务而言,订单服务是服务的提供者,人是服务的消费者。

因此在商品和订单两个微服务之间,我们需要协调好商品微服务的发布,以及订单微服务对于商品微服务的获取。简单而言,由于订单微服务不需要被人使用或者说调用,因此其在整个eureka注册中心中不需要进行注册,即无法被其它服务发现。反之,商品微服务是需要其它微服务调用的,因此需要在eureka注册中心中进行注册。
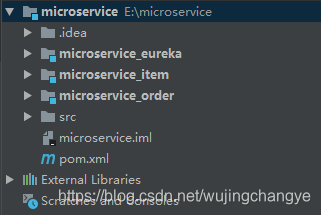
下面我们先创建两个springboot项目,分别是商品和订单微服务项目。在IntelliJ IDEA中新建一个project(maven),注意IntelliJ IDEA和eclipse的项目组织方式是不同的,其project是多个项目的集合,里面的每个项目称为module,而eclipse中每个project是单独的项目。如下图:我们创建一个project(命名为microservice),然后在该project下面新建三个module,分别表示商品(microservice_item)、订单(microservice_order)和eureka服务器(microservice_eureka)。
首先我们打开project的pom.xml文件进行配置,project的pom.xml文件是所有module的pom.xml文件的parent,通过简单的配置可以省略module中的重复配置。在project的pom.xml中加入下列标签。
<properties>
	<java.version>1.8</java.version>
</properties>
<!-- 引入Spring boot(Spring cloud是基于Spring boot的) -->
<parent>
    <groupId>org.springframework.boot</groupId>
    <artifactId>spring-boot-starter-parent</artifactId>
    <version>1.5.14.RELEASE</version>
</parent>

<dependencyManagement>
    <dependencies>
        <dependency>
            <groupId>org.springframework.cloud</groupId>
            <artifactId>spring-cloud-dependencies</artifactId>
            <version>Edgware.SR4</version>
            <type>pom</type>
            <scope>import</scope>
        </dependency>
    </dependencies>
</dependencyManagement>
由于spring cloud的基于spring boot的,因此需要parent下spring boot的启动类。而dependencyManagement是所有子pom依赖的父类,但子pom引入spring cloud时,会向上搜索其版本信息,从而规范整体项目的版本号。
至此,project的配置已经完成,开始编写microservice_item商品微服务。同样是pom文件的配置,加入spring boot和spring cloud eureka的支持。
<dependencies>
    <!-- 加入Spring boot Web支持 -->
    <dependency>
        <groupId>org.springframework.boot</groupId>
        <artifactId>spring-boot-starter-web</artifactId>
    </dependency>

    <dependency>
        <groupId>org.springframework.cloud</groupId>
        <artifactId>spring-cloud-starter-eureka-server</artifactId>
    </dependency>
</dependencies>
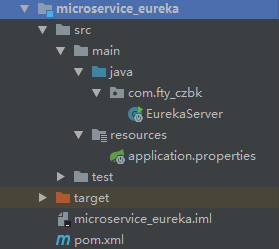
接下来编写item的业务逻辑,下图给出item module的结构。

分别是1个controller、1个model和1个service。商品的model代码如下:
package com.fty_czbk.pojo;
public class Item {
    private Long id;        //唯一标识
    private String title;   //商品标题
    private String pic;     //图片的pic地址
    private String desc;    //描述信息
    private Long price;     //价格
    public Item() {
    }
    public Item(Long id, String title, String pic, String desc, Long price) {
        this.id = id;
        this.title = title;
        this.pic = pic;
        this.desc = desc;
        this.price = price;
    }
    public Long getId() {
        return id;
    }
    public void setId(Long id) {
        this.id = id;
    }
    public String getTitle() {
        return title;
    }
    public void setTitle(String title) {
        this.title = title;
    }
    public String getPic() {
        return pic;
    }
    public void setPic(String pic) {
        this.pic = pic;
    }
    public String getDesc() {
        return desc;
    }
    public void setDesc(String desc) {
        this.desc = desc;
    }
    public Long getPrice() {
        return price;
    }
    public void setPrice(Long price) {
        this.price = price;
    }
    @Override
    public String toString() {
        return "Item{" +
                "id=" + id +
                ", title='" + title + '\'' +
                ", pic='" + pic + '\'' +
                ", desc='" + desc + '\'' +
                ", price=" + price +
                '}';
    }
}
就是简单的几个字段和getter和setter方法。然后是service(具体的业务功能,我们用静态的数据来表示):
package com.fty_czbk.service;
import com.fty_czbk.pojo.Item;
import org.springframework.stereotype.Service;
import java.util.HashMap;
import java.util.Map;

@Service
public class ItemServices {

    //调用DAO查询数据,用静态数据表示
    private static final Map<Long, Item> MAP = new HashMap<Long,Item>();
    static {
        MAP.put(1L, new Item(1L, "商品标题1", "http://图片1", "商品描述1", 1000L));
        MAP.put(2L, new Item(2L, "商品标题2", "http://图片2", "商品描述2", 2000L));
        MAP.put(3L, new Item(3L, "商品标题3", "http://图片3", "商品描述3", 3000L));
        MAP.put(4L, new Item(4L, "商品标题4", "http://图片4", "商品描述4", 4000L));
        MAP.put(5L, new Item(5L, "商品标题5", "http://图片5", "商品描述5", 5000L));
        MAP.put(6L, new Item(6L, "商品标题6", "http://图片6", "商品描述6", 6000L));
        MAP.put(7L, new Item(7L, "商品标题7", "http://图片7", "商品描述7", 7000L));
        MAP.put(8L, new Item(8L, "商品标题8", "http://图片8", "商品描述8", 8000L));
        MAP.put(9L, new Item(9L, "商品标题9", "http://图片9", "商品描述9", 9000L));
    }
    /**
     * 根据商品的id进行查询
     */
    public Item queryItemById(Long id) {
        return MAP.get(id);
    }
}
重点就是queryItemById方法,代表一个具体的商品查询业务。然后就是Controller,负责响应url请求、调用业务并返回数据。
package com.fty_czbk.controller;
import com.fty_czbk.pojo.Item;
import com.fty_czbk.service.ItemServices;
import org.springframework.beans.factory.annotation.Autowired;
import org.springframework.web.bind.annotation.*;
@RestController//@Controller + @ResponseBody
public class ItemController {
    @Autowired
    private ItemServices itemServices;

    //@RequestMapping(value = "/item/{id}", method = RequestMethod.GET)
    @GetMapping(value = "/item/{id}")
    public Item queryItemById(@PathVariable(name = "id") Long id) {
        return itemServices.queryItemById(id);
    }
}
@RestController等于@Controller + @ResponseBody, @GetMapping(value = “/item/{id}”)等于@RequestMapping(value = “/item/{id}”, method = RequestMethod.GET)
不懂的可以百度一下。最后是启动类
package com.fty_czbk;
import org.springframework.boot.SpringApplication;
import org.springframework.boot.autoconfigure.SpringBootApplication;
import org.springframework.cloud.client.discovery.EnableDiscoveryClient;
@EnableDiscoveryClient  //申明该应用是eureka客户端
@SpringBootApplication
public class ItemApplication {
//商品微服务,通过url查询商品信息
public static void main(String[] args) {
    SpringApplication.run(ItemApplication.class, args);
}
}
@EnableDiscoveryClient 可以先不写,其表示申明该微服务是eureka的客户端,此处我们还未对该项目进行配置,因此先当作单个项目来运行。这样整体的代码就编写完毕了,在配置文件中进行配置即可。在resources下新建application.properties文件,在里面加上:
server.port=8083
这样商品微服务就配置好了,注意这里还未对该服务进行eureka注册,所以还是一个单一的微服务项目,在浏览器中进行访问商品。这里有一个问题,我们知道spring boot框架中Controller的@RestController会使数据以json格式进行返回,但是此处显示的是xml的格式,这是因为我们在pom中引入了eureka的依赖,其会覆盖spring boot的默认设置,使返回值变为xml格式。如何更改回来后面会详细说明。

接下来是订单的微服务。同样:

pom文件的配置几乎是一模一样的,就是多引入了一个模拟http请求的包
<dependencies>
    <!-- 加入Spring boot Web支持 -->
    <dependency>
        <groupId>org.springframework.boot</groupId>
        <artifactId>spring-boot-starter-web</artifactId>
    </dependency>
    <!-- 加入OK http 包 -->
    <dependency>
        <groupId>com.squareup.okhttp3</groupId>
        <artifactId>okhttp</artifactId>
        <version>3.9.0</version>
    </dependency>

    <dependency>            <groupId>org.springframework.cloud</groupId>
        <artifactId>spring-cloud-starter-eureka-server</artifactId>
    </dependency>
</dependencies>
然后是订单项目的model,具体而言,一个Order包含用户信息和多个OrderDetails,一个OrderDetails包含多个Item。Item类在上面已经给出,这里就不重复了。
package com.fty_czbk.pojo;
import java.util.Date;
import java.util.List;
public class Order {
    private String orderId;                 //订单的id
    private Long userId;                    //用户id
    private Date createDate;                //创建时间
    private Date updateDate;                //修改时间
    private List<OrderDetail> orderDetails; //订单详情

    public Order() {
    }
    public Order(String orderId, Long userId, Date createDate, Date updateDate, List<OrderDetail> orderDetails) {
        this.orderId = orderId;
        this.userId = userId;
        this.createDate = createDate;
        this.updateDate = updateDate;
        this.orderDetails = orderDetails;
    }
    public String getOrderId() {
        return orderId;
    }
    public void setOrderId(String orderId) {
        this.orderId = orderId;
    }
    public Long getUserId() {
        return userId;
    }
    public void setUserId(Long userId) {
        this.userId = userId;
    }
    public Date getCreateDate() {
        return createDate;
    }
    public void setCreateDate(Date createDate) {
        this.createDate = createDate;
    }
    public Date getUpdateDate() {
        return updateDate;
    }
    public void setUpdateDate(Date updateDate) {
        this.updateDate = updateDate;
    }
    public List<OrderDetail> getOrderDetails() {
        return orderDetails;
    }
    public void setOrderDetails(List<OrderDetail> orderDetails) {
        this.orderDetails = orderDetails;
    }

    @Override
    public String toString() {
        return "Order{" +
                "orderId='" + orderId + '\'' +
                ", userId=" + userId +
                ", createDate=" + createDate +
                ", updateDate=" + updateDate +
                ", orderDetails=" + orderDetails +
                '}';
    }
}
OrderDetail类的代码如下:
package com.fty_czbk.pojo;
public class OrderDetail {
    private String orderId;     //订单id
    private Item item;          //商品
    public OrderDetail() {
    }
    public OrderDetail(String orderId, Item item) {
        this.orderId = orderId;
        this.item = item;
    }
    public String getOrderId() {
        return orderId;
    }
    public void setOrderId(String orderId) {
        this.orderId = orderId;
    }
    public Item getItem() {
        return item;
    }
    public void setItem(Item item) {
        this.item = item;
    }
    @Override
    public String toString() {
        return "OrderDetail{" +
                "orderId='" + orderId + '\'' +
                ", item=" + item +
                '}';
    }
}
有点复杂,可以直接copy,本质上就是一个订单的model,直接换成简单两个字段而是可以的。然后就是service的编写,首先是itemService,我们要通过http请求去获取商品微服务的信息,因此需要借助okHttp包:
package com.fty_czbk.service;

import com.fty_czbk.pojo.Item;
import org.springframework.beans.factory.annotation.Autowired;
import org.springframework.cloud.client.ServiceInstance;
import org.springframework.cloud.client.discovery.DiscoveryClient;
import org.springframework.stereotype.Service;
import org.springframework.web.client.RestTemplate;

import java.util.List;

@Service
public class ItemService {

	@Autowired
	private RestTemplate restTemplate;//等于HttpClient可以模拟请求
	@Value("${item.url}")
 	private String itemUrl;
	public Item queryItemById(Long id) {
 	       Item item = restTemplate.getForObject(itemUrl + id, Item.class);
	 		return item;
	}
}
这里通过配置文件中设置的商品微服务的地址,我们可以请求获取到商品的信息,从而完善我们的订单内容。这里就很关键了!
先给出OrderService的代码:
package com.fty_czbk.service;
import com.fty_czbk.pojo.Item;
import com.fty_czbk.pojo.Order;
import com.fty_czbk.pojo.OrderDetail;
import org.springframework.beans.factory.annotation.Autowired;
import org.springframework.stereotype.Service;
import java.util.*;
@Service
public class OrderService {
    //调用DAO查询数据,用静态数据表示
    private static final Map<String, Order> MAP = new HashMap<String, Order>();
    static {
        //创建一个Order
        Order order = new Order();
        order.setOrderId("59193738268961441");
        order.setCreateDate(new Date());
        order.setUpdateDate(order.getCreateDate());
        order.setUserId(1L);
        //订单详情设置
        List<OrderDetail> orderDetails = new ArrayList<OrderDetail>();
        //在订单中添加商品(商品信息由调用商品微服务获取)
        Item item = new Item();
        item.setId(1L);
        orderDetails.add(new OrderDetail(order.getOrderId(), item));
        //在订单中添加商品(商品信息由调用商品微服务获取)
        item = new Item();
        item.setId(2L);
        orderDetails.add(new OrderDetail(order.getOrderId(), item));

        order.setOrderDetails(orderDetails);
        //放入订单详情
        MAP.put(order.getOrderId(), order);
    }

    @Autowired
    private ItemService itemService;
    /**
     * 根据订单Id查询订单
     */
    public Order queryOrderById(String orderId) {
        Order order = MAP.get(orderId);
        //商品信息由调用商品微服务获取
        //遍历OrderDetail,获取商品id,调用商品微服务
        List<OrderDetail> orderDetails = order.getOrderDetails();
        for (OrderDetail orderDetail: orderDetails) {
            Long id = orderDetail.getItem().getId();
            Item item = itemService.queryItemById(id);
            orderDetail.setItem(item);
        }

        return order;
    }
}
订单中的其它信息由静态数据提供,而商品信息通过调用ItemService进行获取。**到这里,我们可以发现,如果没用用spring cloud对多个微服务进行管理,我们只能通过在配置文件中设置微服务地址的方式获取我们需要的商品信息,这是非常不科学的,一旦商品微服务的地址改变,我们就需要重新配置application.properties文件。**而eureka后续能为我们解决该问题。现在先来看OrderController代码:
package com.fty_czbk.Controller;
import com.fty_czbk.pojo.Order;
import com.fty_czbk.service.OrderService;
import org.springframework.beans.factory.annotation.Autowired;
import org.springframework.web.bind.annotation.GetMapping;
import org.springframework.web.bind.annotation.PathVariable;
import org.springframework.web.bind.annotation.RestController;
@RestController
public class OrderController {

    @Autowired
    private OrderService orderService;

    @GetMapping(value = "/order/{orderId}")
    public Order queryOrderById(@PathVariable(name = "orderId") String orderId) {
        return orderService.queryOrderById(orderId);
    }
}
这里也是非常简单的请求调用的方式。看启动类:
package com.fty_czbk;

import org.springframework.boot.SpringApplication;
import org.springframework.boot.autoconfigure.SpringBootApplication;
import org.springframework.cloud.client.discovery.EnableDiscoveryClient;
import org.springframework.context.annotation.Bean;
import org.springframework.http.client.OkHttp3ClientHttpRequestFactory;
import org.springframework.web.client.RestTemplate;

@EnableDiscoveryClient   //同样申明是eureka的客户端,虽然是消费者
@SpringBootApplication
public class OrderApplication {

    @Bean
    public RestTemplate restTemplate() {//配置RestTemplate
        //使用OKHttpClient进行请求
        return new RestTemplate(new OkHttp3ClientHttpRequestFactory());
    }

    public static void main(String[] args) {
        SpringApplication.run(OrderApplication.class, args);
    }
}
这里注意,使用RestTemplate是需要进行配置的,我们传入OkHttp3ClientHttpRequestFactory实例,从而使其内部调用OkHttp的请求代码。最后就是配置文件
server.port=8082
#并没有本质上解决url动态修改的问题 如果有多个商品微服务,则很难调用
#需要通过服务发现和注册机制进行处理
item.url=http://localhost:8083/item/
通过浏览器进行访问:

到此,进行总结,我们创建了两个微服务,一个商品,一个订单,订单需要请求商品服务从而获取商品信息,而原始的作法是将商品的url写死在配置文件中,从而进行请求获取,而随着微服务数量的增加,这种方式显然是不可取的,因此需要一个服务器对多个服务进行管理,即eureka。
我们新建一个maven项目,然后加入以下内容,其中,排除eureka中的xml包就可以恢复返回json格式的要求。
<dependencies>
    <dependency>
        <groupId>org.springframework.cloud</groupId>
        <artifactId>spring-cloud-starter-eureka-server</artifactId>
        <!-- eureka原本的设置会覆盖json的返回,需要排除以下依赖 -->
        <exclusions>
            <exclusion>
                <groupId>com.fasterxml.jackson.dataformat</groupId>
                <artifactId>jackson-dataformat-xml</artifactId>
            </exclusion>
        </exclusions>
    </dependency>
</dependencies>
而该项目只需要一个启动类即可
package com.fty_czbk;
import org.springframework.boot.SpringApplication;
import org.springframework.boot.autoconfigure.SpringBootApplication;
import org.springframework.cloud.netflix.eureka.server.EnableEurekaServer;

//申明Eureka服务端,即注册中心
@EnableEurekaServer
@SpringBootApplication
public class EurekaServer {
    public static void main(String[] args) {
        SpringApplication.run(EurekaServer.class, args);
    }
}
重点就在于@EnableEurekaServer这个注释,其它的全部不需要动,然后就配置文件:
server.port=6999
#需不需要把自己加入注册中心
eureka.client.register-with-eureka=false
#是否需要获取注册信息
eureka.client.fetch-registry=false
#注册中心地址
eureka.instance.hostname=localhost
eureka.client.service-url.defaultZone=http://${eureka.instance.hostname}:${server.port}/eureka/
这里就是eureka的配置,有几个关键属性:
- eureka.client.register-with-eureka需不需要把当前项目(自身)加入注册中心,即该微服务能不能被其它人发现。因为我们自身是服务器,所以false。
- eureka.client.fetch-registry=false当前项目是否需要发现其它项目,即是否要引用eureka中的其它服务。因为我们自身是服务器,所以false。
- 最后两个属性就是配置eureka服务器的地址。
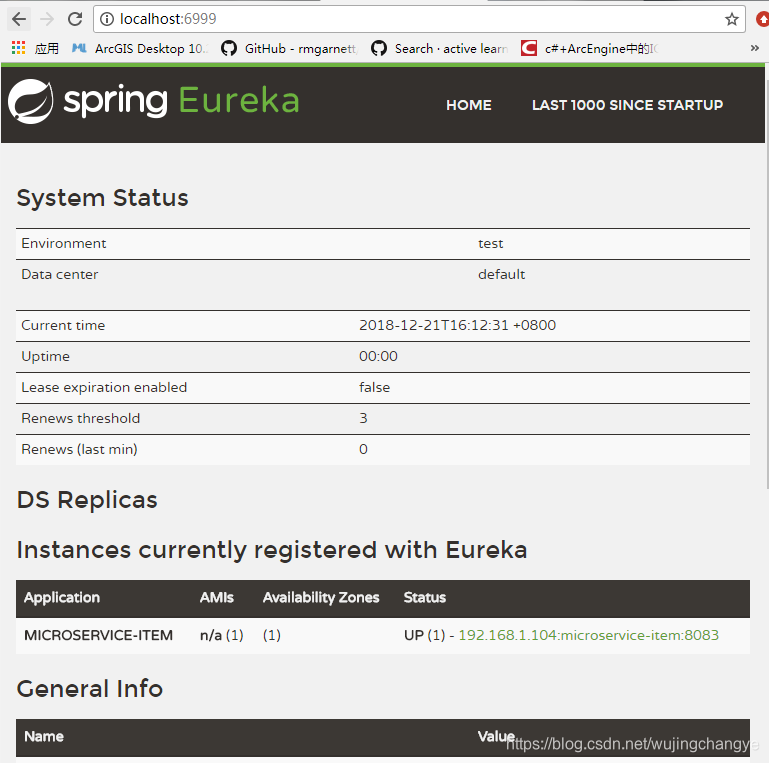
启动eureka服务器,在浏览器中输入:
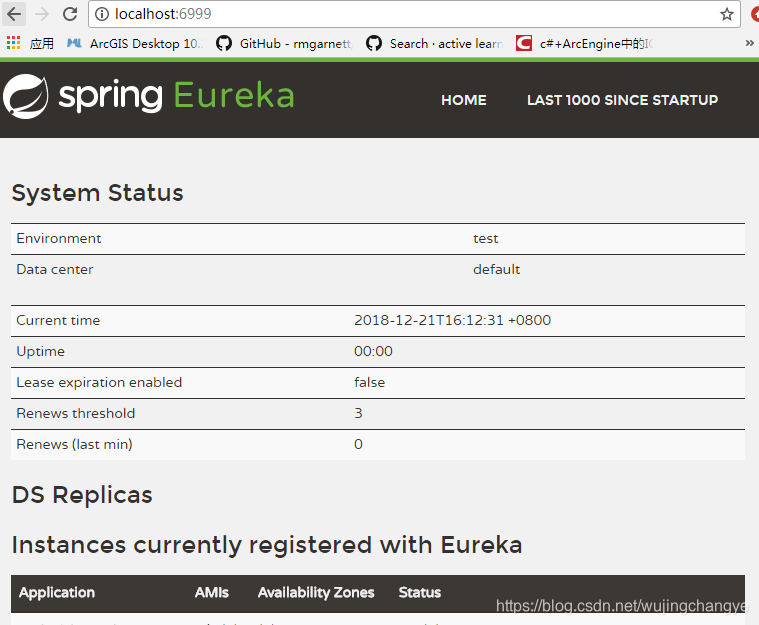
就可以看到eureka的默认管理服务界面,当前Instances currently registered with Eureka中是没有任何一个注册服务的,这就是我们配置文件中设置的。
接下来对商品和订单微服务的配置文件进行配置,注意除了配置文件以外,还需要在商品和订单项目的启动类中添加@EnableDiscoveryClient注释,该点上面已经说明。
spring.application.name=microservice-item

eureka.client.register-with-eureka=true
eureka.client.fetch-registry=false

#与eureka服务器地址相同
eureka.client.service-url.defaultZone=http://localhost:6999/eureka/

#将自己的ip地址注册到eureka服务器中
eureka.instance.prefer-ip-address=true
在商品项目配置文件中添加以上内容,首先就是spring.application.name,这个就表示当前微服务在eureka中的注册名,这个是非常重要的,后面对于该服务的发现就会根据该名字。然后就是两个关键字段eureka.client.register-with-eureka=true和 eureka.client.fetch-registry=false前者因为商品服务是需要被订单服务发现的,所以设置为需要注册到eureka中,后者因为商品服务不需要调用其它服务,因此设置为false。
同理,在订单微服务的注册信息中输入以下内容:
spring.application.name=microservice-order
#应用信息不需要注册,因为是一个消费者,不是服务的提供者
eureka.client.register-with-eureka=false
#是否从注册中心中获取注册信息,需要获取商品信息,以此设置为true
eureka.client.fetch-registry=true
#与eureka服务器地址相同
eureka.client.service-url.defaultZone=http://localhost:6999/eureka/
到此为止,我们还需要对订单的ItemService类进行修改:
package com.fty_czbk.service;

import com.fty_czbk.pojo.Item;
import org.springframework.beans.factory.annotation.Autowired;
import org.springframework.cloud.client.ServiceInstance;
import org.springframework.cloud.client.discovery.DiscoveryClient;
import org.springframework.stereotype.Service;
import org.springframework.web.client.RestTemplate;

import java.util.List;
@Service
public class ItemService {

    @Autowired
    private DiscoveryClient discoveryClient;

    @Autowired
    private RestTemplate restTemplate;

    public Item queryItemById(Long id) {
        String serviceId = "microservice-item";
        List<ServiceInstance> instances = discoveryClient.getInstances(serviceId);
        if(instances == null || instances.isEmpty()) {
            return null;
        }
        ServiceInstance serviceInstance = instances.get(0);
        String url = "http://" + serviceInstance.getHost() + ":" + serviceInstance.getPort();
        Item item = restTemplate.getForObject(url + "/item/" + id, Item.class);
        return item;
    }
}
可以看到,eureka中的DiscoveryClient 对象可以根据商品配置文件中设置的注册id,自动的获取商品的地址和端口号,以此就能轻松的管理商品服务。打开eureka浏览器,也可以看到注册的信息。