本机环境:win10 64位 vs2017
C++新手,代码写得比较一般,高手见谅(抱拳)。
欢迎留言交流!
简介线程池:
在介绍线程池之前,我们要首先知道多线程是啥。
单线程:就是说你现在有四件毫不相干的事情要分别去做,那你只有把一件事情做完在接着做下一件事情了,(你)->A->B->C->D。
多线程:好了,现在你可以分身了。(你)->(你'+你''+你'''+你'''')
那么,现在你可以这样做事:(你')->A,(你'')->B,(你''')->C,(你'''')->D
这就是多线程。不同事情或者同一事情,你可以交给每个分身去做。
这时大家大概知道多线程是怎么一回事了吧:就是同一时间执行多个任务。
那么线程池是用来干啥的?我们可以看到多线程提高了CPU的使用率和程序的工作效率,但是如果有大量的线程,就会影响性能(创建与销毁),因为CPU需要在它们之间切换,而且更多的线程需要更多的内存空间,同时多线程操作可能会出现线程安全或者死锁等问题。
咋办?
——线程池。
线程池可以想象成一个装东西的盒子,它的作用就是让每一个线程结束后,并不会销毁,而是放回到线程池中成为空闲状态,等待下一个对象来使用。
因此,线程池可以减少创建与销毁线程带来的性能开销。可控制最大并发线程数,避免过多资源竞争而导致系统内存消耗完。能更好的控制线程的开启与回收,并且能定时执行任务。
好了,知道了原理我们就可以来实际应用了:
首先建立txt文档,将以下代码复制进去
#ifndef THREAD_POOL_H
#define THREAD_POOL_H

#include <vector>
#include <queue>
#include <memory>
#include <thread>
#include <mutex>
#include <condition_variable>
#include <future>
#include <functional>
#include <stdexcept>

class ThreadPool {
public:
	ThreadPool(size_t);
	template<class F, class... Args>
	auto enqueue(F&& f, Args&&... args)
		->std::future<typename std::result_of<F(Args...)>::type>;
	~ThreadPool();
private:
	// need to keep track of threads so we can join them
	std::vector< std::thread > workers;
	// the task queue
	std::queue< std::function<void()> > tasks;

	// synchronization
	std::mutex queue_mutex;
	std::condition_variable condition;
	bool stop;
};

// the constructor just launches some amount of workers
inline ThreadPool::ThreadPool(size_t threads)
	: stop(false)
{
	for (size_t i = 0; i < threads; ++i)
		workers.emplace_back(
			[this]
	{
		for (;;)
		{
			std::function<void()> task;

			{
				std::unique_lock<std::mutex> lock(this->queue_mutex);
				this->condition.wait(lock,
					[this] { return this->stop || !this->tasks.empty(); });
				if (this->stop && this->tasks.empty())
					return;
				task = std::move(this->tasks.front());
				this->tasks.pop();
			}

			task();
		}
	}
	);
}

// add new work item to the pool
template<class F, class... Args>
auto ThreadPool::enqueue(F&& f, Args&&... args)
-> std::future<typename std::result_of<F(Args...)>::type>
{
	using return_type = typename std::result_of<F(Args...)>::type;

	auto task = std::make_shared< std::packaged_task<return_type()> >(
		std::bind(std::forward<F>(f), std::forward<Args>(args)...)
		);

	std::future<return_type> res = task->get_future();
	{
		std::unique_lock<std::mutex> lock(queue_mutex);

		// don't allow enqueueing after stopping the pool
		if (stop)
			throw std::runtime_error("enqueue on stopped ThreadPool");

		tasks.emplace([task]() { (*task)(); });
	}
	condition.notify_one();
	return res;
}

// the destructor joins all threads
inline ThreadPool::~ThreadPool()
{
	{
		std::unique_lock<std::mutex> lock(queue_mutex);
		stop = true;
	}
	condition.notify_all();
	for (std::thread &worker : workers)
		worker.join();
}

#endif
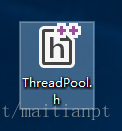
并改名为 ThreadPool.h 如下:
接着打开vs2017的安装目录,右上角搜索MSCV,打开这个文件夹:
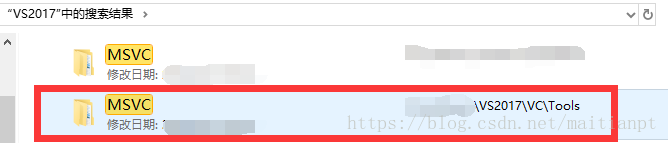
然后依次打开文件夹“14.15.26726”->“include”
在“include”目录下把刚才的ThreadPool.h移入。
二、下面开始简单的代码实现(C++):
#include "pch.h"
#include <iostream>
#include "ThreadPool.h"

using namespace std;

int main()
{
	while (true)
	{
		//初始化线程池,3个线程
		ThreadPool pool(3);
		//vector是一个序列容器,std::future 可以用来获取异步任务的结果(可以理解为用来判断某条线程可以执行新任务与否)
		std::vector< std::future<int> > results;
		for (int j = 0; j < 3; ++j)
		{
			//在vector的末尾插入一个新元素
			results.emplace_back
			(
				//线程池队列
				pool.enqueue
				([j]
			{
				//不断输出现在是哪条线程(j)在工作
				while (true)
				{
					cout << j<<"\t";
				}
				return 0;
			}
				)
			);
		}
	}
	return 0;
}
结果(部分截图):

通过这个输出我们就可以看到各线程的调用与执行情况。