通过事件向父级组件发送消息
在我们开发组件时,它的一些功能有可能要求我们与父组件进行沟通。例如我们可能会引入一个可访问性的功能来放大博文的字号,同时让页面的其他部分保持默认的字号。
这里主要通过的是$emit方法,该方法可以发送要调用的函数名称,这个类似于事件通知系统。触发该事件的组件调用该方法,需要被触发的组件,则注册该方法。
既然是向父组件发送消息,自然是要改变父组件里的属性了。
首先在子组件里要发送消息:
Vue.component('blog-postt', {
    props:['post'],
    template: `
        <div class="blog-post">
            <h3>{{ post.title }}</h3>
            <button v-on:click="$emit('enlarge-text')">
                Enlarge text
            </button>
            <div v-html="post.content"></div>
        </div>
    `
})
还要改变父组件里的属性,那么父组件里就要先定义属性:
new Vue({
    el: '#blog-posts-events-demo',
    data: {
        posts:[
            {id: 0, text: 'Vegetables', title: 'Vegetables', content: 'Vegetables'},
            {id: 1, text: 'Cheese', title: 'Cheese', content: 'Cheese'},
            {id: 2, text: 'Whatever else humans are supposed to eat', title: 'Whatever else humans are supposed to eat', content: 'Whatever else humans are supposed to eat'}
        ],
        postFontSize: 1
    }
})
这里我们选用postFontSize,通过子组件里的按钮控制父组件中的字号大小。
看看我们注册该函数enlarge-text的地方:
        <div id="blog-posts-events-demo">
            <div v-bind:style="{fontSize: postFontSize + 'em' }">
                <blog-postt
                    v-for="post in posts"
                    v-bind:key="post.id"
                    v-bind:post="post"
                    v-on:enlarge-text="postFontSize += 0.1"
                ></blog-postt>
            </div>
        </div>
在子组件创建的时候,制定好发送消息的函数,在调用子组件的时候,注册该消息对应的处理,在该处理里我们改变父组件的属性。
使用事件抛出一个值
有时候使用事件了抛出一个值是十分有用的。例如我们想让<blog-post>组件决定它的文本要放大多少,这时使用$emit的第二个参数来提供这个值。
依然是先在子组件里触发函数:

Vue.component('blog-post', {
    props:['post'],
    template:`
        <div class="blog-post">
            <h3>{{ post.title }}</h3>
            <button v-on:click="$emit('enlarge-text', 0.1)">
                Enlarge text
            </button>
            <div v-html="post.content"></div>
        </div>
    `
})
只不过此时emit的第二个值并不为空,被我们设置为父组件字号要增大的增量0.1。
依然使用定义在父组件里中的属性postFontSize:
new Vue({
    el: '#blog-posts-events-demo',
    data: {
        posts:[
            {id: 0, text: 'Vegetables', title: 'Vegetables', content: 'Vegetables'},
            {id: 1, text: 'Cheese', title: 'Cheese', content: 'Cheese'},
            {id: 2, text: 'Whatever else humans are supposed to eat', title: 'Whatever else humans are supposed to eat', content: 'Whatever else humans are supposed to eat'}
        ],
        postFontSize: 1
    }
})
现在看看在子组件调用的时候如何接收这个参数:
<div id="blog-posts-events-demo">
    <div v-bind:style="{fontSize: postFontSize + 'em'}">
         <blog-post
              v-for="post in posts"
              v-bind:key="post.id"
              v-bind:post="post"
              v-on:enlarge-text="postFontSize += $event"
         ></blog-post>
    </div>
</div>
没错大同小异,就是在注册的函数末尾直接使用$event就可以获得触发函数时发送的值了。
如果该事件的的处理函数是一个方法:
<div v-bind:style="{fontSize: postFontSize + 'em'">
    <blog-post
       v-on:enlarge-text="onEnlargeText"
    ></blog-post>
</div>
那么就要在这个方法里接收这个参数了。
new Vue({
    el: '#blog-posts-events-demo',
    data: {
        posts:[
            {id: 0, text: 'Vegetables', title: 'Vegetables', content: 'Vegetables'},
            {id: 1, text: 'Cheese', title: 'Cheese', content: 'Cheese'},
            {id: 2, text: 'Whatever else humans are supposed to eat', title: 'Whatever else humans are supposed to eat', content: 'Whatever else humans are supposed to eat'}
        ],
        postFontSize: 1
    },
    methods: {
        onEnlargeText: function(enlargeAmount) {
            this.postFontSize += enlargeAmount
        }
    }
})
在组件上使用v-model
自定义组件也可以用于创建支持v-model的自定义输入组件。记住:
<input v-model="searchText">等价于
<input v-bind:value="searchText"
       v-bind:input="searchText = $event.target.value"
>
当用在组件上时,v-modle会是这样:
<custom-input
    v-bind:value="searchText"
    v-on:input="searchText = $event"
></custom-input>
为了让它正常工作,这个组件内的<input>必须:
- 将其 value 特性绑定到一个名叫 value 的prop上
- 当其 input 事件被触发时,的新的值通过自定义的 input 事件抛出。
Vue.component('custom-input', {
    props: ['value'],
    template:`
        <input
            v-bind:value="value",
            v-on:input="$emit('input', $event.target.value)"
        >
    `
})
现在v-model就可以在这个组件上完美的工作起来了。
<custom-input
    Everything is ok.
></custom-input>
通过插槽分发内容
和Html一样我们通常需要向一个组件传递内容。例如
<alert-box>
    It's time to have lunch.
</alert-box>
幸好Vue自定义 <slot> 让这一切变得十分容易。
Vue.component('alert-box', {
    template: `
        <div class="demo-alert-box">
            <strong>Error!</strong>
            <slot></slot>
        </div>
    `
})
动态组件
有的时候,在不同组件之间,进行动态切换是非常有用的。比如在一个多标签的界面里:
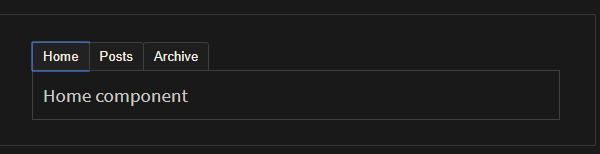
上述的内容可以通过Vue的<component>元素加一个 is 特性实现:
<!-- 组件会在`currentTabComponent`改变时改变 -->
<component v-bind:is="currentTabComponent"></component>
在上述示例中,currentTabComponent可以包括:
- 已注册组件的名字
- 一个组件的选项对象
先说第一种情况,已注册组件的名字,既然是不同组件,自然组件有多个,先定义组件:
Vue.component('tab-home', {
    template: '<div>Home component</div>'
})

Vue.component('tab-posts', {
    template: '<div>Posts component</div>'
})

Vue.component('tab-archive', {
    template: '<div>Archive component</div>'
})
新建Vue实例:
new Vue({
    el: '#dynamic-component-tab',
    data: {
        currentTab: 'Home',
        tabs:['Home', 'Posts', 'Archive']
    },
    computed: {
        currentTabComponent: function() {
            return 'tab' + this.currentTab.toLowerCase()
        }
    }
})
在Html中引用:
<div id="dynamic-component-demo">
    <button
        v-for="tab in tabs"
        v-bind:key="tab"
        v-bind:class="['tab-button', {archive: currentTab === tab}]"
        v-on:click="currentTab = tab"
    ></button>

    <component
        v-bind:is="currentTabComponent"
        class="tab"
    ></component>
</div>
第二种情况,一个组件的选项对象。
先看一下JS代码:
var tabs = [
    {
        name: 'Home',
        component: {
            template: '<div>Home component</div>'
        }
    },
    {
        name: 'Posts',
        component: {
            template: '<div>Posts component</div>'
        }
    },
    {
        name: 'Archive',
        component: {
            template: '<div>Archive component</div>'
        }
    }
]

new Vue({
    el: '#dynamic-component-demo1',
    data: {
        tabs: tabs,
        currentTab: tabs[0]
    }
})
再看一下Html中的调用:
<div id="dynamic-component-demo1">
            <button
                v-for="tab in tabs"
                v-bind:key="tab.name"
                v-bind:class="['tab-button', { archive: currentTab.name === tab.name }]"
                v-on:click="currentTab = tab"
            >{{ tab.name }}</button>

            <component
                v-bind:is="currentTab.component"
                class="tab"
            ></component>
        </div>
解析DOM模板时的注意事项:
有些 HTML 元素,诸如 <ul>、<ol>、<table> 和 <select>,对于哪些元素可以出现在其内部是有严格限制的。而有些元素,诸如 <li>、<tr> 和 <option>,只能出现在其它某些特定的元素内部。
这会导致我们使用这些有约束条件的元素时遇到一些问题。例如:
<table> <blog-post-row></blog-post-row> </table> |
这个自定义组件 <blog-post-row> 会被作为无效的内容提升到外部,并导致最终渲染结果出错。幸好这个特殊的 is 特性给了我们一个变通的办法:
<table> <tr is="blog-post-row"></tr> </table> |
需要注意的是如果我们从以下来源使用模板的话,这条限制是不存在的:
- 字符串 (例如:
template: '...') - 单文件组件 (
.vue) <script type="text/x-template">
到这里,你需要了解的解析 DOM 模板时的注意事项——实际上也是 Vue 的全部必要内容,大概就是这些了。恭喜你!接下来还有很多东西要去学习,不过首先,我们推荐你先休息一下,试用一下 Vue,自己随意做些好玩的东西。
如果你感觉已经掌握了这些知识,我们推荐你再回来把完整的组件指南,包括侧边栏中组件深入章节的所有页面读完。