1. 基本实例
    <div id="components-demo">
        <button-counter></button-counter>
    </div>
    <script>
        Vue.component('button-counter', {
            data: function () {
                return {
                    count: 0
                }
            },
            template: '<button v-on:click="count++">You clicked me {{ count }} times.</button>'
        })
        new Vue({ el: '#components-demo' })
    </script>
代码结构:Vue.component创建一个名为“button-counter”的组件,组件内必有函数data(函数内return一个对象),template组件结构;在使用的时候,创建的组件名就是该组件标签;组件是全局创建的,跟new Vue没有关系;
因为组件是可复用的 Vue 实例,所以它们与 new Vue 接收相同的选项,例如 data、computed、watch、methods 以及生命周期钩子等。仅有的例外是像 el这样根实例特有的选项
2. 组件的复用
    <div id="components-demo">
        <button-counter></button-counter>
        <button-counter></button-counter>
        <button-counter></button-counter>
    </div>
    <script>
        Vue.component('button-counter', {
            data: function () {
                return {
                    count: 0
                }
            },
            template: '<button v-on:click="count++">You clicked me {{ count }} times.</button>'
        })
        new Vue({ el: '#components-demo' })
</script>![]()
注意当点击按钮时,每个组件都会各自独立维护它的 count。因为你每用一次组件,就会有一个它的新实例被创建。
(2)data值必须是一个函数
一个组件的 data 选项必须是一个函数,因此每个实例可以维护一份被返回对象的独立的拷贝
data: function () {
  return {
    count: 0
  }
}
如果 Vue 没有这条规则,被创建的实例都指向一个地址,之间会相互影响,Vue会报错提示The "data" option should be a function
3. 组件的组织
通常一个应用会以一棵嵌套的组件树的形式来组织:

例如,你可能会有页头、侧边栏、内容区等组件,每个组件又包含了其它的像导航链接、博文之类的组件。
这里有两种组件的注册类型:全局注册和局部注册。至此,我们的组件都只是通过 Vue.component 全局注册的:
全局注册的组件:可以用在该组件被注册之后的任何 (通过 new Vue) 新创建的 Vue 根实例,也包括该组件树中的所有子组件的模板中
4. 通过prop向子组件传递数据
一个组件默认可以拥有任意数量的 prop,任何值都可以传递给任何 prop;
用一个 props存放该组件的所有prop;
访问prop中的值,就像访问data中的数据一样;
传递数据就像自定义特性一样,传递进去,下面代码中组件<blog-post>中的title属性就是自定义的,而该属性的值就是要传递进去的值;
    <div id="components-demo">
        <blog-post title="My journey with Vue"></blog-post>
        <blog-post title="Blogging with Vue"></blog-post>
        <blog-post title="Why Vue is so fun"></blog-post>
    </div>
    <script>
        Vue.component('blog-post', {
            props: ['title'],
            template: '<h3>{{ title }}</h3>'
        })
        new Vue({ el: '#components-demo' })
    </script>
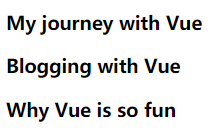
结果:

代码结构:组件中props存放所有的prop,该例子中只有一个prop即title;
template是组件的结构,可以使用title属性;
组件标签blog-post中,title是属性的值,将传入的组件中,进行渲染显示
(2)用 v-bind 来动态传递 prop
    <div id="components-demo">
        <blog-post v-for="post in posts" v-bind:key="post.id" v-bind:title="post.title" v-bind:id="post.id"></blog-post>
    </div>
    <script>
        Vue.component('blog-post', {
            props: ['title', 'id'],
            template: '<h3>{{id}}、{{ title }}</h3>'
        })
        new Vue({
            el: '#components-demo',
            data: {
                posts: [
                    { id: 1, title: 'My journey with Vue' },
                    { id: 2, title: 'Blogging with Vue' },
                    { id: 3, title: 'Why Vue is so fun' }
                ]
            }
        })
    </script>
代码结构:组件标签中用了v-for循环,用了item in items语法,循环的值来自data的posts,v-bind绑定了key,key是保留属性,key的值是post.id是用来区别key的,让key唯一;title和id是绑定值,要传递的值。
在Vue.component中props内有两个prop,即title和id,在template中可以使用这个两个值,前提是这两个要传递进来。
在Vue对象中,data中有posts数组,包含了三个对象。
结果:

5. 单个根元素
组件的功能越来越多,要添加的prop也越来越多,这样组件就越来越复杂,是时候重构一下这个 <blog-post> 组件了,让它变成接受一个单独的 post的prop
    <div id="components-demo">
        <blog-post v-for="post in posts" v-bind:key="post.title" v-bind:post="post"></blog-post>
    </div>
    <script>
        Vue.component('blog-post', {
            props: ['post'],
            template: `
              <div class="blog-post">
                <h3>{{ post.title }}</h3>
                <div v-html="post.content"></div>
              </div>
            `
        })
        new Vue({
            el: '#components-demo',
            data: {
                posts: [
                    { title: 1, content: 'My journey with Vue' },
                    { title: 2, content: 'Blogging with Vue' },
                    { title: 3, content: 'Why Vue is so fun' }
                ]
            }
        })
    </script>
代码结构:组件标签使用v-for循环遍历了data中的posts的每一项,将每一项即post传递给组件,所以组件标签中v-bind:post将post对象{title:,content:}传递给了组件中;组件结构中的使用post.title 和post.content就可以显示。
这样,不论何时为 post 对象添加一个新的属性,它都会自动地在 <blog-post> 内可用。
结果:

注意:这里用到了根标签v-html,应该是div标签的html结构,此处的div的html只有内容post.content
注意:示例中使用了 JavaScript 的模板字符串来让多行的模板更易读。在 IE 下并没有被支持,所以在经过 Babel 或 TypeScript 之类的工具)编译的情况下,请使用折行转义字符取而代之。
6. 通过事件向父级组件发送消息(系统内置方法:$emit)
下面的代码并没有通过事件给父级组件发送消息,需要注意的是:“通过事件”是指组件结构中的标签(比如实例中:div class,h3,button,div v-html)在他们身上绑定事件,“向父级组件”:父级组件是组件标签中<blog-post>监听绑定的事件
    <div id="blog-posts-events-demo">
        <div :style="{ fontSize: postFontSize + 'em' }">
            <blog-post v-for="post in posts" v-bind:key="post.id" v-bind:post="post"></blog-post>
        </div>
    </div>
    <script>
        Vue.component('blog-post', {
            props: ['post'],
            template: `
          <div class="blog-post">
            <h3>{{ post.title }}</h3>
            <button>
              Enlarge text
            </button>
            <div v-html="post.content"></div>
          </div>
        `
        })
        new Vue({
            el: '#blog-posts-events-demo',
            data: {
                posts: [{title:"今日头条",content:"啦啦啦啦"}],
                postFontSize: 1
            }
        })
    </script>
点击按钮使文字变大:
    <div id="blog-posts-events-demo">
        <div :style="{ fontSize: postFontSize + 'em' }">
            <blog-post v-for="post in posts" v-bind:key="post.id" v-bind:post="post" v-on:enlarge-text="postFontSize += 0.1"></blog-post>
        </div>
    </div>
    <script>
        Vue.component('blog-post', {
            props: ['post'],
            template: `
          <div class="blog-post">
            <h3>{{ post.title }}</h3>
            <button v-on:click="$emit('enlarge-text')">
              Enlarge text
            </button>
            <div v-html="post.content"></div>
          </div>
        `
        })
        new Vue({
            el: '#blog-posts-events-demo',
            data: {
                posts: [{title:"今日头条",content:"啦啦啦啦"}],
                postFontSize: 1
            }
        })
</script代码结构:组件标签的子级button中监听了click事件,系统内置方法$emit将enlarge-text事件和click事件绑定在一起,enlarge-text事件是自定义事件;组件标签blog-post(对于button来说就是父级组件)中监听enlarge-text事件,enlarge-text事件对应一个函数
结果:当点击button按钮时,就相当于触发了父级组件上的方法,而该方法正是让组件文字变大的。

注意:调用方法改变的变量,作用在div的style上。
(2)使用事件抛出一个值
$emit(事件名字,值):$emit的第二个参数可以是一个值,我们需要用$event接收这个值
比如:组件中的button标签中:
<button v-on:click="$emit('enlarge-text', 0.1)">
  Enlarge text
</button>
组件标签<blog-post>中:$event = 0.1
<blog-post
  ...
  v-on:enlarge-text="postFontSize += $event"
></blog-post>
上述是内联的方式写的方法,如果是在methods中写方法,在组件标准blog-post中写方法名,那么这个值0.1,应该作为方法的第一个参数传入进来:
<blog-post
  ...
  v-on:enlarge-text="onEnlargeText" 此处是一个方法名
></blog-post>

methods: {
  onEnlargeText: function (enlargeAmount) { //enlargeAmount就是0.1的形参
    this.postFontSize += enlargeAmount
  }
}
(3)在组件上使用v-model
自定义事件也可以用于创建支持 v-model 的自定义输入组件
注意:
<input v-model="searchText"> 等价于 ===
<input v-bind:value="searchText" v-on:input="searchText = $event.target.value">当用在组件上时,v-model 则会这样:
<custom-input
  v-bind:value="searchText"
  v-on:input="searchText = $event"
></custom-input>
组件上使用v-model,用input举例:必须满足
- 将其
value特性绑定到一个名叫value的 prop 上 - 在其
input事件被触发时,将新的值通过自定义的input事件抛出
正确代码:
    <div id="blog-posts-events-demo">
        <custom-input v-model="searchText"></custom-input>
        <span>{{searchText}}</span>
    </div>
    <script>
        Vue.component('custom-input', {
            props: ['value'],
            template: `
              <input
                v-bind:value="value"
                v-on:input="$emit('input', $event.target.value)"
              >
            `
          })
        new Vue({
            el: '#blog-posts-events-demo',
            data: {
                searchText: ''
            },

        })
    </script>
结果:
![]()
代码结构分析:template内必须只有input标签,不然会报错;在vue中接收input的value值,而不是在组件中接收,span标签就是接收input的value值的;
2018.11.7对v-model深度理解:

v-model接收data数据中的textcontent属性值,再将该值传递给组件时,可以用任意变量接收,即上图两个红色框。
template内的结构要唯一
7. 通过插槽分发内容:<slot>元素
     组件的样式
     <style>
        .demo-alert-box{
            height: 40px;
            background-color: red;
            line-height: 40px;
            padding: 10px;
        }
    </style>

    <div id="demo">
        <alert-box>
            Something bad happened.
        </alert-box>
    </div>
    <script>
        Vue.component('alert-box', {
            template: `
              <div class="demo-alert-box">
                <strong>Error!</strong>
                <slot></slot>
              </div>
            `
        })
        new Vue({
            el: '#demo',
        })
    </script>
结果:

8. 动态组件
        .tab-button {
            padding: 6px 10px;
            border-top-left-radius: 3px;
            border-top-right-radius: 3px;
            border: 1px solid #ccc;
            cursor: pointer;
            background: #f0f0f0;
            margin-bottom: -1px;
            margin-right: -1px;
        }

        .tab-button:hover {
            background: #e0e0e0;
        }

        .tab-button.active {
            background: #e0e0e0;
        }

        .tab {
            border: 1px solid #ccc;
            padding: 10px;
        }
<div id="demo" class="demo">
<button v-for="tab in tabs" v-bind:key="tab" v-bind:class="['tab-button', { active: currentTab === tab }]"
v-on:click="currentTab = tab">{{ tab }}</button>
<component v-bind:is="currentTabComponent" class="tab"></component>
</div>
<script>
Vue.component('tab-home', {
template: '<div>Home component</div>'
})
Vue.component('tab-posts', {
template: '<div>Posts component</div>'
})
Vue.component('tab-archive', {
template: '<div>Archive component</div>'
})
new Vue({
el: '#demo',
data: {
currentTab: 'Home',
tabs: ['Home', 'Posts', 'Archive']
},
computed: {
currentTabComponent: function () {
return 'tab-' + this.currentTab.toLowerCase()
}
}
})
</script>
重点是component上的is属性,is对应是组件的名字,即component上的is是某个组件名,就会加载该组件,此处的is绑定一个方法,该方法返回值与currentTab属性有关,当然返回值也应该是组件名字;而currentTab属性值由button标签click事件决定,v-for循环给每个button标签都绑定click事件,只有当点击某个button的时候,触发click事件,currentTab会被最新的tab值替代。
这样就实现了button按钮点击而改变currentTab值,从而改变component的is值。
深度理解:
当然,也可以用内联方式,is = currentTab (其实就是:currentTab ++这样的情况)
需要注意的是这种切换思想
    <div id="demo" class="demo">
        <button v-for="tab in tabs" v-bind:key="tab" v-bind:class="['tab-button',
         { active: currentTab === tab }]" v-on:click="currentTab = tab">{{ tab }}</button>
        <component v-bind:is="currentTab" class="tab"></component>
    </div>
    <script>
        Vue.component('tab-home', {
            template: '<div>Home component</div>'
        })
        Vue.component('tab-posts', {
            template: '<div>Posts component</div>'
        })
        Vue.component('tab-archive', {
            template: '<div>Archive component</div>'
        })

        new Vue({
            el: '#demo',
            data: {
                currentTab: 'tab-home',
                tabs: ['tab-home', 'tab-posts', 'tab-archive']
            }
        })
    </script>
(2)is属性其他用法(解析dom模板)
有些 HTML 元素,诸如 <ul>、<ol>、<table> 和 <select>,对于哪些元素可以出现在其内部是有严格限制的。而有些元素,诸如 <li>、<tr> 和 <option>,只能出现在其它某些特定的元素内部。
如果将组件直接写在上述标签内部,将无法渲染:
<table>
  <blog-post-row></blog-post-row>
</table>
正确的做法:is属性引入组件
<table>
  <tr is="blog-post-row"></tr>
</table>
例子:写一个表格
    <div id="app">
        <table>
            <tbody>
                <tr is="tab1"></tr>
                <tr is="tab2"></tr>
            </tbody>
        </table>
    </div>
    <script>
        Vue.component('tab1',{
            template: `<tr>
                    <td>name</td>
                    <td>age</td>
                    <td>dream</td>
                </tr>
            `
        })
        Vue.component('tab2', {
            template: `<tr>
                    <td>yuzhu</td>
                    <td>22</td>
                    <td>senior engineer</td>
                </tr>`
        })
        var vm = new Vue({
            el: '#app',
        })
    </script>
结果:

注意标签结构:

怎么不是表格的形式了???