更改国内yum源:
1.备份yum源文件,位置在/etc/yum.repos.d/CentOS-Base.repo
mv /etc/yum.repos.d/CentOS-Base.repo /etc/yum.repos.d/CentOS-Base.repo_bak
2.获取阿里的yum源:(centos7为例)
wget -O /etc/yum.repos.d/CentOS-Base.repo http://mirrors.aliyun.com/repo/Centos-7.repo
3.更新cache
yum makecache
4.更新该yum源下所有资源:
yum -y update
安装Nginx
1.更换nginx源为官网源(这步可省略)
To set up the yum repository for RHEL/CentOS, create the file named /etc/yum.repos.d/nginx.repo with the following contents:

[nginx]
name=nginx repo
baseurl=http://nginx.org/packages/OS/OSRELEASE/$basearch/
gpgcheck=0
enabled=1
Replace “OS” with “rhel” or “centos”, depending on the distribution used, and “OSRELEASE” with “6” or “7”, for 6.x or 7.x versions, respectively.
2.安装并启动nginx:
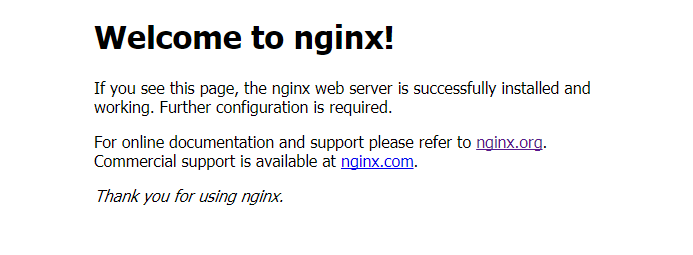
查询nginx源、安装nginx、关闭防火墙、启动nginx
yum search nginx
yum -y install nginx
service iptables stop
service nginx start
安装PHP
如果打算安装5.X版本,直接yum install php就可以。
我这里安装PHP7.0,所以如下操作:
更新yum源、安装php7.0及许多依赖
rpm -Uvh https://dl.fedoraproject.org/pub/epel/epel-release-latest-7.noarch.rpm
rpm -Uvh https://mirror.webtatic.com/yum/el7/webtatic-release.rpm
yum install php70w-common php70w-fpm php70w-opcache php70w-gd php70w-mysqlnd php70w-mbstring php70w-pecl-redis php70w-pecl-memcached php70w-devel
安装OK后,php -v即可看到 php7的版本信息
那么问题来了,怎么验证nginx可以解析php呢?
在nginx默认启动位置/usr/share/nginx/html下,新建info.php。里面测试代码如下:
<?php
phpinfo();
?>
浏览器里访问http://服务器IP/info.php,发现浏览器直接下载了,还是打不开。怎么弄呢?继续往下看。
在/etc/nginx/conf.d/default.conf中,找到对应代码修改为如下代码:
location ~ \.php$ {
         root           /usr/share/nginx/html;
         fastcgi_pass   127.0.0.1:9000;
         fastcgi_index  index.php;
         fastcgi_param  SCRIPT_FILENAME  $document_root$fastcgi_script_name;
         include        fastcgi_params;
    }
重新启动nginx、php-fpm。然后重新访问上一步路径,效果如下:

这样子,php就安装完成了。继续安装mysql。
安装MySQL
执行以下命令:
yum -y install mysql mysql-server ,mysql-devel
有时候,会出现mysql-server找不到的错误。那么不急,再执行下面这条命令后即可。
rpm -Uvh http://dev.mysql.com/get/mysql-community-release-el7-5.noarch.rpm
yum intsall mysql-server
安装成功后,启动mysql。并且修改密码为123.
service mysqld start
use mysql;
update user set password=password('123') where user='root' and host='localhost';
flush privileges;
最后测试下,php能否连接上呢?
在/usr/share/nginx/html下新建mysql.php
<?php
$conn=mysql_connect('localhost','root','123') ;
if($conn)
  echo "OK";
else
  echo "failed";
?>
结果是链接失败了,php-fpm错误日志显示没有mysql_connect()函数。怎么解决呢?
因为缺少php-mysql模块,所以安装命令为:
yum install php-mysql
最后特别需要说明的一点,PHP7以上版本不支持原来的mysql_connect函数。应该使用如下测试代码,我就陷坑好久!
<?php
    $mysqli = new mysqli("localhost", "root", "password");
    if(!$mysqli)  {
        echo"database error";
    }else{
        echo"php env successful";
    }
    $mysqli->close();
?>
至此,LNMP环境全部配置完成。快去建站吧!