前言
在学习完 Mybaits、Spring、SpringMVC 的视频后,因为工作的原因,很长一段时间没有去继续研究他们了,后来就想着自己将它们整合起来写一个小型的项目,于是就在网上百度,自己动手搭建一套自己的 SSM 框架。
一、相关概念
SSM(Spring、SpringMVC、Mybatis)框架的概念在网上一大把,我就直接复制粘贴百度百科的了。
1. Spring
Spring是一个开源框架,它由Rod Johnson创建。它是为了解决企业应用开发的复杂性而创建的。Spring使用基本的JavaBean来完成以前只可能由EJB完成的事情。然而,Spring的用途不仅限于服务器端的开发。从简单性、可测试性和松耦合的角度而言,任何Java应用都可以从Spring中受益。
Spring是一个轻量级的控制反转(IoC)和面向切面(AOP)的容器框架。
2. Spring MVC
Spring MVC属于SpringFrameWork的后续产品,已经融合在Spring Web Flow里面。Spring 框架提供了构建 Web 应用程序的全功能 MVC 模块。使用 Spring 可插入的 MVC 架构,从而在使用Spring进行WEB开发时,可以选择使用Spring的SpringMVC框架或集成其他MVC开发框架,如Struts1(现在一般不用),Struts2(一般老项目使用)等。
3. Mybatis
MyBatis 是一款优秀的持久层框架,它支持定制化 SQL、存储过程以及高级映射。MyBatis 避免了几乎所有的 JDBC 代码和手动设置参数以及获取结果集。MyBatis 可以使用简单的 XML 或注解来配置和映射原生信息,将接口和 Java 的 POJOs(Plain Ordinary Java Object,普通的 Java对象)映射成数据库中的记录。
二、Spring JAR 包介绍
在 SpringMVC 整合 Mybatis 之前,我们需要了解 SpringMVC 整合 Mybatis 中所需要的 JAR 包的作用。下面是我整里的各个 JAR 包的作用:

Spring 和 Mybatis 具体的下载地址是 Spring 官网下载 ,Mybatis 官网下载。
三、开发环境搭建
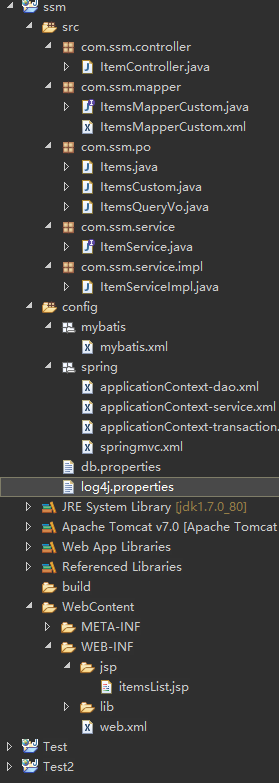
整合前我们需要先新建一个 Dynamic Web Project 项目,然后需要新建一个资源文件夹用来存放配置文件,在该文件夹下,需要新建配置文件 log4j.properties 用来配置日志记录,新建 db.properties 配置数据库链接,以及新建文件夹 mybatis 和 spring 用来存放接下来的整合配置文件。整个工程结构如下图所示,大家可以参考将文件夹、包名,文件等新建好。
四、SSM 整合
从这开始,我们就正式开始 SSM 框架的整合了。整合后的 Spring 需要管理持久层的 Mapper (相当于ssh中的dao接口),还需要管理业务层的Service,在 Service 中调用 Mapper 接口,同时 Spring 需要进行事务控制,最后,Spring 需要管理表现层的 Handler,Handler 中调用 Service。按照这个思路我们开始整合吧。
4.1 导入 JAR 包
导入 JAR 包。除了将 Mybatis 和 Spring 下载的 JAR 包导入外,还需导入 Spring 和 Mybatis 的整合包 mybatis-spring-1.3.0.jar ,然后就是数据库链接包,我这用的MySQL 所以就是 mysql-connector-java-5.1.7-bin.jar,然后就是数据库连接池的包,如果用的 dbcp 连接池就导入其包,如果是 c3p0 连接池就导入 c3p0 的包,其他包可根据实际业务需求再行导入。
如果是使用 Maven 进行项目 JAR 管理的话,可去 Maven 官网 查找配置的各 JAR 的坐标在pom.xml 中。
4.2 整合 Dao
4.2.1 Mybatis 逆向工程生成 POJO、Mapper.xml、Mapper.java
我们可以使用 Mybatis 的逆向工程生成 POJO、Mapper.xml、Mapper.java等文件,如果不知道怎么生成的,可以参考我前面写的 Mybatis 学习笔记(九)——Mybatis 逆向工程的三种方法,
在这里功能不需要太复杂,只需要保证整合完成后能够测试整合成功就行,所以我们整合以查询商品信息功能为例。我这里先编写三个 POJO 类(商品类(Items)、自定义用户扩展类(ItemsCustom)以及一个 ItemsQueryVo 类),Items 是基本类,查询商品条件,商品附加信息用 ItemsCustom 类,而整个查询操作用 ItemsQueryVo 类。这样设计能很好的提高功能的耦合性。下面分别列出各类的类名定义、包名路径和成员属性等情况。
Items类(/ssm/src/com/ssm/po/Items.java)
package com.ssm.po;

import java.util.Date;

public class Items {

    private Integer id;			//主键
    private String name;		//商品名称
    private Float price;		//价格
    private String pic;			//商品图片
    private Date createtime;	//创建时间
    private String detail;		//描述

    public Integer getId() {
        return id;
    }
    public void setId(Integer id) {
        this.id = id;
    }
    public String getName() {
        return name;
    }
    public void setName(String name) {
        this.name = name == null ? null : name.trim();
    }
    public Float getPrice() {
        return price;
    }
    public void setPrice(Float price) {
        this.price = price;
    }
    public String getPic() {
        return pic;
    }
    public void setPic(String pic) {
        this.pic = pic == null ? null : pic.trim();
    }
    public Date getCreatetime() {
        return createtime;
    }
    public void setCreatetime(Date createtime) {
        this.createtime = createtime;
    }
    public String getDetail() {
        return detail;
    }
    public void setDetail(String detail) {
        this.detail = detail == null ? null : detail.trim();
    }
}
ItemsCustom 类(/ssm/src/com/ssm/po/ItemsCustom.java)
public class ItemsCustom extends Items{

	//这里添加扩展字段
}
ItemsQueryVo类(/ssm/src/com/ssm/po/ItemsQueryVo.java)
package com.ssm.po;

public class ItemsQueryVo {

	private Items items;				//商品类

	//自定义用户扩展类,提高系统的可扩展性
	private ItemsCustom itemsCustom;	//自定义用户扩展类

	public Items getItems() {
		return items;
	}

	public void setItems(Items items) {
		this.items = items;
	}

	public ItemsCustom getItemsCustom() {
		return itemsCustom;
	}

	public void setItemsCustom(ItemsCustom itemsCustom) {
		this.itemsCustom = itemsCustom;
	}

}
还需要新建一个 ItemsMapperCustom.xml 和 ItemsMapperCustom.java 文件。
我们在手动在 src/com/ssm/mapper 下新建一个 ItemsMapperCustom.xml 和 ItemsMapperCustom.java 文件。知道 Mybatis 的人就知道 Mapper 开发很方便快捷,只需要 Mapper 接口遵循一定的规范就可以,然后就使用接口就可以操作数据库数据了。
ItemsMapperCustom 配置文件 (/ssm/src/com/ssm/mapper/ItemsMapperCustom.xml)
<?xml version="1.0" encoding="UTF-8" ?>
<!DOCTYPE mapper PUBLIC "-//mybatis.org//DTD Mapper 3.0//EN" "http://mybatis.org/dtd/mybatis-3-mapper.dtd" >
<mapper namespace="com.ssm.mapper.ItemsMapperCustom" >

	<!-- 定义商品查询的sql片段,就是商品查询条件 -->
	<sql id="query_items_where">
		<!-- 使用动态sql,通过if判断,满足条件进行sql拼接 -->
		<!-- 商品查询条件通过ItemsQueryVo包装对象 中itemsCustom属性传递 -->
			<if test="itemsCustom!=null">
				<if test="itemsCustom.name!=null and itemsCustom.name!=''">
					items.name LIKE '%${itemsCustom.name}%'
				</if>
			</if>
	</sql>
	<!--
		parameterType 传入包装对象(包装了查询条件)
		resultType 建议使用扩展对象
	 -->
  <select id="findItemsList" parameterType="com.ssm.po.ItemsQueryVo"
  	resultType="com.ssm.po.ItemsCustom">
		SELECT * FROM items
		<where>
			<include refid="query_items_where"></include>
		</where>
  </select>
</mapper>
ItemsMapperCustom 接口 (/ssm/src/com/ssm/mapper/ItemsMapperCustom.java)
package com.ssm.mapper;

import java.util.List;

import com.ssm.po.ItemsCustom;
import com.ssm.po.ItemsQueryVo;

public interface ItemsMapperCustom {
	//商品查询列表
    public List<ItemsCustom> findItemsList(ItemsQueryVo itemsQueryVo)
    		throws Exception;
}
4.2.2 配置 mybatis.xml
在资源文件夹 config 下 新建文件夹 mybatis,用来存放 Mybatis 的配置文件,新建配置文件 mybatis.xml。配置方法如下代码所示:
<?xml version="1.0" encoding="UTF-8" ?>
<!DOCTYPE configuration
PUBLIC "-//mybatis.org//DTD Config 3.0//EN"
"http://mybatis.org/dtd/mybatis-3-config.dtd">

<configuration>
	<!-- 定义别名 -->
	<typeAliases>
		<!-- 针对批量别名定义,别名就是类名(首字母大小写都可以) -->
		<package name="com.ssm.po" />
	</typeAliases>

	<!-- 配置mapper 由于使用 spring和mybatis的整合包进行mapper扫描,
		这就不需要配置了 必须遵循 mapper.xml
		和 mapper.java 文件同名且同目录。 -->
	<!-- mapper 交由 Spring 管理 所以不需要<mappers></mappers> -->
</configuration>
4.2.3 新建 db 属性文件
在 config 下新建 db.properties 的数据库配置文件。
jdbc.driver=com.mysql.jdbc.Driver
jdbc.url=jdbc:mysql://localhost:3306/mybatis
jdbc.username=root
jdbc.password=123456
4.2.4 配置 applicationContext-dao.xml
在资源文件夹 config 下 新建文件夹 spring,用来存放 Spring 和 SpringMVC 的配置文件,在新建配置文件 applicationContext-dao.xml。这里我使用 c3p0 连接池,配置方法如下代码所示:
<beans xmlns="http://www.springframework.org/schema/beans"
	xmlns:xsi="http://www.w3.org/2001/XMLSchema-instance" xmlns:mvc="http://www.springframework.org/schema/mvc"
	xmlns:context="http://www.springframework.org/schema/context"
	xmlns:aop="http://www.springframework.org/schema/aop" xmlns:tx="http://www.springframework.org/schema/tx"
	xsi:schemaLocation="http://www.springframework.org/schema/beans
		http://www.springframework.org/schema/beans/spring-beans-3.2.xsd
		http://www.springframework.org/schema/mvc
		http://www.springframework.org/schema/mvc/spring-mvc-3.2.xsd
		http://www.springframework.org/schema/context
		http://www.springframework.org/schema/context/spring-context-3.2.xsd
		http://www.springframework.org/schema/aop
		http://www.springframework.org/schema/aop/spring-aop-3.2.xsd
		http://www.springframework.org/schema/tx
		http://www.springframework.org/schema/tx/spring-tx-3.2.xsd ">

	<!-- 加载配置文件 -->
	<context:property-placeholder location="classpath:db.properties" />

	<!-- 数据源,使用c3p0 -->
	<bean id="dataSource" class="com.mchange.v2.c3p0.ComboPooledDataSource"
		destroy-method="close">
		<property name="driverClass" value="${jdbc.driver}" />
		<property name="jdbcUrl" value="${jdbc.url}" />
		<property name="user" value="${jdbc.username}" />
		<property name="password" value="${jdbc.password}" />
	</bean>

	<!-- sqlSessinFactory -->
	<bean id="sqlSessionFactory" class="org.mybatis.spring.SqlSessionFactoryBean">
		<!-- 加载mybatis的配置文件 -->
		<property name="configLocation" value="classpath:mybatis/mybatis.xml" />
		<!-- 数据源 -->
		<property name="dataSource" ref="dataSource" />
	</bean>

	<!-- mapper批量扫描
	从mapper包中扫描出mapper接口,自动创建代理对象并且在spring容器中注册
	遵循规范:将mapper.java和mapper.xml映射文件名称保持一致,且在一个目录中
	自动扫描出来的mapper的bean的id为首字母小写的mapper类名
	-->
	<bean class="org.mybatis.spring.mapper.MapperScannerConfigurer">
		<!-- sqlSessionFactory 注入 -->
		<property name="sqlSessionFactoryBeanName" value="sqlSessionFactory" />
		<!-- 扫描包 -->
		<property name="basePackage" value="com.ssm.mapper" />
	</bean>

</beans>
4.3 整合 Service
4.3.1 编写 Service 及 Impl
编写的 ItemService 接口和 Mapper 接口类似,然后在编写 ItemService 接口的实现类 ItemServiceImpl类。在 ItemServiceImpl 类中通过 @Autowired 注解注入 ItemsMapperCustom 接口,在类中就可以通过 ItemsMapperCustom 查询数据库数据。具体代码如下:
ItemService接口 (/ssm/src/com/ssm/service/ItemService.java)
package com.ssm.service;

import java.util.List;

import com.ssm.po.ItemsCustom;
import com.ssm.po.ItemsQueryVo;

/**
* @Description 商品管理service
* @author 欧阳
* @since 2018年11月18日 上午12:07:16
* @version V1.0
*/

public interface ItemService {
	//商品查询列表
    public List<ItemsCustom> findItemsList(ItemsQueryVo itemsQueryVo)
    		throws Exception;
}
ItemServiceImpl 实现类(/ssm/src/com/ssm/service/impl/ItemServiceImpl.java)
package com.ssm.service.impl;

import java.util.List;

import org.springframework.beans.factory.annotation.Autowired;

import com.ssm.mapper.ItemsMapperCustom;
import com.ssm.po.ItemsCustom;
import com.ssm.po.ItemsQueryVo;
import com.ssm.service.ItemService;

/**
* @Description 商品的管理
* @author 欧阳
* @since 2018年11月18日 上午12:09:42
* @version V1.0
*/

public class ItemServiceImpl implements ItemService {

	@Autowired
	private ItemsMapperCustom itemsMapperCustom;

	@Override
	public List<ItemsCustom> findItemsList(ItemsQueryVo itemsQueryVo) throws Exception {

		//通过ItemsMapperCustom 查询数据库
		return itemsMapperCustom.findItemsList(itemsQueryVo);
	}

}
4.3.2 配置 Service
在 spring 文件夹下新建 applicationContext-service.xml
<beans xmlns="http://www.springframework.org/schema/beans"
	xmlns:xsi="http://www.w3.org/2001/XMLSchema-instance" xmlns:mvc="http://www.springframework.org/schema/mvc"
	xmlns:context="http://www.springframework.org/schema/context"
	xmlns:aop="http://www.springframework.org/schema/aop" xmlns:tx="http://www.springframework.org/schema/tx"
	xsi:schemaLocation="http://www.springframework.org/schema/beans
		http://www.springframework.org/schema/beans/spring-beans-3.2.xsd
		http://www.springframework.org/schema/mvc
		http://www.springframework.org/schema/mvc/spring-mvc-3.2.xsd
		http://www.springframework.org/schema/context
		http://www.springframework.org/schema/context/spring-context-3.2.xsd
		http://www.springframework.org/schema/aop
		http://www.springframework.org/schema/aop/spring-aop-3.2.xsd
		http://www.springframework.org/schema/tx
		http://www.springframework.org/schema/tx/spring-tx-3.2.xsd ">

	<!-- 配置service -->
	<bean id="itemService" class="com.ssm.service.impl.ItemServiceImpl" />


	<!-- 通知 -->
	<tx:advice id="txAdvice" transaction-manager="transactionManager">
		<tx:attributes>
			<!-- 传播行为 -->
			<tx:method name="save*" propagation="REQUIRED"/>
			<tx:method name="insert*" propagation="REQUIRED"/>
			<tx:method name="delete*" propagation="REQUIRED"/>
			<tx:method name="update*" propagation="REQUIRED"/>
			<tx:method name="find*" propagation="SUPPORTS" read-only="true"/>
		</tx:attributes>
	</tx:advice>

	<aop:config>
		<aop:advisor advice-ref="txAdvice" pointcut="execution(* com.ssm.service.impl.*.*(..))"/>
	</aop:config>
</beans>
4.3.3 事务控制
再配置 Spring 的事务控制的配置文件,在 spring 文件夹下新建配置文件 applicationContext-transaction.xml。
<beans xmlns="http://www.springframework.org/schema/beans"
	xmlns:xsi="http://www.w3.org/2001/XMLSchema-instance" xmlns:mvc="http://www.springframework.org/schema/mvc"
	xmlns:context="http://www.springframework.org/schema/context"
	xmlns:aop="http://www.springframework.org/schema/aop" xmlns:tx="http://www.springframework.org/schema/tx"
	xsi:schemaLocation="http://www.springframework.org/schema/beans
		http://www.springframework.org/schema/beans/spring-beans-3.2.xsd
		http://www.springframework.org/schema/mvc
		http://www.springframework.org/schema/mvc/spring-mvc-3.2.xsd
		http://www.springframework.org/schema/context
		http://www.springframework.org/schema/context/spring-context-3.2.xsd
		http://www.springframework.org/schema/aop
		http://www.springframework.org/schema/aop/spring-aop-3.2.xsd
		http://www.springframework.org/schema/tx
		http://www.springframework.org/schema/tx/spring-tx-3.2.xsd ">

	<!-- 配置事务管理器,对mybatis操作数据库事务控制,Spring使用 JDBC 的事务控制类 -->
	<bean id="transactionManager" class="org.springframework.jdbc.datasource.DataSourceTransactionManager">
		<!-- 配置数据源 -->
		<!-- 这的dataSource 在applicationContext-dao.xml 中配置了-->
		<property name="dataSource" ref="dataSource" />
	</bean>
</beans>
4.4 整合 Spring MVC
4.4.1 配置 springmvc.xml
在 spring 文件夹下新建配置文件 springmvc.xml。
<beans xmlns="http://www.springframework.org/schema/beans"
	xmlns:xsi="http://www.w3.org/2001/XMLSchema-instance" xmlns:mvc="http://www.springframework.org/schema/mvc"
	xmlns:context="http://www.springframework.org/schema/context"
	xmlns:aop="http://www.springframework.org/schema/aop" xmlns:tx="http://www.springframework.org/schema/tx"
	xsi:schemaLocation="http://www.springframework.org/schema/beans
		http://www.springframework.org/schema/beans/spring-beans-3.2.xsd
		http://www.springframework.org/schema/mvc
		http://www.springframework.org/schema/mvc/spring-mvc-3.2.xsd
		http://www.springframework.org/schema/context
		http://www.springframework.org/schema/context/spring-context-3.2.xsd
		http://www.springframework.org/schema/aop
		http://www.springframework.org/schema/aop/spring-aop-3.2.xsd
		http://www.springframework.org/schema/tx
		http://www.springframework.org/schema/tx/spring-tx-3.2.xsd ">

	<!-- 对静态资源访问 -->
	<!-- <mvc:resources location="/js/" mapping="/js/**"/> -->

	<!-- 配置注解的handler -->
	<!-- 对于注解的handler可单个配置
		也可使用组件扫描批量配置 ,实际开发中一般用组件扫描
	-->

	<!-- 组件扫描配置 -->
	<context:component-scan base-package="com.ssm.controller"></context:component-scan>

	<!-- 注解处理器映射器 和 注解处理器适配器 必须配对使用,不能一个非注解的一个注解的-->
	<!--
		使用 mvc:annotation-driven 可替代注解处理器映射器和注解处理器适配器
		同时,mvc:annotation-driven 默认还加载了很多参数绑定方法,比如json转换解析器就默认加载了
		即,如果使用了 mvc:annotation-driven 就不用配置上面的注解处理器映射器和注解处理器适配器了
		建议使用,使用开发也用  mvc:annotation-driven 。
	 -->
	<mvc:annotation-driven></mvc:annotation-driven>

	<!-- 视图解析器
		解析jsp解析,默认使用jstl标签,需要使用jstl包
	-->
	<bean class="org.springframework.web.servlet.view.InternalResourceViewResolver">
		<!-- 前缀 -->
		<property name="prefix" value="/WEB-INF/jsp/" />
		<!-- 后缀 -->
		<property name="suffix" value=".jsp" />
	</bean>

</beans>
4.4.2 配置前端控制器
在 web.xml 文件中加入前端控制器的配置。
<servlet>
  <servlet-name>SpringMVC</servlet-name>
  <servlet-class>org.springframework.web.servlet.DispatcherServlet</servlet-class>
  <init-param>
    <param-name>contextConfigLocation</param-name>
    <param-value>classpath:spring/springmvc.xml</param-value>
  </init-param>
</servlet>
<servlet-mapping>
  <servlet-name>SpringMVC</servlet-name>
  <url-pattern>*.action</url-pattern>
</servlet-mapping>
4.4.3 编写 Handler(Controller)
在 ItemController 中通过 @Autowired 注入 Service ,通过 Service 操作 数据库数据。
package com.ssm.controller;

import java.util.List;

import org.springframework.beans.factory.annotation.Autowired;
import org.springframework.stereotype.Controller;
import org.springframework.ui.Model;
import org.springframework.web.bind.annotation.RequestMapping;

import com.ssm.po.ItemsCustom;
import com.ssm.service.ItemService;

/**
* @Description 商品Controller
* @author 欧阳
* @since 2018年11月18日 上午12:34:15
* @version V1.0
*/

@Controller
@RequestMapping("/items")
public class ItemController {

	@Autowired
	private ItemService itemService;

	//商品查询
	@RequestMapping("/queryItems")
	public String queryItems(Model model) throws Exception {

		//1.调用service 查找数据库的商品查询
		List<ItemsCustom> itemsList = itemService.findItemsList(null);
		model.addAttribute("itemsList", itemsList);

		return "itemsList";
	}

}
4.4.4 编写 JSP
编写 itemsList.jsp,在 WebContent/WEB-INF 下新建文件夹 jsp ,再在 jsp 文件夹下创建 itemsList.jsp。
商品列表:
<table width="100%" border=1 cellpadding="0" cellspacing="0">
<tr>
	<td>商品名称</td>
	<td>商品价格</td>
	<td>生产日期</td>
	<td>商品描述</td>
</tr>
<c:forEach items="${itemsList }" var="item">
<tr>
	<td>${item.name }</td>
	<td>${item.price }</td>
	<td><fmt:formatDate value="${item.createtime}" pattern="yyyy-MM-dd HH:mm:ss"/></td>
	<td>${item.detail }</td>
</tr>
</c:forEach>
</table>
4.5 加载 Spring 容器
在 web.xml 文件中加入 Spring 容器的配置。
<!-- 加载Spring容器 -->
<context-param>
  <param-name>contextConfigLocation</param-name>
  <param-value>/WEB-INF/classes/spring/applicationContext-*.xml</param-value>
</context-param>
<listener>
  <listener-class>org.springframework.web.context.ContextLoaderListener</listener-class>
</listener>
4.6 加入 Log4j 配置文件
在 config 下加入配置文件 log4j.properties。Log4j 的配置很简单,而且也是通用的,下面给出一个基本的配置:
# Global logging configuration
log4j.rootLogger=DEBUG, stdout
# MyBatis logging configuration...
log4j.logger.org.mybatis.example.BlogMapper=TRACE
# Console output...
log4j.appender.stdout=org.apache.log4j.ConsoleAppender
log4j.appender.stdout.layout=org.apache.log4j.PatternLayout
log4j.appender.stdout.layout.ConversionPattern=%5p [%t] - %m%n
4.6 测试
在 Tomcat 中部署运行项目,访问链接 http://localhost:8080/ssm/items/queryItems.action
访问之后控制台输出信息:
DEBUG [http-bio-8080-exec-8] - DispatcherServlet with name 'SpringMVC' processing GET request for [/ssm/items/queryItems.action]
DEBUG [http-bio-8080-exec-8] - Looking up handler method for path /items/queryItems.action
DEBUG [http-bio-8080-exec-8] - Returning handler method [public java.lang.String com.ssm.controller.ItemController.queryItems(org.springframework.ui.Model) throws java.lang.Exception]
DEBUG [http-bio-8080-exec-8] - Returning cached instance of singleton bean 'itemController'
DEBUG [http-bio-8080-exec-8] - Last-Modified value for [/ssm/items/queryItems.action] is: -1
DEBUG [http-bio-8080-exec-8] - Creating a new SqlSession
DEBUG [http-bio-8080-exec-8] - Registering transaction synchronization for SqlSession [org.apache.ibatis.session.defaults.DefaultSqlSession@d900584]
DEBUG [http-bio-8080-exec-8] - Fetching JDBC Connection from DataSource
DEBUG [http-bio-8080-exec-8] - Registering transaction synchronization for JDBC Connection
DEBUG [http-bio-8080-exec-8] - JDBC Connection [com.mchange.v2.c3p0.impl.NewProxyConnection@5146f243 [wrapping: com.mysql.jdbc.JDBC4Connection@2ade491b]] will be managed by Spring
DEBUG [http-bio-8080-exec-8] - ==>  Preparing: SELECT * FROM items
DEBUG [http-bio-8080-exec-8] - ==> Parameters:
DEBUG [http-bio-8080-exec-8] - <==      Total: 3
DEBUG [http-bio-8080-exec-8] - Releasing transactional SqlSession [org.apache.ibatis.session.defaults.DefaultSqlSession@d900584]
DEBUG [http-bio-8080-exec-8] - Transaction synchronization deregistering SqlSession [org.apache.ibatis.session.defaults.DefaultSqlSession@d900584]
DEBUG [http-bio-8080-exec-8] - Transaction synchronization closing SqlSession [org.apache.ibatis.session.defaults.DefaultSqlSession@d900584]
DEBUG [http-bio-8080-exec-8] - Returning JDBC Connection to DataSource
DEBUG [http-bio-8080-exec-8] - Rendering view [org.springframework.web.servlet.view.JstlView: name 'itemsList'; URL [/WEB-INF/jsp/itemsList.jsp]] in DispatcherServlet with name 'SpringMVC'
DEBUG [http-bio-8080-exec-8] - Added model object 'itemsList' of type [java.util.ArrayList] to request in view with name 'itemsList'
DEBUG [http-bio-8080-exec-8] - Forwarding to resource [/WEB-INF/jsp/itemsList.jsp] in InternalResourceView 'itemsList'
DEBUG [http-bio-8080-exec-8] - Successfully completed request
在页面显示内容:

通过比对数据库,显示数据与数据库数据一致,说明到此我们对 ssm 整合完成。
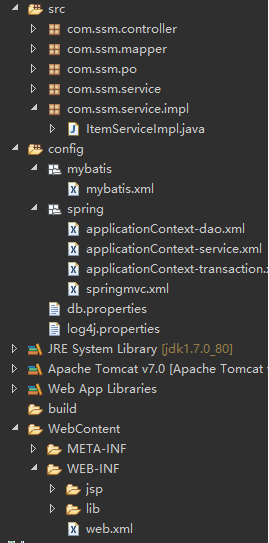
此时项目结构图为: