SpringWebflux是SpringFramework5.0添加的新功能,WebFlux本身追随当下最火的Reactive Programming而诞生的框架,那么本篇就来简述一下这个框架到底是做什么的
一、关于WebFlux
我们知道传统的Web框架,比如说:struts2,springmvc等都是基于Servlet API与Servlet容器基础之上运行的,在Servlet3.1之后才有了异步非阻塞的支持。而WebFlux是一个典型非阻塞异步的框架,它的核心是基于Reactor的相关API实现的。相对于传统的web框架来说,它可以运行在诸如Netty,Undertow及支持Servlet3.1的容器上,因此它的运行环境的可选择行要比传统web框架多的多。
根据官方的说法,webflux主要在如下两方面体现出独有的优势:
1)非阻塞式
其实在servlet3.1提供了非阻塞的API,WebFlux提供了一种比其更完美的解决方案。使用非阻塞的方式可以利用较小的线程或硬件资源来处理并发进而提高其可伸缩性
2) 函数式编程端点
老生常谈的编程方式了,Spring5必须让你使用java8,那么函数式编程就是java8重要的特点之一,而WebFlux支持函数式编程来定义路由端点处理请求。
二、SpringMVC与SpringWebFlux
我们先来看官网的一张图:
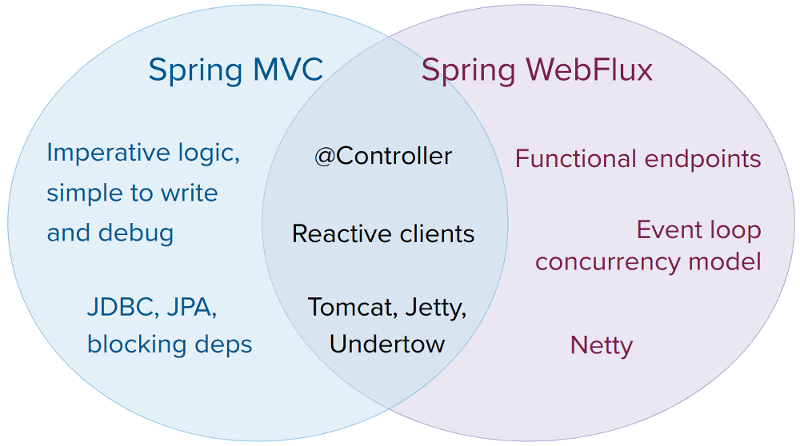
它们都可以用注解式编程模型,都可以运行在tomcat,jetty,undertow等servlet容器当中。但是SpringMVC采用命令式编程方式,代码一句一句的执行,这样更有利于理解与调试,而WebFlux则是基于异步响应式编程,对于初次接触的码农们来说会不习惯。对于这两种框架官方给出的建议是:
1)如果原先使用用SpringMVC好好的话,则没必要迁移。因为命令式编程是编写、理解和调试代码的最简单方法。因为老项目的类库与代码都是基于阻塞式的。
2)如果你的团队打算使用非阻塞式web框架,WebFlux确实是一个可考虑的技术路线,而且它支持类似于SpringMvc的Annotation的方式实现编程模式,也可以在微服务架构中让WebMvc与WebFlux共用Controller,切换使用的成本相当小
3)在SpringMVC项目里如果需要调用远程服务的话,你不妨考虑一下使用WebClient,而且方法的返回值可以考虑使用Reactive Type类型的,当每个调用的延迟时间越长,或者调用之间的相互依赖程度越高,其好处就越大
我个人意见是:官网明确指出,SpringWebFlux并不是让你的程序运行的更快(相对于SpringMVC来说),而是在有限的资源下提高系统的伸缩性,因此当你对响应式编程非常熟练的情况下并将其应用于新的系统中,还是值得考虑的,否则还是老老实实的使用WebMVC吧
三、Reactive Spring Web
在这里定义了最基本的服务端接口:HttpHandler和WebHandler
HttpHandler
HttpHandler定义了最基本的处理Http请求行为,这个接口主要作用是处理Http请求并将结果做出响应,下面这个表格是说明了Server API的使用方式及何种方式进行响应式流支持的:
| Server name | Server API used | Reactive Streams support |
|---|---|---|
| Netty |
Netty API |
|
| Undertow |
Undertow API |
spring-web: Undertow to Reactive Streams bridge |
| Tomcat |
Servlet 3.1 non-blocking I/O; Tomcat API to read and write ByteBuffers vs byte[] |
spring-web: Servlet 3.1 non-blocking I/O to Reactive Streams bridge |
| Jetty |
Servlet 3.1 non-blocking I/O; Jetty API to write ByteBuffers vs byte[] |
spring-web: Servlet 3.1 non-blocking I/O to Reactive Streams bridge |
| Servlet 3.1 container |
Servlet 3.1 non-blocking I/O |
spring-web: Servlet 3.1 non-blocking I/O to Reactive Streams bridge |
WebHandler
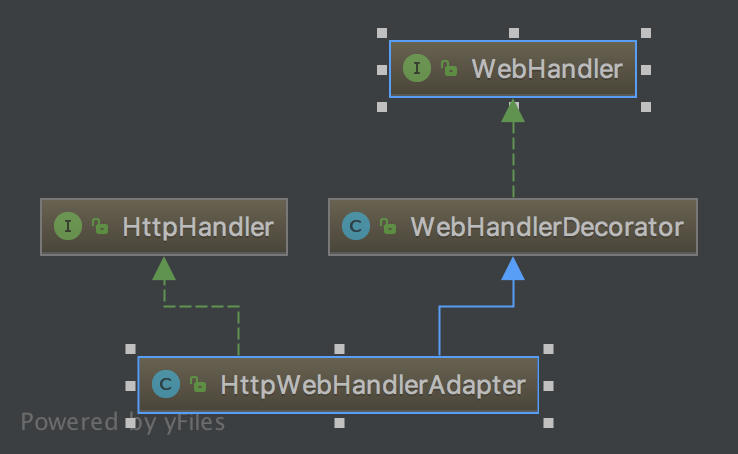
WebHandler定义了Web请求必要一些处理行为,大家不妨想想看:WebFlux已经脱离了Servlet API,那么使用WebFlux时遇到会话机制怎么办,想要对请求过滤处理怎么办或者想要处理静态资源怎么办等等,那么WebHandler就是做这个事情的。其实在HttpHandler的基本实现类通过适配器模式及装饰模式也间接的实现了WebHandler接口:
WebHandler常见的实现类,我在这里列举一下:
WebHandlerDecorator:WebHandler的装饰器,利用装饰模式实现相关功能的扩展
HttpWebHandlerAdapter: 进行Http请求处理,同时也是HttpHandler的实现类
FilteringWebHandler:通过WebFilter进行过滤处理的类,类似于Servlet中的Filter
ExceptionHandlingWebHandler: 针对于异常的处理类
ResourceWebHandler:用于静态资源请求的处理类
DispatcherHandler:请求的总控制器,类似于WebMVC中的DispatcherServlet
四、实现WebFlux示例
建立SpringBoot项目,注意SpringBoot版本必须为2.0.0+,在build.gradle配置文件里写:
compile('org.springframework.boot:spring-boot-starter-webflux')
基于Annotated Controller方式实现
WebFluxConfig配置:

package com.hzgj.framework.study.springwebflux.web.reactive;

import org.springframework.context.ApplicationContext;
import org.springframework.context.annotation.Bean;
import org.springframework.context.annotation.ComponentScan;
import org.springframework.context.annotation.Configuration;
import org.springframework.web.reactive.DispatcherHandler;
import org.springframework.web.reactive.config.EnableWebFlux;
import org.springframework.web.reactive.config.WebFluxConfigurer;

@Configuration
@ComponentScan
@EnableWebFlux
public class WebFluxConfig implements WebFluxConfigurer {

    @Bean
    public WebHandler webHandler(ApplicationContext applicationContext) {
        DispatcherHandler dispatcherHandler = new DispatcherHandler(applicationContext);
        return dispatcherHandler;
    }


}
在这里我们创建一个WebHandler并使用@EnableWebFlux打开相关功能。我们可以发现与SpringMVC的WebConfig配置真的好像
Controller:
package com.hzgj.framework.study.springwebflux.web.reactive.controller;

import org.springframework.web.bind.annotation.GetMapping;
import org.springframework.web.bind.annotation.RestController;

@RestController
public class IndexController {

    @GetMapping("/index")
    public String index() {
        return "index";
    }
}
在这里与SpringMVC定义的Controller无异
Main方法:
package com.hzgj.framework.study.springwebflux.web.reactive;

import org.springframework.context.annotation.AnnotationConfigApplicationContext;
import org.springframework.http.server.reactive.HttpHandler;
import org.springframework.http.server.reactive.ReactorHttpHandlerAdapter;
import org.springframework.web.server.adapter.WebHttpHandlerBuilder;
import reactor.ipc.netty.http.server.HttpServer;

import java.io.IOException;

/**
 * 基于Reactor Netty实现WebFlux服务
* @author chen.nie
* @date 2018/7/13
**/
public class SpringWebfluxApplication {

    public static void main(String[] args) throws IOException {

        AnnotationConfigApplicationContext applicationContext = new AnnotationConfigApplicationContext(WebFluxConfig.class);
        //通过ApplicationContext创建HttpHandler
        HttpHandler httpHandler = WebHttpHandlerBuilder.applicationContext(applicationContext).build();
        ReactorHttpHandlerAdapter httpHandlerAdapter = new ReactorHttpHandlerAdapter(httpHandler);
        HttpServer.create("localhost",8080).newHandler(httpHandlerAdapter).block();
        System.in.read();
    }
}
程序启动成功后即可通过http://localhost:8080/index拿到对应结果
函数式编程方式
使用这种方式请先了解Java8提供的函数式编程特性。那么我们先编写一个简单的Handler
package com.hzgj.framework.study.springwebflux.web.reactive.handler;

import org.springframework.beans.BeanUtils;
import org.springframework.web.reactive.function.server.ServerRequest;
import org.springframework.web.reactive.function.server.ServerResponse;
import reactor.core.publisher.Mono;

import static org.springframework.http.MediaType.*;
import static org.springframework.web.reactive.function.BodyInserters.fromObject;
import static org.springframework.web.reactive.function.server.ServerResponse.ok;

/**
 * 类似于Controller,处理用户请求的真实逻辑
 */
public class StudentHandler {


    public static Mono<ServerResponse> selectStudent(ServerRequest request) {
        Student studentBody = new Student();
        request.bodyToMono(Student.class).subscribe(student -> BeanUtils.copyProperties(student, studentBody));
        return ok().contentType(APPLICATION_JSON_UTF8).body(fromObject(studentBody));
    }

    public static Mono<ServerResponse> insertStudent(ServerRequest request){
        return ok().contentType(TEXT_PLAIN).body(fromObject("success"));

    }
    private static class Student {
        private Integer id;
        private String name;

        public Integer getId() {
            return id;
        }

        public void setId(Integer id) {
            this.id = id;
        }

        public String getName() {
            return name;
        }

        public void setName(String name) {
            this.name = name;
        }
    }
}
这个Handler类似于Controller的作用,在这里的返回值均为Mono类型,其中ServerRequest和ServerResponse,大家可以先理解为WebFlux替代ServletRequest与ServletResponse对象的,而且这些类能够支持异步。
Main方法里我们创建的HttpHandler的方式需要进行改变一下,同样用函数式方式进行编写:
package com.hzgj.framework.study.springwebflux.web.reactive;

import com.hzgj.framework.study.springwebflux.web.reactive.handler.StudentHandler;
import org.springframework.http.MediaType;
import org.springframework.http.server.reactive.HttpHandler;
import org.springframework.http.server.reactive.ReactorHttpHandlerAdapter;
import reactor.ipc.netty.http.server.HttpServer;

import java.io.IOException;

import static org.springframework.web.reactive.function.server.RequestPredicates.*;
import static org.springframework.web.reactive.function.server.RouterFunctions.route;
import static org.springframework.web.reactive.function.server.RouterFunctions.toHttpHandler;


public class FunctionRouteApplication {

    public static void main(String[] args) throws IOException {

        HttpHandler httpHandler = toHttpHandler(
                route(POST("/selectStudent").and(accept(MediaType.APPLICATION_JSON_UTF8)), StudentHandler::selectStudent).
                        and(route(GET("/saveStudent"), StudentHandler::insertStudent)));
        ReactorHttpHandlerAdapter httpHandlerAdapter = new ReactorHttpHandlerAdapter(httpHandler);
        HttpServer.create("localhost", 8080).newHandler(httpHandlerAdapter).block();
        System.in.read();
    }
}
启动成功后,我们用postman测试一下
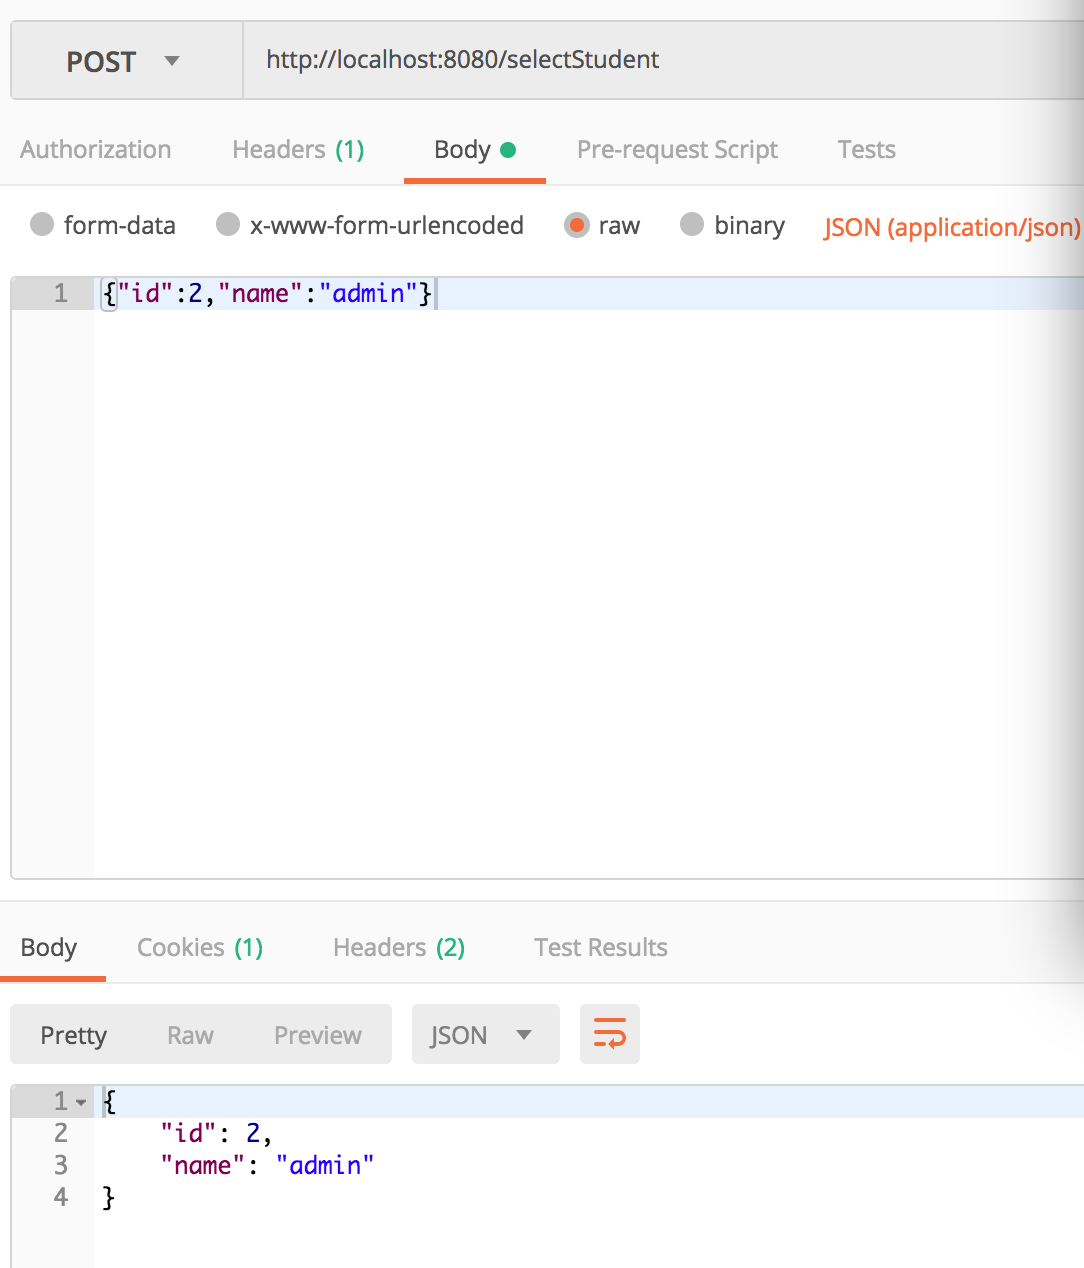
此时我们可以看到使用函数式编程创建路由端点,也可以实现同样的功能。