第一套:CSDN代码+百度文库报告
将一个Eclipse项目转到Intellij IDEA的步骤
https://blog.csdn.net/u010444171/article/details/53860121?utm_source=itdadao&utm_medium=referral
【Intellij IDEA】eclipse项目导入:
https://www.cnblogs.com/lindp/p/4484390.html
IntelliJ IDEA平台下JNI编程
IntelliJ IDEA平台下JNI编程(一)—HelloWorld篇:
https://blog.csdn.net/huachao1001/article/details/53906237
这篇必看,JNI的应用
1搭建GCC编译环境
安装MinGW
2开始编码
编写Java文件
生成JNI头文件
手动输入javah指令
一键生成头文件
3编写C文件并编译成dll(或so)文件
手动输入命令生成
一键生成dll
4运行
5可能出现的错误
java.library.path找不到dll的错误
无法识别__int64类型错误
-bit mode not compiled
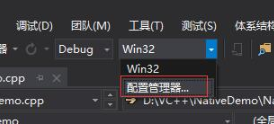
IntelliJ IDEA平台下JNI编程(二)—类型映射:
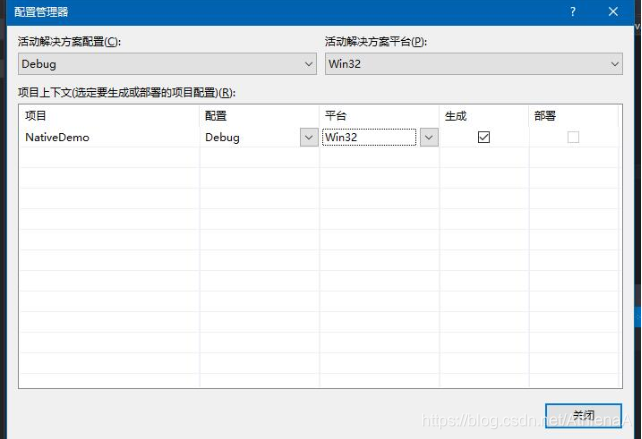
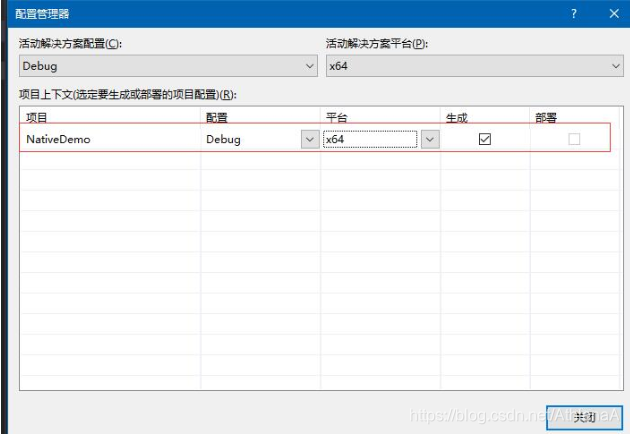
https://blog.csdn.net/huachao1001/article/details/53992258
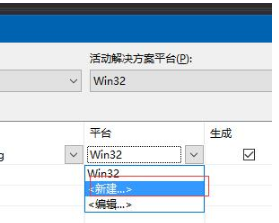
IntelliJ IDEA平台下JNI编程(三)—字符串、数组:
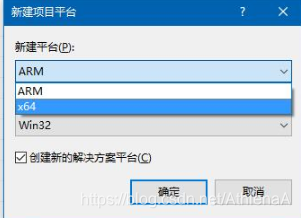
https://blog.csdn.net/huachao1001/article/details/54407327
IntelliJ IDEA平台下JNI编程(四)—本地C代码访问JAVA对象:
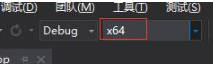
https://blog.csdn.net/huachao1001/article/details/64924057
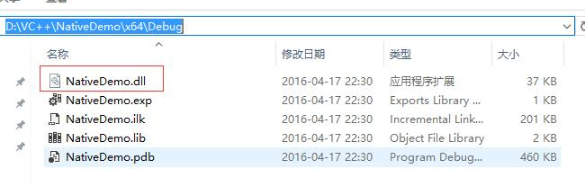
IntelliJ IDEA平台下JNI编程(五)—本地C代码创建Java对象及引用:
https://blog.csdn.net/huachao1001/article/details/65446070
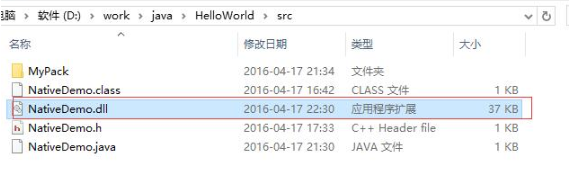
IntelliJ IDEA平台下JNI编程:
https://blog.csdn.net/Fighting_Boss/article/details/82628002
java.library.path找不到dll的错误:
即找不到我们生成的dll文件。因为在Windows中JVM的java.library.path属性即为环境变量Path指定的目录,而我们生成的dll并未放入到Path指定的任何一个目录中,因此我们需要告诉JVM,dll文件在哪个目录中。点击Run > Edit Configurations…,如下:
在VM options中加入java.library.path,指定dll(或so)文件所在的目录,比如本文中dll放在项目目录中的lib中,如下:
-Djava.library.path=E:\workspace\StudyJNI\lib
IntelliJ IDEA平台下JNI编程(姊妹篇)
1使用JNI,那就不可避免地需要将C/C++文件编译成dll(windows)或so(Linux)文件
2在Java代码中需要将调用的C++方法用native修饰。同时在初始化主方法之前需要加载库。(函数System.loadLibrary()是加载dll(windows)或so(Linux)库,只需名称即可,无需加入文件名后缀(.dll或.so)。native关键字将函数sayHello()声明为本地函数,由C/C++实现。具体的实现就在hello.dll(Windows平台)或hello.so(Linux平台)中)
3JNI生成头文件是通过JDK中提供的javah来完成,javah在 {JDKHome}/bin目录中。成的.h头文件 一般如下:
/* DO NOT EDIT THIS FILE - it is machine generated */
#include <jni.h>
/* Header for class com_zhonghao_java_HelloJNI */

#ifndef _Included_com_zhonghao_java_HelloJNI
#define _Included_com_zhonghao_java_HelloJNI
#ifdef __cplusplus
extern "C" {
#endif
/*
 * Class:     com_zhonghao_java_HelloJNI
 * Method:    sayHello
 * Signature: ()V
 */
JNIEXPORT void JNICALL Java_com_zhonghao_java_HelloJNI_sayHello
  (JNIEnv *, jobject);

#ifdef __cplusplus
}
#endif
#endif
4接下来我们只需实现Java_com_zhonghao_java_HelloJNI_sayHello
(JNIEnv *, jobject)即可。仔细观察就会发现这个函数名称是有规律的,即Java_<包><类名><函数名>,JNIEXPORT和JNICALL这两个宏定义暂时不用管。
5在jni目录中新建HelloJNI.c文件,这里就是需要调用的C方法
#include<jni.h>
#include <stdio.h>
#include "com_zhonghao_java_HelloJNI"

JNIEXPORT void JNICALL Java_com_zhonghao_java_HelloJNI_sayHello(JNIEnv *env, jobject thisObj) {
   printf("Hello World!\n");
   return;
}
6之后就是使用工具将该c编译成dll的动态链接库.方法很多,这里不予详写
7此时执行java代码,即可以调用到C中的方法。打印出Hello World!
IntelliJ IDEA平台下JNA编程(姊妹篇)
https://blog.csdn.net/Fighting_Boss/article/details/82664047
JNA简单介绍
1JNA(Java Native Access)是一个开源的Java框架,是Sun公司推出的一种调用本地方法的技术,是建立在经典的JNI基础之上的一个框架。之所以说它是JNI的替代者,是因为JNA大大简化了调用本地方法的过程,使用很方便,基本上不需要脱离Java环境就可以完成。
2JNA只需要我们写Java代码而不用写JNI或本地代码(适配用的.dll/.so)只需要在Java中编写一个接口和一些代码,作为.dll/.so的代理,就可以在Java程序中调用dll/so。功能相对于Windows的Platform/Invoke和Python的ctypes。
3JNA的简单实例在下边,需要注意的就是,dll/so库的加载路径问题
Native.loadLibrary(“hzh”, CLibrary.class)会自动去项目的根目录下找dll,因此位置一定要放对,不然会报找不到dll库的错误
1首先在pom中加入JNA的依赖
<dependency>
  <groupId>com.sun.jna</groupId>
  <artifactId>jna</artifactId>
  <version>3.0.9</version>
</dependency>
2其次是编写Java方法
package com.zhonghao;
import com.sun.jna.Library;
import com.sun.jna.Native;
/**
-
Created by zhonghao.han on 9/12/2018.
*/
public class JnaTest {
//继承Library,用于加载库文件
public interface Clibrary extends Library{
//加载libhello.so链接库
Clibrary INSTANTCE = (Clibrary) Native.loadLibrary(“helloworld”, Clibrary.class);//此方法为链接库中的方法
void test();
}
public static void main(String[] args) {
//调用
Clibrary.INSTANTCE.test();
}
}
3其次编写C 的方法helloworld.h
#include<stdio.h>
void test(){
printf(“helloworld\n”);
}
这样就可以了
4同时将C代码helloworld.h编译成dll.至于怎么编译自己找资料
5然后将dll文件放到工程根目录下,运行即可!
为什么是根目录下呢?因为Native.loadLibrary第 一个参数是动态链接库dll/so的名称,但不带.dll或.so这样的后缀,这符合JNI的规范,因为带了后缀名就不可以跨操作系统平台了。搜索动态链 接库路径的顺序是:先从当前类的当前文件夹找,如果没有找到,再在工程当前文件夹下面找win32/win64文件夹,找到后搜索对应的dll文件,如果 找不到再到WINDOWS下面去搜索,再找不到就会抛异常了。
Java调用C++知识分享(JNA执行过程)
https://blog.csdn.net/Fighting_Boss/article/details/82786693
JNA(Java Native Access)框架是一个开源的Java框架,是SUN公司主导开发的,建立在经典的JNI的基础之上的一个框架。
Java调用C/C++代码,最原始的方式是使用JNI(Java Native Interface),但是使用JNI技术非常痛苦,因为你需要对照要调用的C/C++函数写一个“接口”,使用SUN规定的数据结构替代C/C++语言的数据结构,调用已有的 dll/so中公布的函数。然后再在Java中载入这个“接口”,调用dll/so库中的函数。面对如此繁琐的过程的,因此诞生出了建立在经典的JNI的基础之上的一个框架–JNA( Java Native Access)。
本文主要是通过举例的方式,从代码中来到代码中去的方法,讲述JNA的使用。本文中的方法在Windows平台下以及在Centos的Linux平台下都加以验证过。因此我也才放开胆子去写。
不堪回首的JNI
我们知道,使用JNI调用.dll/.so共享类库是非常非常麻烦和痛苦的。
如果有一个现有的.dll/.so文件,如果使用JNI技术调用,我们首先需要另外使用C语言写一个.dll/.so共享库,使用SUN规定的数据结构替代C语言的数据结构,调用已有的 dll/so中公布的函数。
然后再在Java中载入这个适配器dll/so,再编写Java native函数作为dll中函数的代理。
经过2个繁琐的步骤才能在Java中调用本地代码。
因此,很少有Java程序员愿意编写调用dll/.so库中的原生函数的java程序。这也使Java语言在客户端上乏善可陈。可以说JNI是Java的一大弱点!
下边通过一个简单的例子,让你对JNA方式完成Java调用C++有一个简单清晰的认识。
第一步:首先在pom文件中加入JNA的依赖
<dependency>
  <groupId>com.sun.jna</groupId>
  <artifactId>jna</artifactId>
  <version>3.0.9</version>
</dependency>
第二步:编写Java方法(注意看注释的部分就行了0.0)
/**
-
Created by zhonghao.han on 9/12/2018.
*/
public class JnaTest {
//继承Library,用于加载库文件
public interface Clibrary extends Library{
//windows下加载helloworld.dll链接库,Linux下加载libhelloworldLinux.so(Linux下会自动寻找lib开头的库)
Clibrary INSTANTCE = (Clibrary) Native.loadLibrary((Platform.isWindows() ? “helloworld” : “helloworldLinux”), Clibrary.class);//此方法为链接库中的方法
void test();
}
public static void main(String[] args) {
//调用
Clibrary.INSTANTCE.test();
}
}
第三步:编写需要调用的C方法helloworld.c(C和C++都可以,都测试过0.0 这里是随手复制的一个C代码)
#include<stdio.h>
void test(){
printf(“hello JNA!\n”);
}
需要注意的是Native.loadLibrary第 一个参数是动态链接库dll/so的名称,但不带.dll或.so这样的后缀,这符合JNI的规范,因为带了后缀名就不可以跨操作系统平台了。
第四步:将C代码编译成dll(在Windos平台下C/C++一般都是编译成.dll,在Linux下一般是编译成.so).具体的编译这里就不再细说哈哈
上例用的是Windows的平台做的演示,Linux平台的一样。
注意:库文件的位置需要放置到项目的根路径下,否则Java调用库的时候会找不到这个库文件而报如下的错误
Exception in thread "main" java.lang.UnsatisfiedLinkError: Unable to load library 'helloworld': Native library (win32-x86-64/helloworld.dll) not found in resource path
([file:/C:/hzh/SoftWares/jdk/jre/lib/charsets.jar, file:/C:/hzh/SoftWares/jdk/jre/lib/deploy.jar, file:/C:/hzh/SoftWares/jdk/jre/lib/ext/access-bridge-64.jar, file:/C:/hzh/SoftWares/jdk/jre/lib/ext/cldrdata.jar,
file:/C:/hzh/SoftWares/jdk/jre/lib/ext/dnsns.jar, file:/C:/hzh/SoftWares/jdk/jre/lib/ext/jaccess.jar,
file:/C:/hzh/SoftWares/jdk/jre/lib/ext/jfxrt.jar, file:/C:/hzh/SoftWares/jdk/jre/lib/ext/localedata.jar,
file:/C:/hzh/SoftWares/jdk/jre/lib/ext/nashorn.jar,
file:/C:/hzh/SoftWares/jdk/jre/lib/ext/sunec.jar, file:/C:/hzh/SoftWares/jdk/jre/lib/ext/sunjce_provider.jar,
file:/C:/hzh/SoftWares/jdk/jre/lib/ext/sunmscapi.jar,
file:/C:/hzh/SoftWares/jdk/jre/lib/ext/sunpkcs11.jar,
file:/C:/hzh/SoftWares/jdk/jre/lib/ext/zipfs.jar, file:/C:/hzh/SoftWares/jdk/jre/lib/javaws.jar,
file:/C:/hzh/SoftWares/jdk/jre/lib/jce.jar,
file:/C:/hzh/SoftWares/jdk/jre/lib/jfr.jar,
file:/C:/hzh/SoftWares/jdk/jre/lib/jfxswt.jar,
file:/C:/hzh/SoftWares/jdk/jre/lib/jsse.jar,
file:/C:/hzh/SoftWares/jdk/jre/lib/management-agent.jar,
file:/C:/hzh/SoftWares/jdk/jre/lib/plugin.jar, file:/C:/hzh/SoftWares/jdk/jre/lib/resources.jar, file:/C:/hzh/SoftWares/jdk/jre/lib/rt.jar,
file:/C:/hzh/codes/JNADemo/target/classes/,
file:/C:/hzh/SoftWares/Intellij/IntelliJ%20IDEA%202016.3.2/jre/jre/bin/hzh/maven/repository/net/java/dev/jna/jna/4.1.0/jna-4.1.0.jar,
file:/C:/hzh/SoftWares/Intellij/IntelliJ%20IDEA%202016.3.2/lib/idea_rt.jar])
	at com.sun.jna.NativeLibrary.loadLibrary(NativeLibrary.java:271)
	at com.sun.jna.NativeLibrary.getInstance(NativeLibrary.java:398)
	at com.sun.jna.Library$Handler.<init>(Library.java:147)
	at com.sun.jna.Native.loadLibrary(Native.java:412)
	at com.sun.jna.Native.loadLibrary(Native.java:391)
	at com.zhonghao.JnaTest$Clibrary.<clinit>(JnaTest.java:16)
	at com.zhonghao.JnaTest.main(JnaTest.java:25)
	at sun.reflect.NativeMethodAccessorImpl.invoke0(Native Method)
	at sun.reflect.NativeMethodAccessorImpl.invoke(NativeMethodAccessorImpl.java:62)
	at sun.reflect.DelegatingMethodAccessorImpl.invoke(DelegatingMethodAccessorImpl.java:43)
	at java.lang.reflect.Method.invoke(Method.java:498)
	at com.intellij.rt.execution.application.AppMain.main(AppMain.java:147)
为什么是项目根目录呢?
Java代码搜索动态链接库路径的顺序是:先从当前类的当前文件夹找,如果没有找到再在工程当前文件夹下面找对应的dll文件,如果找不到再到WINDOWS下面去搜索,再找不到就会抛异常了。
即:
1)项目的根路径
2)操作系统的全局路径、
3)path指定的路径。(这种尝试了未遂)
至此JNA的简单实例就结束了。
我目前只找到这一种指定库文件位置的方法,其他的方式也试了,但是未遂。方法肯定是有的,但是需要再花点时间去尝试。同样在Linux环境下,路径也是一个问题。
在Linux环境下,我尝试了指定路径等做法,未遂!然后按照windows下把库文件放到项目根目录下也不行,找不到库,报上边相同的错误。于是我将库文件放到上边错误中提到的一个路径/Desktop/JNADemo/target/classes/下,于是就可以找到库并正常调用C/C++的方法了。目前Linux下就只发现这一种。即把库文件.so放到项目编译生成的/target/ 下。
看到这里,估计大佬们已经耐不住想要深入了解JNA了,甚至想摩拳擦掌看看有没有复杂点的例子
不要着急,下边将献上一些复杂点的C++方法接口,你先思考拿到这样的方法接口,在Java中该怎么调用?比如这个C++方法接口中需要结构体这样的参数,需要指针、函数指针这样的参数,这些在Java中该如何声明?
大餐上菜之前先说说JNA的编程过程
JNA的编程过程
在Java中加载库的接口中你需要声明要调用的函数,如test方法就是C/C++代码中的方法(文章底部附上本篇实例的完整代码,那时你可以看到全局,现在只放出局部代码)
public interface Clibrary extends Library{
//加载libhello.dll链接库
Clibrary INSTANTCE = (Clibrary) Native.loadLibrary((Platform.isWindows() ? “helloworld” : “helloworldLinux”), Clibrary.class);
//此方法为链接库中的方法
void test();
}
void test();
需要注意的是:参数和返回值的类型,应该和dll/so中的C/C++函数的类型一致。这一点是JNA,甚至所有跨平台调用的难点。(这是为了给下边大餐做的提示)
Java要调用C语言的函数,那么就必须严格按照C语言要求的内存数量提供Java格式的数据。要用Java的数据类型完美模拟C语言的数据类型。JNA已经提供了大量的类型匹配C语言的数据类型。
此处放上JNA提供的Java和C/C++类型的转换表(想了想,略掉。估计没人看,还占篇幅)
下面分享一下Java调用复杂C/C++函数
首先了解一下背景知识:模拟C语言结构体
本示例中,大量把模拟Struct的类写作为接口的内部类。这不是JNA规定的,因为这些结构体(Structure类的子类),一般没有重用的价值,因此写成内部类比较方便。
示例一:需要结构体指针作为参数的方法
C++方法void sayUser(UserStruct* pUserStruct);
这是一个需要结构体指针作为参数的方法
头文件如下:
#define extern “C”
struct UserStruct{
long id;
wchar_t* name;
int age;
};
void sayUser(UserStruct* pUserStruct);
对应Java程序,首先要创建一个这样的结构体UserStruct ,这里直接让他继承于JNA包中的Structure类,继承了该类就相当于是一个结构体。使用结构体指针就直接用.ByReference就可以,这个点下边会细说。
/*
- 定义一个类,模拟C语言的结构体
*/
public static class UserStruct extends Structure{
public NativeLong id;
public WString name;
public int age;
public void sayUser(UserStruct.ByReference struct);
}
Java中的调用代码:
UserStruct userStruct=new UserStruct ();
userStruct.id=new NativeLong(100);
userStruct.age=30;
userStruct.name=new WString("hzh");
TestDll1.INSTANCE.sayUser(userStruct);
这里对Structure类进行说明:
继承了Structure类,用这个类来模拟C语言的结构体,这个Sturcture类是JNA依赖中的类。需要注意,Structure子类中的公共字段的顺序,必须与C语言中的结构的顺序一致。否则会报错!因为,Java调用dll中的C函数,实际上就是一段内存作为函数的参数传递给dll。Dll以为这个参数就是C语言传过来的参数。同时,C语言的结构是一个严格的规范,它定义了内存的次序。因此,JNA中模拟的结构的变量顺序绝对不能错。
此时你肯那个会注意到Java程序中有这么一个参数(下一行方法参数中加粗的部分)
public void sayUser(UserStruct.ByReference struct);
这个参数是什么呢? 下边我来详细的说一下。
Structure类中,有两个接口
public interface ByReference {
}
public interface ByValue {
}
这2个内部接口是标记,内部什么都没有。在运行时,JNA的执行框架会使用反射查看你是否实现了这2个接口,然后进行特定的处理。
如果我们实现Struct的类内部中有类实现Structure.ByReference接口,那么JNA认为你的Struct是一个指针。指向C语言的结构体。
如果我们实现Struct的类内部中有类实现Structure.ByValue接口,那么JNA认为你的Struct是值类型,就是C语言的结构体。
如果你不实现这2个接口,那么就相当于你实现了Structure.ByReference接口。
因此这里的这个参数,意思就是一个结构体指针。
举例如下:
C++代码中有这样一个结构体
struct Rect
{
int nLong;
int nShort;
};
有这样两个方法,即一个是要求传递结构体作为参数,一个要求是结构体指针作为参数
int RectangleArea(Rect rect)
{
int area = rect.nLong * rect.nShort;
std::cout<<“计算面积:长”<<rect.nLong<<", 宽"<<rect.nShort<<", 面积="<<area<<std::endl;
return area;
}
void Standardrize(Rect * rect)
{
int nSize = min(rect->nLong, rect->nShort);
rect->nLong = nSize;
rect->nShort = nSize;

std::cout<<"调整为正方形:长"<<rect->nLong<<", 宽"<<rect->nShort<<std::endl;
}
对应的Java代码就要这样实现结构体
//简单结构体
public static class Rect extends Structure
{
	public static class ByReference extends Rect implements Structure.ByReference {};
	public static class ByValue extends Rect implements Structure.ByValue{};
	public int nLong;
	public int nShort;
}
对应的调用方法Java代码为:
   System.out.println("---------我是RectangleArea方法-----------");
    Rect.ByValue rc3=new Rect.ByValue();
	rc3.nLong = 10;
	rc3.nShort = 20;
	int area;
	area = DllInterface.INSTANCE.RectangleArea(rc3);
	System.out.println("返回值:" + area);


   System.out.println("---------我是Standardrize方法-----------");
	Rect.ByReference rc2 = new Rect.ByReference();
	rc2.nLong = 15;
	rc2.nShort = 25;
	System.out.println("调整前的矩形长" + rc2.nLong + ", 宽" + rc2.nShort);
	DllInterface.INSTANCE.Standardrize(rc2);
	System.out.println("调整后的矩形长" + rc2.nLong + ", 宽" + rc2.nShort);
也就是一个参数传的是结构体,一个传递的是结构体指针。
到这里对于结构体的使用已经分享完成,下边将对C++中其他的复杂方法进行分享。
实例二:输入结构数组指针
有这么一个c++的方法(注意实例的名字!该方法的特点就是参数需要一个结构数组指针!)
int ArrayInput(SerialNum * lstSN, int nCount)
{
CString str, szTemp;
for (int i=0; i<nCount; i++)
{
	szTemp.Format("%d: 编号:%d, 备注:%s\n", i, lstSN[i].id, lstSN[i].msg);
	str += szTemp;

	lstSN[i].id += 100000;
	sprintf(lstSN[i].msg, "当前编号%d", lstSN[i].id);
}

std::cout<<str<<std::endl;
return nCount;
}
参数中用到的结构体如下:
struct SerialNum
{
int id;
char msg[32];
};
这样的方法Java怎么调用呢?
java调用的部分代码如下:
public static void main(String[] args)
{
SerialNum serialNum = new SerialNum();
SerialNum [] lstSN = (SerialNum [])serialNum.toArray(arrSize);
	lstSN[0].id = 11;
	lstSN[0].setMSG("一号");
	lstSN[1].id = 12;
	lstSN[1].setMSG("二号");

	DllInterface.INSTANCE.ArrayInput(lstSN, lstSN.length);

	System.out.println(lstSN[0].id + "," + lstSN[0].getMsg());
	System.out.println(lstSN[1].id + "," + lstSN[1].getMsg());
	}
Java中调用该方法使用到的SerialNum对象其声明 如下:
//包含字符数组的结构
public static class SerialNum extends Structure
{
	public static class ByReference extends SerialNum implements Structure.ByReference {};
	public static class ByValue extends SerialNum implements Structure.ByValue{};
/下边这个方法需要特别注意,上边的实例因为为了讲解用法没有加,但是没加这个会运行出错***********/
/下边这个方法需要返回C++方法中的Field的名字,而且顺序不能错********************/
@Override protected List getFieldOrder() {
return Arrays.asList(new String[] { “id”,“msg”});
}
/**上边这个方法,在每一个模仿C/C++实现结构体的类中都要实现并重写,不然会报空指针异常/
public int id;
public byte msg[] = new byte[32];
	public SerialNum(){
		this.allocateMemory();
	}

	public int setMSG(String str){
		return StringToFixedBytes(str, msg);
	}

	public String getMsg(){
		return BytesToString(msg);
	}
}
这样子就可以调用了,结构数组指针和普通的结构体指针没有多大的区别,但是记得在加载库的接口中声明C++的这个方法,不然DllInterface.INSTANCE可找不到这个方法。
//动态库类
public interface DllInterface extends Library
{
	DllInterface INSTANCE = (DllInterface)Native.loadLibrary("DllTest", DllInterface.class);
	public int ArrayInput(SerialNum [] strt, int a);
}
上边调用方法的JAVA代码是写在main函数里的。
实例三:输出结构数组指针
有C++方法如下:(要求int类型的指针作为参数,并且return结构数组指针)
SerialNum * ArrayOutput(int * nCount)
{
int nSize = (float)rand() / RAND_MAX * 5 + 1;
SerialNum * pSN = new SerialNum[nSize];
for (int i=0; i<nSize; i++)
{
pSN[i].id = (float)rand()/RAND_MAX * 100;
sprintf(pSN[i].msg, “当前编号%3d”, pSN[i].id);
}
*nCount = nSize;
return pSN;
}
这里C++需要一个int类型的指针作为参数,这个在Java调用的时候也有针对策略。
IntByReference pcount = new IntByReference();
这样就可以模拟创建Int类型的指针了。当然其他类型的都类似。还有
PS知识补充:
JNA可以模拟原生代码中的指针。Java和原生代码的类型映射表中的指针映射是这样的:
原生代码中的数组,可以使用JNA中对应类型的数组来表示。
原生代码中的指针,可以使用Pointer类型,或者PointerType类型及它们的子类型来模拟。
PointerType类代表的是一个类型安全的指针。ByReference类是PointerType类的子类。ByReference类代表指向堆内存的指针。而上述图片中的类都是ByReference的子类。
调用该C++方法的Java代码如下:
public static void main(String[] args)
{
	IntByReference pcount = new IntByReference();
	SerialNum sn7 = DllInterface.INSTANCE.ArrayOutput(pcount);
	SerialNum[] lstSN7 = (SerialNum[])sn7.toArray(pcount.getValue());

	int nCount = lstSN7.length;
	System.out.println("返回序列号数目:"+nCount);


	System.out.println("第"+lstSN7.length+"个序列号:"+lstSN7[nCount-1].getMsg());

	DllInterface.INSTANCE.FreeArray(lstSN7);
	System.out.println(lstSN7.length);
	}
记得在加载库的接口中声明该方法。
注意到这里有个FreeArray的方法,这个方法在C++的实现如下,主要用来删除多余分配的内存。
void FreeArray(SerialNum * pSN)
{
if (pSN != NULL)
{
delete [] pSN;
pSN = NULL;
std::cout<<“释放成功!”<<std::endl;
}
}
同样还有用到的释放内存的方法,C++代码如下:
void FreeMemory(void *ptr)
{
if(ptr == NULL)
return ;
delete [] (char *)ptr;
}
至此,实例三输出结构体指针的调用就结束了。
实例四:参数为数组指针结构体的C++方法调用
void GetStaff(Staff * pStaff)
{
if (pStaff == NULL)
	std::cout<<"地址无效"<<std::endl;

int nCount = 3;
pStaff->nCount = nCount;
pStaff->pSNs = new SerialNum [nCount];

for (int i=0; i<nCount; i++)
{
	pStaff->pSNs[i].id = (float)rand()/RAND_MAX * 100;
	sprintf(pStaff->pSNs[i].msg, "当前编号%3d", pStaff->pSNs[i].id);
}

return;
}
C++方法中用到的结构体Staff:
struct Staff
{
SerialNum * pSNs;
int nCount;
};
struct SerialNum
{
int id;
char msg[32];
};
对应的Java代码如下:
(这个方法是写在main方法中的)
	Staff.ByReference pStaff9 = new Staff.ByReference();
	DllInterface.INSTANCE.GetStaff(pStaff9);

	SerialNum.ByReference [] sns9 = pStaff9.toArray();

	for(int i=0; i<pStaff9.nCount; i++){
		System.out.println(sns9[i].getMsg());
	}

	DllInterface.INSTANCE.FreeMemory(pStaff9.pSN.getPointer());
用到的模拟C++结构体Stall的类声明如下
//用于带数组指针的结构
public static class Staff extends Structure{
	public static class ByReference extends Staff implements Structure.ByReference {};

	public SerialNum.ByReference pSN;
	public int nCount;

	public Staff() {nCount=0;}

	@Override protected List getFieldOrder() {
		return Arrays.asList(new String[] { "pSN","nCount"});
	}

	public SerialNum.ByReference[] toArray() {
		return (SerialNum.ByReference[]) pSN.toArray(nCount);
	}
}
记得在动态类库接口中声明该C++方法
public interface DllInterface extends Library
{
DllInterface INSTANCE = (DllInterface)Native.loadLibrary(“DllTest”, DllInterface.class);
public void GetStaff(Staff.ByReference staff);
}
至此就可以了0.0
实例五:简单函数指针
C++代码如下:(该方法第一个参数是个函数指针,该参数由Java传递,自然而然的就是调用Java的方法,因此就相当于回调Java的方法)
int MultiOperate(int (*fp)(int,int), int val1, int val2)
{
int nResult = fp(val1, val2);
std::cout<<“自定义操作结果:(”<<val1<<","<<val2<<")="<<nResult<<std::endl;
return nResult;
}
Java调用该方法的代码如下
    SimpleAdd add = new SimpleAdd();
	DllInterface.INSTANCE.MultiOperate(add, 100,2000);
这里用到的模拟C++函数的类SimpleAdd为
//简单回调实现
public static class SimpleAdd implements CustumPlus{
	public final int callback(int a, int b){
		return a+b;
	}
}

//简单回调接口
public static interface CustumPlus extends Callback {
	public abstract int callback(int a,int b);
}
再次强调注意在动态库接口中声名C++的被调用的方法
//动态库类
public interface DllInterface extends Library
{
	DllInterface INSTANCE = (DllInterface)Native.loadLibrary("DllTest", DllInterface.class);

	public int MultiOperate(CustumPlus fp, int a, int b);
}
这里C++函数中调用的函数实际是java中的方法,因此就是一个回调。而在Java中模拟C++中的函数需要实现callback这样一个接口当做回调函数。
至此简单的实例Demo分享完成,这些应该可以涵盖常用的C++代码了ヾ(◍°∇°◍)ノ゙ 仅仅个人想法。
最终附上一个综合的,我练习的最复杂的一个列子,如果这个例子你秒懂的话!那你现在可以随意调用C/C++代码了。0.0
实例∞ 带字符指针和复杂函数指针的参数方法
先上C++代码(该方法的描述请参考此实例名称)
int AppointAssignMethod(const AssignMethod * pMethod)
{
int nSize = 3;
SerialNum SN[3];
for (int i=0; i<nSize; i++)
{
	SN[i].id = (float)rand()/RAND_MAX * 100;
	sprintf(SN[i].msg, "当前编号%3d", SN[i].id);
}

std::cout<<pMethod->title<<std::endl;
pMethod->fp(SN, nSize);

return 0;
}
PS知识点:
注意这里C++方法参数中有个const修饰,这个我不懂是什么意思,查了一下:
通过把类成员函数声明为const 以表明它们不修改类对象。任何不会修改数据成员的函数都应该声明为const类型。如果在编写const成员函数时,不慎修改了数据成员,或者调用了其它非const成员函数,编译器将指出错误,这样做的好处是提高程序了的健壮性。
用到的C++结构体AssignMethod如下:
typedef int (*ON_ASSIGN_SN)(SerialNum * pSN, int nCount);
struct AssignMethod
{
char * title;
ON_ASSIGN_SN fp;
};
搜噶,接下来是Java代码
public class CallMain
{
public static class AssignMethod extends Structure{
public String title;
public OnAssignSN fp;
	@Override protected List getFieldOrder() {

		return Arrays.asList("title","fp");
	}

	public static class ByReference extends AssignMethod implements Structure.ByReference {};
}

//复杂回调接口
public static interface OnAssignSN extends Callback {
	public abstract int callback(SerialNum.ByReference pSN, int nCount);
}

//复杂回调接口实现
public static class DispLastSN implements OnAssignSN{
	public final int callback(SerialNum.ByReference pSN, int nCount)
	{
		if(nCount <=0)
			return 0;
		System.out.println("回调显示:");
		SerialNum.ByReference [] sns = (SerialNum.ByReference[])pSN.toArray(nCount);

		for(int i=0; i<nCount; i++){
			System.out.println(sns[i].getMsg());
		}
		return nCount;
	}
}

//动态库类
public interface DllInterface extends Library
{
	DllInterface INSTANCE = (DllInterface)Native.loadLibrary("DllTest", DllInterface.class);
	public int AppointAssignMethod(AssignMethod method);
}
public static void main(String[] args)
{
		System.out.println("---------带字符指针和复杂函数指针的结构-----------");
	AssignMethod.ByReference method = new AssignMethod.ByReference();
	method.title = new String("来自JAVA");
	method.fp = new DispLastSN();
	DllInterface.INSTANCE.AppointAssignMethod(method);
}
}
至此,分享结束0.0 。目前还有些小问题就是库文件的存放路径,找到可行的存放位置的方法任重道远~
下面附上所有实例的完整代码:(一个类)
package com.zhonghao;
import com.sun.jna.Library;
import com.sun.jna.Callback;
import com.sun.jna.Native;
import com.sun.jna.Structure;
import com.sun.jna.Pointer;
import com.sun.jna.ptr.IntByReference;
import com.sun.jna.ptr.FloatByReference;
import java.util.ArrayList;
import java.util.Arrays;
import java.util.List;
public class CallMain
{
//字符转换
public static int StringToFixedBytes(String str, byte by[])
{
byte byTemp[] = str.getBytes();
int strLen = byTemp.length;
int byLen = by.length;
	if(strLen > byLen)
		return -1;

	if(strLen==0)
		for(int i=0; i<byLen; i++)
			by[i] = '\0';

	System.arraycopy(byTemp, 0, by, 0, strLen);
	return strLen;
}

//字符转换
public static String BytesToString(byte by[])
{
	String str = new String(by);
	int pos = str.indexOf ('\0');
	if(pos!=-1)
		str = str.substring (0, pos);
	return str;
}

//简单结构
public static class Rect extends Structure
{
	@Override protected List getFieldOrder() {

		return Arrays.asList(new String[] { "nLong","nShort"});
	}

	public static class ByReference extends Rect implements Structure.ByReference {};
	public static class ByValue extends Rect implements Structure.ByValue{};
	public int nLong;
	public int nShort;
}

//包含字符数组的结构
public static class SerialNum extends Structure
{
	public static class ByReference extends SerialNum implements Structure.ByReference {};
	public static class ByValue extends SerialNum implements Structure.ByValue{};

	public int id;
	public byte msg[] = new byte[32];

	public SerialNum(){
		this.allocateMemory();
	}

	@Override protected List getFieldOrder() {
		return Arrays.asList(new String[] { "id","msg"});
	}

	public int setMSG(String str){
		return StringToFixedBytes(str, msg);
	}

	public String getMsg(){
		return BytesToString(msg);
	}
}

//用于二维数组
public static class Char32msg extends Structure
{
	//		public static class ByReference extends Char32msg implements Structure.ByReference {};
	//      public static class ByValue extends Char32msg implements Structure.ByValue{};

	public byte msg[] = new byte[32];

	public Char32msg(){
		this.allocateMemory();
	}

	@Override protected List getFieldOrder() {
		return Arrays.asList("msg");
	}

	public String getMsg(){
		return BytesToString(msg);
	}
}

//用于带数组指针的结构
public static class Staff extends Structure{
	public static class ByReference extends Staff implements Structure.ByReference {};

	public SerialNum.ByReference pSN;
	public int nCount;

	public Staff() {nCount=0;}

	@Override protected List getFieldOrder() {
		return Arrays.asList(new String[] { "pSN","nCount"});
	}

	public SerialNum.ByReference[] toArray() {
		return (SerialNum.ByReference[]) pSN.toArray(nCount);
	}
}

//简单回调接口
public static interface CustumPlus extends Callback {
	public abstract int callback(int a,int b);
}

//简单回调实现
public static class SimpleAdd implements CustumPlus{
	public final int callback(int a, int b){
		return a+b;
	}
}

//复杂回调接口
public static interface OnAssignSN extends Callback {
	public abstract int callback(SerialNum.ByReference pSN, int nCount);
}

//复杂回调接口实现
public static class DispLastSN implements OnAssignSN{
	public final int callback(SerialNum.ByReference pSN, int nCount)
	{
		if(nCount <=0)
			return 0;
		System.out.println("回调显示:");
		SerialNum.ByReference [] sns = (SerialNum.ByReference[])pSN.toArray(nCount);

		for(int i=0; i<nCount; i++){
			System.out.println(sns[i].getMsg());
		}
		return nCount;
	}
}

//包含复杂回调接口的结构
public static class AssignMethod extends Structure{
	public String title;
	public OnAssignSN fp;

	@Override protected List getFieldOrder() {

		return Arrays.asList("title","fp");
	}

	public static class ByReference extends AssignMethod implements Structure.ByReference {};
}

//动态库类
public interface DllInterface extends Library
{
	DllInterface INSTANCE = (DllInterface)Native.loadLibrary("DllTest", DllInterface.class);

	public void DispInfor();
	public void DispMessage(String msg);
	public int Plus(int a, int b);
	public void LoadData(IntByReference n, FloatByReference f);
	// public void AssignSN(SerialNum.ByReference struct);
	public void AssignSN(SerialNum struct);
	public int RectangleArea(Rect.ByValue struct);
	public void Standardrize(Rect.ByReference struct);
	// public void Standardrize(Rect struct);
	public void EnlargeRect(Rect struct);
	public int MultiOperate(CustumPlus fp, int a, int b);
	public int ArrayInput(SerialNum [] strt, int a);
	public SerialNum ArrayOutput(IntByReference pcount);
	public void FreeArray(SerialNum[] pSN);
	public void CharArrayInput(Char32msg[] pChar32, int count);
	public void GetStaff(Staff.ByReference staff);
	public void FreeMemory(Pointer p);
	public int AssignSNWithCallBack(OnAssignSN disp);
	public int AppointAssignMethod(AssignMethod method);

}
public static void main(String[] args)
{
	System.out.println("---------1.简单调用-----------");
	DllInterface.INSTANCE.DispInfor();

	System.out.println("---------2.简单参数-----------");
	int a2=10, b2=100;
	int val = DllInterface.INSTANCE.Plus(a2, b2);
	System.out.println(a2+"+"+b2+"="+val);

	String msg2 = "这里是JNA";
	DllInterface.INSTANCE.DispMessage(msg2);

	IntByReference pn2 = new IntByReference();
	FloatByReference pf2 = new FloatByReference();

	DllInterface.INSTANCE.LoadData(pn2, pf2);
	System.out.println("int="+pn2.getValue() + ", float="+pf2.getValue());

	System.out.println("---------3.简单结构-----------");
	Rect.ByValue rc3=new Rect.ByValue();
	rc3.nLong = 10;
	rc3.nShort = 20;
	int area;
	area = DllInterface.INSTANCE.RectangleArea(rc3);
	System.out.println("返回值:" + area);

	System.out.println("---------4.简单结构指针-----------");
	Rect.ByReference rc2 = new Rect.ByReference();
	rc2.nLong = 15;
	rc2.nShort = 25;
	System.out.println("调整前的矩形长" + rc2.nLong + ", 宽" + rc2.nShort);
	DllInterface.INSTANCE.Standardrize(rc2);
	System.out.println("调整后的矩形长" + rc2.nLong + ", 宽" + rc2.nShort);

	Rect rc4 = new Rect();
	rc4.nLong = 15;
	rc4.nShort = 25;
	DllInterface.INSTANCE.EnlargeRect(rc4);
	System.out.println("放大后的矩形长" + rc4.nLong + ", 宽" + rc4.nShort);


	System.out.println("---------5.包含字符数组的结构-----------");
	//	SerialNum.ByReference sn = new SerialNum.ByReference();
	SerialNum sn = new SerialNum();
	sn.id = 1;
	sn.msg = "abc你好".getBytes();
	//	sn.setMSG("abc你好");
	DllInterface.INSTANCE.AssignSN(sn);
	System.out.println(sn.id + ", " + sn.getMsg());

	System.out.println("---------6.输入结构数组指针-----------");
	int arrSize = 2;
	SerialNum serialNum = new SerialNum();
	SerialNum [] lstSN = (SerialNum [])serialNum.toArray(arrSize);

	lstSN[0].id = 11;
	lstSN[0].setMSG("一号");
	lstSN[1].id = 12;
	lstSN[1].setMSG("二号");

	DllInterface.INSTANCE.ArrayInput(lstSN, lstSN.length);

	System.out.println(lstSN[0].id + "," + lstSN[0].getMsg());
	System.out.println(lstSN[1].id + "," + lstSN[1].getMsg());

	System.out.println("---------7.输出结构数组指针-----------");
	IntByReference pcount = new IntByReference();
	SerialNum sn7 = DllInterface.INSTANCE.ArrayOutput(pcount);
	SerialNum[] lstSN7 = (SerialNum[])sn7.toArray(pcount.getValue());

	int nCount = lstSN7.length;
	System.out.println("返回序列号数目:"+nCount);


	System.out.println("第"+lstSN7.length+"个序列号:"+lstSN7[nCount-1].getMsg());

	//	DllTest.INSTANCE.FreeMemory(sn8.getPointer());
	DllInterface.INSTANCE.FreeArray(lstSN7);
	System.out.println(lstSN7.length);

	System.out.println("---------8.输入定长字符串数组----------");
	int nCount8 = 3;
	Char32msg msg8 = new Char32msg();
	Char32msg [] lsgMsg8 = (Char32msg[])msg8.toArray(nCount8);

	lsgMsg8[0].msg = "当前编号A1001".getBytes();
	lsgMsg8[1].msg = "当前编号A1002".getBytes();
	lsgMsg8[2].msg = "当前编号B1019".getBytes();

	DllInterface.INSTANCE.CharArrayInput(lsgMsg8, nCount8);

	System.out.println("---------9.带数组指针的结构-----------");
	Staff.ByReference pStaff9 = new Staff.ByReference();
	DllInterface.INSTANCE.GetStaff(pStaff9);

	SerialNum.ByReference [] sns9 = pStaff9.toArray();

	for(int i=0; i<pStaff9.nCount; i++){
		System.out.println(sns9[i].getMsg());
	}

	DllInterface.INSTANCE.FreeMemory(pStaff9.pSN.getPointer());

	System.out.println("---------10.简单函数指针-----------");
	SimpleAdd add = new SimpleAdd();
	DllInterface.INSTANCE.MultiOperate(add, 100,2000);

	System.out.println("---------11.复杂函数指针-----------");
	DispLastSN dispSN = new DispLastSN();
	DllInterface.INSTANCE.AssignSNWithCallBack(dispSN);

	System.out.println("---------12.带字符指针和复杂函数指针的结构-----------");
	AssignMethod.ByReference method = new AssignMethod.ByReference();
	method.title = new String("来自JAVA");
	method.fp = new DispLastSN();
	DllInterface.INSTANCE.AppointAssignMethod(method);
}
}
javah命令生成不了.h文件解决办法
java使用起来非常方便,然而有些层次的任务用java实现起来不容易,或者我们对程序的效率很在意时,问题就来了,与java环境外交互,有时java应用需要与java外面的环境交互。这是本地方法存在的主要原因,你可以想想java需要与一些底层系统如操作系统或某些硬件交换信息时的情况。本地方法正是这样一种交流机制:它为我们提供了一个非常简洁的接口,而且我们无需去了解java应用之外的繁琐的细节。
当确实需要这么做的时候,java的关键字native就至关重要了,native关键字说明其修饰的方法是一个原生态方法,方法对应的实现不是在当前文件,而是在用其他语言(如c)实现的文件中。java语言本身不能对操作系统底层进行访问和操作,但是可以通过JNI接口调用其他语言来实现对底层的访问。
JNI是Java本机接口(Java Native Interface),是一个本机编程接口,它是Java软件开发工具箱(sdk)的一部分。JNI允许Java代码使用以其他语言编写的代码和代码库。Invocation API(JNI的一部分)可以用来将Java虚拟机(JVM)嵌入到本机应用程序中,从而允许程序员从本机代码内部调用Java代码.
JNI的书写步骤如下:
a.编写带有native声明的方法的Java类
b.使用javac命令编译编写的Java类
c.使用java -jni ****来生成后缀名为.h的头文件
d.使用其他语言(C、C++)实现本地方法
e.将本地方法编写的文件生成动态链接库
下面是代码示例:
a.类文件
package com.mw.mbox.boss.demo;
public class HelloWorld {
public native void hello(String name,int i, boolean b);
static{
	System.loadLibrary("hello");
}

public static void main(String[] args) {
	new HelloWorld().hello("saoyong",1,true);
}
}
b.生成class文件
window环境下cmd到java文件所在的目录,使用命令javac HelloWorld.java编译生成class文件
c.生成.h文件
使用命令javah -jni HelloWorld在生成.h文件的时候,发现目录下并没有生成的文件。
我的解决方案是set classpath=F:\svnproject\mbox-boss\src\main\java\ 然后
javah -jni com.mw.mbox.boss.demo.HelloWorld,这样就ok了,使用命令的时候要带上具体的文件目录。(我的HelloWorld.java在本地F:\svnproject\mbox-boss\src\main\java\com\mw\mbox\boss\demo\下)
总结:在使用javah -jni命令前,先set classpath=文件所在的目录,到src那一层级,然后使用javah -jni要带上文件的包名就可以。
后面的d、e两步就不演示了,该篇博客要解决的问题到此已经处理完毕了。
JNI之——Can’t load IA 32-bit .dll on a AMD 64-bit platform错误的解决:
https://blog.csdn.net/l1028386804/article/details/46605003
第二套:
idea编译java文件错误 非法字符: ‘\ufeff’
问题:
用idea编译项目中java文件时候,提示
Error:(1, 1) java: 非法字符: ‘\ufeff’
Error:(1, 10) java: 需要class, interface或enum
原因:
编码不一致导致
解决方法:
将这些报错的文件拷贝到一个目录中,然后用notpad++打开,点击工具类上的 编码,将 以uft8格式编码 转为 以utf8无BOM格式编码,然后保存,再覆盖idea中对应的文件。
java调用vs2013编写的dll动态库
https://blog.csdn.net/sunxiaoju/article/details/51175505
1、首先创建一个NativeDemo.java文件,文件内容如下代码:
public class NativeDemo {
	int i;
	public static void main(String[] args) {
		NativeDemo ob=new NativeDemo();
		ob.i=10;
		System.out.println("This is ob.i before the native method:"+ob.i);
		ob.test();
		System.out.println("This is ob.i after the native method:"+ob.i);
	}
	//使用native修饰的方法,方法不能有方法体,但可以用C/C++实现方法体
	public native void test();
	static{
		//加载NativeDemo.dll动态库
		System.loadLibrary("NativeDemo");
	}
}
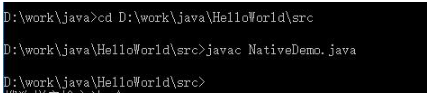
2、对NativeDemo.java文件进行编译,通过DOS进入到NativeDemo.java文件所在的目录,然后执行javac NativeDemo.java命令,如下图所示:
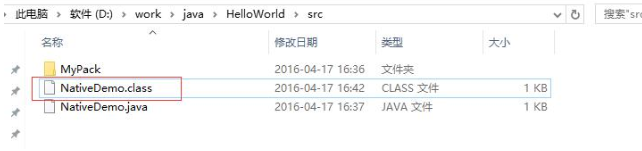
3、如果编译成功会出现NativeDemo.class文件,如下图所示:
4、然后在使用javah -jni NativeDemo命令,如下图所示:
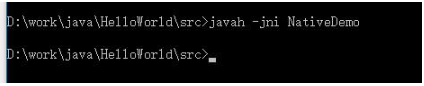
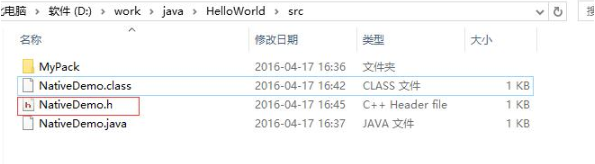
5、此时在src目录中就多了一个NativeDemo.h文件,如下图所示:
6、NativeDemo.h文件代码为:
/* DO NOT EDIT THIS FILE - it is machine generated */
#include <jni.h>
/* Header for class NativeDemo */

#ifndef _Included_NativeDemo
#define _Included_NativeDemo
#ifdef __cplusplus
extern "C" {
#endif
/*
 * Class:     NativeDemo
 * Method:    test
 * Signature: ()V
 */
JNIEXPORT void JNICALL Java_NativeDemo_test(JNIEnv *, jobject);

#ifdef __cplusplus
}
#endif
#endif
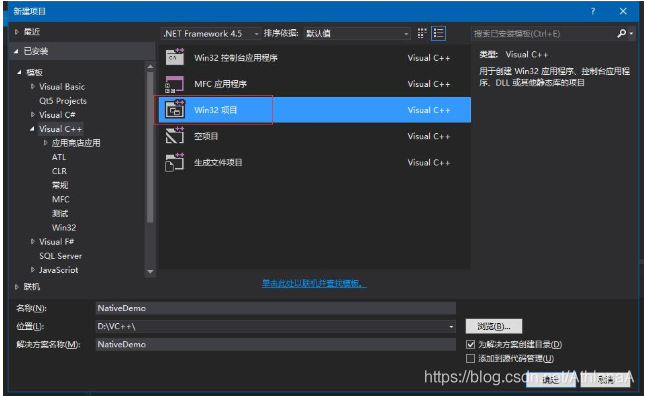
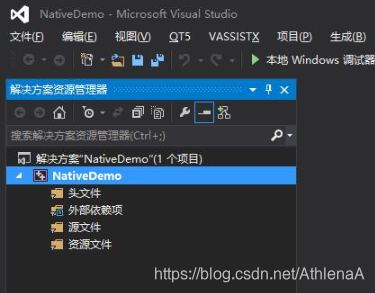
7、打开VS2013创建一个Win32项目,名称为NativeDemo,如下图所示:
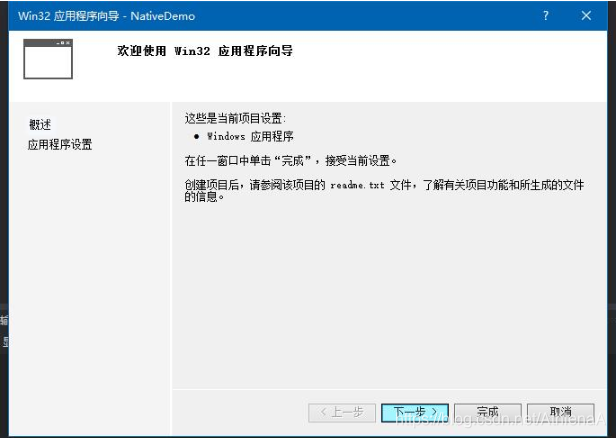
8、点击确定进入创建项目向导,如下图所示:
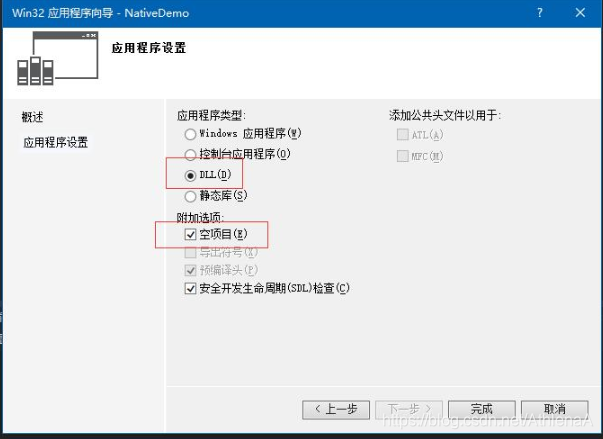
9、点击下一步,然后在应用程序类型选择DLL,附加选项选择空项目,如下图所示:
10、点击完成即完成了新项目的创建,如下图所示:
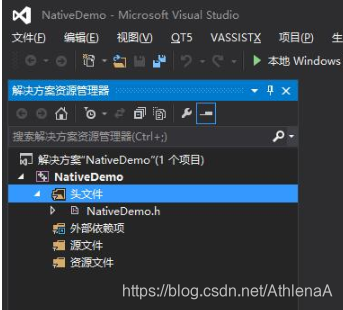
11、将生成的NativeDemo.h文件拷贝到该项目中,并添加到项目,如下图所示:
12、新建一个NativeDemo.cpp文件,如下图所示:
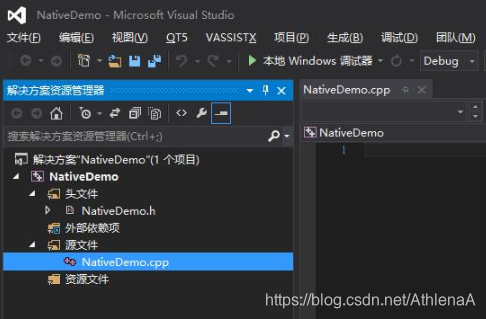
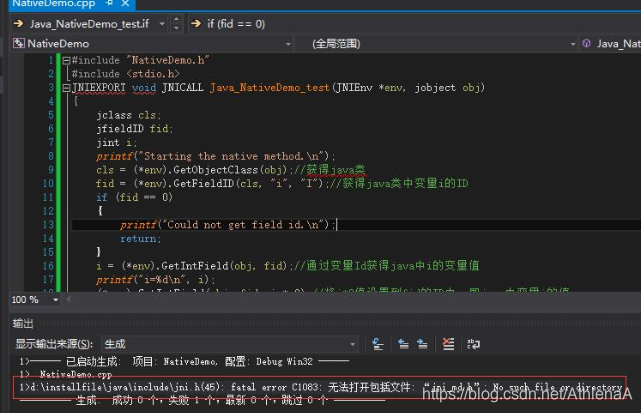
13、在NativeDemo.cpp文件中输入以下代码:
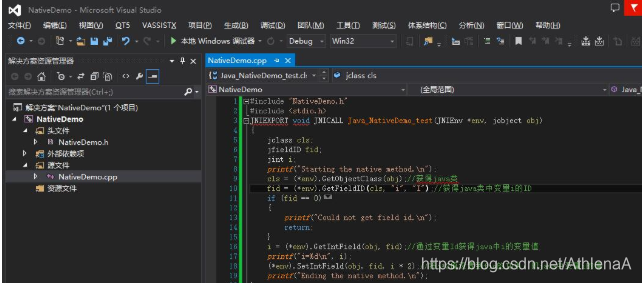
#include "NativeDemo.h"
#include <stdio.h>
JNIEXPORT void JNICALL Java_NativeDemo_test(JNIEnv *env, jobject obj)
{
	jclass cls;
	jfieldID fid;
	jint i;
	printf("Starting the native method.\n");
	cls = (*env).GetObjectClass(obj);//获得java类
	fid = (*env).GetFieldID(cls, "i", "I");//获得java类中变量i的ID
	if (fid == 0)
	{
		printf("Could not get field id.\n");
		return;
	}
	i = (*env).GetIntField(obj, fid);//通过变量Id获得java中i的变量值
	printf("i=%d\n", i);
	(*env).SetIntField(obj, fid, i * 2);//将i*2值设置到fid的ID中,即java中变量i的值
	printf("Ending the native method.\n");
}
如下图所示:
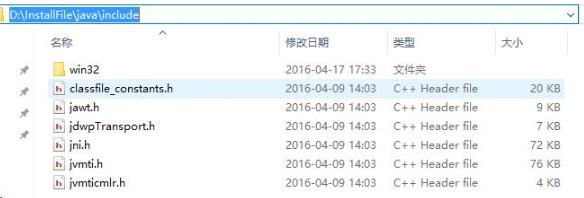
14、由图可以看出有很多错误,那是因为项目的include没有包含jni.h的目录,查找jni.h所在目录在安装 jdk位置的include目录内,我的目录是:D:\InstallFile\java\include,如下图所示:
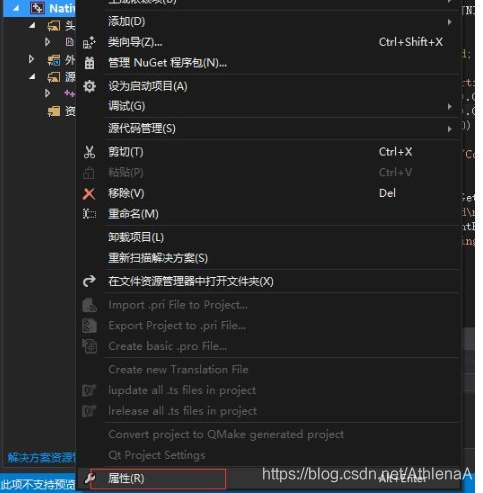
15、那么将此目录添加到项目工程的目录,对NativeDemo项目右键单击,在弹出的快捷菜单中选择“属性”,如下图所示:
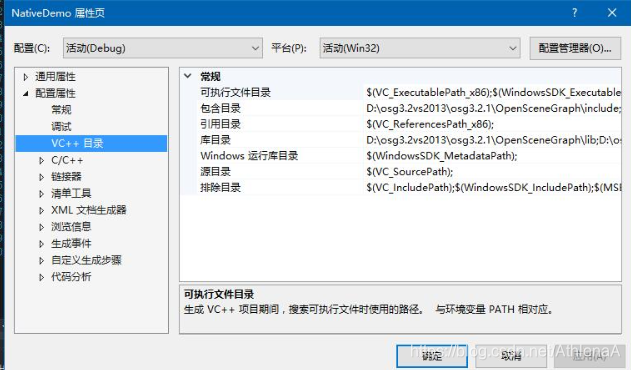
16、在弹出的对话框中选择VC++目录,如下图所示:
18、打开包含目录将D:\InstallFile\java\include目录添加进去,如下图所示:
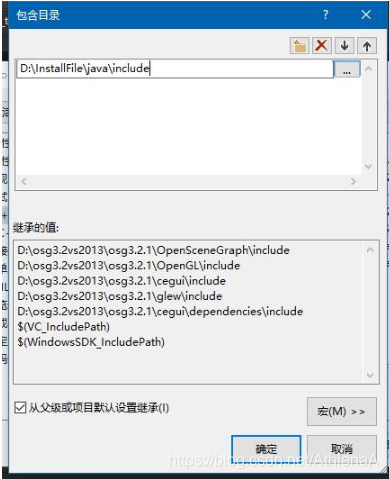
19、确定之后进行编译,会出现错误,如:1>d:\installfile\java\include\jni.h(45): fatal error C1083: 无法打开包括文件: “jni_md.h”: No such file or directory,如下图所示:
20、由错误可以看出jni_md.h是在jni.h文件中包含的,而查找D:\InstallFile\java\include目录发现有一个win32文件夹,jni_md.h正是在这个文件夹中,因此也要将D:\InstallFile\java\include\win32添加到工程项目的包含目录中,如下图所示:
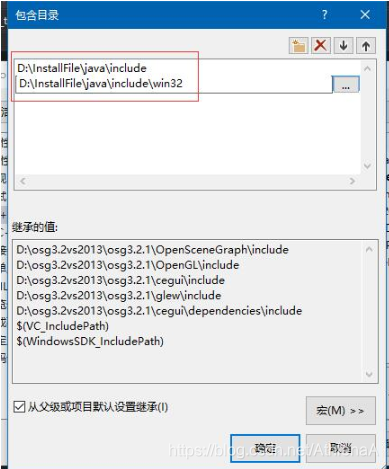
21、在此重新生成,即可生成NativeDemo.dll文件,如下图所示:
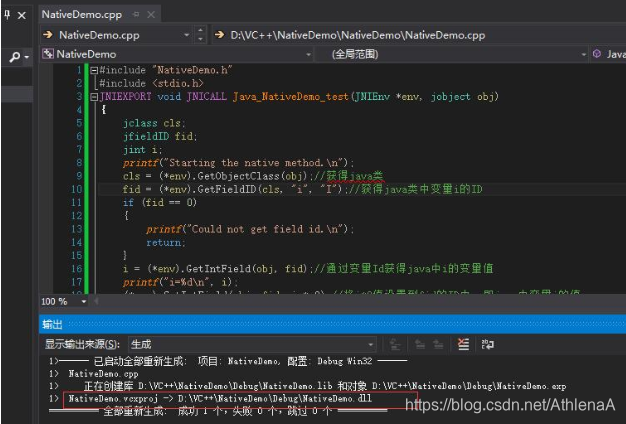
22、将NativeDemo.dll文件拷贝到D:\work\java\HelloWorld\src目录,如下图所示:

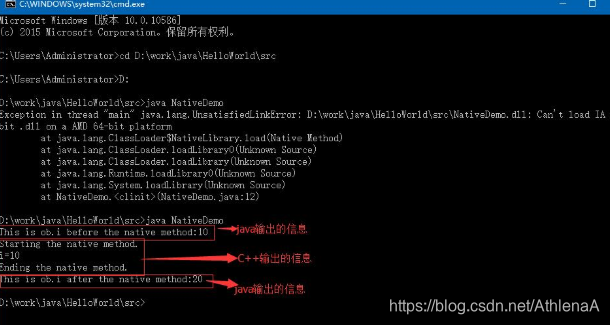
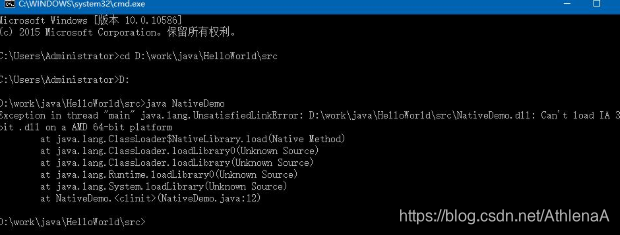
23、打开DOS窗口,进入到D:\work\java\HelloWorld\src目录,然后执行java NativeDemo命令,会出现错误,如:Exception in thread “main” java.lang.UnsatisfiedLinkError:D:\work\java\HelloWorld\src\NativeDemo.dll:Can`t load IA 32-bit .dll on a AMD 64-bit platform错误,如下图所示:
24、出现以上错误是由于jdk8是64位的,而NativeDemo.dll是32位编译的,因此会出现错误,那么我们要在vs2013中修改编译64位的dll,设置方法在vs2013中有一个win32的下拉中有个配置,选择配置管理器,如下图所示:
25、选择配置管理器之后,弹出了配置管理器窗口,如下图所示:
26、选择平台下的Win32下拉菜单,点击新建,如下图所示:
27、在新建项目平台中选择X64,如下图所示:
28、其他的选择默认,确定之后的选项如下图所示:
29、最后的选项如下图所示:
30、在重新编译生成,如下图所示:

31、找到X64目录的Debug目录下的NativeDemo.dll文件,如下图所示:
32、将NativeDemo.dll拷贝的java代码所在的目录,如下图所示:
33、最后切换的DOS窗口重新执行java NativeDemo.dll命令,如下图所示执行成功: