版权声明:本文为博主原创文章,未经博主允许不得转载。 https://blog.csdn.net/kuangdacaikuang/article/details/83077385
iOS原生项目(Objective-C)集成React Native(0.57.3版本)图文教程–(1)基本环境
iOS原生项目(Objective-C)集成React Native(0.57.3版本)图文教程–(2)集成过程
文章目录
- iOS原生项目(Objective-C)集成React Native(0.57.3版本)图文教程--(2)集成过程
- 1. 先用react-native init RNDemo命令,创建个空的RN项目
- 2. 在iOS项目(RNDemo)根目录下创建ReactComponent文件夹,将1的package.json文件放进去
- 3. cd到ReactComponent文件下,运行npm install,会生成node_modules文件夹和package-lock.json文件: 如果特别慢,镜像到国内
- 4. ReactComponent文件夹里面创建index.js,添加测试代码
- 5. Podfile文件添加RN依赖库
- 6. pod install安装完成
- 7. AppDelegate.m添加测试代码
- 8. 进入package.json文件所在文件夹 运行npm start,启动8081服务器
- 9. 再用xcode运行工程即可
- 10. Xcode的ATS配置
- 11. 如果有如下报错
- 12. 运行成功
iOS原生项目(Objective-C)集成React Native(0.57.3版本)图文教程–(2)集成过程
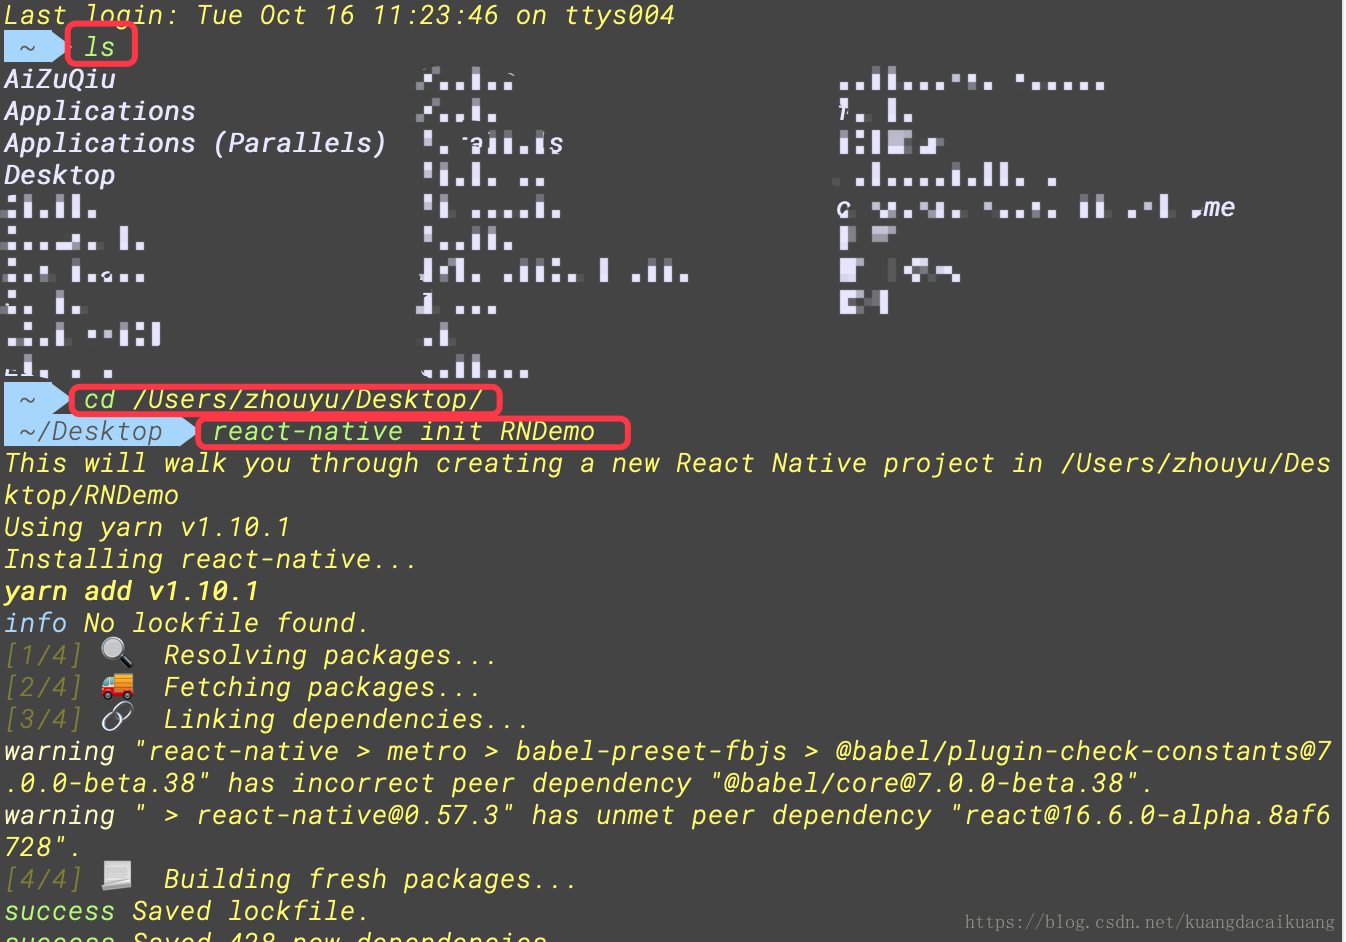
1. 先用react-native init RNDemo命令,创建个空的RN项目
目的是获取package.json文件配置
目的是获取package.json文件配置
目的是获取package.json文件配置
package.json文件处理
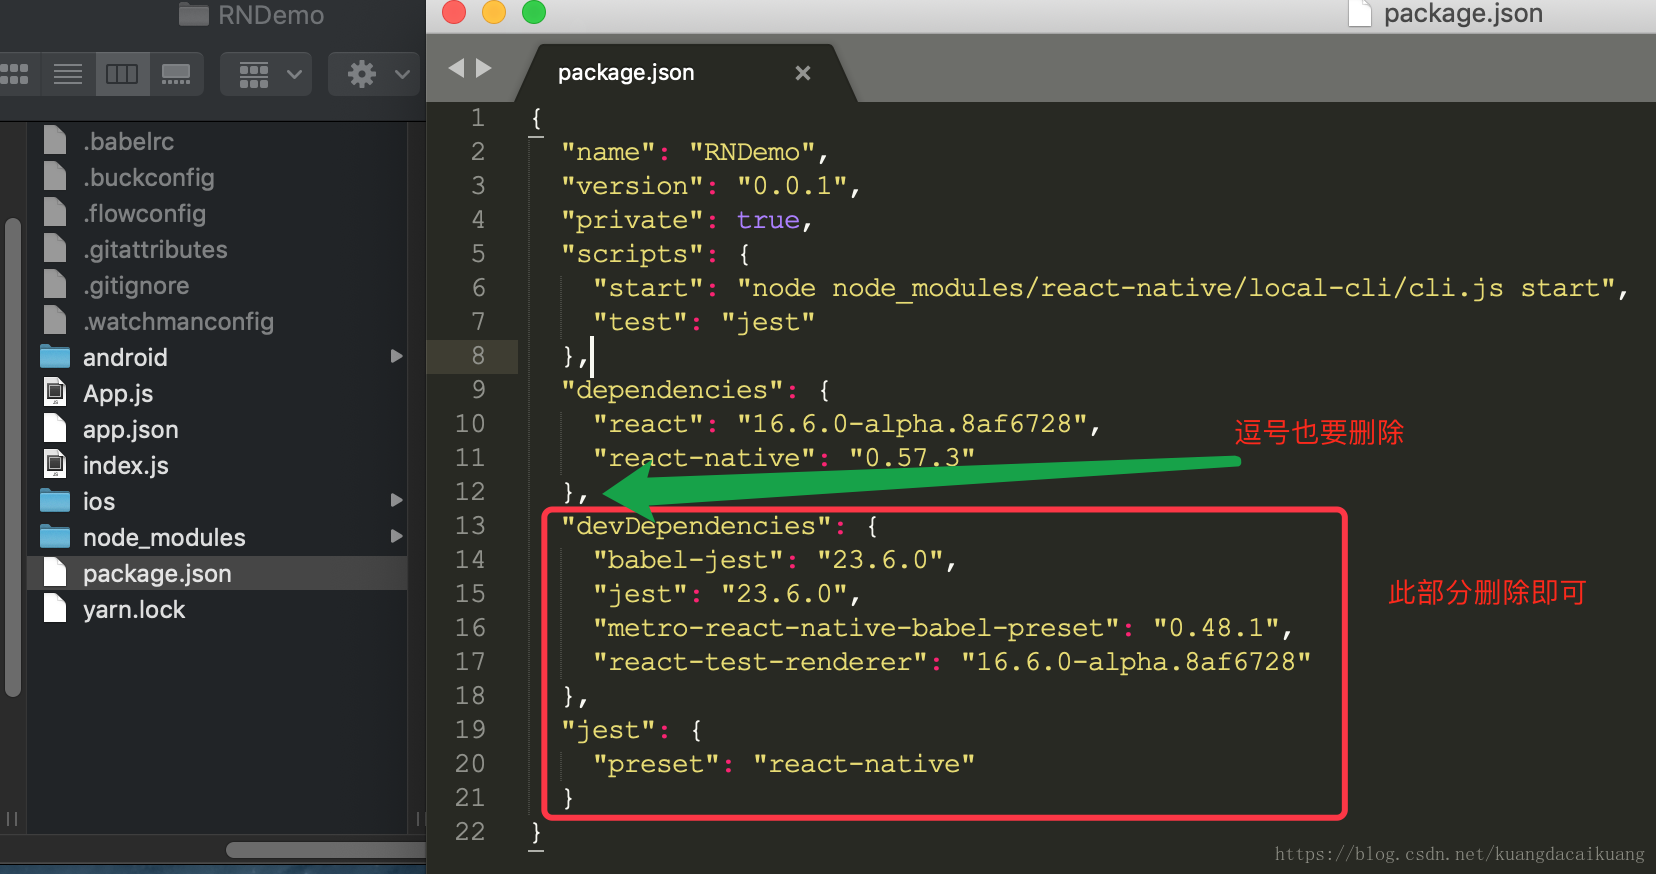
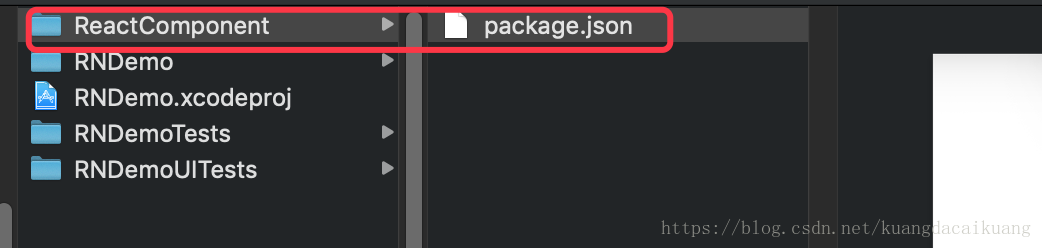
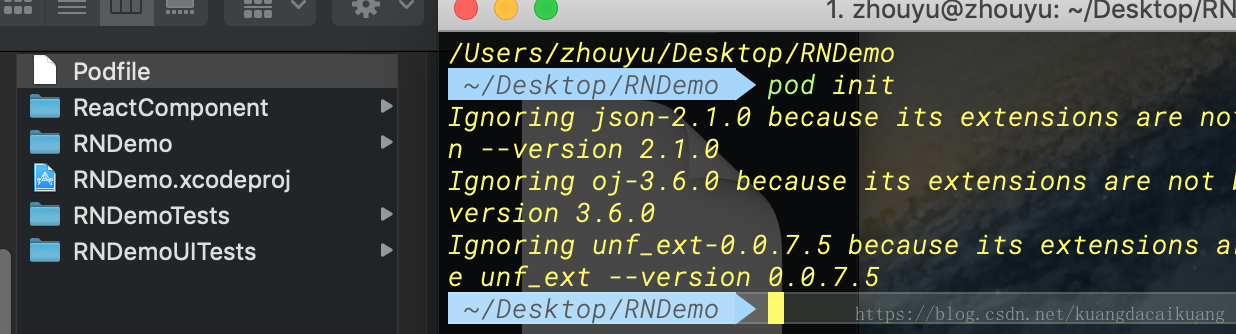
2. 在iOS项目(RNDemo)根目录下创建ReactComponent文件夹,将1的package.json文件放进去
name是当前iOS原生项目文件夹的名称,如此为RNDemo
{
  "name": "RNDemo",
  "version": "0.0.1",
  "private": true,
  "scripts": {
    "start": "node node_modules/react-native/local-cli/cli.js start",
    "test": "jest"
  },
  "dependencies": {
    "react": "16.6.0-alpha.8af6728",
    "react-native": "0.57.3"
  }
}
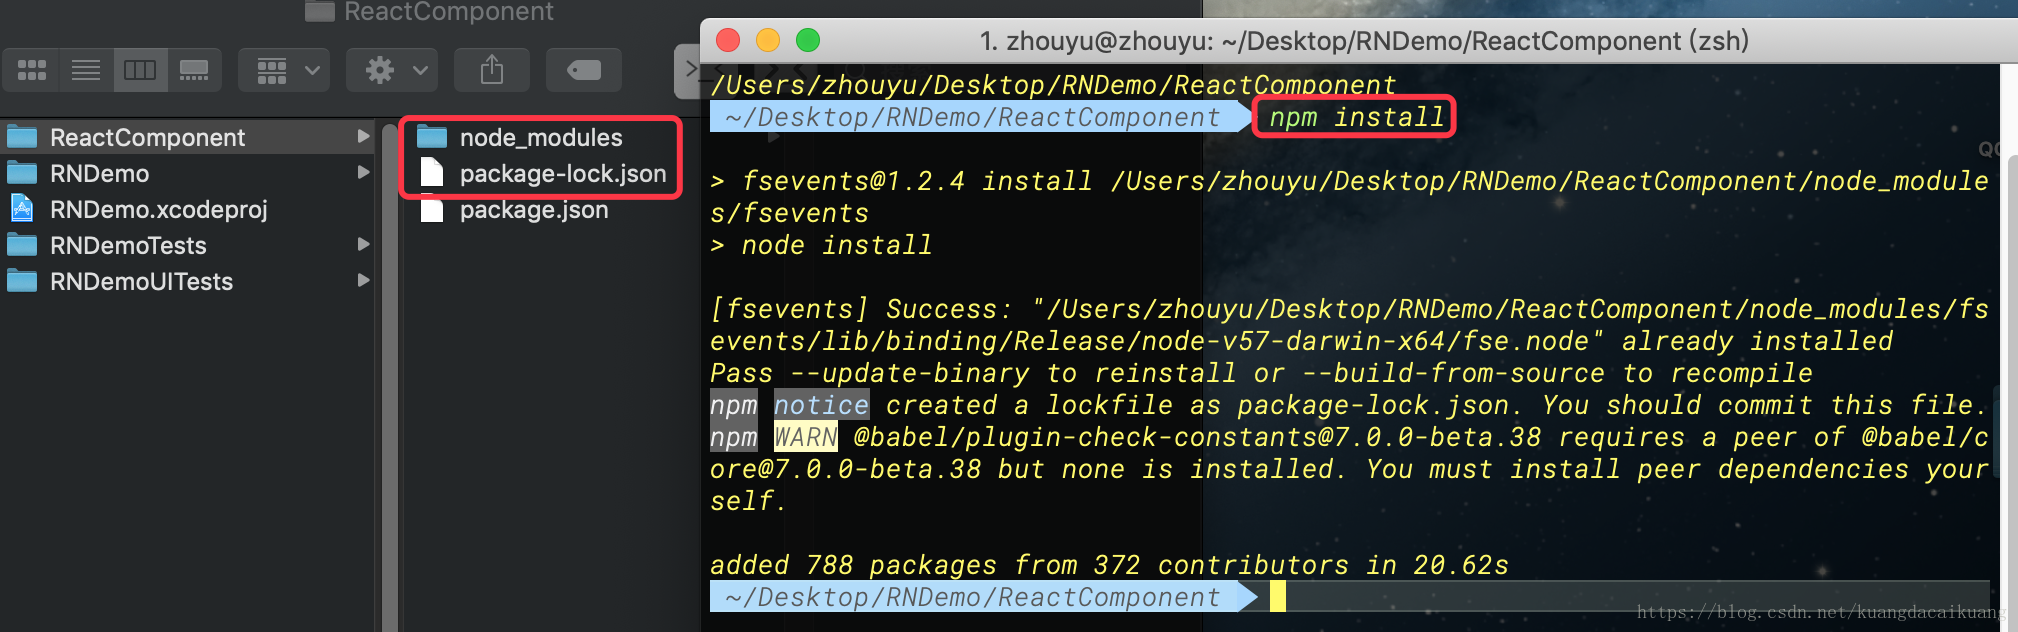
3. cd到ReactComponent文件下,运行npm install,会生成node_modules文件夹和package-lock.json文件: 如果特别慢,镜像到国内
npm config set registry https://registry.npm.taobao.org --global
npm config set disturl https://npm.taobao.org/dist --global
4. ReactComponent文件夹里面创建index.js,添加测试代码

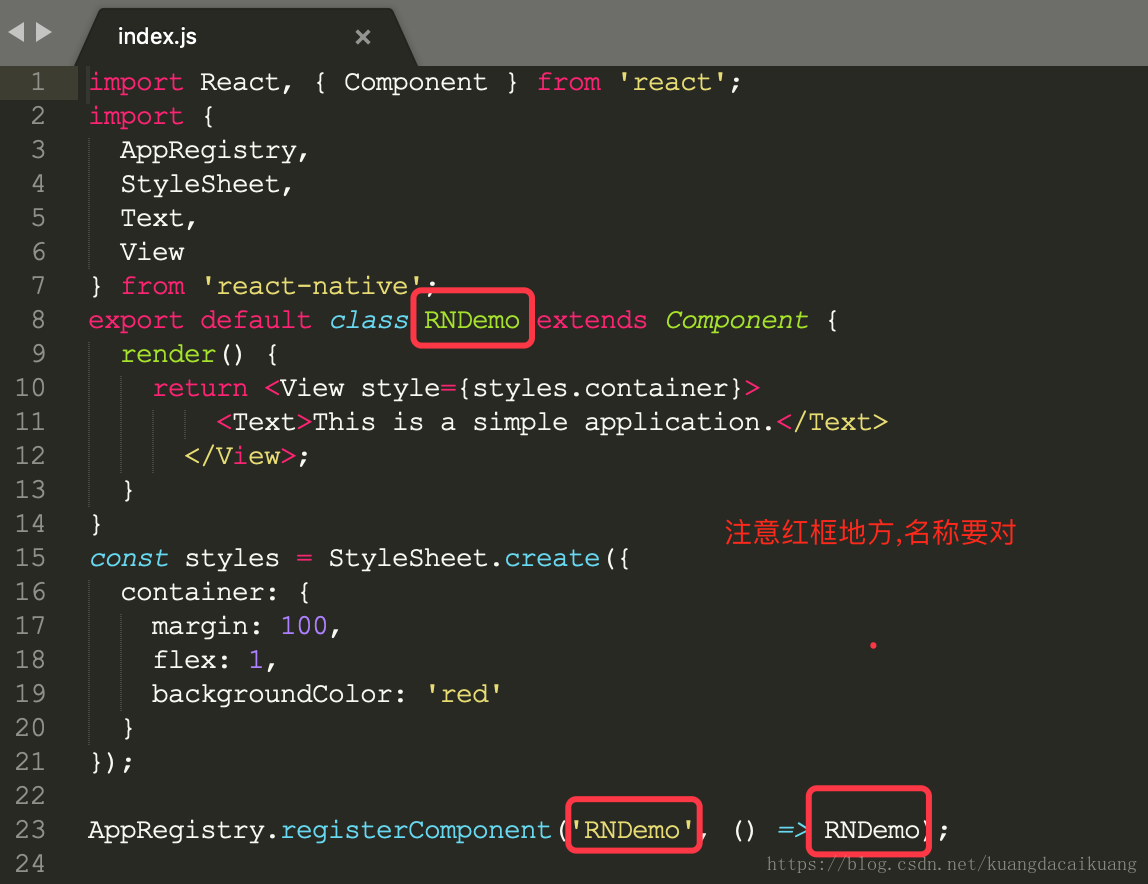
import React, { Component } from 'react';
import {
  AppRegistry,
  StyleSheet,
  Text,
  View
} from 'react-native';
export default class RNDemo extends Component {
  render() {
    return <View style={styles.container}>
        <Text>This is a simple application.</Text>
      </View>;
  }
}
const styles = StyleSheet.create({
  container: {
    margin: 100,
    flex: 1,
    backgroundColor: 'red'
  }
});

AppRegistry.registerComponent('RNDemo', () => RNDemo);
5. Podfile文件添加RN依赖库
pod init获取Podfile文件
添加RN依赖库,目前iOS12已出来,最低支持iOS9.0即可
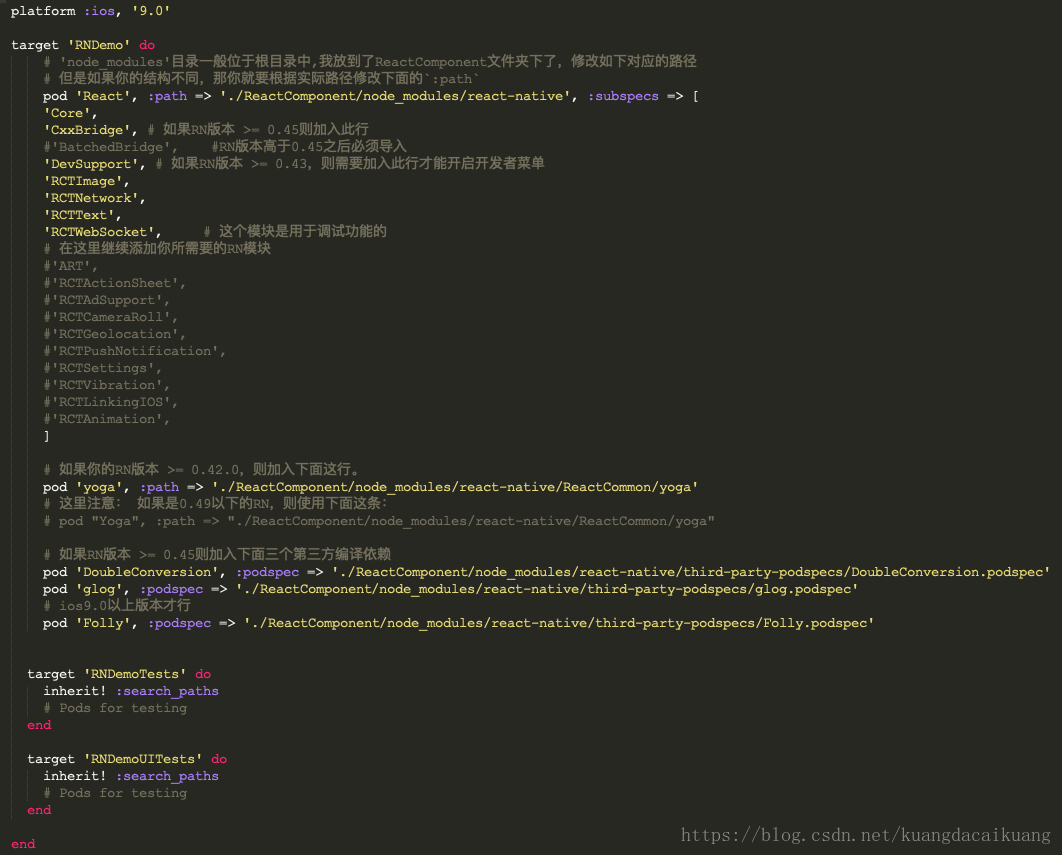
platform :ios, '9.0'

target 'RNDemo' do
    # 'node_modules'目录一般位于根目录中,我放到了ReactComponent文件夹下了,修改如下对应的路径
    # 但是如果你的结构不同,那你就要根据实际路径修改下面的`:path`
    pod 'React', :path => './ReactComponent/node_modules/react-native', :subspecs => [
    'Core',
    'CxxBridge', # 如果RN版本 >= 0.45则加入此行
    #'BatchedBridge',    #RN版本高于0.45之后必须导入
    'DevSupport', # 如果RN版本 >= 0.43,则需要加入此行才能开启开发者菜单
    'RCTImage',
    'RCTNetwork',
    'RCTText',
    'RCTWebSocket',     # 这个模块是用于调试功能的
    # 在这里继续添加你所需要的RN模块
    #'ART',
    #'RCTActionSheet',
    #'RCTAdSupport',
    #'RCTCameraRoll',
    #'RCTGeolocation',
    #'RCTPushNotification',
    #'RCTSettings',
    #'RCTVibration',
    #'RCTLinkingIOS',
    #'RCTAnimation',
    ]

    # 如果你的RN版本 >= 0.42.0,则加入下面这行。
    pod 'yoga', :path => './ReactComponent/node_modules/react-native/ReactCommon/yoga'
    # 这里注意: 如果是0.49以下的RN,则使用下面这条:
    # pod "Yoga", :path => "./ReactComponent/node_modules/react-native/ReactCommon/yoga"

    # 如果RN版本 >= 0.45则加入下面三个第三方编译依赖
    pod 'DoubleConversion', :podspec => './ReactComponent/node_modules/react-native/third-party-podspecs/DoubleConversion.podspec'
    pod 'glog', :podspec => './ReactComponent/node_modules/react-native/third-party-podspecs/glog.podspec'
    # ios9.0以上版本才行
    pod 'Folly', :podspec => './ReactComponent/node_modules/react-native/third-party-podspecs/Folly.podspec'


  target 'RNDemoTests' do
    inherit! :search_paths
    # Pods for testing
  end

  target 'RNDemoUITests' do
    inherit! :search_paths
    # Pods for testing
  end

end
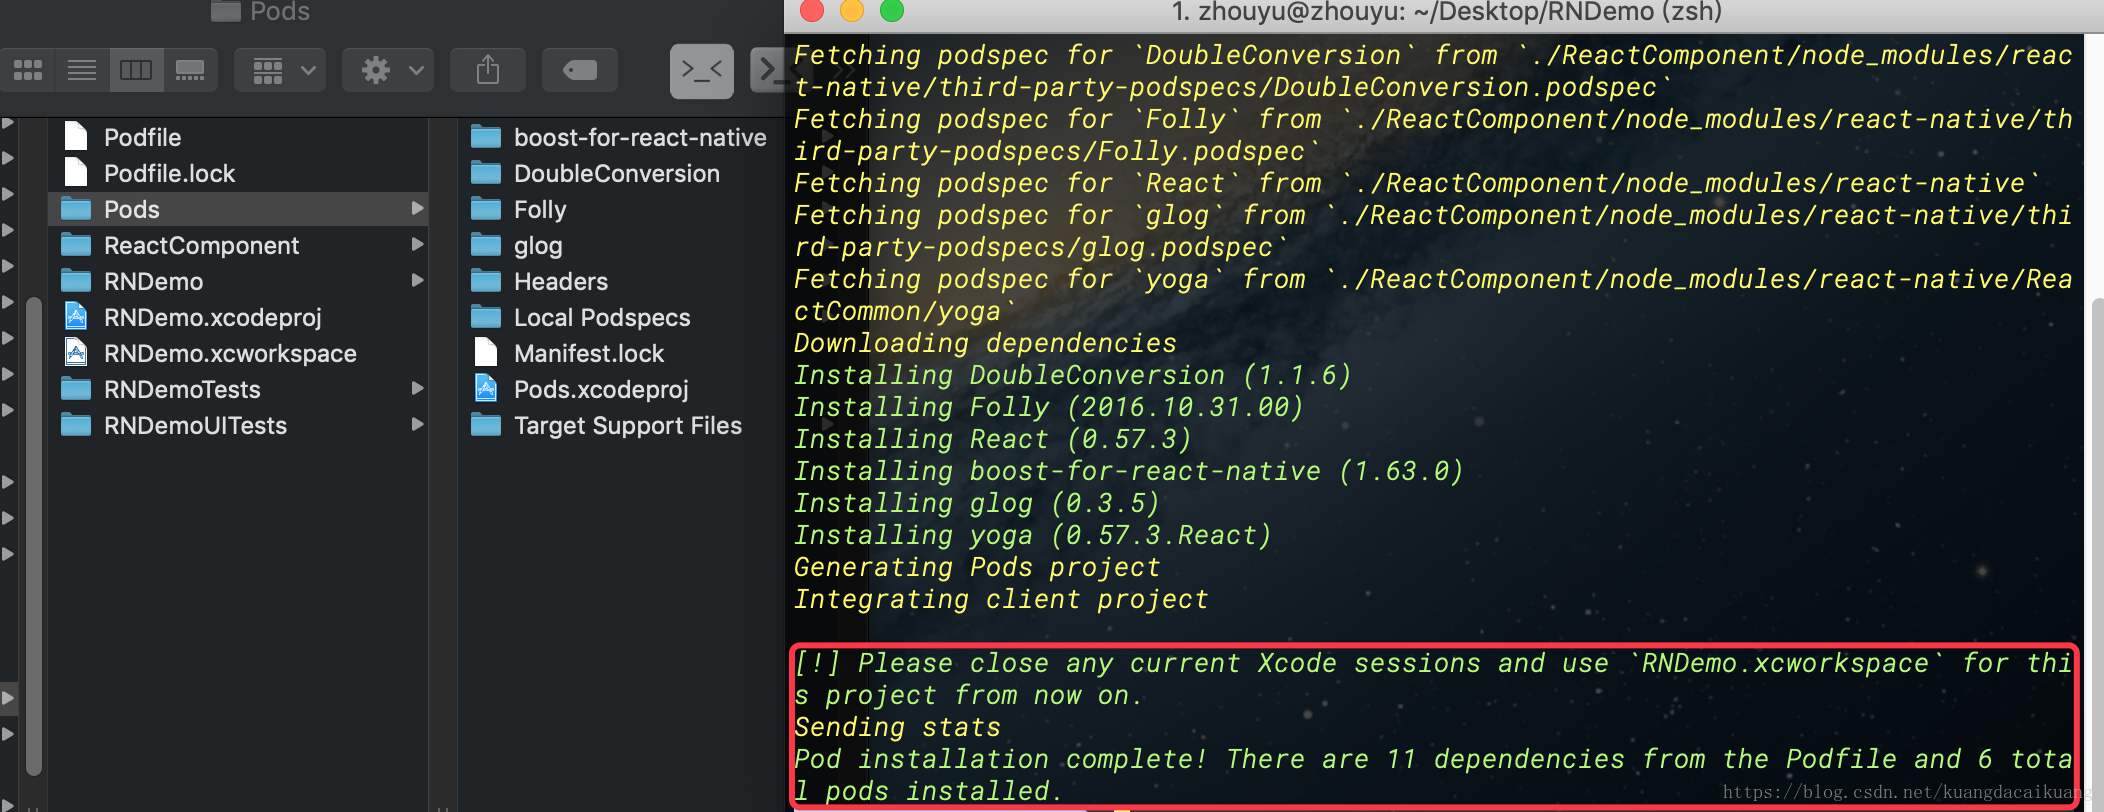
6. pod install安装完成
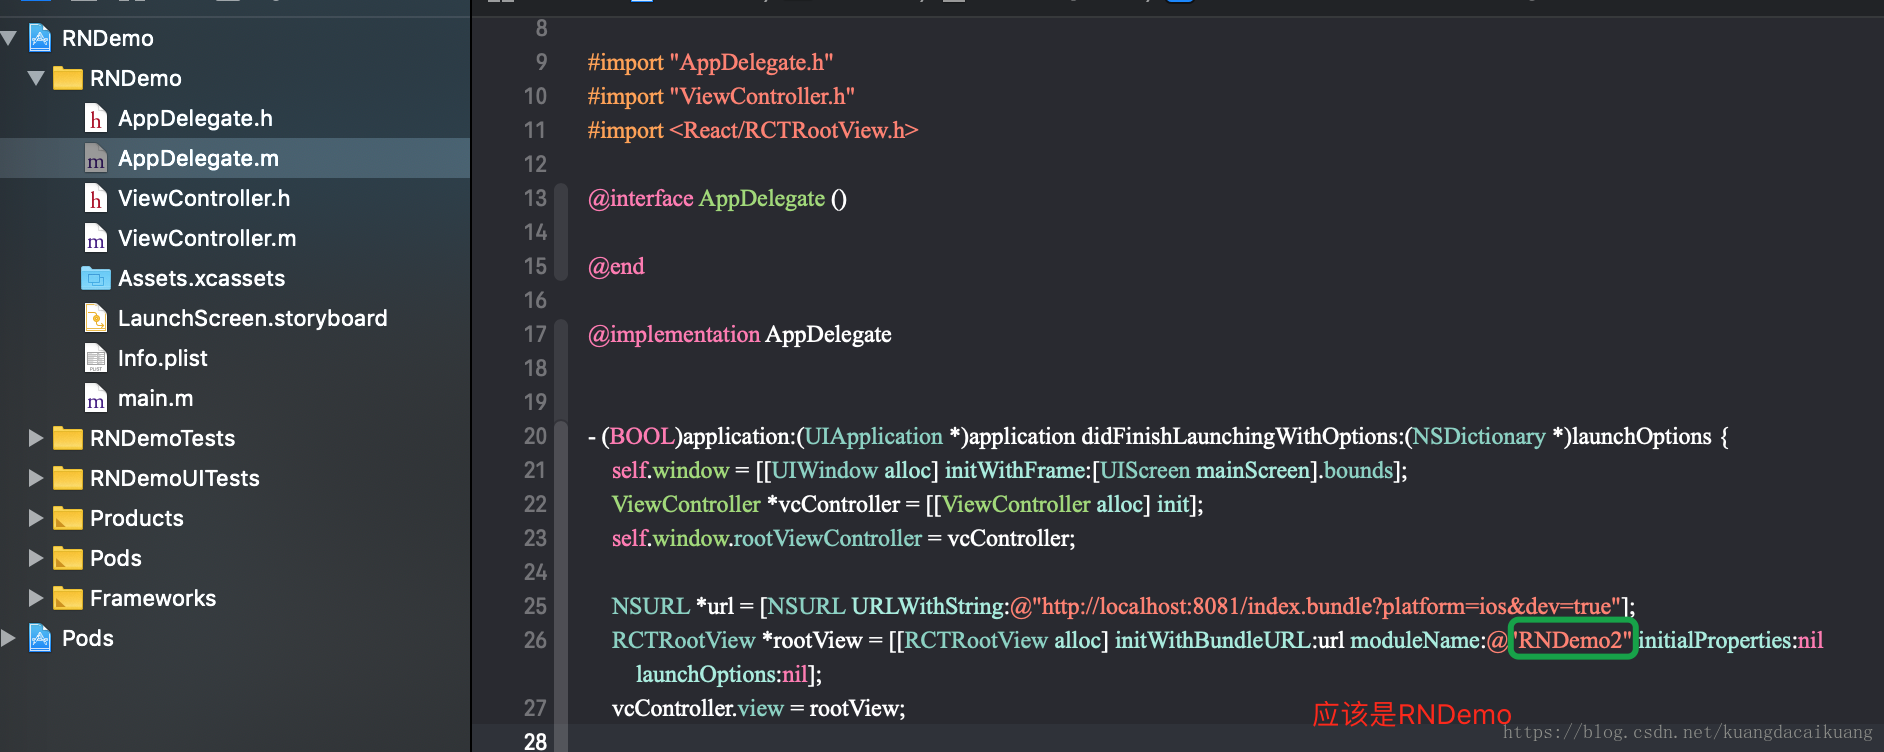
7. AppDelegate.m添加测试代码
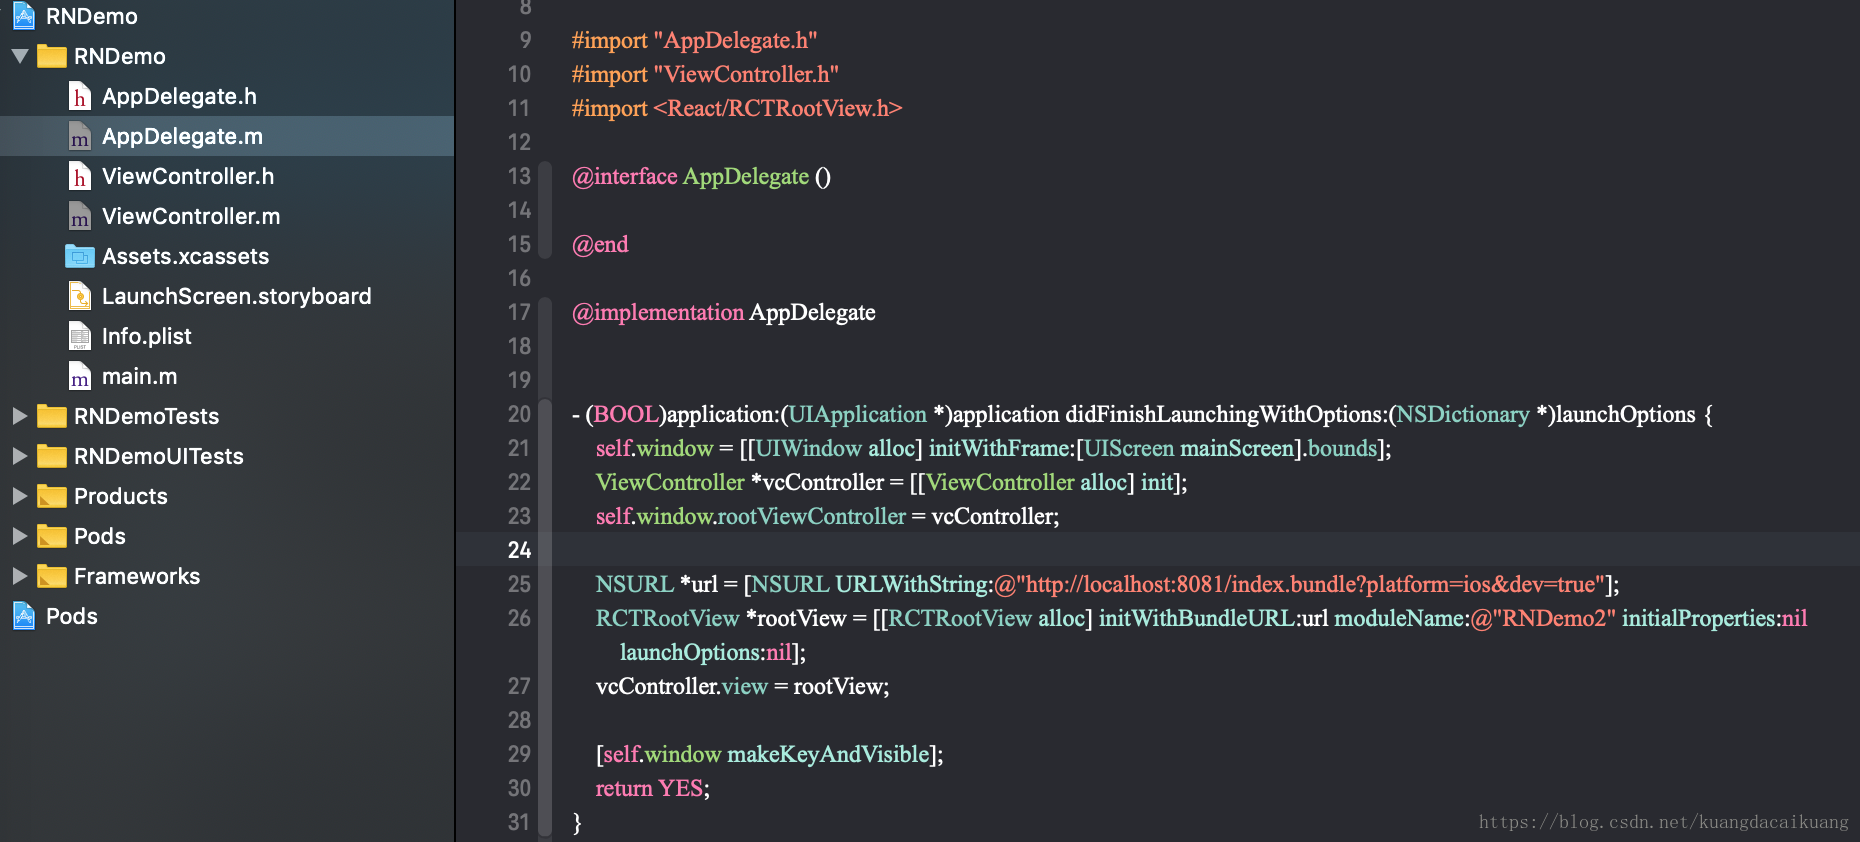
#import "AppDelegate.h"
#import "ViewController.h"
#import <React/RCTRootView.h>

@interface AppDelegate ()

@end

@implementation AppDelegate


- (BOOL)application:(UIApplication *)application didFinishLaunchingWithOptions:(NSDictionary *)launchOptions {
    self.window = [[UIWindow alloc] initWithFrame:[UIScreen mainScreen].bounds];
    ViewController *vcController = [[ViewController alloc] init];
    self.window.rootViewController = vcController;

    NSURL *url = [NSURL URLWithString:@"http://localhost:8081/index.bundle?platform=ios&dev=true"];
    RCTRootView *rootView = [[RCTRootView alloc] initWithBundleURL:url moduleName:@"RNDemo" initialProperties:nil launchOptions:nil];
    vcController.view = rootView;

    [self.window makeKeyAndVisible];
    return YES;
}
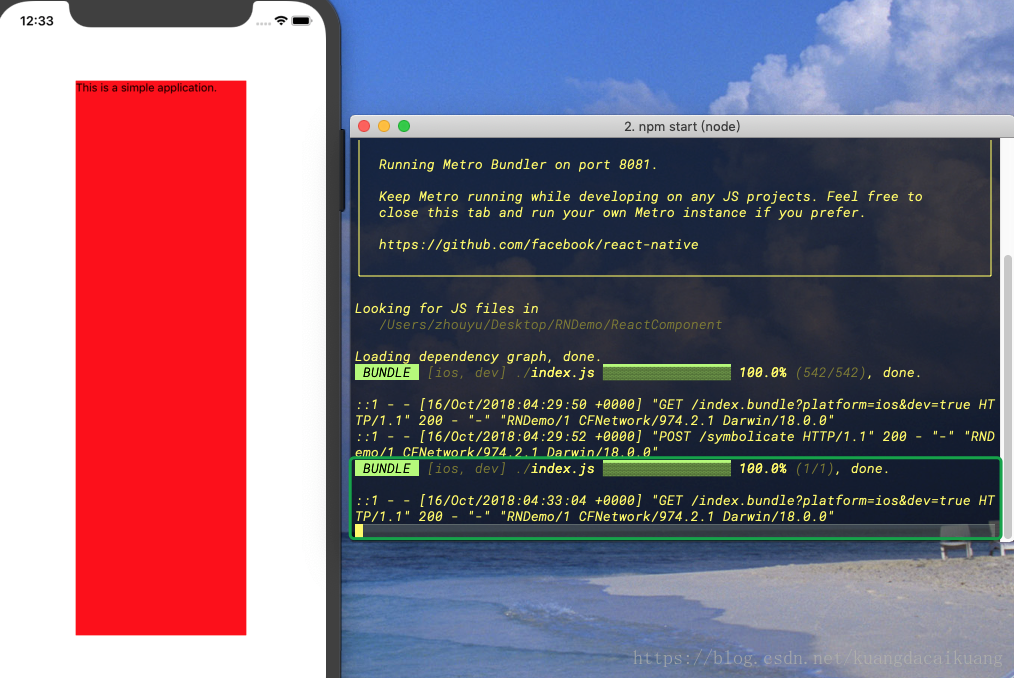
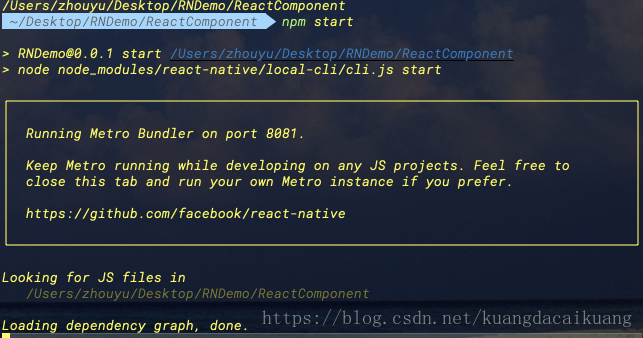
8. 进入package.json文件所在文件夹 运行npm start,启动8081服务器
9. 再用xcode运行工程即可
首次启动会报错,因为xcode目前后ATS设置,默认为NO,不允许HTTP请求,只允许HTTPS请求
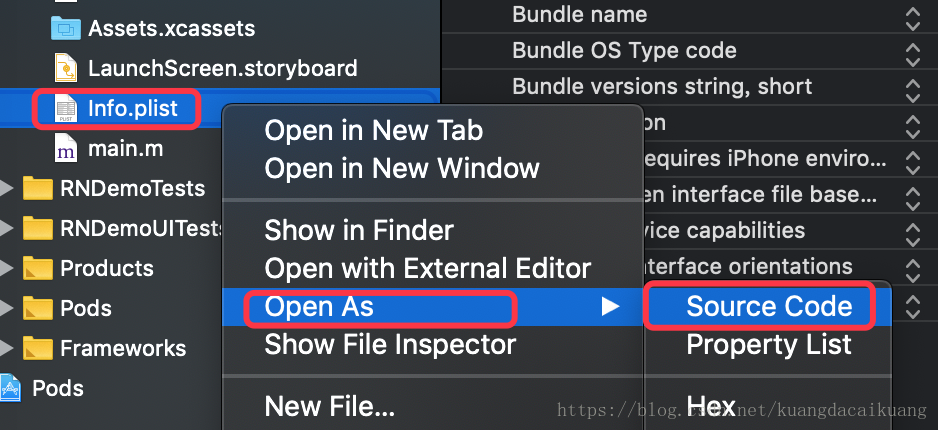
10. Xcode的ATS配置
找到项目的info.plist文件,源码打开,添加如下代码,再次用xcode运行项目即可
<key>NSAppTransportSecurity</key>
	<dict>
		<key>NSAllowsArbitraryLoads</key>
		<true/>
		<key>NSExceptionDomains</key>
		<dict>
			<key>localhost</key>
			<dict>
				<key>NSTemporaryExceptionAllowsInsecureHTTPLoads</key>
				<true/>
			</dict>
		</dict>
	</dict>

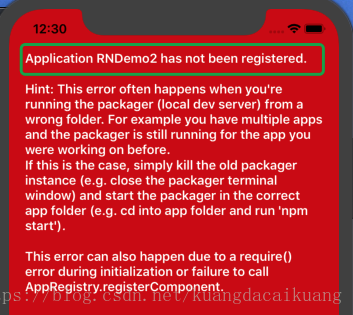
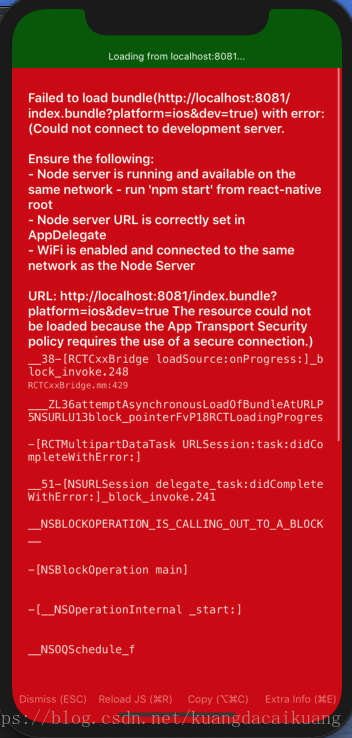
11. 如果有如下报错
说明上面AppDelegate.m文件里的注册代码有误
修改成RNDemo即可运行成功