必须具备react-native的开发环境
创建结构目录
创建一个名为rn_test的文件夹(这个文件夹是存放react-native项目的),在rn_test文件夹中创建名为android的文件夹(是存放android项目的)把原生项目复制进去,这里我创建了一个新的
引入react-native
在rn项目的根目录创建package.json文件,拷贝如下内容:
{
  "name": "MyReactNativeApp",
  "version": "0.0.1",
  "private": true,
  "scripts": {
    "start": "node node_modules/react-native/local-cli/cli.js start"
  }
}
每次init rn项目的时候会引入大量的依赖包,而我们这次集成到现有项目也要引入这些依赖,在rn跟目录运行如下命令:
yarn add react-native
会出现很多信息,如下:
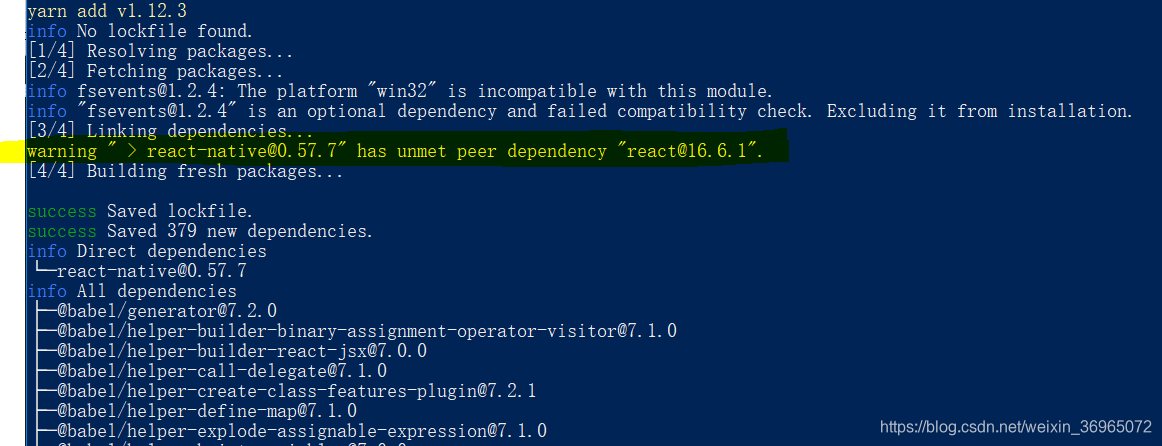
要注意其中标黄的警告信息,是说还要安装“[email protected]”,这个版本必须要和警告中给出的版本号一致,如下命令:
yarn add [email protected]
这时目录结构已经有了变化
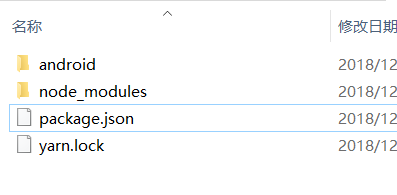
其中的node_modules就是刚才所安装的依赖。
配置rn项目中的android原生项目
添加react-native的依赖
implementation “com.facebook.react:react-native:+” // From node_modules
在android项目的build.gradle中加入maven入口,必须写在 “allprojects” 代码块中:
allprojects {
    repositories {
        maven {
            // All of React Native (JS, Android binaries) is installed from npm
            url "$rootDir/../node_modules/react-native/android"
        }
        ...
    }
    ...
}
这个url的路径是刚才加入的node_modules文件夹中的位置,…/是返回上一层目录,在找到node_modules,如果结构有变动这里要记得变。
声明网络权限
个人觉得是因为rn项目要连接node服务,所以要声明
如果要访问开发者菜单也要添加
添加代码
在rn项目的根目录中创建一个index.js文件添加如下代码:
import React from 'react';
import {AppRegistry, StyleSheet, Text, View} from 'react-native';

class Shy extends React.Component {
  render() {
    return (
      <View>
        <Text >Shy</Text>
      </View>
    );
  }
}

AppRegistry.registerComponent('MyReactNativeApp', () => Shy);
这个index.js文件就是主入口,我只在里边写了很简单的东西。
还需要打开悬浮窗权限,这个权限只是在开发的时候react-native出错时所弹出的错误信息,所以上线后可以关掉,我是直接写在了MainActivity中了
private final int OVERLAY_PERMISSION_REQ_CODE = 1;  // 任写一个值

...

if (Build.VERSION.SDK_INT >= Build.VERSION_CODES.M) {
    if (!Settings.canDrawOverlays(this)) {
        Intent intent = new Intent(Settings.ACTION_MANAGE_OVERLAY_PERMISSION,
                                   Uri.parse("package:" + getPackageName()));
        startActivityForResult(intent, OVERLAY_PERMISSION_REQ_CODE);
    }
}
@Override
protected void onActivityResult(int requestCode, int resultCode, Intent data) {
    if (requestCode == OVERLAY_PERMISSION_REQ_CODE) {
        if (Build.VERSION.SDK_INT >= Build.VERSION_CODES.M) {
            if (!Settings.canDrawOverlays(this)) {
                // SYSTEM_ALERT_WINDOW permission not granted
            }
        }
    }
    //mReactInstanceManager.onActivityResult( this, requestCode, resultCode, data );
}
这里的onActivityResult函数中有个mReactInstanceManager,这个mReactInstanceManager会没有引用,因为只是弹出错误信息不影响实际业务,所以我注释了,暂时没有发现什么关系。
ReactRootView
这个东西官方并没有给出白话定义,但是从代码可以看出,在Activity中创建了这个ReactRootView,又通过startReactApplication找到了“MyReactNativeApp”,而index.js中的AppRegistry.registerComponent(‘MyReactNativeApp’, () => Shy)也注册了,切注释说明名字要相同;所以我觉得就是加载了js视图。
public class MyReactActivity extends Activity implements DefaultHardwareBackBtnHandler {
    private ReactRootView mReactRootView;
    private ReactInstanceManager mReactInstanceManager;

    @Override
    protected void onCreate(Bundle savedInstanceState) {
        super.onCreate(savedInstanceState);

        mReactRootView = new ReactRootView(this);
        mReactInstanceManager = ReactInstanceManager.builder()
                .setApplication(getApplication())
                .setBundleAssetName("index.android.bundle")
                .setJSMainModulePath("index")
                .addPackage(new MainReactPackage())
                .setUseDeveloperSupport(BuildConfig.DEBUG)
                .setInitialLifecycleState(LifecycleState.RESUMED)
                .build();
        // 注意这里的MyReactNativeApp必须对应“index.js”中的
        // “AppRegistry.registerComponent()”的第一个参数
        mReactRootView.startReactApplication(mReactInstanceManager, "MyReactNativeApp", null);

        setContentView(mReactRootView);
    }

    @Override
    public void invokeDefaultOnBackPressed() {
        super.onBackPressed();
    }
}
这个MyReactActivity官方也是推荐设置样式的
<activity
  android:name=".MyReactActivity"
  android:label="@string/app_name"
  android:theme="@style/Theme.AppCompat.Light.NoActionBar">
</activity>
生命周期:
这些函数都是和activity对应的,我碰到过提示参数不对的情况,请重新编译
@Override
protected void onPause() {
    super.onPause();

    if (mReactInstanceManager != null) {
        mReactInstanceManager.onHostPause(this);
    }
}

@Override
protected void onResume() {
    super.onResume();

    if (mReactInstanceManager != null) {
        mReactInstanceManager.onHostResume(this, this);
    }
}

@Override
protected void onDestroy() {
    super.onDestroy();

    if (mReactInstanceManager != null) {
        mReactInstanceManager.onHostDestroy(this);
    }
    if (mReactRootView != null) {
        mReactRootView.unmountReactApplication();
    }
}
后退按钮
@Override
 public void onBackPressed() {
    if (mReactInstanceManager != null) {
        mReactInstanceManager.onBackPressed();
    } else {
        super.onBackPressed();
    }
}
开发菜单(Ctrl + M)
@Override
public boolean onKeyUp(int keyCode, KeyEvent event) {
    if (keyCode == KeyEvent.KEYCODE_MENU && mReactInstanceManager != null) {
        mReactInstanceManager.showDevOptionsDialog();
        return true;
    }
    return super.onKeyUp(keyCode, event);
}
再写一个从MainActivity跳转到MyReactActivity的意图,这样就足以证明项目中既有原生,又存在js。
开启服务,运行命令:
yarn start
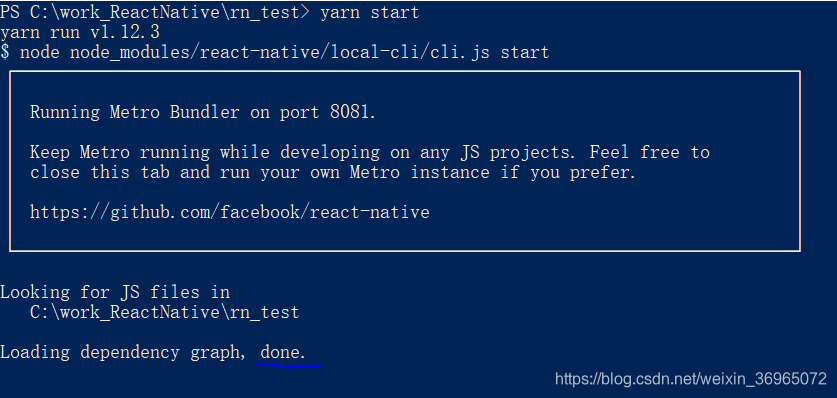
done完成 就可以通过android studio来启动项目了,我遇到了这样的错误:
dlopen failed: “/data/data/com.example.shy_4.rn_android_test/lib-main/libgnustl_shared.so” is 32-bit instead of 64-bit
解决方法:
在android项目的根目录的gradle.properties中添加android.useDeprecatedNdk=true,
在app的build.gradle中添加
defaultConfig {
        ...
        ndk {
            abiFilters "armeabi-v7a", "x86"
        }
        packagingOptions {
            exclude "lib/arm64-v8a/librealm-jni.so"
        }
    }
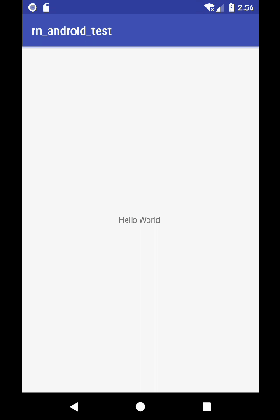
就是点击textView跳转到react-native的js页面显示一个“Shy”的字
这样就完成了。就是配置配置加配置,最主要是细心啊,期间也碰到毫无头绪莫名其妙的问题,实在没有办法可以重新启动一下环境试试,我有一次就重启完成的