##################1.磁盘在电脑上的显示格式############################
vda #第一个虚拟磁盘
vdb #第二个虚拟磁盘
IDE /dev/hd0 #并口硬盘(老式硬盘)
/dev/sda #串口硬盘,a表示第一块,b表示第二块
/dev/cdrom #光驱
/dev/sr0 #光驱
/dev/mapper #系统中的虚拟设备
#################2.用于查看设备的命令#####################################
cat/proc/partitions #查看系统识别的设备,但真实存在的未必能够被识别
blkid # 系统识别且可用的,但是不是正在使用不知道
fdisk -l # 系统真实存在的设备,但其是否可用具有不确定性
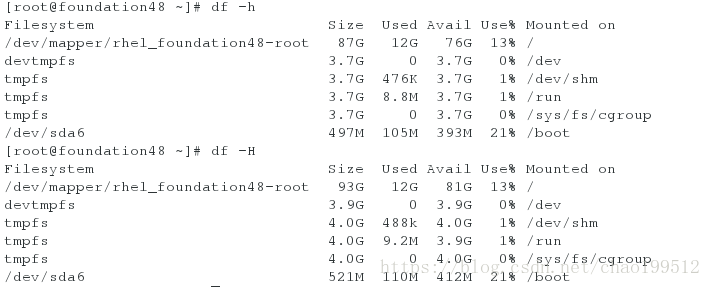
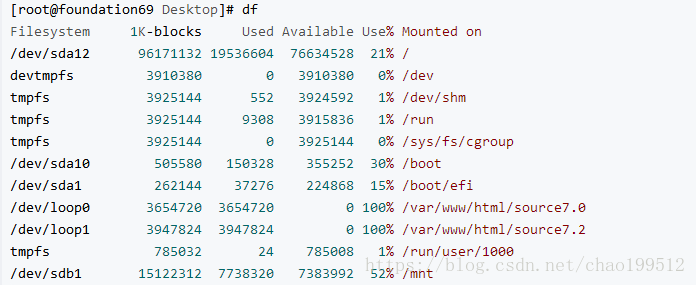
df #查看系统中在使用的设备没有使用的查看不到
df -h #查看到的设备大小更准确
df -H #查看到的设备大小不准确
lsblk #命令用于列出所有可用块设备的信息,而且还能显示他们之间的依赖关系
大小对比:df <= blkid < cat /proc/partitions < fdisk -l

eg:U盘的挂载与卸载实验
插上移动设备
打开一个真机shell,切换到超级用户
fdisk -l 查看优盘
用df查看优盘挂载路径
挂载优盘到/mnt/下
移动路径到/mnt/下
su -
umount /dev/sdb1
mount /dev/sdb1 /mnt/
cd /mnt
打开另一个shell
切换到超级用户
卸载移动设备
关闭进程
成功卸载
umount /mnt/
umount: /mnt: target is busy.
(In some cases useful info about processes that use
the device is found by lsof(8) or fuser(1))
lsof /dev/sdb1|/mnt #执行时,底下会显示任务号,然后 kill -9 任务号,就可以结束该任务 或者是 fuser -kvm /dev/sdb1
fuser -kvm /dev/sdb1|/mnt #结束这个任务
fuser -vm /dev/sdb1|/mnt #查看这个任务的进程
USER PID ACCESS COMMAND
/dev/sdb1: root kernel mount /mnt
root 4107 ..c.. bash
root 5032 ..c.. bash
umount /dev/sdb1
改变对u盘的操作权限
[root@foundation16 ~]# umount /dev/sdb1
[root@foundation16 ~]# mount /dev/sdb1 /mnt/
[root@foundation16 ~]# cd /mnt
[root@foundation16 mnt]# touch file
[root@foundation16 mnt]# ls
?? 4-14 4-21- file rhel-server-7.0-x86_64-dvd.iso
?? 4-15 4-22- gf rhel-server-7.2-x86_64-dvd.iso
11 4-19?? 4.29 gfgf rht-server.desktop
[root@foundation16 mnt]# rm -fr file
[root@foundation16 mnt]# umount /dev/sdb1
umount: /mnt: target is busy.
(In some cases useful info about processes that use
the device is found by lsof(8) or fuser(1))
[root@foundation16 mnt]# cd
[root@foundation16 ~]# umount /dev/sdb1
[root@foundation16 ~]# mount -o ro /dev/sdb1 /mnt/ ##使u盘只读
[root@foundation16 ~]# df
Filesystem 1K-blocks Used Available Use% Mounted on
/dev/sda3 307974224 46810112 261164112 16% /
devtmpfs 1868060 0 1868060 0% /dev
tmpfs 1881152 512 1880640 1% /dev/shm
tmpfs 1881152 8964 1872188 1% /run
tmpfs 1881152 0 1881152 0% /sys/fs/cgroup
/dev/sda1 508588 149392 359196 30% /boot
/dev/loop0 3654720 3654720 0 100% /var/www/html/source7.0
/dev/loop1 3947824 3947824 0 100% /var/www/html/source7.2
tmpfs 376232 20 376212 1% /run/user/1000
/dev/sdb1 15122448 8082032 7040416 54% /mnt
[root@foundation16 ~]# touch /mnt/file
touch: cannot touch ‘/mnt/file’: Read-only file system
[root@foundation16 ~]# mount -o remount,rw /dev/sdb1 ##使u盘从只读变为rw
[root@foundation16 ~]# touch /mnt/file
[root@foundation16 ~]# ls /mnt
?? 4-14 4-21- file rhel-server-7.0-x86_64-dvd.iso
?? 4-15 4-22- gf rhel-server-7.2-x86_64-dvd.iso
11 4-19?? 4.29 gfgf rht-server.desktop
[root@foundation16 ~]# rm -fr /mnt/file
###############################3.磁盘分区的划分#############################
分区是硬件信息,在分区表里面 ,硬盘引导最少可写446,最接近的共有512字节,其中 ,mbr 主引导,最少可写446字节 ,mpt,主分区表,64字节 ,55aa 硬盘的有效性标识,2字节 ,一个分区用16个字节记录 ,而我们通过实验知道一个分区需要在分区表中占据16个字节,所以64个字节的空间只能有四个分区。如果我们想要得到多于4个的分区,则需要将第四个分区变为扩展分区,在扩展分区里还可以添加逻辑分区。
mb2主引导记录,打开分区。
mpt记录分区信息
512-446(mb2)(最小的字节)=66=64(mpt)+2
mbr分区方式,主分区,剩下的放在容器中叫做扩展分区,容器里面的东西为逻辑分区,在linux中最多放16个,每个不超过2t 。
##################################################
分区步骤:
1、fdisk -l #查看设备,fdisk是用于管理磁盘分区的实用程序
2、fdisk # /dev/vdb #给vdb划分分区
3、cat /proc/partitions #查看系统识别的分区信息
4、如果没有分区信息:partprobe #手动同步分区表到内核
[root@localhost ~]# fdisk /dev/vdb ##进入划分区
Welcome to fdisk (util-linux 2.23.2).
Changes will remain in memory only, until you decide to write them.
Be careful before using the write command.
Device does not contain a recognized partition table
Building a new DOS disklabel with disk identifier 0x52ca37e8.
Command (m for help): m 获得帮助
Command action
a toggle a bootable flag
b edit bsd disklabel
c toggle the dos compatibility flag
d delete a partition 删除分区
g create a new empty GPT partition table
G create an IRIX (SGI) partition table
l list known partition types
m print this menu
n add a new partition 新建分区
o create a new empty DOS partition table
p print the partition table 显示分区标信息
q quit without saving changes 退出
s create a new empty Sun disklabel
t change a partition's system id 修改分区id
u change display/entry units
v verify the partition table
w write table to disk and exit 将当前操作写入硬盘分区(如不w保存,则之前分区操作不被记录)
x extra functionality (experts only)
Command (m for help): n 新建分区
Partition type:
p primary (0 primary, 0 extended, 4 free) 分区类型 p 主分区
e extended e 扩展分区
Select (default p): p 选择主分区
Partition number (1-4, default 1): 1 选择主分区编号
First sector (2048-20971519, default 2048): 设置起始扇区 默认2048开始
Using default value 2048
Last sector, +sectors or +size{K,M,G} (2048-20971519, default 20971519): +100M 设置终止扇区
Partition 1 of type Linux and of size 100 MiB is set 建立成功
Command (m for help): n
Partition type:
p primary (1 primary, 0 extended, 3 free)
e extended
Select (default p): p
Partition number (2-4, default 2): 2
First sector (206848-20971519, default 206848):
Using default value 206848
Last sector, +sectors or +size{K,M,G} (206848-20971519, default 20971519): +100M
Partition 2 of type Linux and of size 100 MiB is set
Command (m for help): n
Partition type:
p primary (2 primary, 0 extended, 2 free)
e extended
Select (default p): p
Partition number (3,4, default 3): 3
First sector (411648-20971519, default 411648):
Using default value 411648
Last sector, +sectors or +size{K,M,G} (411648-20971519, default 20971519): +100M
Partition 3 of type Linux and of size 100 MiB is set
Command (m for help): n
Partition type:
p primary (3 primary, 0 extended, 1 free)
e extended
Select (default e):
Using default response e
Selected partition 4 建立第四个分区即扩展分区时选择默认
First sector (616448-20971519, default 616448):
Using default value 616448
Last sector, +sectors or +size{K,M,G} (616448-20971519, default 20971519):
Using default value 20971519
Partition 4 of type Extended and of size 9.7 GiB is set
Command (m for help): n
All primary partitions are in use
Adding logical partition 5 可以建立第一个逻辑分区,需要注意的是如果第四个扩展分区不存在了,那 么所有的逻辑分区也会被损坏,因为逻辑分区是在扩展分区基础上建立的。
First sector (618496-20971519, default 618496):
Using default value 618496
Last sector, +sectors or +size{K,M,G} (618496-20971519, default 20971519): +100M
Partition 5 of type Linux and of size 100 MiB is set
Command (m for help): wq ##保存推出,如果不wq表示放弃更改退出
The partition table has been altered!
Calling ioctl() to re-read partition table.
Syncing disks.
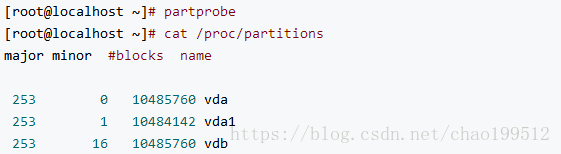
[root@localhost ~]# partprobe ##同步分区表
[root@localhost ~]# cat /proc/partitions ##查看系统识别的分区信息
major minor #blocks name
253 0 10485760 vda
253 1 10484142 vda1
253 16 10485760 vdb
253 17 102400 vdb1
253 18 102400 vdb2
253 19 102400 vdb3
253 20 1 vdb4
253 21 102400 vdb5
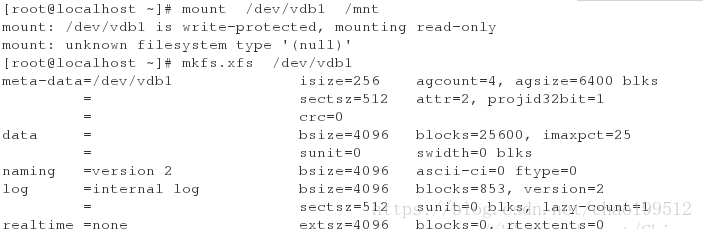
对磁盘分区结束后,并不能进行挂载,我们需要让他获取文件系统后才能进行挂载,对1,2,3进行格式化,而4不能执行这个命令,因为他本来就是一个容器,不能进行挂载【mkfs.xfs/dev/vdb1】
[root@localhost ~]# blkid
/dev/vda1: UUID="9bf6b9f7-92ad-441b-848e-0257cbb883d1" TYPE="xfs"
[root@localhost ~]# mkfs.xfs /dev/vdb3
[root@localhost ~]# blkid
/dev/vda1: UUID="9bf6b9f7-92ad-441b-848e-0257cbb883d1" TYPE="xfs"
/dev/vdb3: UUID="197f404e-e44b-48d4-b917-957f22c5096f" TYPE="xfs"
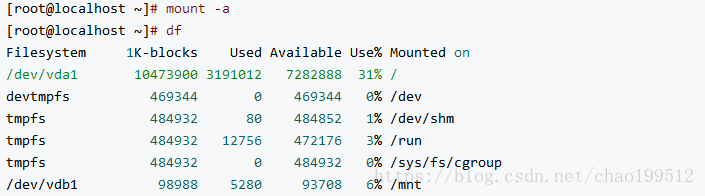
[root@localhost ~]# mount /dev/vdb1 /mnt/
[root@localhost ~]# df -----查看是否有挂载上去
Filesystem 1K-blocks Used Available Use% Mounted on
/dev/vda1 10473900 3807028 6666872 37% /
devtmpfs 469344 0 469344 0% /dev
tmpfs 484932 84 484848 1% /dev/shm
tmpfs 484932 12860 472072 3% /run
tmpfs 484932 0 484932 0% /sys/fs/cgroup
/dev/vdb1 98988 5280 93708 6% /mnt
#############################################################################
但是这种标签下的分区设置有限,只能建立四个分区,要想建立更多的分区,可以把dos分区方式改为gpt的分区方式
设定分区方式为gpt
<1>umount /mnt/ #解除之前的挂载
<2> fdisk /dev/vdb #进入分区,删除之前的分区
[root@localhost ~]#umount /mnt/ ##解除之前的挂载
[root@localhost ~]# fdisk /dev/vdb ##进入分区并删除之前的分区
Welcome to fdisk (util-linux 2.23.2).
Changes will remain in memory only, until you decide to write them.
Be careful before using the write command.
Command (m for help): -----删除之前建立的dos类型分区
Command (m for help): d
Partition number (1-3, default 3):
Partition 3 is deleted
Command (m for help): d
Partition number (1,2, default 2):
Partition 2 is deleted
Command (m for help): d
Selected partition 1
Partition 1 is deleted
Command (m for help): d
No partition is defined yet!
Command (m for help): wq
The partition table has been altered!
Calling ioctl() to re-read partition table.
Syncing disks.
[root@localhost ~]# parted /dev/vdb ------改变分区方式
GNU Parted 3.1
Using /dev/vdb
Welcome to GNU Parted! Type 'help' to view a list of commands.
[root@localhost ~]# fdisk /dev/vdb -----创建新的gpt分区
WARNING: fdisk GPT support is currently new, and therefore in an experimental phase. Use at your own discretion.
Welcome to fdisk (util-linux 2.23.2).
Changes will remain in memory only, until you decide to write them.
Be careful before using the write command.
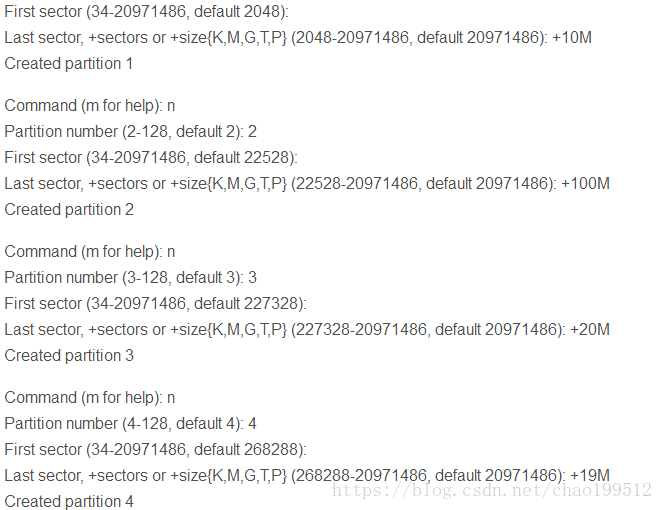
Command (m for help): n
Partition number (1-128, default 1): ------可以创建128个主分区
注意:
当没有删除原分区,而直接修改成其他类型时,因为已经使用了原分区,则会有提示
Warning: Partition(s) on /dev/vdb are being used.
Ignore/Cancel? I #选择忽略即可
#########################################################################
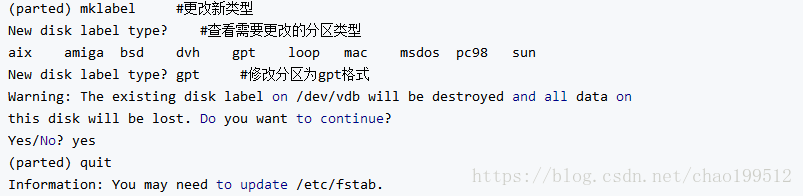
改变分区方式
[root@localhost ~]# parted /dev/vdb
GNU Parted 3.1
Using /dev/vdb
Welcome to GNU Parted! Type ‘help’ to view a list of commands.
(parted) mklabel
New disk label type? ##按Tab键查看类型
aix amiga bsd dvh gpt loop mac msdos pc98 sun
New disk label type? msdos
Warning: The existing disk label on /dev/vdb will be destroyed and all data on
this disk will be lost. Do you want to continue?
Yes/No? yes
(parted) quit
Information: You may need to update /etc/fstab.
[root@localhost ~]# fdisk -l
Disk /dev/vda: 10.7 GB, 10737418240 bytes, 20971520 sectors
Units = sectors of 1 * 512 = 512 bytes
Sector size (logical/physical): 512 bytes / 512 bytes
I/O size (minimum/optimal): 512 bytes / 512 bytes
Disk label type: dos ##出现DOS表示更改成功
Disk identifier: 0x00013f3e
Device Boot Start End Blocks Id System
/dev/vda1 * 2048 20970332 10484142+ 83 Linux
Disk /dev/vdb: 10.7 GB, 10737418240 bytes, 20971520 sectors
Units = sectors of 1 * 512 = 512 bytes
Sector size (logical/physical): 512 bytes / 512 bytes
I/O size (minimum/optimal): 512 bytes / 512 bytes
Disk label type: dos
Disk identifier: 0x0005a330
Device Boot Start End Blocks Id System
######################################################################################
永久挂载
mount 为临时挂载
vim /etc/fstab #编辑永久挂载文件
eg:/dev/vdb1 /mnt xfs defaults 0 0
退出保存
mount -a #将文件的挂载策略生效,相当于激活
[root@localhost ~]# vim /etc/fstab
## /etc/fstab
# Created by anaconda on Wed May 7 01:22:57 2014
## Accessible filesystems, by reference, are maintained under '/dev/disk'
# See man pages fstab(5), findfs(8), mount(8) and/or blkid(8) for more info
#
UUID=9bf6b9f7-92ad-441b-848e-0257cbb883d1 / xfs defaults 1 1
/dev/vdb1 /mnt xfs defaults 0 0 ----新添加的内容
##########################################################################
(1)swap分区的添加
fdisk /dev/vdb #建立分区
cat /proc/partitions #查看是否有swap分区信息
partprobe #如果没有新的分区信息则手动同步分区信息,再次查看分区信息
mkswap /dev/vdb2 #准备好将分区用作交换区
swapon -a /dev/vdb2 #激活新交换区,是临时的
swapon -s #查看交换区的状态

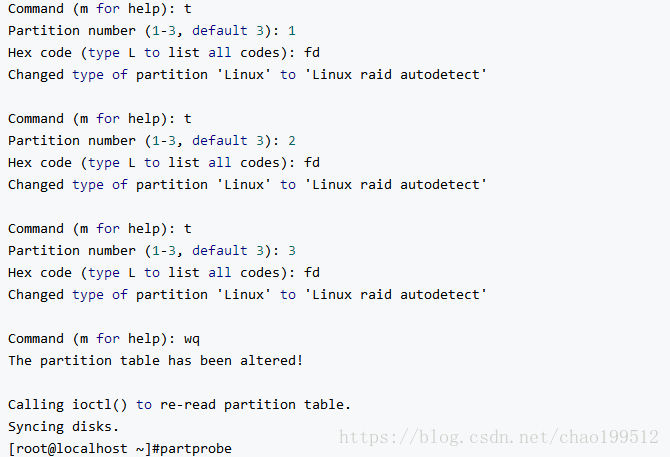
Command (m for help): t ----------修改分区
Partition number (1,2, default 2):2
Hex code (type L to list all codes): l --------查看改变成swap分区标识的序号
0 Empty 24 NEC DOS 81 Minix / old Lin bf Solaris
1 FAT12 27 Hidden NTFS Win 82 Linux swap / So c1 DRDOS/sec (FAT-
2 XENIX root 39 Plan 9 83 Linux c4 DRDOS/sec (FAT-
3 XENIX usr 3c PartitionMagic 84 OS/2 hidden C: c6 DRDOS/sec (FAT-
4 FAT16 <32M 40 Venix 80286 85 Linux extended c7 Syrinx
5 Extended 41 PPC PReP Boot 86 NTFS volume set da Non-FS data
6 FAT16 42 SFS 87 NTFS volume set db CP/M / CTOS / .
7 HPFS/NTFS/exFAT 4d QNX4.x 88 Linux plaintext de Dell Utility
8 AIX 4e QNX4.x 2nd part 8e Linux LVM df BootIt
9 AIX bootable 4f QNX4.x 3rd part 93 Amoeba e1 DOS access
a OS/2 Boot Manag 50 OnTrack DM 94 Amoeba BBT e3 DOS R/O
b W95 FAT32 51 OnTrack DM6 Aux 9f BSD/OS e4 SpeedStor
c W95 FAT32 (LBA) 52 CP/M a0 IBM Thinkpad hi eb BeOS fs
e W95 FAT16 (LBA) 53 OnTrack DM6 Aux a5 FreeBSD ee GPT
f W95 Ext'd (LBA) 54 OnTrackDM6 a6 OpenBSD ef EFI (FAT-12/16/
10 OPUS 55 EZ-Drive a7 NeXTSTEP f0 Linux/PA-RISC b
11 Hidden FAT12 56 Golden Bow a8 Darwin UFS f1 SpeedStor
12 Compaq diagnost 5c Priam Edisk a9 NetBSD f4 SpeedStor
14 Hidden FAT16 <3 61 SpeedStor ab Darwin boot f2 DOS secondary
16 Hidden FAT16 63 GNU HURD or Sys af HFS / HFS+ fb VMware VMFS
17 Hidden HPFS/NTF 64 Novell Netware b7 BSDI fs fc VMware VMKCORE
18 AST SmartSleep 65 Novell Netware b8 BSDI swap fd Linux raid auto
1b Hidden W95 FAT3 70 DiskSecure Mult bb Boot Wizard hid fe LANstep
1c Hidden W95 FAT3 75 PC/IX be Solaris boot ff BBT
1e Hidden W95 FAT1 80 Old Minix
Hex code (type L to list all codes): 82 -----通过查看得知82为swap分区的序号
Changed type of partition 'Linux' to 'Linux swap / Solaris'
Command (m for help): wq
The partition table has been altered!
Calling ioctl() to re-read partition table.
[root@localhost ~]# partprobe -------手动刷新分区信息
[root@localhost ~]# cat /proc/partitions -----查看这个分区的信息

[root@localhost ~]# mkswap /dev/vdb1 ##格式化/dev/vdb2分区

[root@localhost ~]# swapon -a /dev/vdb1 ##启动/dev/vdb1分区swap装置
[root@localhost ~]# swapon -s ##显示swap分区

################################################################################
swap分区的永久挂载
1、vim /etc/fstab #编写使分区永久成为swap分区
/dev/vdb2 swap swap defaults 0 0 #编写内容,第一个swap表示不需要挂载
2、swapon -a #将文件刷新,并激活使swap分区永久存在
[root@localhost ~]# vim /etc/fstab ##永久挂载
编写内容:/dev/vdb2 swap swap defaults 0 0
[root@localhost ~]# swapon -a ##使/etc/fstab中记录的挂载策略生效
############################################################################
删除swap分区
1、vim /etc/fstab #将变成swap分区那行删掉
2、swapoff /dev/vdb2 #关闭swap分区
3、fdisk /dev/vdb #删掉分区
4、partprobe #同部分区信息
5、cat /proc/partitions #查看分区信息
如下:
[root@localhost ~]# vim /etc/fstab ---将变成swap分区那行删掉
[root@localhost ~]# swapoff /dev/vdb2 ----关闭swap分区
[root@localhost ~]# fdisk /dev/vdb -------删掉分区
Welcome to fdisk (util-linux 2.23.2).
Changes will remain in memory only, until you decide to write them.
Be careful before using the write command.
Command (m for help): d
Partition number (1,2, default 2): 2
Partition 2 is deleted
Command (m for help): wq
The partition table has been altered!
Calling ioctl() to re-read partition table.
WARNING: Re-reading the partition table failed with error 16: Device or resource busy.
The kernel still uses the old table. The new table will be used at
the next reboot or after you run partprobe(8) or kpartx(8)
Syncing disks.
[root@localhost ~]# partprobe -------同部分区信息
################################################################################
磁盘加密
fdisk /dev/vdb #新建一个磁盘
partprobe #同步分区信息
3、cryptsetup luksFormat /dev/vdb1 #给这个磁盘设置磁盘加密,并设置密码
4、mount /dev/vdb1 /mnt/ #尝试挂载失败
5、cryptsetup open /dev/vdb1 westos #以westos形态打开盖子,会提示输入密码 (密码必须有一定的 复杂度)
6、mkfs.xfs /dev/mapper/westos #格式化磁盘
7、mount /dev/mapper/westos /mnt/ #再次尝试将该磁盘重新挂载
8、touch /mnt/see{1..5} #建立文件
9、umount /mnt/ #卸载 磁盘
10、cryptsetup close westos #将盖子合上,即关闭加密磁盘
11、ll /dev/mapper/ #查看不到设备
####################################################################################
加密磁盘开机自动挂载
[root@localhost ~]# vim /root/diskpass 写入磁盘密码
[root@localhost ~]# chmod 600 /root/diskpass 将磁盘权限设置成只对超级用户可操作
[root@localhost ~]# cryptsetup luksAddKey /dev/vdb1 /root/diskpass 告诉系统加密磁盘的密码指定
Enter any passphrase:
[root@localhost ~]# vim /etc/crypttab 写入磁盘名称,磁盘设备,以及磁盘密码所在文件
[root@localhost ~]# vim /etc/fstab 修改配置文件
[root@localhost ~]# df
Filesystem 1K-blocks Used Available Use% Mounted on
/dev/vda1 10473900 3811156 6662744 37% /
devtmpfs 469344 0 469344 0% /dev
tmpfs 484932 84 484848 1% /dev/shm
tmpfs 484932 12816 472116 3% /run
tmpfs 484932 0 484932 0% /sys/fs/cgroup
/dev/sr2 3654720 3654720 0 100% /run/media/root/RHEL-7.0 Server.x86_64
/dev/sr1 3654720 3654720 0 100% /run/media/root/RHEL-7.0 Server.x86_641
/dev/sr0 3654720 3654720 0 100% /run/media/root/RHEL-7.0 Server.x86_642
[root@localhost ~]# umount /mnt/
[root@localhost ~]# reboot
[root@localhost ~]# df
Filesystem 1K-blocks Used Available Use% Mounted on
/dev/vda1 10473900 3810164 6663736 37% /
devtmpfs 469344 0 469344 0% /dev
tmpfs 484932 80 484852 1% /dev/shm
tmpfs 484932 12792 472140 3% /run
tmpfs 484932 0 484932 0% /sys/fs/cgroup
/dev/mapper/linux 1018540 32928 985612 4% /mnt
#############################################################################
取消开机自动挂载
[root@localhost ~]# vim /etc/fstab ##删除掉配置文件里面的设定
[root@localhost ~]# vim /etc/crypttab ##删除里面的内容指定
[root@localhost ~]# rm -fr /root/diskpass ##删除密码文件
[root@localhost ~]# umount /mnt/ ##卸载挂载
[root@localhost ~]# cryptsetup close linux ##关闭加密磁盘
[root@localhost ~]# mkfs.xfs /dev/vdb1 ##格式化加密磁盘
mkfs.xfs: /dev/vdb1 appears to contain an existing filesystem (crypto_LUKS).
mkfs.xfs: Use the -f option to force overwrite.
[root@localhost ~]# mkfs.xfs /dev/vdb1 -f ##加密此番格式化需要加-f
meta-data=/dev/vdb1 isize=256 agcount=4, agsize=64000 blks
= sectsz=512 attr=2, projid32bit=1
= crc=0
data = bsize=4096 blocks=256000, imaxpct=25
= sunit=0 swidth=0 blks
naming =version 2 bsize=4096 ascii-ci=0 ftype=0
log =internal log bsize=4096 blocks=853, version=2
= sectsz=512 sunit=0 blks, lazy-count=1
realtime =none extsz=4096 blocks=0, rtextents=0
#########################################################################################
磁盘阵列raid
1、fdisk /dev/vdb #建立分区

2、Command (m for help): t #修改分区类型,并刷新分区表
watch -n 1 cat /proc/mdstat #监控

mdadm -C /dev/md0 -a yes -l 1 -n 2 -x 1 /dev/vdb{1..3}
-C 创建
-a yes 自动创建
-l 表示级别
-n 表示有几块设备
-x 闲置设备

6、mount /dev/md0 /mnt/ #挂载

################################################################################
设备管理
mdadm -f /dev/md0 /dev/vdb2 ##强行损坏设备vdb2

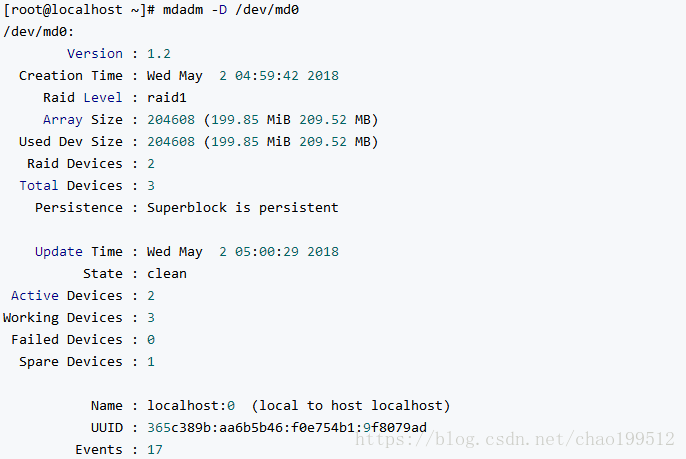
mdadm -D /dev/md0 ##查看状态
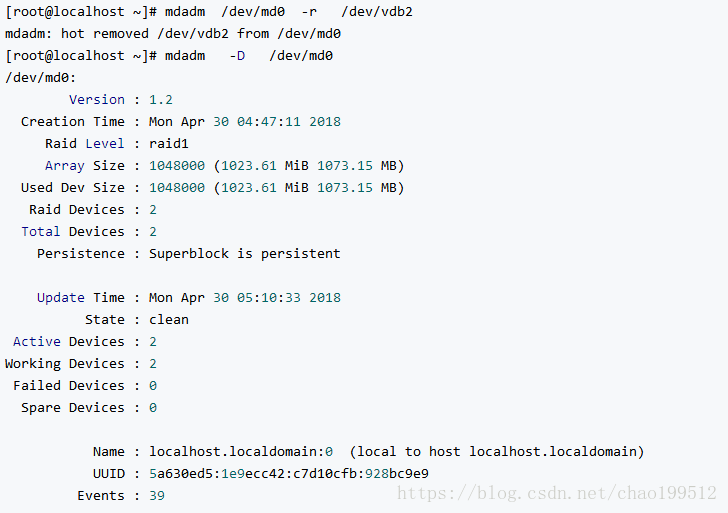
mdadm /dev/md0 -r /dev/vdb2 #删除/dev/vdb2这个扇区【可以看到我们的磁盘阵列中只有/dev/vdb1和/dev/vdb3

mdadm -a /dev/md0 /dev/vdb1 ##添加设备


###################################################################################
设备删除
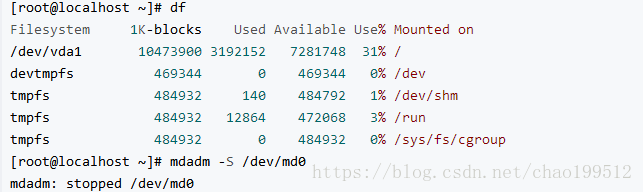
umount /mnt/
mdadm -S /dev/md0##停止
fdisk /dev/vdb
partprobe

#############################################################################